
Are you ready to take on a kitchen upgrade that saves you time and hassle? Knowing how to plumb a kitchen sink with a dishwasher can make your daily chores much easier.
Imagine a clean, efficient setup where your dishwasher drains smoothly without leaks or clogs. This step-by-step guide will help you do just that—whether you’re a beginner or just need a refresher. Stick with me, and by the end, you’ll have the confidence to handle the plumbing yourself, saving money and avoiding common mistakes.
Let’s dive in and make your kitchen work smarter for you!

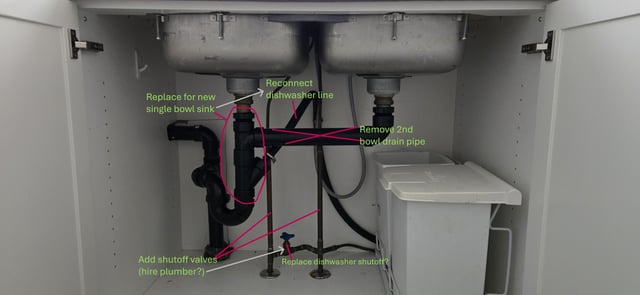
Credit: www.reddit.com
Tools And Materials Needed
Preparing to plumb a kitchen sink with a dishwasher requires the right tools and materials. Having everything ready helps the job go smoothly and saves time. This section lists the essential items you need for a successful installation.
Essential Plumbing Tools
- Adjustable wrench – for tightening and loosening fittings
- Pipe wrench – to grip and turn pipes securely
- Slip-joint pliers – useful for gripping and bending
- Hacksaw – to cut pipes to the right length
- Pipe cutter – for clean and precise pipe cuts
- Plumber’s tape (Teflon tape) – seals threaded connections
- Basin wrench – reaches nuts under the sink easily
- Bucket – to catch water during disassembly
- Tube bending tool – shapes drain pipes without kinks
- Measuring tape – ensures accurate pipe and fitting sizes
Required Materials And Parts
- PVC or ABS drain pipes – for waste water drainage
- P-trap assembly – prevents sewer gases from entering
- Dishwasher drain hose – connects dishwasher to sink drain
- Dishwasher tailpiece – links sink drain to dishwasher hose
- Compression fittings – secure pipe connections without soldering
- Pipe straps or clamps – hold pipes firmly in place
- Silicone sealant – seals around sink drain and fittings
- Sink strainer – catches debris and connects to drain pipes
- Shut-off valves – control water supply to sink and dishwasher
Preparing The Sink Area
Preparing the sink area is essential before plumbing a kitchen sink with a dishwasher. This step ensures safety and provides enough space to work efficiently. Proper preparation helps avoid leaks and other plumbing issues later.
Shutting Off Water Supply
Turn off the main water valve or the valve under the sink. This stops water flow to the sink and dishwasher connections. Open the faucet to drain any remaining water in the pipes. This reduces the risk of water spills and damage.
Clearing The Cabinet Space
Remove items stored under the sink and dishwasher area. Clear the cabinet completely for easy access to plumbing parts. Clean the space to remove dust and debris. This prevents dirt from entering plumbing connections and keeps the workspace safe.
Installing The Faucet And Drain
Installing the faucet and drain is a crucial part of plumbing your kitchen sink with a dishwasher. This stage ensures water flows smoothly and waste exits without leaks. Paying close attention here saves you from future headaches and costly repairs.
Fitting The Faucet
Start by placing the faucet through the designated hole in your sink or countertop. Secure it tightly with the mounting nuts underneath, making sure it doesn’t wobble. Tightening it too much can crack the sink, so find a firm but careful balance.
Connect the hot and cold water supply lines to their respective valves. Hand-tighten first, then use a wrench for a snug fit without over-tightening. Have you checked if your faucet comes with extra washers or seals? These tiny parts prevent leaks and are easy to miss.
Once connected, turn on the water and test the faucet for any drips or loose connections. It’s easier to fix small leaks now than after the cabinet is closed up.
Connecting The Drain Assembly
Attach the drain flange to the sink’s drain hole using plumber’s putty to create a watertight seal. Press firmly to spread the putty evenly, then place the flange in position. The putty squeezes out around the edges—wipe the excess away after tightening.
Next, connect the drain tailpiece to the flange and secure it with a slip nut. This connection guides wastewater from the sink into the plumbing system. Don’t forget to connect the dishwasher drain hose to the side inlet on the drain assembly—this prevents dishwasher water from backing up into your sink.
Tighten all connections by hand first, then finish with a wrench for a secure fit. Run water through the drain and check carefully for leaks. If you spot any, tightening the connections slightly or adding more plumber’s putty usually does the trick.
Connecting The Dishwasher Drain
Connecting the dishwasher drain is a key part of plumbing your kitchen sink with a dishwasher. This step ensures wastewater flows correctly from the dishwasher to the sink drain system. Proper connection prevents leaks and keeps your kitchen clean and dry. Follow these simple steps to connect the dishwasher drain safely and effectively.
Locating The Dishwasher Drain Inlet
The dishwasher drain inlet is usually near the bottom back of the dishwasher. It looks like a small, round or oval port. This inlet connects the dishwasher to the drain hose. Check your dishwasher manual to find the exact location. Make sure the area around the inlet is clean and free from debris before attaching the hose.
Attaching The Drain Hose
Use a flexible drain hose designed for dishwashers. Attach one end of the hose to the dishwasher drain inlet. Slide the hose onto the inlet firmly. Secure it with a hose clamp to prevent leaks. The other end of the hose should connect to the sink drain or garbage disposal drain port. Make sure it loops up before reaching the drain to stop backflow. Tighten all connections but avoid overtightening, which can damage parts.
Setting Up The Garbage Disposal (optional)
Setting up a garbage disposal can be a smart addition to your kitchen sink plumbing, especially if you want to handle food waste efficiently. While it’s optional, having a disposal can make cleanup quicker and reduce the chance of clogged drains. If you decide to add one, understanding how to connect it properly is key to avoiding leaks and ensuring smooth operation.
Connecting Disposal To Sink Drain
Start by removing the existing sink drain if you have one. The disposal unit will mount directly under the sink drain opening, so make sure the flange fits tightly to prevent leaks.
Use plumber’s putty around the sink flange before securing the disposal. Tighten the mounting ring from below, and connect the disposal’s discharge pipe to your drain trap with a slip-joint fitting.
Double-check all connections for firmness. A loose connection could cause water to leak under your sink.
Linking Dishwasher Drain To Disposal
Most disposals have a dishwasher inlet port designed for the dishwasher drain hose. Before attaching, you’ll need to knock out the plug inside this inlet using a screwdriver and hammer.
Attach the dishwasher drain hose to the disposal’s inlet using a hose clamp. Make sure the clamp is tight to prevent leaks but avoid over-tightening which can damage the hose.
Run your dishwasher through a cycle after installation and watch under the sink for any sign of leaks. This simple test saves you from bigger plumbing headaches later.
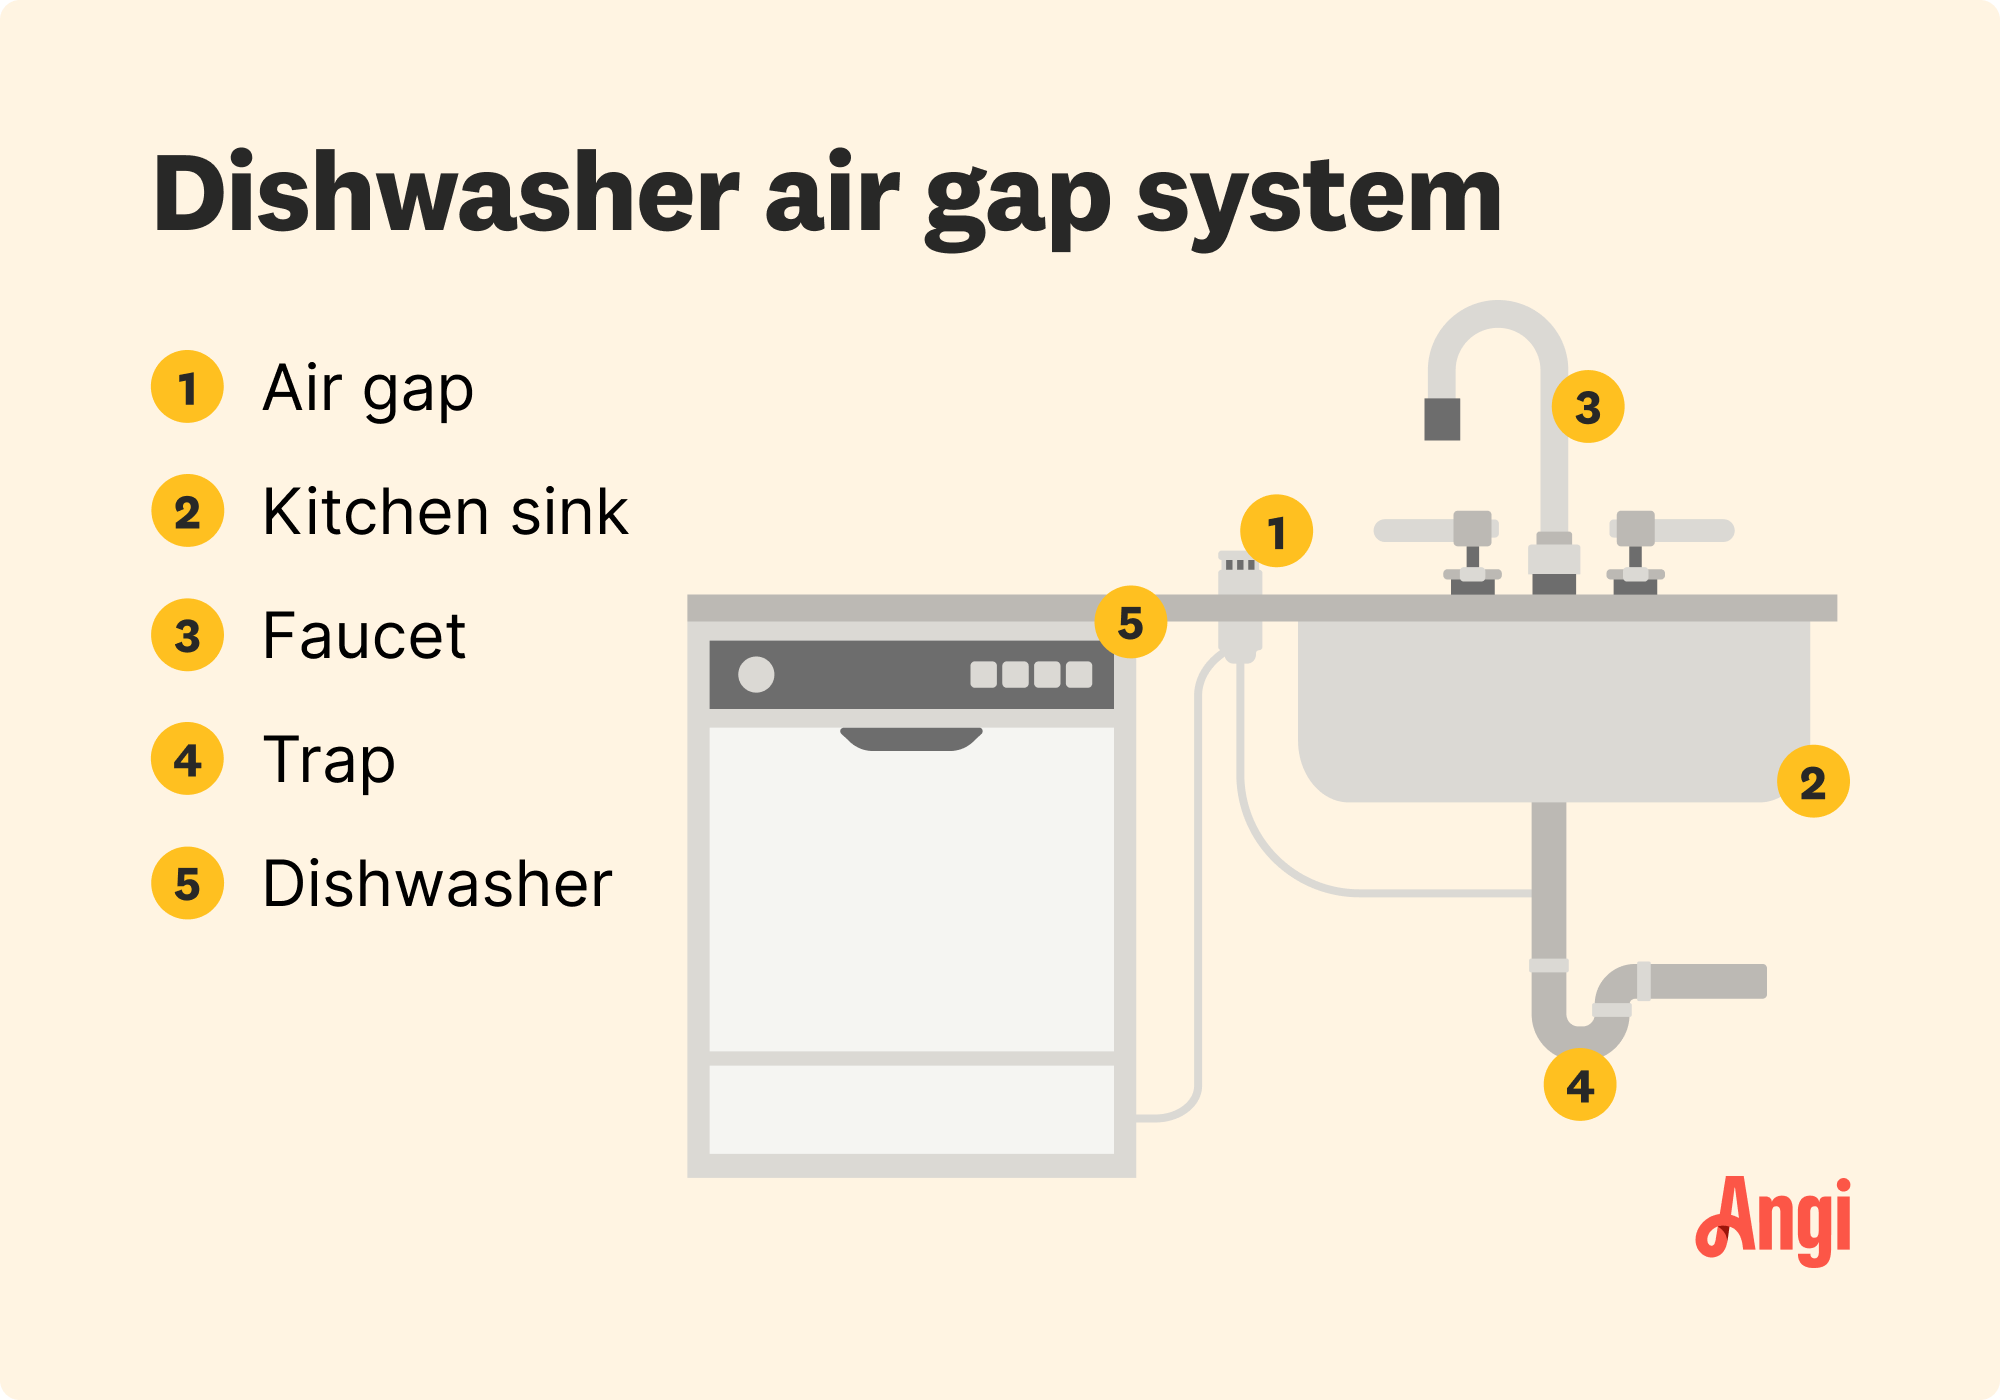
Credit: www.angi.com
Installing The P-trap And Drain Pipes
Installing the P-trap and drain pipes is a crucial part of plumbing your kitchen sink with a dishwasher. This setup not only ensures proper drainage but also prevents sewer gases from entering your kitchen. Getting this step right saves you from leaks and drainage issues later on.
Assembling The P-trap
The P-trap connects directly to your sink drain and forms a water seal that blocks sewer gases. Start by fitting the curved section of the trap beneath the sink drain tailpiece. Make sure the trap arm aligns horizontally with your wall drain pipe.
Use slip nuts and washers to connect each piece snugly, but avoid over-tightening which can crack plastic parts. You’ll often find the P-trap kit includes all necessary components, so check everything is present before starting. Have you noticed how a loose P-trap can cause an annoying drip? Tightening the connections just right stops that problem.
Securing All Pipe Connections
Once the P-trap is in place, focus on securing every pipe connection firmly. Hand-tighten slip nuts first, then use a wrench for a quarter turn to avoid damage. Double-check that all washers are seated properly to prevent leaks.
Don’t forget to connect the dishwasher drain line to the sink drain or garbage disposal inlet. This connection often uses a dishwasher tailpiece or a branch tee fitting. Secure the hose clamp tightly around the dishwasher drain hose to prevent backflow.
After assembly, run water through the drain and watch closely for leaks. Can you spot even a tiny drip? That small leak could cause big damage over time. Tightening connections at this stage saves you from future headaches.
Hooking Up The Water Supply Lines
Connecting the water supply lines ensures your kitchen sink and dishwasher work smoothly. Attach the lines securely to prevent leaks. Check all connections for tightness and functionality.
Hooking up the water supply lines is a crucial part of plumbing a kitchen sink with a dishwasher. It ensures that both the sink and dishwasher receive the water they need to function. Proper installation of these lines prevents leaks and ensures efficient water flow. Below, you'll find step-by-step guidance on connecting the hot and cold water lines and attaching the dishwasher water supply.
Connecting Hot And Cold Water Lines
Begin with turning off the main water supply. Use a wrench to connect the hot and cold water lines to their respective valves under the sink. Ensure each connection is tight to prevent leaks. Use plumber's tape on the threads for a secure fit. Check the connections by turning on the water supply. Watch for any drips or leaks. Tighten the connections if necessary.
Attaching Dishwasher Water Supply
Locate the dishwasher's water inlet valve. Connect the dishwasher water supply line to this valve. Use a wrench to secure the connection firmly. Plumber's tape helps in ensuring a leak-free connection. Once connected, turn on the water supply. Run a test cycle on the dishwasher. Check for any leaks around the connection. Adjust and tighten if needed.

Credit: www.reddit.com
Testing For Leaks And Functionality
Testing for leaks and ensuring your kitchen sink and dishwasher plumbing work correctly is crucial before finishing the job. Skipping this step can lead to water damage, costly repairs, and frustration. Taking the time to carefully check each connection and run the dishwasher through a cycle helps you catch problems early.
Turning On Water And Inspecting Joints
Start by turning on the main water supply to your kitchen sink. Watch every joint and connection closely for any signs of dripping or moisture. Pay special attention to the P-trap and the dishwasher hose connection—these spots often hide small leaks.
If you notice even a tiny drip, tighten the fittings slightly and check again. You might want to keep a dry cloth handy to wipe surfaces and help spot fresh leaks quickly. Have you ever ignored a slow drip, only to find a puddle days later? Catching it early saves headaches.
Running The Dishwasher Drain Test
Once the water lines look dry, run your dishwasher through a full cycle. This tests the drainage and ensures water flows correctly from the dishwasher into the sink drain without backing up. Watch under the sink while the dishwasher drains—any leakage or pooling means you need to adjust the hose or tighten clamps.
Check that the air gap or high loop is working properly to prevent dirty water from flowing back into the dishwasher. After the cycle ends, open the cabinet and inspect all connections again. Does everything look dry? If yes, your plumbing is ready to handle daily use.
Troubleshooting Common Issues
Troubleshooting plumbing issues in a kitchen sink with a dishwasher can save you time and money. Identifying the root cause quickly helps you avoid bigger problems later. Let’s dive into the most common issues you might face and how to fix them effectively.
Fixing Drainage Problems
Slow or clogged drainage is a frequent headache. First, check if the drain hose from the dishwasher is kinked or blocked. A simple straighten or cleaning can restore proper flow.
If the sink drains slowly, the P-trap under the sink might be clogged. Remove it carefully and clean out any debris or buildup. You’ll be surprised how often this small step clears the issue.
Have you noticed water backing up into the dishwasher? This usually means the air gap or high loop isn’t set up correctly. Adjusting the hose so it loops higher can prevent backflow and keep your dishwasher draining smoothly.
Resolving Water Supply Leaks
Leaks around your water supply lines can cause frustration and water damage. Inspect the connections to both the sink faucet and dishwasher for any drips or moisture.
Tighten loose fittings gently with a wrench, but avoid overtightening as this can damage threads. If you find worn-out washers or O-rings, replacing them often stops leaks immediately.
Have you checked the dishwasher’s water inlet valve? Sometimes, debris can cause it to leak. Cleaning or replacing this valve can solve persistent leaks and improve water flow to your appliance.
Frequently Asked Questions
How Do I Connect A Dishwasher To A Kitchen Sink Drain?
To connect a dishwasher, attach its drain hose to the sink’s drain or garbage disposal. Use a dishwasher branch tailpiece for proper fitting and prevent backflow with a high loop or air gap.
What Tools Are Needed To Plumb A Kitchen Sink With Dishwasher?
You’ll need a pipe wrench, adjustable pliers, plumber’s tape, a screwdriver, a hacksaw, and a bucket to catch water. Having these tools ensures smooth installation and leak-free connections.
Can I Use Existing Plumbing For Dishwasher Installation?
Yes, you can use existing plumbing if it has a dishwasher drain connection. Otherwise, you must add a branch tailpiece and connect the dishwasher drain hose properly.
Why Is The Dishwasher Drain Hose Connected To The Sink Drain?
The dishwasher drain hose connects to the sink drain to safely remove wastewater. This prevents kitchen flooding and ensures that dirty water drains effectively during dishwasher cycles.
Conclusion
Plumbing a kitchen sink with a dishwasher can be simple. Follow each step carefully and take your time. Use the right tools and check all connections well. Test for leaks before finishing the job. A properly plumbed sink saves water and avoids future problems.
Small efforts now prevent big repairs later. Enjoy your kitchen’s smooth function and clean dishes. Plumbing tasks feel easier with practice and patience. Keep your workspace tidy and stay safe throughout. This guide helps you complete the job with confidence.