
Are you ready to tackle your kitchen plumbing but unsure where to start? Installing plumbing for your kitchen sink and dishwasher might seem tricky, but with the right steps, you can do it yourself and save time and money.
Imagine having a smoothly working kitchen without waiting for a plumber. This guide will walk you through the process clearly and simply, giving you the confidence to handle the job on your own. Keep reading to discover easy tips and tricks that make kitchen plumbing straightforward and stress-free.
Your perfect kitchen setup is just a few steps away!

Credit: www.sinkple.com
Planning Your Plumbing Setup
Planning your plumbing setup is the foundation of a smooth installation for your kitchen sink and dishwasher. Skipping this stage can lead to costly mistakes and time-consuming fixes. Taking time to carefully evaluate your space and materials ensures that everything fits perfectly and functions well.
Assessing Water Supply Lines
Start by identifying the location of your main water shutoff valve. Knowing where to stop the water flow is crucial before you begin any work.
Check if your existing water lines can handle both the sink and the dishwasher. You might need to add a splitter or a new line if your current setup lacks extra valves.
Consider the type of piping you have—copper, PEX, or PVC—as this affects the connectors and tools you’ll need.
Checking Drainage Requirements
Drainage is often overlooked but can cause major problems if done wrong. Your dishwasher needs a proper drain connection to prevent water backup.
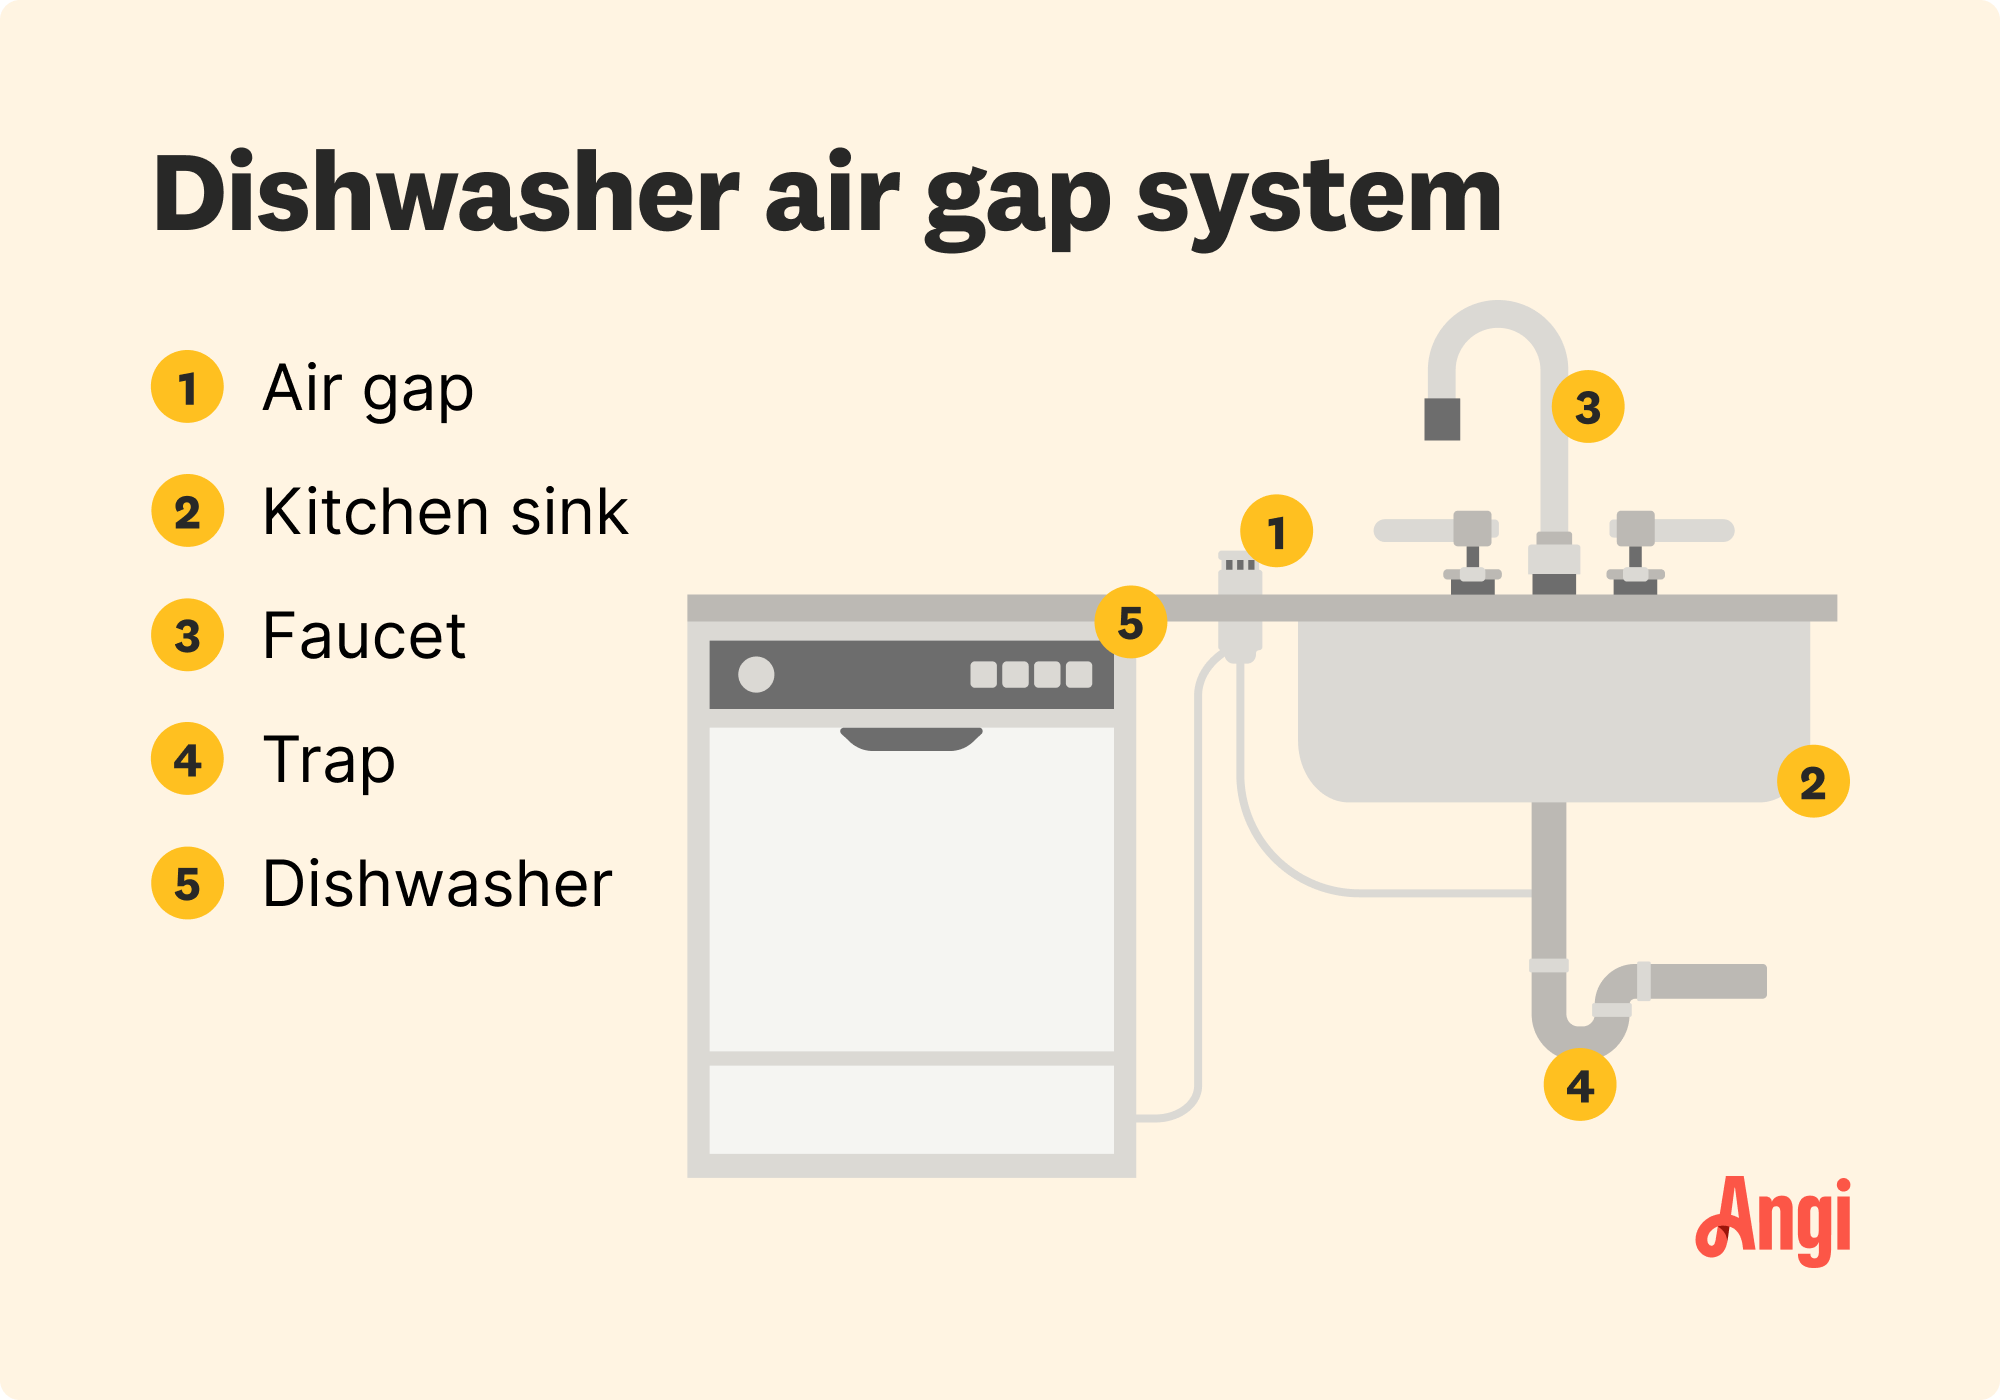
Make sure the sink’s drain and dishwasher drain share an air gap or a high loop to avoid contamination. This is required by plumbing codes in many areas.
Measure the distance from your sink drain to the wall drain pipe. Too long or too short can lead to leaks or slow drainage.
Gathering Necessary Tools And Materials
Before you start, gather all essential tools to avoid interruptions. Common items include an adjustable wrench, pipe cutter, plumber’s tape, and a basin wrench.
Don’t forget materials like flexible supply lines, drain pipes, washers, and connectors suited to your plumbing type. Having everything on hand saves trips to the hardware store.
I once underestimated the need for a basin wrench and had to pause my project. That delay taught me to prepare thoroughly beforehand—it’s worth the extra effort.
Shutting Off Water And Preparing Area
Before you dive into installing plumbing for your kitchen sink and dishwasher, the first essential task is shutting off the water and getting the area ready. This step is crucial to avoid unwanted water spills and to make your workspace safe and accessible. Taking time here can save you from costly messes and extra work later.
Turning Off Main Water Valve
Locate the main water valve that controls water flow to your kitchen. This valve is usually found near your water meter or where the main water line enters your home. Turning it off stops the water supply, preventing leaks or flooding during your plumbing work.
If you’re unsure about the valve’s location, check under your kitchen sink or near the basement. Once off, open the faucet to drain any remaining water from the pipes. Have you checked if the water is completely off before starting? A simple test like this can save you a big cleanup.
Clearing Space Under The Sink
Remove everything stored under your kitchen sink. This includes cleaning supplies, trash bins, and any other items that can obstruct your work. Clearing this space gives you better access and reduces the risk of damaging your belongings.
Use a flashlight to see deeper into the cabinet corners and wipe down any dirt or moisture. A clean and clear workspace helps you spot potential plumbing issues like leaks or mold early on. How much easier would your installation be with a tidy and well-lit area?
Removing Old Plumbing Fixtures
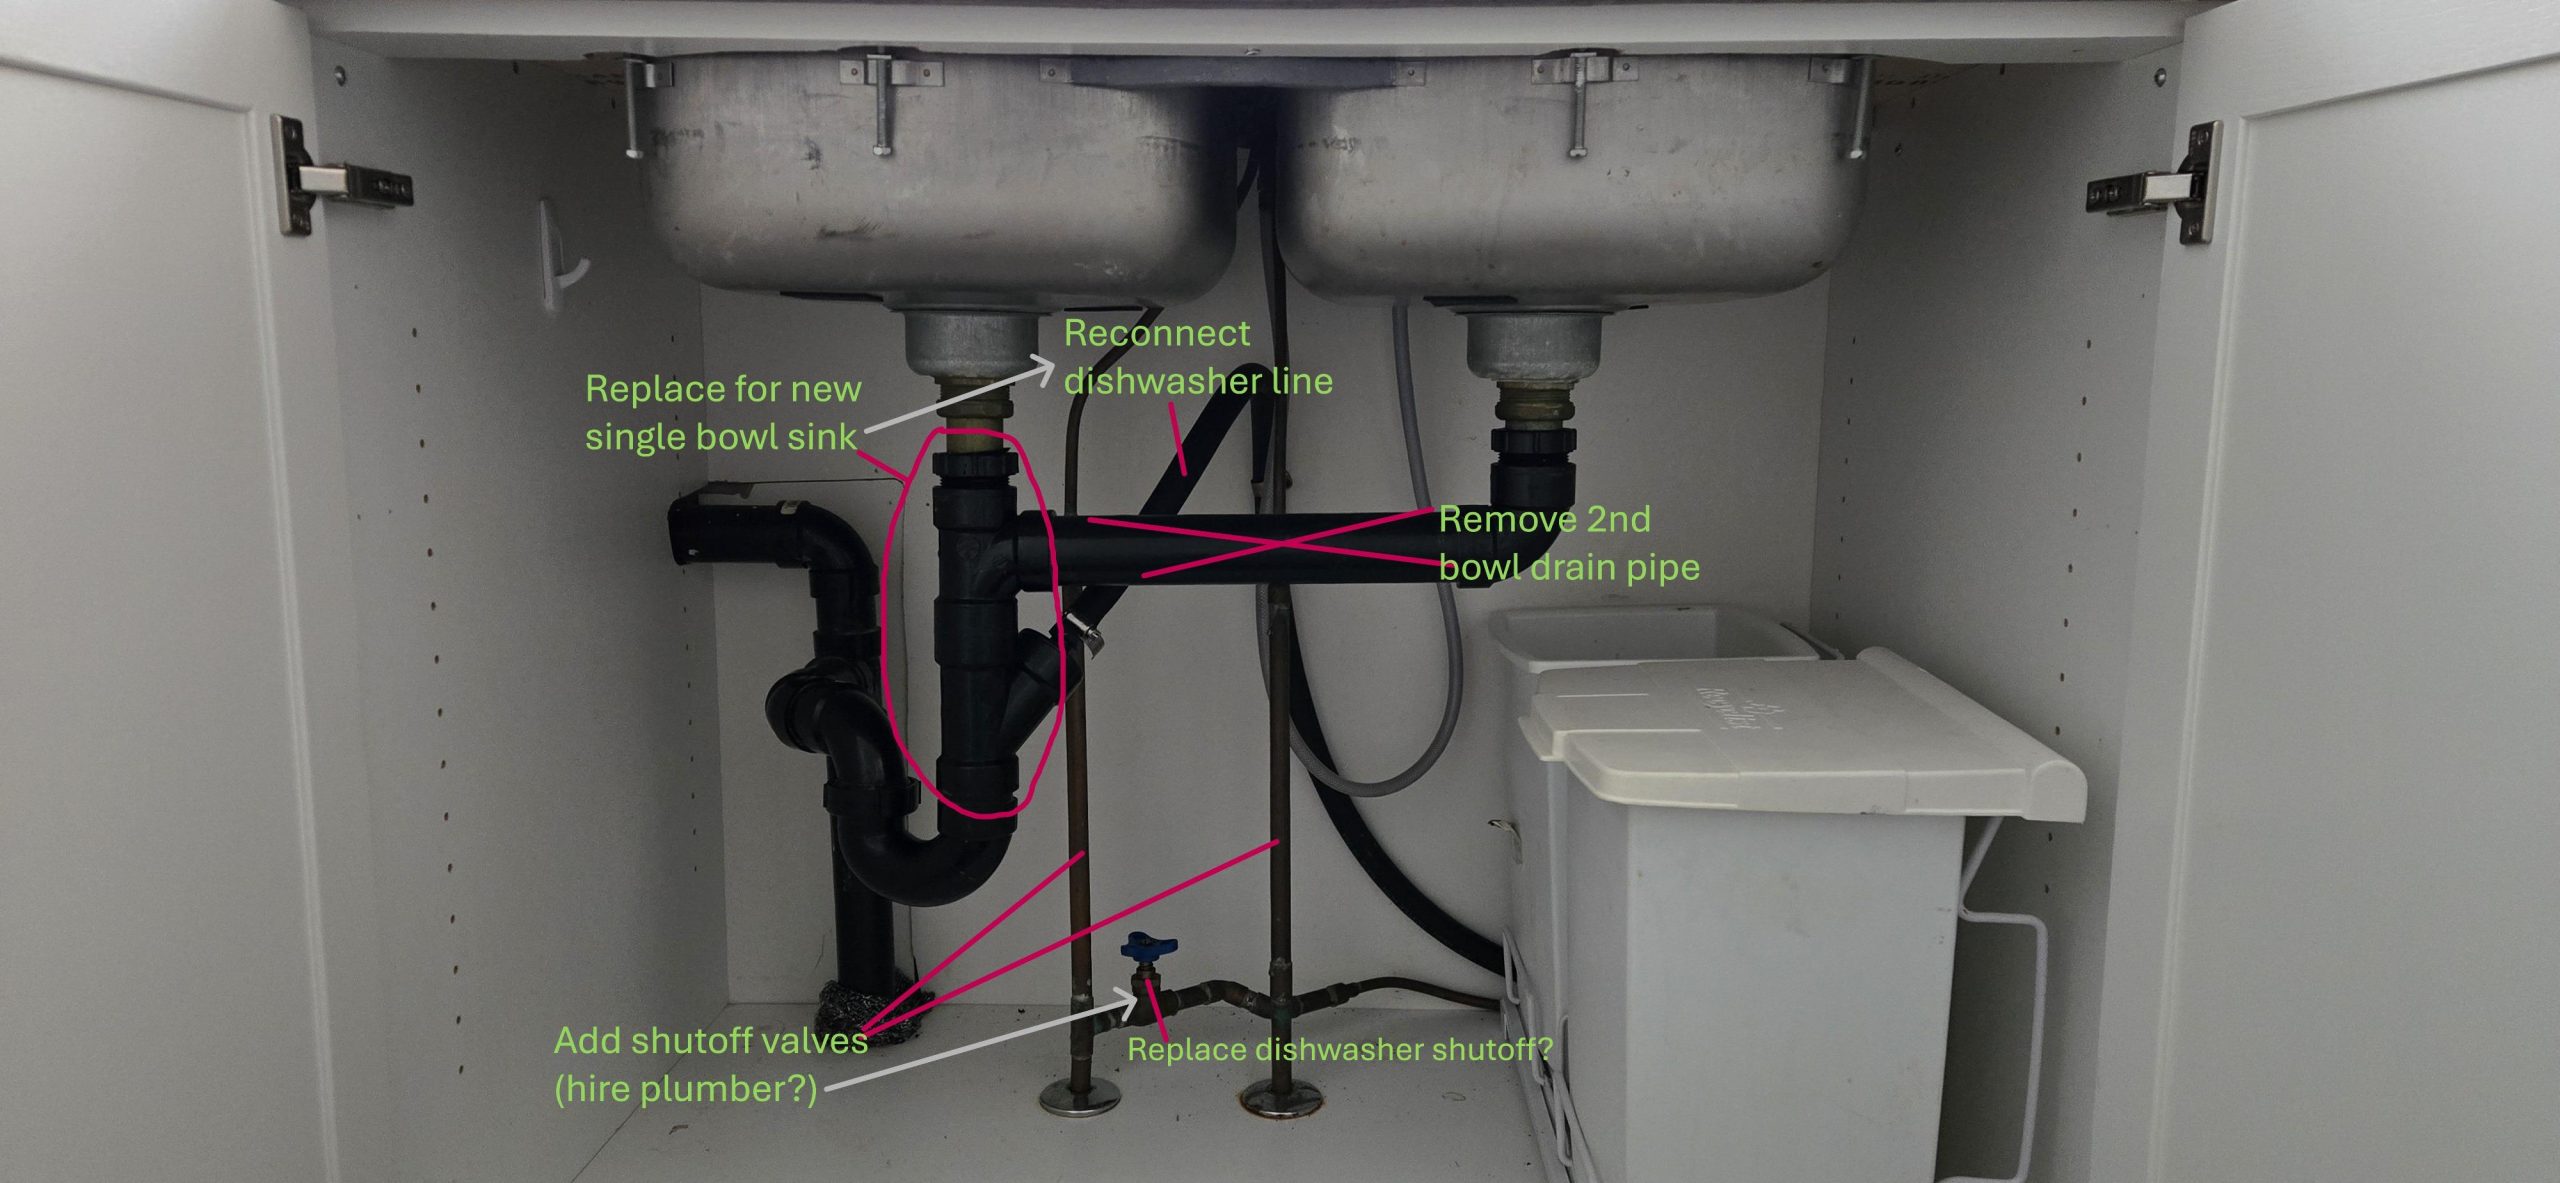
Carefully disconnect any old pipes, hoses, or fittings attached to the sink and dishwasher. Use the right tools like a wrench or pliers to avoid damaging the plumbing. Keep a bucket handy to catch any leftover water that may spill.
Inspect the old fixtures for wear and tear—this can give clues about the overall condition of your plumbing. If you find damaged parts, make a note to replace them during your installation. Have you ever found unexpected problems after removing old fixtures? It’s a common scenario that highlights the value of thorough preparation.
Installing Water Supply Lines
Properly connect water supply lines to ensure smooth flow for both kitchen sink and dishwasher. Use flexible tubing and secure fittings to prevent leaks and maintain steady water pressure. Careful installation avoids future repairs and keeps appliances working efficiently.
Installing water supply lines for a kitchen sink and dishwasher requires careful planning. This process ensures that both appliances receive adequate water flow. Proper installation prevents leaks and ensures efficient operation.
Connecting Hot And Cold Water Lines
Begin by identifying the hot and cold water pipes. Use flexible supply lines for easy connection. Attach one end to the faucet’s inlet. Ensure a tight fit to prevent leaks. Connect the other end to the water supply lines. Label each line for hot and cold to avoid confusion. Ensure the connections are secure.
Attaching Shut-off Valves
Shut-off valves allow for easy repairs and replacements. Attach them to the main water supply line. Use a wrench to tighten the connections. Ensure the valve is easily accessible. Check that the valves open and close smoothly. This step is crucial for safety and maintenance.
Testing For Leaks
After connections, turn on the water supply. Inspect all joints for any drips or leaks. Use a dry cloth to check for moisture around connections. Tighten any loose connections if needed. Leave the water running for a few minutes. Ensure the system is leak-free before completing the installation.
Setting Up Drain Pipes
Setting up drain pipes for your kitchen sink and dishwasher is essential for proper water flow and waste removal. This step ensures that wastewater exits your kitchen efficiently without leaks or clogs. Proper installation helps maintain hygiene and prevents unpleasant odors.
Drain pipes must be sealed tightly and positioned correctly. Each connection needs careful attention to avoid future plumbing problems. Follow the guidelines below to install the drain pipes properly.
Installing P-trap Assembly
The P-trap prevents sewer gases from entering your home. It holds a small amount of water to block bad smells. Fit the curved pipe under the sink drain outlet.
- Attach the P-trap to the sink drain tailpiece.
- Use slip nuts and washers to secure connections.
- Make sure the trap is aligned and not twisted.
Tighten all joints by hand, then give a slight turn with a wrench. Avoid over-tightening to prevent damage.
Connecting Drain To Sink
Connect the drain pipes from both the sink and dishwasher to the main drain line. Use a branch tailpiece or dishwasher tailpiece for the dishwasher drain hose.
- Insert the dishwasher drain hose into the branch tailpiece.
- Secure the hose with a clamp or zip tie.
- Connect the tailpiece to the P-trap inlet.
Check all connections for tight seals. Loose fittings can cause leaks under the sink.
Ensuring Proper Slope For Drainage
A correct slope ensures water flows smoothly without pooling. The drain pipe should slope downward toward the waste line.
- Maintain a slope of about 1/4 inch per foot.
- Use a level tool to check the pipe angle.
- Adjust pipe hangers or supports to hold the slope steady.
This slope helps waste water drain quickly and prevents clogs in your kitchen plumbing.
Hooking Up Dishwasher Plumbing
Hooking up dishwasher plumbing is a key task that ensures your appliance works smoothly without leaks or electrical issues. Getting these connections right saves you from costly repairs and water damage later. Let’s break down the essentials to help you tackle this confidently.
Connecting Dishwasher Drain Hose
The dishwasher drain hose carries wastewater from the machine to your sink drain or garbage disposal. Start by attaching the hose to the dishwasher’s drain outlet securely. Use a clamp to tighten it and prevent leaks.
Next, connect the other end of the hose to the sink drain or disposal unit. Make sure it loops upward before connecting—this prevents dirty water from flowing back into the dishwasher. Have you checked if the hose is kink-free? A bent hose can cause drainage problems.
Linking Water Supply To Dishwasher
Your dishwasher needs a steady water supply connected through a valve under the sink. Use a flexible braided stainless steel hose for durability and safety. Attach one end to the dishwasher’s water inlet and the other to the shutoff valve.
Don’t overtighten the connections; hand-tight plus a quarter turn with a wrench usually works best. Turn on the water and watch for any leaks. If you spot dripping, tighten a bit more carefully—water leaks can cause hidden damage over time.
Securing Electrical Connections
Most dishwashers require a dedicated electrical connection for safety and efficiency. Before working on wiring, always switch off the circuit breaker to avoid shocks. Check your dishwasher’s manual for wiring instructions specific to your model.
Connect wires matching colors: black to black (hot), white to white (neutral), and green or bare copper to ground. Use wire nuts to secure connections tightly. Finally, mount the dishwasher in place and test the power by running a short cycle.

Credit: www.shutterstock.com
Final Checks And Testing
After installing the plumbing for your kitchen sink and dishwasher, the final checks and testing are crucial. This step ensures everything works properly and prevents future water damage. Taking the time to carefully inspect and test can save you from costly repairs later.
Inspecting All Connections
Start by closely examining every connection point. Look for tight seals around the pipes, fittings, and hose clamps. Even a small loose connection can cause leaks that might go unnoticed at first.
Pay special attention to the dishwasher drain hose and water supply lines. Are the connections secure and properly aligned? If you spot any signs of wear or damage, replace those parts before proceeding.
Running Water And Dishwasher Test
Turn on the water supply and let the sink faucet run for a few minutes. Watch the pipes under the sink carefully for any drips or moisture. Next, run a full dishwasher cycle to check its drainage and water intake.
Observe the dishwasher hose during the cycle. Does it stay firmly attached without any leaks? If your dishwasher has a filter or trap, ensure it is clean and functioning well. This test helps confirm your installation is sound and the appliances operate smoothly.
Fixing Any Leaks Or Issues
If you notice leaks, don’t ignore them. Tighten loose fittings with a wrench but avoid over-tightening, which can cause cracks. Use plumber’s tape on threaded connections to improve the seal.
For persistent leaks, consider replacing washers or seals. You might also need to adjust hose positions to prevent kinks or stress. Remember, catching issues now prevents water damage and costly fixes later.
Have you ever skipped these checks and faced a messy repair? Taking these final steps seriously can keep your kitchen dry and your mind at ease.
Tips For Maintenance And Troubleshooting
Maintaining your kitchen sink and dishwasher plumbing is key to avoiding costly repairs and ensuring everything runs smoothly. Paying attention to small details and acting quickly on minor issues can save you a lot of hassle. Let’s look at some practical tips to keep your plumbing in top shape and how to handle common troubles when they arise.
Regular Cleaning Of Pipes
Cleaning your pipes regularly prevents buildup that can lead to slow drainage or blockages. Use a mixture of baking soda and vinegar followed by hot water to clear out residue without harsh chemicals. This simple step can extend the life of your pipes and keep odors at bay.
Check under your sink periodically for leaks or moisture that might indicate a hidden problem. Even a small drip can cause damage over time or attract pests. Keeping the area dry and clean helps you spot issues early.
Preventing Clogs
Think about what you’re sending down the drain. Avoid pouring grease, coffee grounds, or large food scraps into the sink. These items tend to stick to pipe walls and lead to stubborn clogs.
Consider using a drain strainer to catch debris before it enters the plumbing. It’s a small investment that saves you from frequent clogs and expensive plumber visits. How often do you check your strainer?
Handling Common Problems
When your sink drains slowly, it might be a sign of a partial clog. Try a plunger or a plumber’s snake to clear the blockage yourself before calling a professional. Many blockages happen close to the drain and can be removed easily with the right tools.
If your dishwasher isn’t draining properly, check the drain hose for kinks or clogs. Sometimes, food particles trapped in the filter or hose cause water to back up. Cleaning these parts regularly can prevent drainage issues.
What’s your go-to solution when plumbing acts up unexpectedly? Having a basic toolkit and knowing a few quick fixes can save you time and frustration. Don’t wait until a small drip turns into a flood.
Credit: www.angi.com
Frequently Asked Questions
How Do I Connect A Dishwasher To Kitchen Plumbing?
To connect a dishwasher, attach its drain hose to the sink’s drain or garbage disposal. Secure it with a clamp to prevent leaks. Connect the water supply line to the dishwasher’s inlet valve. Ensure all connections are tight and test for leaks before use.
What Tools Are Needed For Kitchen Sink Plumbing Installation?
Essential tools include a pipe wrench, adjustable wrench, plumber’s tape, pipe cutter, and a basin wrench. You may also need PVC cement, a drill, and a screwdriver. These tools help in cutting pipes, tightening fittings, and securing connections efficiently.
Can I Install Kitchen Sink Plumbing Myself?
Yes, with basic plumbing knowledge and proper tools, you can install kitchen sink plumbing. Follow local codes and manufacturer instructions carefully. If unsure, consult a professional to avoid leaks, water damage, or code violations.
How To Prevent Leaks In Kitchen Sink Plumbing?
Use plumber’s tape on threaded connections and tighten fittings properly. Inspect all joints and hoses for damage before installation. Test the system by running water and checking for drips. Regular maintenance helps prevent future leaks and plumbing issues.
Conclusion
Installing plumbing for your kitchen sink and dishwasher can be simple. Follow each step carefully and take your time. Use the right tools and materials for best results. Check all connections to avoid leaks or damage. Test the water flow before finishing the job.
This project saves money and adds convenience at home. Feel confident to tackle small plumbing tasks yourself. Keep safety in mind and ask for help if needed. With patience and care, your kitchen will work smoothly.