
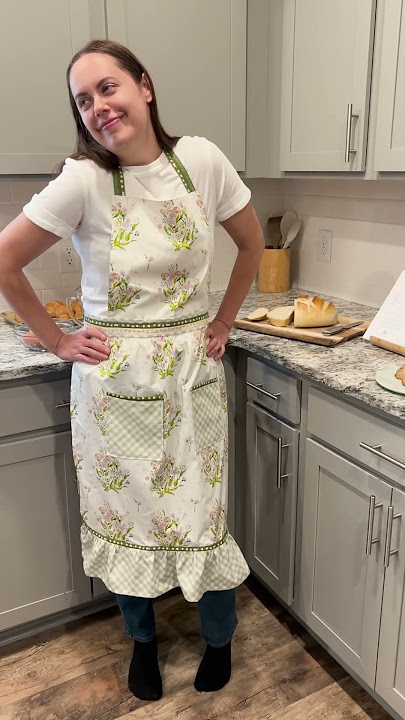
Are you tired of messy spills and stains while cooking? Imagine having a stylish, custom apron that fits you perfectly and protects your clothes every time you step into the kitchen.
Making your own apron is easier than you think, and it gives you the freedom to choose the fabric, design, and size that match your style. In this guide, you’ll discover simple steps to create a practical and beautiful kitchen apron that you’ll love wearing.
Ready to turn your kitchen time into a cleaner, more enjoyable experience? Let’s get started!

Credit: www.youtube.com
Choosing Fabric
Choosing the right fabric for your kitchen apron is crucial. The fabric affects comfort, durability, and how easy the apron is to clean. Selecting the perfect material can make your apron a practical kitchen companion rather than just a decorative piece.
Best Materials For Kitchen Aprons
Look for fabrics that are strong and easy to wash. Cotton is a popular choice because it’s breathable and soft, making it comfortable to wear for long periods.
Denim works well if you want something tougher. It resists stains and holds up through many washes. Canvas is another durable option, often used in professional kitchens due to its thickness and resilience.
Consider a fabric blend with polyester to add wrinkle resistance and faster drying. Avoid delicate fabrics like silk or linen, which can stain easily and wear out fast.
Picking Patterns And Colors
Think about how often you'll use your apron and what kind of stains it might encounter. Darker colors or busy patterns hide stains better than light, solid colors.
Stripes, checks, or floral prints can add personality and make your apron stand out. If you love bright colors, balance them with functional fabric so your apron stays looking fresh longer.
Ask yourself if you want your apron to match your kitchen decor or express your style. Choosing the right pattern makes wearing your apron a more enjoyable experience every time you cook.

Credit: www.youtube.com
Gathering Supplies
Gathering the right supplies is the first step to making a kitchen apron. Having all tools and materials ready makes the process easier and faster. This preparation helps avoid interruptions and keeps your work smooth. Focus on quality items for a durable and comfortable apron. Start by collecting essential tools that will help you sew and assemble the apron perfectly.
Essential Tools You Need
- Fabric scissors – for cutting cloth cleanly
- Measuring tape – to get accurate dimensions
- Pins and needles – for holding fabric pieces together
- Thread – choose a color that matches your fabric
- Sewing machine – speeds up stitching but hand sewing works too
- Fabric chalk or pencil – for marking cutting lines
- Iron and ironing board – to press fabric and seams
Additional Accessories
- Bias tape – for neat edging and straps
- Buttons or snaps – to fasten the apron securely
- Pockets – optional but useful for holding utensils
- Decorative ribbons or patches – to personalize your apron
- Elastic bands – for adjustable waist or neck straps
Measuring And Cutting
Measure fabric carefully to fit your body and kitchen needs. Cut along the lines with sharp scissors for clean edges and a perfect shape.
Creating an apron for your kitchen is both a practical and creative endeavor. The first crucial step involves measuring and cutting your fabric accurately. This process is foundational to ensure a good fit and aesthetic appeal. Let's dive into how you can achieve precision and confidence in your apron-making journey.
Taking Accurate Measurements
Accurate measurements are the cornerstone of a well-fitting apron. Begin by measuring the width of your waist and decide how long you want the apron to be. Consider where the apron will sit—at the waist or a bit lower. Wrap a measuring tape around your waist, just above your hips. Note this measurement and add a few inches for comfort and movement. Don't forget to measure the desired length from your waist down to where you want the apron to end.
Cutting Fabric Pieces
Once you have your measurements, it’s time to cut the fabric. Lay the fabric on a flat surface, ensuring it’s smooth and wrinkle-free. Use a sharp pair of scissors or a rotary cutter for clean, precise cuts. Mark the fabric using tailor's chalk or a fabric marker, following the measurements you took. Cut the main body of the apron first, then proceed to cut strips for the ties and any additional pockets you might want to add. Remember to leave a small allowance for seams. This extra fabric is essential for sewing the pieces together without compromising size. It’s amazing how a little extra fabric can make a big difference in the final fit of your apron. As you embark on this project, think about how the apron will reflect your style. Will you add pockets for functionality or decorative trims for flair? Your choices will make the apron uniquely yours.
Sewing The Apron
Sewing the apron is where your project starts to take shape. This step involves connecting all the fabric pieces carefully. A strong stitch helps the apron last longer in the kitchen. Precise sewing also ensures a neat and professional look.
Keep your sewing machine ready and thread matched to your fabric color. Use pins to hold pieces together before sewing. This prevents shifting and uneven seams. Take your time and sew slowly for better control.
Stitching The Main Body
Begin by folding and hemming the edges of the apron’s main fabric. This stops the fabric from fraying. Use a straight stitch close to the edge. Then, sew the sides and bottom edges securely. Make sure the stitches are even and straight. Press the seams flat with an iron for a clean finish.
Adding Straps And Ties
Cut fabric strips for the neck strap and waist ties. Fold each strip lengthwise and sew along the edge. Turn the strips inside out to hide the seam. Attach the neck strap to the top corners of the apron. Sew the waist ties on each side at the waist level. Double stitch the ends to keep them strong.
Creating Pockets
Choose a small piece of fabric for your pocket. Fold and hem the edges just like the apron body. Position the pocket on the apron front where you want it. Pin it in place to avoid movement. Sew around the sides and bottom of the pocket. Leave the top open for easy access. Reinforce the corners with extra stitching for durability.
Customizing Your Apron
Customizing your apron makes it truly yours. It adds style and personality to a simple kitchen essential. Small details can turn a plain apron into a favorite kitchen companion.
Choose decorations that suit your taste. Think about colors, patterns, and textures. Make your apron stand out or keep it simple and elegant.
Adding Embellishments
Embellishments bring fun and flair to your apron. Sew on buttons, patches, or fabric flowers. Use lace or ribbons along the edges for a soft touch. Iron-on transfers or fabric paint can create unique designs. These small touches make your apron eye-catching and special.
Personalizing With Monograms
Monograms add a personal and classic look. Stitch your initials or name on the apron pocket or chest area. Use embroidery thread or fabric markers for this detail. Choose a font style that matches your personality. A monogram shows pride and makes the apron a perfect gift, too.
Credit: www.agfblog.com
Caring For Your Apron
Caring for your apron helps it last longer and stay fresh. Proper care keeps the fabric strong and colors bright. Clean aprons look neat and feel comfortable every time you wear them.
Simple care steps protect the apron from stains and damage. Knowing how to wash and maintain the fabric ensures your apron stays in top shape.
Washing Tips
- Use cold or warm water to prevent shrinking.
- Wash aprons separately or with similar colors.
- Choose a gentle detergent to protect fabric fibers.
- Spot clean stubborn stains before washing.
- Air dry to avoid heat damage from dryers.
Maintaining Fabric Quality
- Iron aprons on low heat to smooth wrinkles.
- Store aprons folded or hung to keep shape.
- Avoid bleach to prevent fabric weakening.
- Check and repair small tears or loose threads early.
- Keep aprons away from direct sunlight to avoid fading.
Frequently Asked Questions
How Do I Choose Fabric For A Kitchen Apron?
Choose durable, washable fabric like cotton or linen. These materials are breathable and easy to clean. Avoid slippery or delicate fabrics to ensure comfort and longevity in the kitchen.
What Basic Tools Are Needed To Make An Apron?
You need fabric scissors, measuring tape, pins, sewing machine, and thread. These tools help cut, measure, and sew your apron precisely and efficiently.
How Do I Measure For A Custom-fit Kitchen Apron?
Measure from the chest to desired length for coverage. Also, measure around the waist for ties. Accurate measurements ensure a comfortable and well-fitting apron.
Can I Add Pockets To My Kitchen Apron?
Yes, pockets are practical for holding utensils or recipes. Sew pockets onto the front before assembling the apron for convenience and style.
Conclusion
Making your own kitchen apron is simple and fun. You only need a few materials and basic steps. A homemade apron fits you well and shows your style. It also protects your clothes while cooking or baking. Try different fabrics and designs to match your kitchen mood.
Enjoy the process and feel proud of your creation. Start today and add a personal touch to your kitchen tasks.