
Are your kitchen cabinets making you cringe every time you walk in? Ugly or outdated cabinets can really drag down the look of your entire kitchen.
But don’t worry—you don’t have to spend a fortune or do a full remodel to fix them. Imagine transforming your kitchen into a space you love, with simple tricks that anyone can try. You’ll discover easy, effective ways to cover those ugly cabinets and give your kitchen a fresh, stylish makeover.
Ready to see your kitchen in a whole new light? Keep reading—you’re closer than you think!
Assessing Your Cabinets
Assessing your kitchen cabinets is the first step in transforming their look. A clear understanding of their condition helps choose the best covering option. This phase involves examining every detail and planning carefully for a smooth makeover.
Identify Problem Areas
Start by inspecting each cabinet surface closely. Look for scratches, dents, peeling paint, or water damage. Check the doors and drawers for alignment issues or broken handles. Note any spots that need extra repair or special attention.
Measure Dimensions
Use a tape measure to record the height, width, and depth of all cabinet faces. Measure doors, drawers, and open shelves separately. Write down these dimensions accurately to avoid mistakes when buying materials. Double-check your numbers for precision.
Choose Your Style
Decide on a look that fits your kitchen and taste. Options include painting, staining, vinyl wraps, or new cabinet doors. Consider colors, patterns, and textures that match your space. Pick a style that improves your kitchen’s feel and hides flaws well.
Preparing Cabinets For Makeover
Preparing your kitchen cabinets before a makeover is essential for a smooth and lasting transformation. Skipping this step can lead to peeling paint, uneven finishes, or hardware that won’t fit properly. Taking the time to prepare ensures your cabinets look professional and hold up over time.
Clean Thoroughly
Start by removing all grease, dirt, and grime from your cabinets. Use a degreaser or a mixture of warm water and dish soap. Pay close attention to areas around handles and edges where buildup tends to accumulate.
Rinse with clean water and dry completely before moving on. Have you noticed how even a little leftover grease can ruin fresh paint? That’s why cleaning well is non-negotiable.
Remove Hardware
Take off all knobs, handles, and hinges carefully. This makes sanding and painting much easier and gives you a cleaner finish. Keep all screws and hardware in a labeled container so you don’t lose anything.
If you’re thinking about replacing hardware, now’s the perfect time to plan that out. Removing hardware might seem tedious, but it saves you a lot of hassle during the makeover.
Sand Surfaces
Sanding is key to helping paint or stain stick properly. Use medium-grit sandpaper to scuff the surface, focusing on worn or glossy areas. This creates a rough texture that improves adhesion.
After sanding, wipe away dust with a tack cloth or damp rag. Did you know that skipping sanding could cause your paint to peel in just a few months? It’s a small step that makes a big difference in durability.
Painting Cabinets
Painting cabinets can transform old, unattractive kitchen doors into fresh and stylish surfaces. Choose the right paint and prep the wood well for smooth, lasting results. Simple steps can give your kitchen a whole new look without a full remodel.
Painting kitchen cabinets can transform your space dramatically. It’s a cost-effective way to cover unsightly surfaces. With the right techniques, your cabinets will look fresh and new. Follow these steps to ensure a smooth painting process.
Select The Right Paint
Choosing the correct paint is essential. Opt for paints designed for cabinets. These paints are durable and easy to clean. Semi-gloss or satin finishes work best for kitchens. They resist moisture and stains effectively. Always pick a color that complements your kitchen decor.
Prime For Durability
Priming cabinets is a crucial step. Primer helps the paint adhere better. It also hides imperfections on the surface. Use a high-quality primer suitable for wood. Apply a thin, even coat and let it dry completely. This ensures long-lasting results.
Apply Even Coats
Apply paint in thin, even layers. Avoid thick layers which may drip. Use a brush for corners and edges. Rollers work well for larger surfaces. Allow each coat to dry before applying the next. Two to three coats usually provide good coverage. Be patient for the best finish.
Credit: www.lovelyetc.com
Using Contact Paper And Vinyl Wraps
Using contact paper and vinyl wraps is a smart, budget-friendly way to transform ugly kitchen cabinets without the mess of paint or the cost of full replacement. These materials offer a quick facelift and come in a variety of styles, from sleek modern finishes to classic wood grains. You can achieve a fresh new look that suits your style and kitchen vibe with just a little patience and care.
Pick Patterns And Colors
Think about the overall feel you want for your kitchen. Are you aiming for a bold statement or something subtle? Contact paper and vinyl wraps come in a wide range of options like marble, matte black, or vibrant colors.
Choosing the right pattern can change how your kitchen feels. For example, a light wood grain wrap can make a small kitchen feel larger and warmer. Would a glossy finish make your space feel brighter?
Cut To Size
Measure each cabinet door and drawer front carefully before cutting. Use a ruler and a sharp utility knife or scissors to get clean edges. Cutting slightly larger pieces than needed can help with alignment during application.
Label each piece to avoid confusion. This small step saves time and frustration later, especially if you’re working on multiple cabinets.
Apply Smoothly
Start by peeling off a small section of the backing and align the wrap with the edge of the cabinet. Slowly press it down using a squeegee or a credit card to avoid bubbles and wrinkles.
Work your way across, peeling the backing gradually and smoothing as you go. If bubbles appear, gently lift the wrap and reapply, or use a pin to release trapped air.
Patience here pays off—taking your time ensures a professional-looking finish. Have you ever rushed a project only to find it needed redoing? This step is where you avoid that.
Adding New Doors Or Panels
Adding new doors or panels to your kitchen cabinets is a smart way to hide wear and tear without a full remodel. It can completely change the look of your space while saving time and money. You don’t need to be a pro to give your cabinets a fresh face that matches your style.
Find Affordable Options
Start by checking local hardware stores or online marketplaces for cabinet doors and panels. You can find a variety of materials like MDF, plywood, or even laminate at reasonable prices. Sometimes, buying unfinished doors allows you to paint or stain them yourself, cutting costs even more.
Don’t overlook second-hand shops or salvage yards. You might discover high-quality doors that just need a little cleaning up. How much value could you add by choosing doors that fit your budget and style perfectly?
Install With Basic Tools
You only need a few tools to get started: a screwdriver, drill, measuring tape, and level. Remove the old doors carefully to avoid damage, then attach the new ones using existing hinges or new ones if necessary. This process usually takes a few hours and doesn’t require professional help.
Keep screws and hardware organized to avoid frustration during installation. Taking your time to align the doors correctly will make a big difference in the final look. Have you ever been surprised by how a little patience during installation pays off?
Match Existing Layout
Measure your cabinets before purchasing doors or panels to ensure a seamless fit. Matching the size and style of your new doors with your current cabinet layout keeps everything looking cohesive. If your cabinets have unique features like glass inserts or specific moldings, look for doors that complement or replicate those details.
If you can’t find an exact match, consider customizing panels or adding trim to blend the new pieces with the old. This approach can prevent your kitchen from looking disjointed. What small detail could you add to make your new doors feel like they’ve always belonged?
Installing Decorative Molding
Installing decorative molding is a smart way to transform your ugly kitchen cabinets without a full replacement. It adds character and style, making cabinets look custom and polished. Plus, molding is budget-friendly and allows you to personalize your kitchen’s look.
Select Molding Styles
Choosing the right molding style sets the tone for your kitchen makeover. You can pick from crown molding for an elegant finish, beadboard trim for a cottage feel, or simple flat molding for a modern touch. Think about your kitchen’s overall design—do you want something bold or subtle?
Visiting a local hardware store can help you see different profiles in person. Don’t hesitate to take photos of your cabinets and hold molding samples against them. This hands-on approach will make your choice clearer and ensure the molding complements your space.
Cut And Attach
Precision is key when cutting molding to fit your cabinets perfectly. Measure twice, cut once is more than a saying here—it saves you from costly mistakes. Use a miter saw for clean, angled cuts, especially around corners.
Attaching molding can be done with nails or strong adhesive, depending on your tools and skills. Nail guns speed up the process, but small finishing nails hammered carefully also work well. Make sure the molding is flush with the cabinet edges for a seamless look.
Paint Or Stain
Painting or staining the molding can enhance your cabinets’ new look dramatically. If your cabinets are painted, matching or contrasting colors can both work—think about whether you want the molding to stand out or blend in. For wood cabinets, staining the molding to match creates a cohesive, warm feel.
Use a primer before painting to help the color adhere and last longer. Sand lightly between coats for a smooth finish. Have you considered how the finish will age? Matte finishes hide wear better than glossy ones, which show every fingerprint.
Using Peel-and-stick Tiles
Using peel-and-stick tiles is a fantastic way to transform ugly kitchen cabinets without the mess or expense of a full renovation. These tiles offer a quick, clean, and effective solution that can refresh your kitchen’s look in just a few hours. They’re especially great if you want a temporary fix or if you rent your home and can’t make permanent changes.
Choose Durable Tiles
Not all peel-and-stick tiles are created equal. Look for tiles made from materials like vinyl or waterproof laminate that can handle kitchen moisture and heat. Durable tiles will last longer and resist peeling or fading, especially in areas near the stove or sink.
Consider the texture and finish too. Matte finishes hide fingerprints and smudges better than glossy ones. Have you thought about coordinating the tile color with your countertops or backsplash for a cohesive look?
Prepare Surface
Before applying tiles, clean your cabinet surfaces thoroughly. Use a mild detergent and water to remove grease, dirt, and dust. This step is crucial because any residue can prevent the tiles from sticking properly.
Once dry, lightly sand glossy or uneven surfaces to create a better grip. Skip this, and your tiles might peel off sooner than you expect. Have you checked for loose cabinet doors or hardware that might interfere with tile application?
Apply With Precision
Start by measuring and cutting the tiles to fit your cabinets perfectly. Use a sharp utility knife and a ruler for straight edges. Applying tiles carefully around handles and corners will make your kitchen look professionally updated.
Peel the backing slowly and press the tile firmly onto the surface, smoothing out any air bubbles with a plastic card or your fingers. Take your time—rushing can cause misalignment or wrinkles.
How much difference do you think a smooth, precise application will make in the overall look of your kitchen cabinets? Paying close attention here can turn your project from "okay" to "wow."
Replacing Or Updating Hardware
Replacing or updating hardware is one of the easiest and most cost-effective ways to transform ugly kitchen cabinets. You don’t need to repaint or replace the entire cabinet to make a noticeable difference. Swapping out old knobs and handles can give your kitchen a fresh, modern look in just a few hours.
Select Modern Handles
Choosing the right handles can change the entire vibe of your kitchen. Look for sleek designs in materials like brushed nickel, matte black, or even brass to add a touch of sophistication. Think about your kitchen’s style—do you want something minimalist or more decorative?
Try visiting a hardware store to feel the texture and weight of handles before buying. Sometimes, a simple switch from round knobs to bar pulls can instantly update the cabinet’s appearance.
Measure For Fit
Before buying new hardware, measure your existing handles carefully. Pay attention to the distance between screw holes, known as the “center-to-center” measurement. This ensures the new handles fit perfectly without needing to drill new holes.
If your cabinets have no previous hardware, measure the cabinet doors and drawers to choose an appropriate size and placement. Getting this step right saves you time and prevents damage to your cabinets.
Install Easily
Installation is straightforward and requires only a screwdriver or a drill. Remove the old handles by unscrewing them, then align the new ones using your measurements. Tighten the screws gently to avoid stripping the holes.
Work on one cabinet at a time to keep track of screws and hardware. You’ll be surprised how much this small change can brighten your kitchen’s look without a big renovation.
Adding Open Shelving
Adding open shelving is a smart way to refresh ugly kitchen cabinets. It creates a lighter, more open feel. Open shelves show off your favorite dishes and decor. They break up heavy cabinetry and add style. This simple change transforms your kitchen without a full remodel.
Remove Unwanted Doors
Start by taking off cabinet doors that look old or damaged. Use a screwdriver to remove the hinges carefully. Keep the screws and hardware in case you want to reuse them. Sand the edges of the open cabinet to smooth rough spots. Clean inside the cabinet before moving on.
Install Brackets
Choose sturdy brackets that match your kitchen style. Measure the space where the shelves will go. Mark bracket positions evenly along the wall or cabinet frame. Use a drill to fix the brackets securely. Make sure brackets are level and strong enough to hold weight.
Style With Accessories
Place your favorite dishes, bowls, and cups on the shelves. Add small plants or decorative jars for a fresh look. Use baskets or containers to keep small items tidy. Arrange items by size or color for a neat appearance. Change accessories often to keep the space lively and inviting.
Credit: www.kylieminteriors.ca
Maintaining Your New Look
Transforming kitchen cabinets can uplift your kitchen's appearance. But keeping them in good condition requires effort. Regular maintenance ensures your cabinets look fresh and inviting. Here are some simple ways to maintain the new look of your kitchen cabinets.
Clean Gently
Use a soft cloth for cleaning surfaces. Harsh chemicals might damage the finish. Mild soap mixed with water works well. Wipe the cabinets gently to remove dirt and stains. Avoid soaking the wood. Dry the surface with a clean towel to prevent water spots.
Touch Up Paint
Keep some leftover paint for touch-ups. Small scratches can appear over time. Use a small brush for fixing minor paint issues. Apply a thin layer and let it dry completely. This will keep your cabinets looking new and fresh.
Replace Worn Parts
Inspect cabinet handles and hinges regularly. Replace any worn or loose parts. New handles can give a fresh look. Tighten screws to ensure stability. This simple step keeps your cabinets functional and stylish.
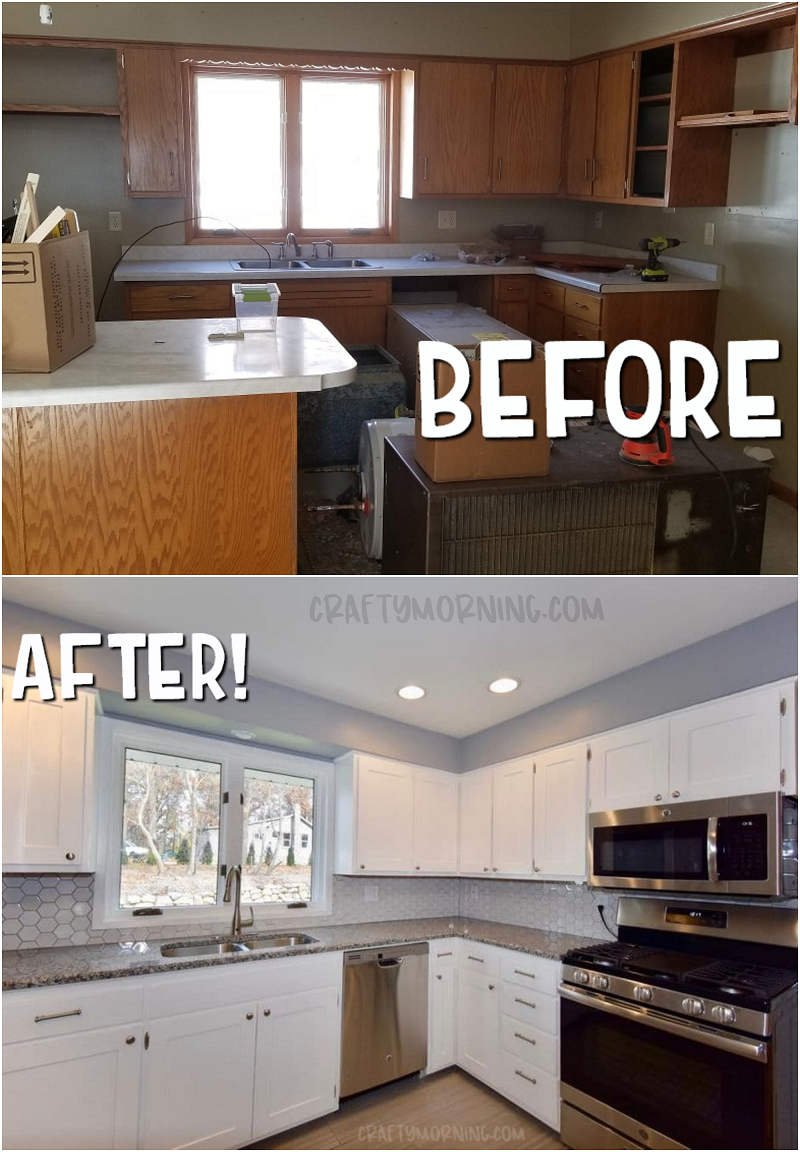
Credit: www.craftymorning.com
Frequently Asked Questions
How Can I Hide Ugly Kitchen Cabinets Cheaply?
You can use peel-and-stick wallpaper or adhesive vinyl to cover cabinets. Painting is also an affordable way to refresh their look. Adding new hardware like handles or knobs improves appearance without a full remodel.
What Paint Type Works Best For Kitchen Cabinets?
Use a high-quality semi-gloss or satin enamel paint. These finishes resist moisture and stains. Proper surface prep and primer ensure long-lasting results and a smooth, attractive finish.
Are Cabinet Refacing Options Better Than Replacement?
Refacing is cheaper and faster than full replacement. It updates cabinet doors and drawer fronts while keeping the existing structure. It’s ideal if your cabinets are structurally sound but look outdated.
Can I Use Wallpaper On Kitchen Cabinets?
Yes, wallpaper can add patterns and color to cabinets. Use washable, moisture-resistant types designed for kitchens. Proper sealing helps protect against spills and steam damage.
Conclusion
Ugly kitchen cabinets do not have to stay that way. Simple covers and fresh paint can change their look fast. Choose materials that fit your style and budget. Small changes make a big difference in your kitchen’s feel. Try different ideas until you find what works best.
Your kitchen can look nice again with little effort. Enjoy cooking in a space that feels clean and bright. Start today and see your kitchen transform step by step.