
Are you tired of your old kitchen tiles but worried about the mess and cost of ripping them out? What if you could give your kitchen a fresh, stylish look without the hassle of a full renovation?
Covering your kitchen tiles with a splashback might be the simple solution you’re looking for. You’ll discover how this clever trick can transform your space quickly and affordably. Keep reading to find out if this option is right for your kitchen and how you can make it work perfectly for you.

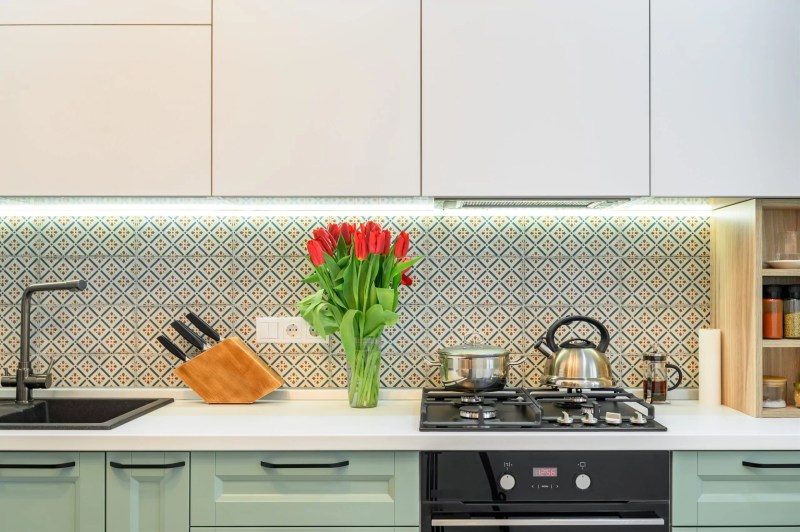
Credit: www.gathered.how
Benefits Of Covering Kitchen Tiles
Covering your kitchen tiles with a splashback offers several advantages that go beyond just changing the look of your space. Whether your tiles are outdated, chipped, or simply not matching your current style, adding a splashback can transform your kitchen efficiently. Let’s look at how this simple change can benefit you in multiple ways.
Improved Aesthetics
Adding a splashback instantly updates the appearance of your kitchen. You can choose from a variety of materials like glass, stainless steel, or acrylic to match your style. This creates a fresh, modern look without the need to replace the entire tiled area.
Imagine turning a dull, tired kitchen wall into a striking focal point with just one panel. It’s a quick way to reflect your personality and taste without a full remodel.
Enhanced Protection
A splashback acts as a strong barrier that protects your kitchen walls from spills, splashes, and stains. Unlike tiles with grout lines, many splashbacks offer a seamless surface that’s easier to clean and less likely to harbor mold or dirt.
Think about how much time you spend scrubbing grout—covering tiles can save you that effort and keep your kitchen looking cleaner for longer.
Cost-effective Makeover
Replacing or covering tiles with a splashback is often much cheaper than removing and re-tiling the entire wall. It reduces labor costs and material waste, making it an affordable way to refresh your kitchen.
Have you considered how a simple splashback could stretch your renovation budget further, allowing you to invest in other upgrades? This small change can bring big value without breaking the bank.
Types Of Splashback Materials
Choosing the right splashback material can change your kitchen’s look and feel. Splashbacks protect your walls from stains and water damage. They also add style and color to your space. Various materials suit different kitchen styles and budgets. Here are some popular options to cover kitchen tiles with splashbacks.
Glass Splashbacks
Glass splashbacks offer a sleek, modern look. They are easy to clean with just a wipe. Glass reflects light, making kitchens appear larger and brighter. You can get them in many colors and patterns. Tempered glass is strong and heat resistant. It fits well behind stoves and sinks.
Acrylic Panels
Acrylic panels are a budget-friendly alternative to glass. They are lightweight and simple to install. Acrylic comes in many vibrant colors and finishes. It resists stains and splashes effectively. These panels are less fragile but can scratch more easily. Acrylic suits kitchens needing a quick makeover.
Metal Sheets
Metal splashbacks create an industrial, stylish vibe. Stainless steel is the most common choice. It is highly durable and heat resistant. Metal is easy to clean and maintain. It hides fingerprints and watermarks well. Metal sheets fit perfectly in modern or professional kitchens.
Ceramic And Porcelain
Ceramic and porcelain tiles offer classic charm and durability. They come in many shapes, sizes, and colors. These tiles handle heat and moisture well. You can match them with existing kitchen tiles easily. Grout lines may require regular cleaning. They work great for traditional or rustic kitchens.
Preparing Tiles For Splashback Installation
Preparing kitchen tiles before installing a splashback is essential for a smooth, lasting finish. The surface must be clean and even to ensure proper adhesion. Neglecting this step can cause the splashback to peel or bubble over time. Follow these key tasks to get your tiles ready.
Cleaning And Smoothing Surfaces
Start by cleaning the tiles thoroughly. Remove all grease, dirt, and dust using a mild detergent and warm water. Rinse well and let the surface dry completely. Smooth any rough or uneven areas with fine sandpaper. This creates a better grip for the splashback adhesive.
Removing Loose Grout
Check the grout lines for any loose or crumbling parts. Use a grout removal tool or a small scraper to clear them out. Loose grout can weaken the bond between the tiles and the splashback. Cleaning grout gaps also helps the splashback sit flush against the wall.
Priming For Adhesion
Apply a primer designed for tiles to improve adhesion. Use a brush or roller to cover the entire tiled area evenly. Allow the primer to dry according to the product instructions. This step seals the surface and prevents moisture from affecting the splashback’s grip.
Installation Techniques For Covering Tiles
Covering kitchen tiles with splashbacks can refresh your space. The process isn't too complex. You need to follow the right steps. Understanding installation techniques is crucial. This ensures a smooth and long-lasting finish.
Measuring And Cutting Splashbacks
Start by measuring the area accurately. Use a tape measure for precision. Consider the outlet and switch positions. Mark these spots clearly. Choose a splashback that fits your measurements. Cut the splashback with a suitable tool. A glass cutter works well for glass. For acrylic, use a fine-toothed saw. Always wear safety gear while cutting.
Using Adhesives And Fixings
Select a strong adhesive suitable for splashbacks. Spread it evenly on the tiles. Use a notched trowel for uniform coverage. Press the splashback firmly onto the tiles. Ensure there are no air bubbles. For extra support, use fixings or screws. Check the manufacturer's instructions before drilling. This helps avoid damage to the splashback.
Sealing Edges And Joints
Sealing edges and joints prevents water damage. Use a high-quality silicone sealant. Apply it along the edges of the splashback. Smooth it out with a caulking tool. Ensure all joints are sealed properly. This keeps moisture out and maintains hygiene. Regularly check the seals for wear and tear.
Common Challenges And Solutions
Covering kitchen tiles with a splashback can be a smart way to update your kitchen’s look without major renovations. However, it comes with its own set of challenges that can affect the final result. Understanding these common issues and how to tackle them will save you time, money, and frustration.
Dealing With Uneven Surfaces
Old kitchen tiles often have uneven grout lines and surfaces that make it tricky to install a splashback smoothly. If you try to stick a splashback directly onto a bumpy surface, it might not sit flush or could develop gaps over time.
A practical solution is to fill in grout lines and any chips with a tile filler or leveling compound. Sand the area gently to create a smooth, even base before applying adhesive. This extra prep work ensures your splashback lies flat and looks seamless.
Avoiding Moisture Traps
Moisture can sneak behind your splashback if there are gaps or if the edges aren’t sealed properly. This often leads to mold growth or damage to the wall underneath, which can be costly to fix later.
Make sure you use a waterproof adhesive and apply a good quality silicone sealant around all edges. Check your splashback periodically for any signs of water ingress. Have you ever noticed mold appearing where you least expected it?
Ensuring Durable Attachment
One of the biggest worries is whether the splashback will stay firmly attached over time, especially in a busy kitchen environment. Heavy use, heat, and humidity can weaken adhesives not designed for this setting.
Choose an adhesive specifically made for kitchen splashbacks or tiles. Press the splashback firmly and use support if needed while the adhesive cures. Avoid shortcuts here—your splashback should feel solid and stable to avoid future repairs.
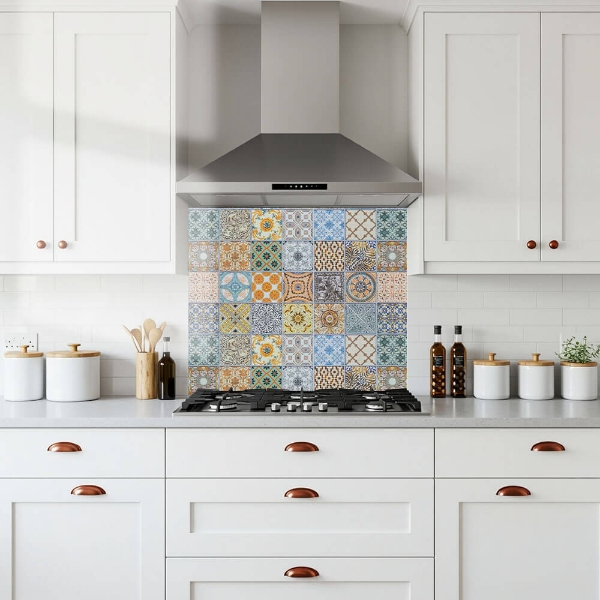
Credit: www.diysplashbacks.co.uk
Maintenance Tips For Splashbacks
Keeping your splashback in top shape is easier than you might think. Proper maintenance not only preserves its look but also extends its life. Let’s dive into some practical tips that will help you care for your splashback daily and over time.
Cleaning Methods
Regular cleaning prevents grime from building up on your splashback. Use a soft cloth or sponge with warm, soapy water to wipe down the surface after cooking. Avoid abrasive cleaners or scouring pads, as they can scratch or dull the finish.
If you notice stubborn stains, try a mixture of baking soda and water. Gently rub the paste onto the spot, then rinse thoroughly. For glass or stainless steel splashbacks, a vinegar solution can work wonders without leaving streaks.
Preventing Damage
Think about what might harm your splashback before it happens. Hot pans or utensils placed directly against the surface can cause burns or discoloration. Use heat-resistant mats or trivets to protect the area.
Sharp objects can chip or scratch the tiles or panels. Keep knives and metal tools away from the splashback to avoid accidental damage. Also, be mindful when using strong chemical cleaners, as they might erode certain finishes.
Long-term Care
Have you checked your splashback for loose tiles or peeling edges recently? Small issues can become bigger problems if ignored. Repair any damage promptly to prevent moisture from seeping behind the tiles.
Sealing your splashback tiles periodically can add an extra layer of protection against stains and water damage. Follow the manufacturer’s recommendations on sealing frequency and products. This simple step can keep your splashback looking fresh for years.
Cost Considerations And Budgeting
Understanding the costs involved in covering kitchen tiles with a splashback helps plan your budget well. Costs vary based on materials, labor, and installation choices. Careful budgeting avoids surprises and ensures a smooth project.
Material Costs
Material prices differ widely by type and quality. Glass splashbacks tend to cost more than acrylic or laminate. Stone and ceramic options may also raise the budget. Consider durability and style when choosing materials. Some materials need extra preparation, adding to expenses.
Labor Expenses
Labor costs depend on complexity and location. Skilled tradespeople charge more for precise work. Removing old tiles or preparing surfaces adds time and cost. Working around outlets and corners increases labor fees. Always ask for a detailed quote before starting.
Diy Vs Professional Installation
DIY saves money but needs skill and time. Mistakes can lead to higher costs later. Professionals offer faster, cleaner results with warranties. They handle tricky cuts and fitting easily. Balance your skill level and budget to decide the best path.

Credit: www.tilegiant.co.uk
Design Ideas To Complement Kitchen Style
Designing a kitchen splashback offers a chance to elevate your kitchen style. It can enhance the room’s look while protecting your walls. Choosing the right splashback design creates harmony with existing tiles and fixtures. Consider colors, textures, and materials that suit your kitchen’s vibe.
Color Matching
Matching splashback colors with kitchen tiles helps achieve a balanced look. Select shades that blend or contrast gently for visual interest. Neutral tones create calm, while bright colors add energy. Use a color wheel to find complementary hues. This approach ties the splashback to cabinets, countertops, and appliances.
Textured And Patterned Splashbacks
Textures and patterns add depth to kitchen walls. Subway tiles with grout lines offer subtle texture. Patterned tiles bring character and can serve as a focal point. Choose simple patterns for small spaces to avoid clutter. Raised or 3D tiles create a tactile experience. These options work well over plain kitchen tiles.
Mixing Materials
Combining different materials creates a unique kitchen splashback. Glass panels add shine and are easy to clean. Stainless steel provides a modern, industrial feel. Natural stone introduces warmth and organic texture. Mix materials carefully to maintain style balance. Using wood or metal accents with tiles can enhance the kitchen’s personality.
Frequently Asked Questions
Can You Install A Splashback Over Existing Kitchen Tiles?
Yes, you can install a splashback over existing kitchen tiles. Proper surface preparation is essential for good adhesion. Clean and dry tiles ensure a secure and durable finish. Splashbacks can refresh your kitchen look without removing old tiles.
What Materials Work Best For Kitchen Splashbacks Over Tiles?
Glass, acrylic, and stainless steel work best as splashbacks over tiles. These materials adhere well and are easy to clean. Choose based on your kitchen style and durability needs. Each offers a smooth, waterproof surface over tiled walls.
Does Covering Tiles With A Splashback Save Renovation Costs?
Yes, covering tiles with a splashback saves renovation costs. It avoids tile removal expenses and reduces labor time. Splashbacks provide a quick and affordable kitchen upgrade. This method is budget-friendly and less disruptive than full remodeling.
How Do You Prepare Tiles Before Adding A Splashback?
To prepare tiles, clean them thoroughly and remove grease or dust. Lightly sand the tile surface to improve adhesive grip. Ensure the wall is dry and free from damage. Proper preparation prevents splashback lifting or bubbles.
Conclusion
Covering kitchen tiles with a splashback can refresh your space easily. It hides old tiles and adds style without heavy work. Choose materials that resist water and heat for best results. Measure carefully to avoid gaps or uneven edges. Simple installation saves time and money.
A splashback also makes cleaning easier in busy kitchens. This update can improve your kitchen’s look quickly. Consider your kitchen’s style before picking a design. Small changes can make a big difference. Try this idea to give your kitchen a fresh feel.