

Is your Kitchen Aid dishwasher acting up again? You don’t have to wait for a costly repair or scramble to find a technician.
Imagine fixing it yourself, saving time and money, and getting your dishwasher running smoothly right away. In this guide, you’ll discover simple, step-by-step tips that anyone can follow. Whether it’s a strange noise, a leak, or dishes that aren’t coming out clean, you’ll learn how to tackle common problems with confidence.
Keep reading, and you’ll be amazed at how easy it is to bring your dishwasher back to life on your own.
Common Dishwasher Issues
Common dishwasher issues can disrupt your kitchen routine. Knowing these problems helps you fix your Kitchen Aid dishwasher yourself. Many problems have simple solutions. This saves time and money on repairs.
Identifying the issue quickly makes repair easier. Some problems affect cleaning. Others stop the dishwasher from starting or cause leaks. Understanding these common faults prepares you for repair.
Water Not Draining
Water may stay in the bottom after a cycle. This happens when the drain hose is clogged or kinked. Food debris can block the filter or drain pump. Check the drain hose for bends or blockages.
- Clean the filter regularly to prevent clogs.
- Remove any debris from the drain area.
- Inspect the drain pump for damage or blockage.
Dishwasher Not Starting
The dishwasher may not start if the door latch is faulty. Power issues can also stop it from working. A blown fuse or tripped circuit breaker might cause this. Test the door latch and electrical connections.
- Ensure the door closes firmly.
- Check the power supply and reset breakers.
- Inspect the control panel for error codes.
Dishes Not Getting Clean
Dirty dishes after a cycle indicate spray arm or detergent problems. Spray arms can get clogged by food particles. Using the wrong detergent or too little detergent also reduces cleaning power.
- Clean spray arms and remove blockages.
- Use dishwasher detergent recommended by Kitchen Aid.
- Load dishes properly for better water flow.
Leaking Problems
Leaks often come from door seals or hoses. Cracked seals or loose connections cause water to escape. Overfilling the detergent or using the wrong type can also cause leaks.
- Inspect door seals for cracks or damage.
- Tighten hose connections securely.
- Use correct detergent amounts.

Credit: www.youtube.com
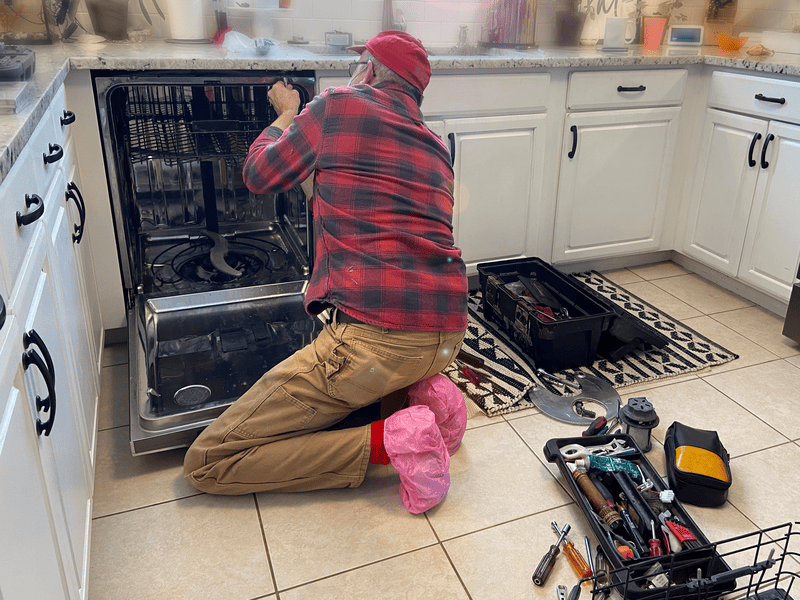
Tools Needed For Repairs
Before diving into fixing your Kitchen Aid dishwasher, gathering the right tools is essential. Having the proper equipment not only makes the repair smoother but also prevents accidental damage. Let’s look at the essential tools you need to tackle common dishwasher issues confidently.
Basic Hand Tools
Start with a reliable set of basic hand tools. These include:
- Phillips and flathead screwdrivers of various sizes
- Adjustable wrench or a set of open-end wrenches
- Pliers, especially needle-nose for tight spots
- A socket set for bolts and nuts
These tools cover most mechanical tasks like removing panels or tightening connections. I once fixed a leaking hose by simply tightening a clamp with pliers. Small tools can make a big difference in your repair success.
Multimeter Usage
A multimeter is invaluable for diagnosing electrical issues inside your dishwasher. It measures voltage, resistance, and continuity, helping you pinpoint faulty components like heating elements or door switches.
If you’ve never used one, start by testing simple circuits for continuity. For example, checking if the dishwasher’s door latch is sending the right signal can save you hours of guesswork. Do you know how to interpret those readings? Learning this skill turns guesswork into clear decisions.
Replacement Parts Guide
Knowing which parts to replace is as important as having the tools. Common components that might need swapping include:
| Part | Common Issue | Tip |
|---|---|---|
| Door Seal | Leaks and water pooling | Check for cracks or warping before replacing |
| Heating Element | Dishwasher not drying or heating | Use a multimeter to test for continuity |
| Water Inlet Valve | Dishwasher not filling | Look for blockages or electrical faults |
Ordering exact replacement parts matched to your model number prevents compatibility headaches. Have you already checked your dishwasher’s manual or model online? This small step saves you from costly returns and delays.
Fixing Water Drainage Problems
Water drainage problems in your Kitchen Aid dishwasher can stop it from working properly. Standing water at the bottom is a common sign. Fixing drainage issues yourself saves time and repair costs. Start by checking the main parts that handle water flow. Clearing blockages is often the key.
Clearing The Drain Filter
The drain filter traps food particles and debris. Over time, it can get clogged and block water flow. Remove the bottom rack to access the filter. Turn the filter counterclockwise and lift it out carefully. Rinse the filter under running water to remove all debris. Use a soft brush for stubborn dirt. Place the filter back and lock it securely. Regular cleaning prevents drainage problems.
Unclogging The Drain Hose
The drain hose carries water from the dishwasher to the sink drain. It can get kinked or clogged with debris. Locate the hose behind or under the dishwasher. Disconnect the hose carefully and check for blockages. Run water through the hose to flush out dirt. Use a flexible brush if needed to clear stubborn clogs. Reconnect the hose properly to avoid leaks. Make sure the hose is not bent or twisted.
Checking The Drain Pump
The drain pump pushes water out of the dishwasher. It may fail due to debris or mechanical issues. Unplug the dishwasher before inspecting the pump. Remove the access panel to reach the drain pump. Check for any objects stuck in the pump impeller. Clear any debris carefully to avoid damage. Test the pump by rotating the impeller manually. If the pump is noisy or won’t spin, it may need replacement. A working drain pump is crucial for proper drainage.

Credit: m.youtube.com
Resolving Power And Start Issues
Troubleshooting dishwasher start problems often involves checking power sources and door latches. Simple fixes like resetting the control panel or cleaning contacts can restore function quickly. Understanding common issues helps save time and avoid costly repairs.
Resolving power and start issues in your KitchenAid dishwasher can seem daunting. Yet, with a little guidance, you can handle it yourself. This step-by-step guide will help you address common problems. We will explore the door latch, control panel, and fuses. Each part plays a key role in the dishwasher's operation. Let's dive in.
Inspecting The Door Latch
A faulty door latch can prevent your dishwasher from starting. First, check if the door closes properly. It should click into place. If not, the latch might be misaligned or broken. Open and close the door several times. Listen for the click sound. A damaged latch often requires replacement. Ensure the latch is clean and free from debris. This can hinder proper closure.
Testing The Control Panel
The control panel manages all dishwasher functions. If it malfunctions, the dishwasher might not start. Inspect the panel for visible damage. Check for loose or unresponsive buttons. Press each button individually. Observe if any feel stuck or unresponsive. If the panel is faulty, consider replacing it. A new panel can restore normal operation.
Replacing Faulty Fuses
Fuses protect the dishwasher from electrical surges. A blown fuse can stop the dishwasher from starting. Locate the fuse box in the dishwasher. Refer to your manual for its exact location. Check each fuse for damage. A blackened or broken fuse needs replacing. Use the correct fuse type for your model. This ensures safety and proper function.
Improving Cleaning Performance
Improving your Kitchen Aid dishwasher’s cleaning performance can save time and enhance results. Many cleaning issues come from simple problems. Addressing these can restore your dishwasher’s efficiency without costly repairs.
Cleaning Spray Arms
Spray arms distribute water to clean dishes. Over time, they can clog with food or mineral deposits. Remove the spray arms and check for blockages in the holes. Use a toothpick or small brush to clear any debris. Rinse the arms under running water before reinstalling. Clean spray arms ensure strong water flow and better cleaning.
Checking Water Inlet Valve
The water inlet valve controls water entering the dishwasher. If it is partially blocked or faulty, water flow may be weak. Inspect the valve for dirt or damage. Clean the valve screen gently to remove buildup. Replace the valve if it shows signs of wear. Proper water flow is vital for effective washing cycles.
Using The Right Detergents
Detergents affect cleaning power and dishwasher health. Use detergents designed for dishwashers only. Avoid too much detergent, which can leave residue. Choose detergents that work well in your water type—hard or soft. Check detergent expiration dates and store them properly. Correct detergent use helps remove stains and prevents buildup inside the machine.
Stopping Leaks Effectively
Stopping leaks in your Kitchen Aid dishwasher saves water and prevents damage. Leaks often happen around the door area and connections. Fixing these leaks yourself is possible with the right approach. Focus on common leak sources like door seals, loose fittings, and worn gaskets.
Examining Door Seals
Door seals keep water inside the dishwasher during cycles. Dirt or damage on these seals causes leaks. Carefully open the dishwasher door and inspect the rubber seal. Look for cracks, tears, or hardened spots. Clean the seal with a damp cloth to remove debris. Replace the seal if it shows visible damage or does not fit tightly.
Tightening Loose Connections
Water leaks often come from loose hose connections. Check the hoses under the sink and behind the dishwasher. Use a wrench to tighten any loose nuts or clamps. Be careful not to overtighten and damage the fittings. After tightening, run a short cycle and watch for leaks. Repeat the process if you still see water escaping.
Replacing Worn Gaskets
Gaskets help seal joints and prevent leaks. Over time, gaskets become brittle and crack. Remove the old gasket by gently pulling it away from the dishwasher. Clean the area before fitting a new gasket. Make sure the new gasket fits perfectly and sits flush. This simple replacement stops leaks and improves dishwasher performance.
Preventive Maintenance Tips
Preventive maintenance keeps your Kitchen Aid dishwasher running smoothly. Small, regular actions stop big problems. It saves money and time on repairs.
Simple steps help avoid breakdowns and extend your dishwasher’s life. Follow easy tips to maintain performance and cleanliness.
Regular Cleaning Schedule
Clean your dishwasher at least once a month. Remove food debris from filters and spray arms. Wipe door seals and edges to stop mold growth.
Use dishwasher cleaner to remove buildup inside. Run an empty cycle with vinegar or baking soda for fresh results. Regular cleaning keeps your dishwasher efficient and fresh.
Inspecting Parts Periodically
Check key parts regularly for wear and tear. Look at hoses, spray arms, and racks. Tighten loose screws and replace damaged seals.
Inspect the detergent dispenser and drain for blockages. Early spotting of issues prevents costly repairs. Keep parts in good shape to ensure smooth operation.
Avoiding Common Mistakes
Do not overload the dishwasher. Overloading blocks water flow and reduces cleaning power. Avoid using too much detergent to prevent residue buildup.
Do not use regular dish soap inside the dishwasher. It creates excess suds and causes leaks. Make sure to scrape dishes before loading to avoid clogging filters.
Credit: www.homeserve.com
Frequently Asked Questions
How Do I Troubleshoot A Kitchenaid Dishwasher Not Draining?
First, check and clean the dishwasher filter and drain hose. Remove any debris blocking water flow. Inspect the drain pump for damage or clogs. Reset the dishwasher by turning off power for a few minutes. If the issue persists, consider professional repair.
What Tools Are Needed For Kitchenaid Dishwasher Repair?
Common tools include a screwdriver set, multimeter, pliers, and a socket wrench. A flashlight helps inspect hard-to-see parts. Having a replacement part, like a door seal or pump, may be necessary. Always unplug the dishwasher before starting repairs.
How Can I Fix A Kitchenaid Dishwasher That Won’t Start?
Check if the door latch is properly closed. Inspect the power supply and circuit breaker. Test the control panel buttons for responsiveness. Reset the dishwasher by unplugging it for a few minutes. If unresolved, the door switch or control board may need replacement.
What Causes A Kitchenaid Dishwasher To Leak Water?
Leaks often come from damaged door gaskets, loose hoses, or clogged filters. Inspect the door seal for cracks or wear. Tighten hose connections and clean filters regularly. Replace faulty parts to prevent water damage. Proper loading also avoids water overflow.
Conclusion
Fixing your Kitchen Aid dishwasher yourself saves time and money. Small problems often have simple solutions. Follow steps carefully and use the right tools. Take safety precautions to avoid accidents. Patience helps when troubleshooting and fixing issues. Regular maintenance keeps your dishwasher working well longer.
You gain confidence by handling repairs on your own. Trust your skills and learn from each attempt. Keep this guide handy for future dishwasher problems. Your effort makes a big difference in appliance care.