
Have extra holes in your kitchen sink that you don’t know what to do with? Those open spots can look messy and even let water leak underneath.
But don’t worry—you don’t have to replace your entire sink to fix this. You’ll discover simple and effective ways to cover those extra holes, saving you time and money. Keep reading to learn easy tricks that anyone can do, even if you’re not a DIY expert.
Your kitchen will look neat and work perfectly again in no time!
Reasons For Extra Holes
Extra holes in your kitchen sink can be confusing and sometimes frustrating. Understanding why these holes exist helps you decide the best way to cover or use them. Let’s look at the common reasons these extra holes appear and what they mean for your kitchen setup.
Common Kitchen Sink Designs
Many kitchen sinks come with multiple holes to allow flexibility in fixture installation. Some sinks have three or even four holes to accommodate a faucet, a soap dispenser, and a sprayer or filtered water tap.
Manufacturers often produce sinks with extra holes to suit different customer needs. This means you might have unused holes if you didn’t add all the accessories. Have you checked if your sink’s extra holes were designed for specific accessories you don’t have yet?
Previous Fixtures And Upgrades
Extra holes can also be leftover from previous fixtures or upgrades. If your kitchen was remodeled, the old faucet or accessories might have used different hole configurations.
People often replace old faucets without patching or covering the unused holes. This leaves visible gaps that can collect dirt or cause water leaks. When was the last time you upgraded your faucet or kitchen accessories? You might be looking at holes from an older setup.
Choosing The Right Cover
Choosing the right cover for extra holes in your kitchen sink can make a big difference in both appearance and functionality. It’s not just about plugging a hole; it’s about finding a solution that blends seamlessly with your kitchen setup. You want something durable, easy to install, and visually pleasing.
Material Options
Sink hole covers come in various materials like stainless steel, plastic, and silicone. Stainless steel covers are popular because they resist rust and match most kitchen sinks. Plastic covers are lightweight and budget-friendly, but they might not last as long.
Silicone covers offer flexibility and can create a tight seal, which is great if you want to prevent water from leaking underneath. Think about how often you use your sink and how much wear and tear the cover will face. Choosing the right material affects how well the cover holds up over time.
Matching Sink Style
Have you noticed how some covers stand out in an awkward way? Matching the cover to your sink’s style is key to a polished look. If you have a modern stainless steel sink, a shiny metal cover will blend in perfectly.
For farmhouse or ceramic sinks, consider covers with a matte finish or colors that complement your sink. Don’t overlook the size and shape either—covers should fit flush without gaps. Picking a cover that looks like it belongs makes your kitchen feel more put together and intentional.
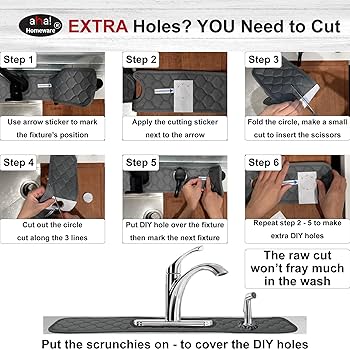
Diy Cover Solutions
Dealing with extra holes in your kitchen sink can seem like an unnecessary hassle, but it doesn't have to be. With a little creativity and some DIY spirit, you can cover those holes in a way that enhances your kitchen's aesthetics. Whether you're looking for a quick fix or a stylish upgrade, there are several solutions you can try at home.
Using Sink Hole Covers
Sink hole covers are the simplest and most effective solution. These covers come in various designs and colors, allowing you to match your kitchen's style effortlessly. Installation is straightforward—just place the cover over the hole and secure it using the provided gasket or nut.
Choose stainless steel or chrome finishes for a sleek, modern look. If you prefer something more subtle, opt for plastic covers that blend seamlessly with your sink. They are inexpensive and available at most hardware stores.
Installing Decorative Caps
Decorative caps offer a chance to add a personal touch to your kitchen. These caps can come in unique designs, such as whimsical shapes or intricate patterns. They not only cover the holes but also serve as a conversation starter among guests.
Consider using caps with built-in features like soap dispensers or small hooks. These add functionality while maintaining an attractive appearance. Installation is as easy as screwing the cap into place, making it a quick DIY project.
Custom Metal Or Silicone Covers
If you have a specific design in mind, custom metal or silicone covers might be your best bet. These covers can be tailored to fit your unique taste and kitchen design. Metal covers offer a robust, durable solution that can withstand daily use.
Silicone covers provide flexibility and are perfect for those who prefer a softer material. They can be molded to fit any sink shape and are often available in vibrant colors. Why settle for standard when you can create a cover that truly represents your style?
Do you have extra holes in your sink that need covering? Why not try one of these DIY solutions? Transform your kitchen while keeping it functional and stylish.
Professional Cover Options
Professional cover options offer a polished and durable solution to hide extra holes in your kitchen sink. These choices not only enhance the sink’s appearance but also maintain its functionality. If you want a seamless look without DIY guesswork, turning to experts and custom solutions can make all the difference.
Custom Sink Replacement
Replacing your sink with a custom model tailored to your needs can completely eliminate unwanted holes. Custom sinks are designed to match your countertop and faucet setup perfectly, avoiding unnecessary cutouts. Imagine having a sink that fits your kitchen layout exactly, without extra holes to cover.
Materials like stainless steel, granite composite, or fireclay can be selected based on your style and durability preferences. Custom sinks often come with options for additional features like integrated cutting boards or extra drain areas. This way, you get both function and a flawless finish.
Professional Installation Services
Hiring a professional installer ensures the cover or replacement is done precisely and securely. Experts have the right tools and experience to handle tricky measurements and sealant applications that prevent leaks. They can also advise on the best cover materials and designs for your specific sink model.
Professional services often include warranty coverage, giving you peace of mind about the longevity of the repair. What’s more, they save you time and potential frustration from trial-and-error attempts. If you want a quick, reliable fix that looks great, their skills are invaluable.
Tools And Materials Needed
Covering extra holes in your kitchen sink requires the right tools and materials to achieve a clean, professional look. Having everything ready before you start will save you time and prevent frustration. Let’s go over what you’ll need so you can tackle the job confidently.
Basic Tools For Installation
- Screwdriver:Essential for removing any existing fixtures and securing covers.
- Measuring Tape:Accurate measurements help you choose the right size cover plates.
- Utility Knife:Useful for trimming sealant or caulking if needed.
- Putty Knife:Helps to scrape off old sealant and smooth surfaces.
- Adjustable Wrench:Needed for loosening or tightening nuts under the sink.
- Caulking Gun:Required if you plan to seal around the cover for waterproofing.
Having these basic tools on hand makes the process smoother. I once started covering holes without a putty knife and struggled with removing old sealant. It’s a small detail but made a big difference once I had the right tool.
Recommended Materials
- Sink Hole Cover Plates:Available in various sizes and finishes like stainless steel or plastic to match your sink.
- Silicone Caulk:Provides a waterproof seal around the cover plate, preventing water from leaking.
- Plumber’s Putty:Useful for sealing the edges of the cover plate to the sink surface.
- Cleaning Supplies:Rubbing alcohol and cloths to clean the area before installation.
Choosing the right material depends on your sink style and the look you want. Have you ever picked a cover plate that didn’t match the sink finish? It can stand out awkwardly, so take a moment to compare options. Clean the surface thoroughly before applying any sealant; this small step ensures better adhesion and a longer-lasting fix.
Credit: www.amazon.com
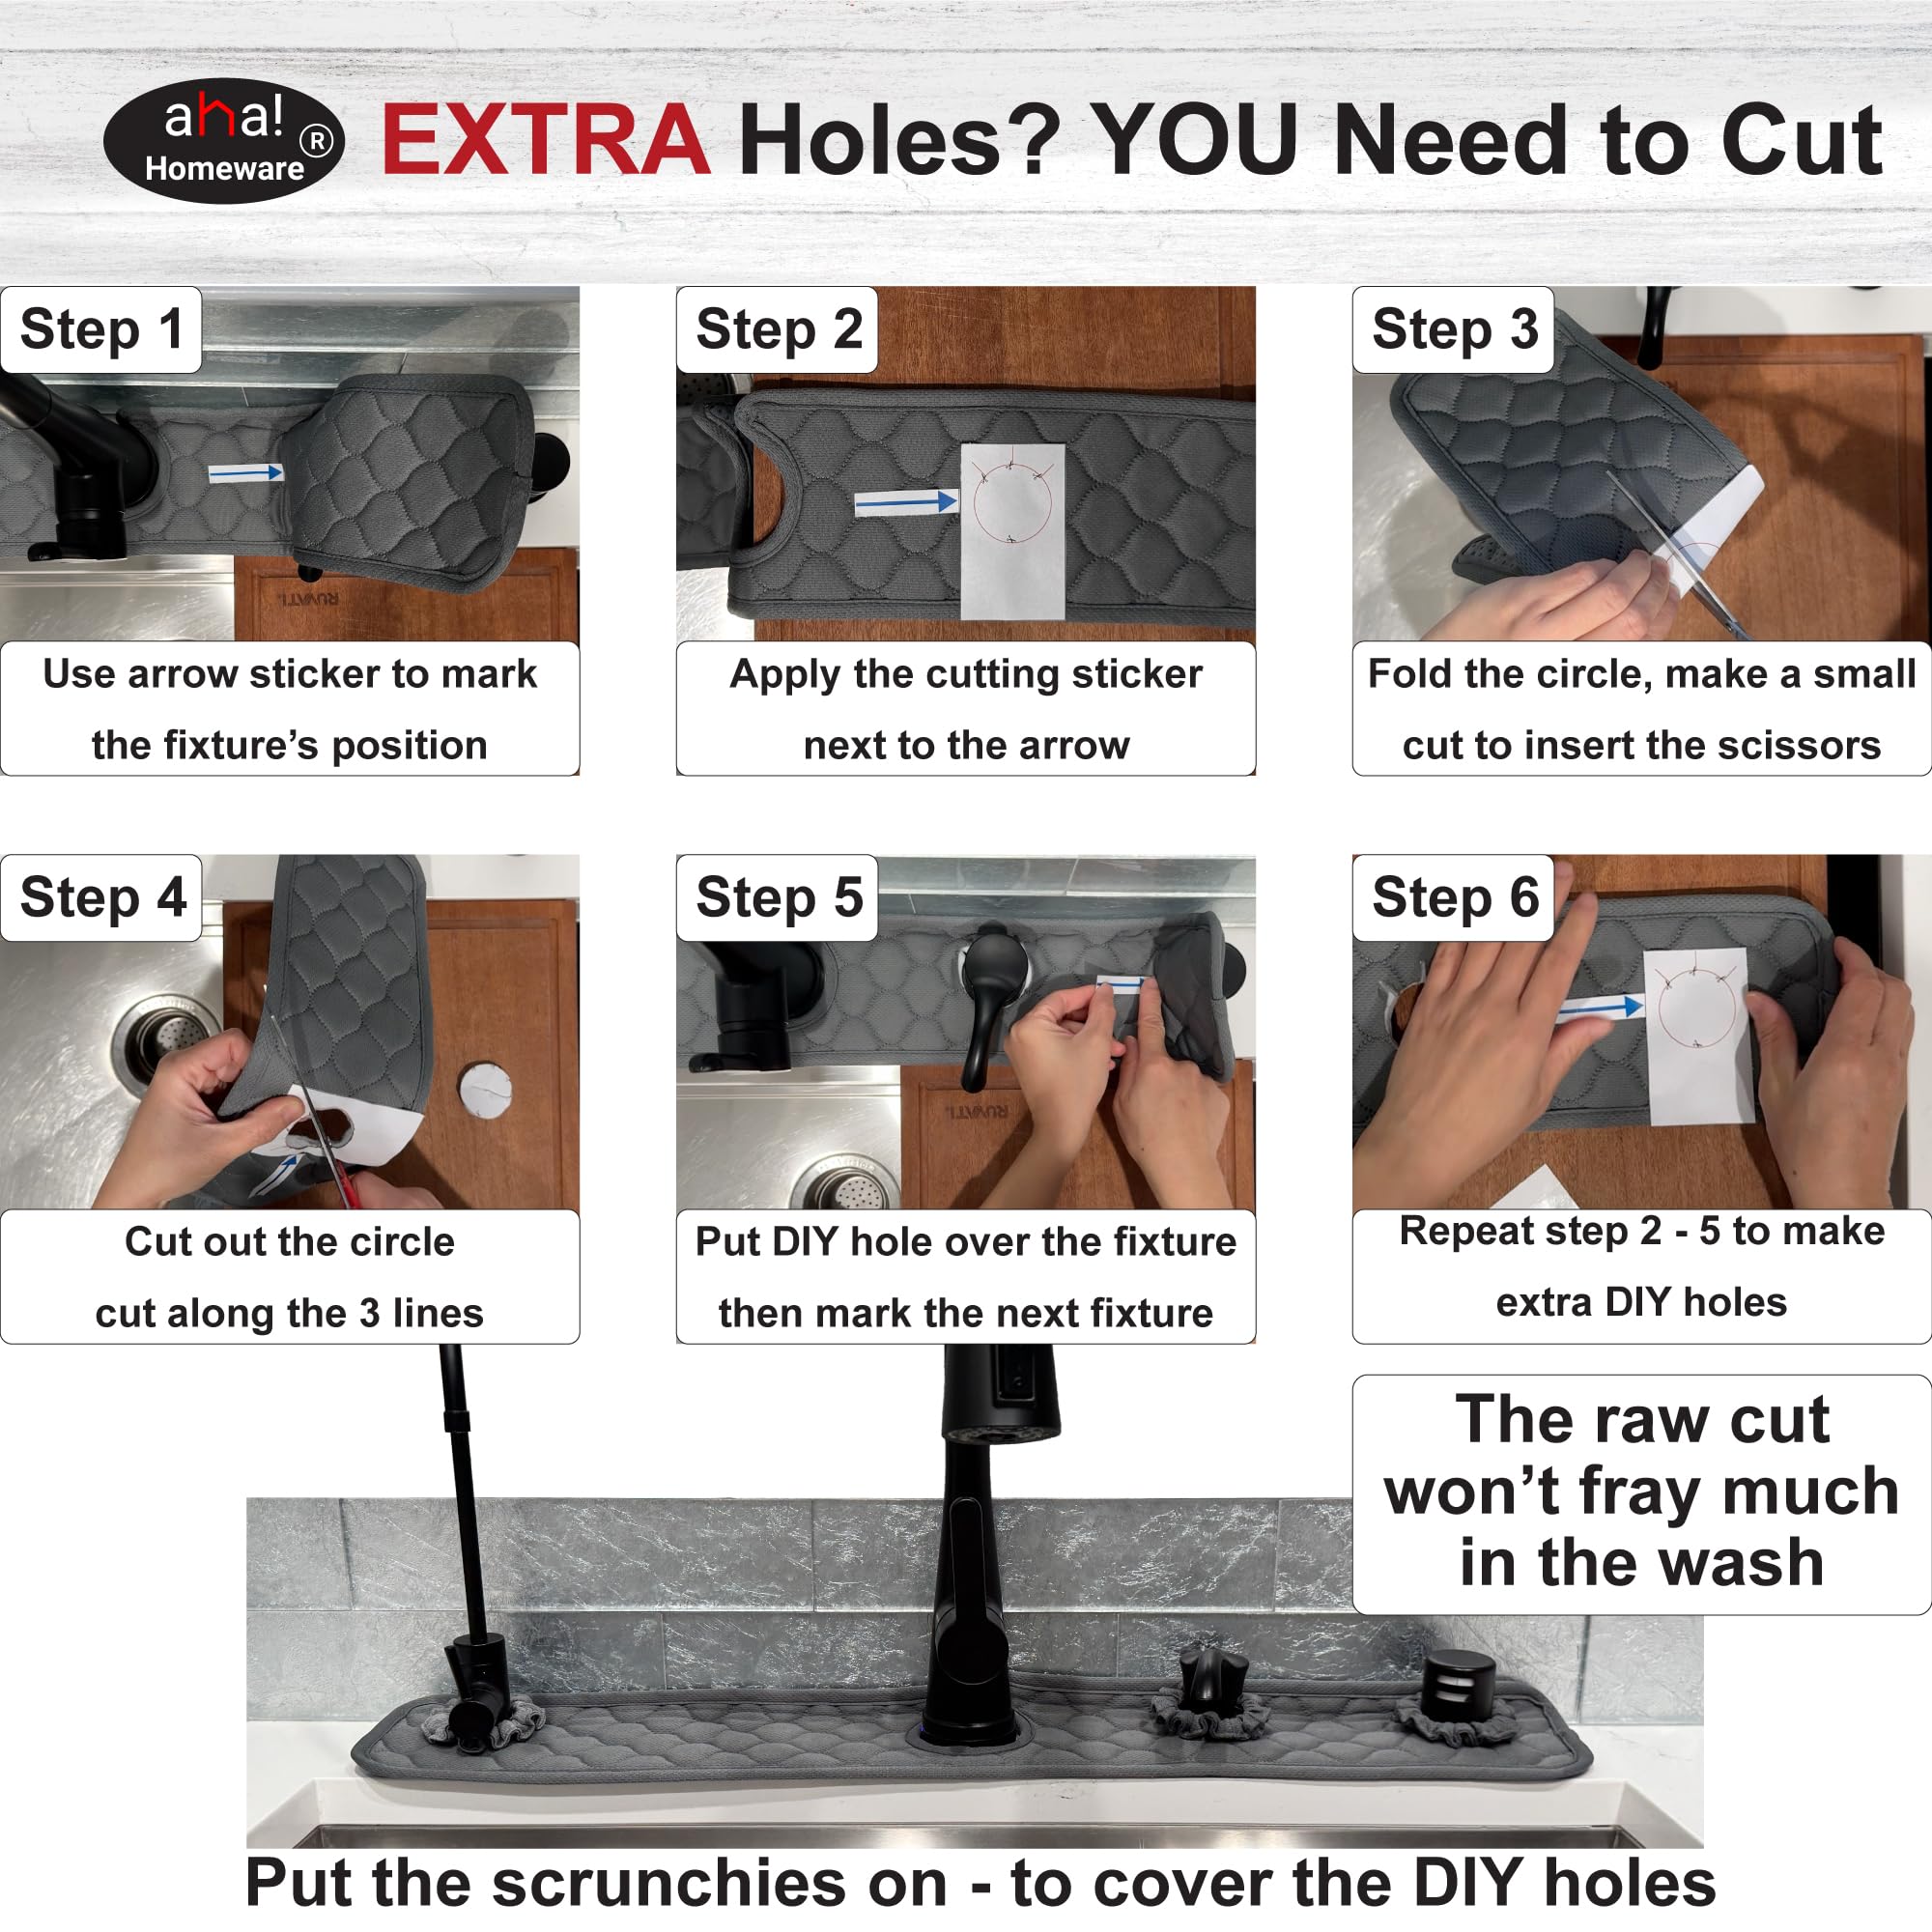
Step-by-step Installation Guide
Covering extra holes in your kitchen sink can improve both the look and functionality of your space. A clear installation process makes this task straightforward, even if you’re not a seasoned DIYer. Here’s a step-by-step guide to help you get a perfect fit and finish.
Preparing The Sink Surface
Start by cleaning the sink surface around the extra holes thoroughly. Use a mild detergent and a sponge to remove grease, dirt, and debris. Dry the area completely to ensure the cover will stick properly.
Next, check for any rust or damage near the holes. Sand lightly if needed to create a smooth surface. This step is crucial because a clean and smooth area helps the cover sit flush and prevents future leaks.
Fitting The Cover
Choose a cover that matches your sink’s material and hole size. Place it over the hole to test the fit before applying any sealant. Does it sit evenly without wobbling? This quick check saves you from redoing the work later.
Secure the cover by tightening any screws or clamps that come with it. If your cover uses adhesive, press it firmly onto the surface and hold it for a minute or two. A snug fit ensures the cover won’t shift during use.
Sealing And Finishing Touches
Apply a waterproof silicone sealant around the edges of the cover. Use a small bead and smooth it out with your finger or a sealant tool for a clean look. This step keeps water from seeping under the cover and causing damage.
After sealing, let it cure according to the product instructions—usually a few hours. Avoid using the sink in this time to ensure the seal sets properly. Once dry, test by running water over the area to confirm it’s watertight.
Maintenance Tips
Maintaining the covers you use to fill extra holes in your kitchen sink is key to keeping your workspace looking neat and functioning well. Proper care ensures these covers last longer and continue to protect against water damage and dirt buildup. Let’s look at some practical tips on how to clean these covers and prevent damage effectively.
Cleaning Covers
Regular cleaning keeps sink hole covers looking fresh and prevents grime from building up around the edges. Use a soft cloth or sponge with mild soap and warm water to wipe the covers gently.
Avoid abrasive cleaners or scrubbers—they can scratch the surface and reduce the cover’s effectiveness. If you notice stubborn stains, soaking the cover in a mixture of vinegar and water for a few minutes can help loosen dirt.
Have you tried wiping the covers after every use? It might seem tedious, but this small habit stops buildup and keeps your kitchen cleaner overall.
Preventing Damage
Protect your sink covers from damage by avoiding placing heavy objects or sharp tools on them. These actions can cause dents or cracks that compromise their sealing ability.
Check the covers periodically for signs of wear or loosening. Tighten or replace them as needed to maintain a secure fit that prevents water from leaking into unwanted areas.
Consider applying a thin layer of food-safe silicone sealant around the edges if you notice minor gaps. This simple step can extend the cover’s lifespan and improve water resistance.

Credit: www.homehardware.ca

Credit: www.amazon.ca
Frequently Asked Questions
How Can I Cover Extra Holes In My Kitchen Sink?
You can cover extra holes using sink hole covers or decorative plugs. These fit into unused holes, providing a clean look. They are inexpensive, easy to install, and come in various finishes to match your sink.
What Materials Are Best For Sink Hole Covers?
Stainless steel, silicone, and plastic are popular materials for sink hole covers. Stainless steel offers durability and matches most sinks. Silicone provides flexibility and a tight seal. Plastic is budget-friendly and comes in many colors.
Can I Install A Soap Dispenser In Extra Sink Holes?
Yes, many extra sink holes are designed for soap dispensers. Installing one utilizes the hole effectively and adds convenience. Ensure the dispenser size matches the hole diameter for a secure fit.
Are Sink Hole Covers Waterproof And Easy To Clean?
Most sink hole covers are waterproof and designed for easy cleaning. Materials like stainless steel resist rust and stains. Silicone covers can be wiped clean and prevent water leakage.
Conclusion
Covering extra holes in your kitchen sink does not have to be hard. Simple tools and materials can do the job well. Choose the right cover that fits your sink perfectly. Take your time to install it carefully for a neat look.
This small fix keeps your kitchen clean and tidy. A well-covered sink looks better and works well. Try these easy steps to improve your kitchen today.