

Your kitchen sponge is one of the dirtiest items in your home, even dirtier than your toilet seat. You use it every day to clean dishes, wipe counters, and soak up spills—but do you know how to keep it truly clean?
If you don’t disinfect your sponge regularly, harmful bacteria can build up and spread germs around your kitchen. You’ll discover simple and effective ways to disinfect your kitchen sponge, protecting your health and making your cleaning routine safer. Keep reading to learn easy tips that will change how you clean forever.
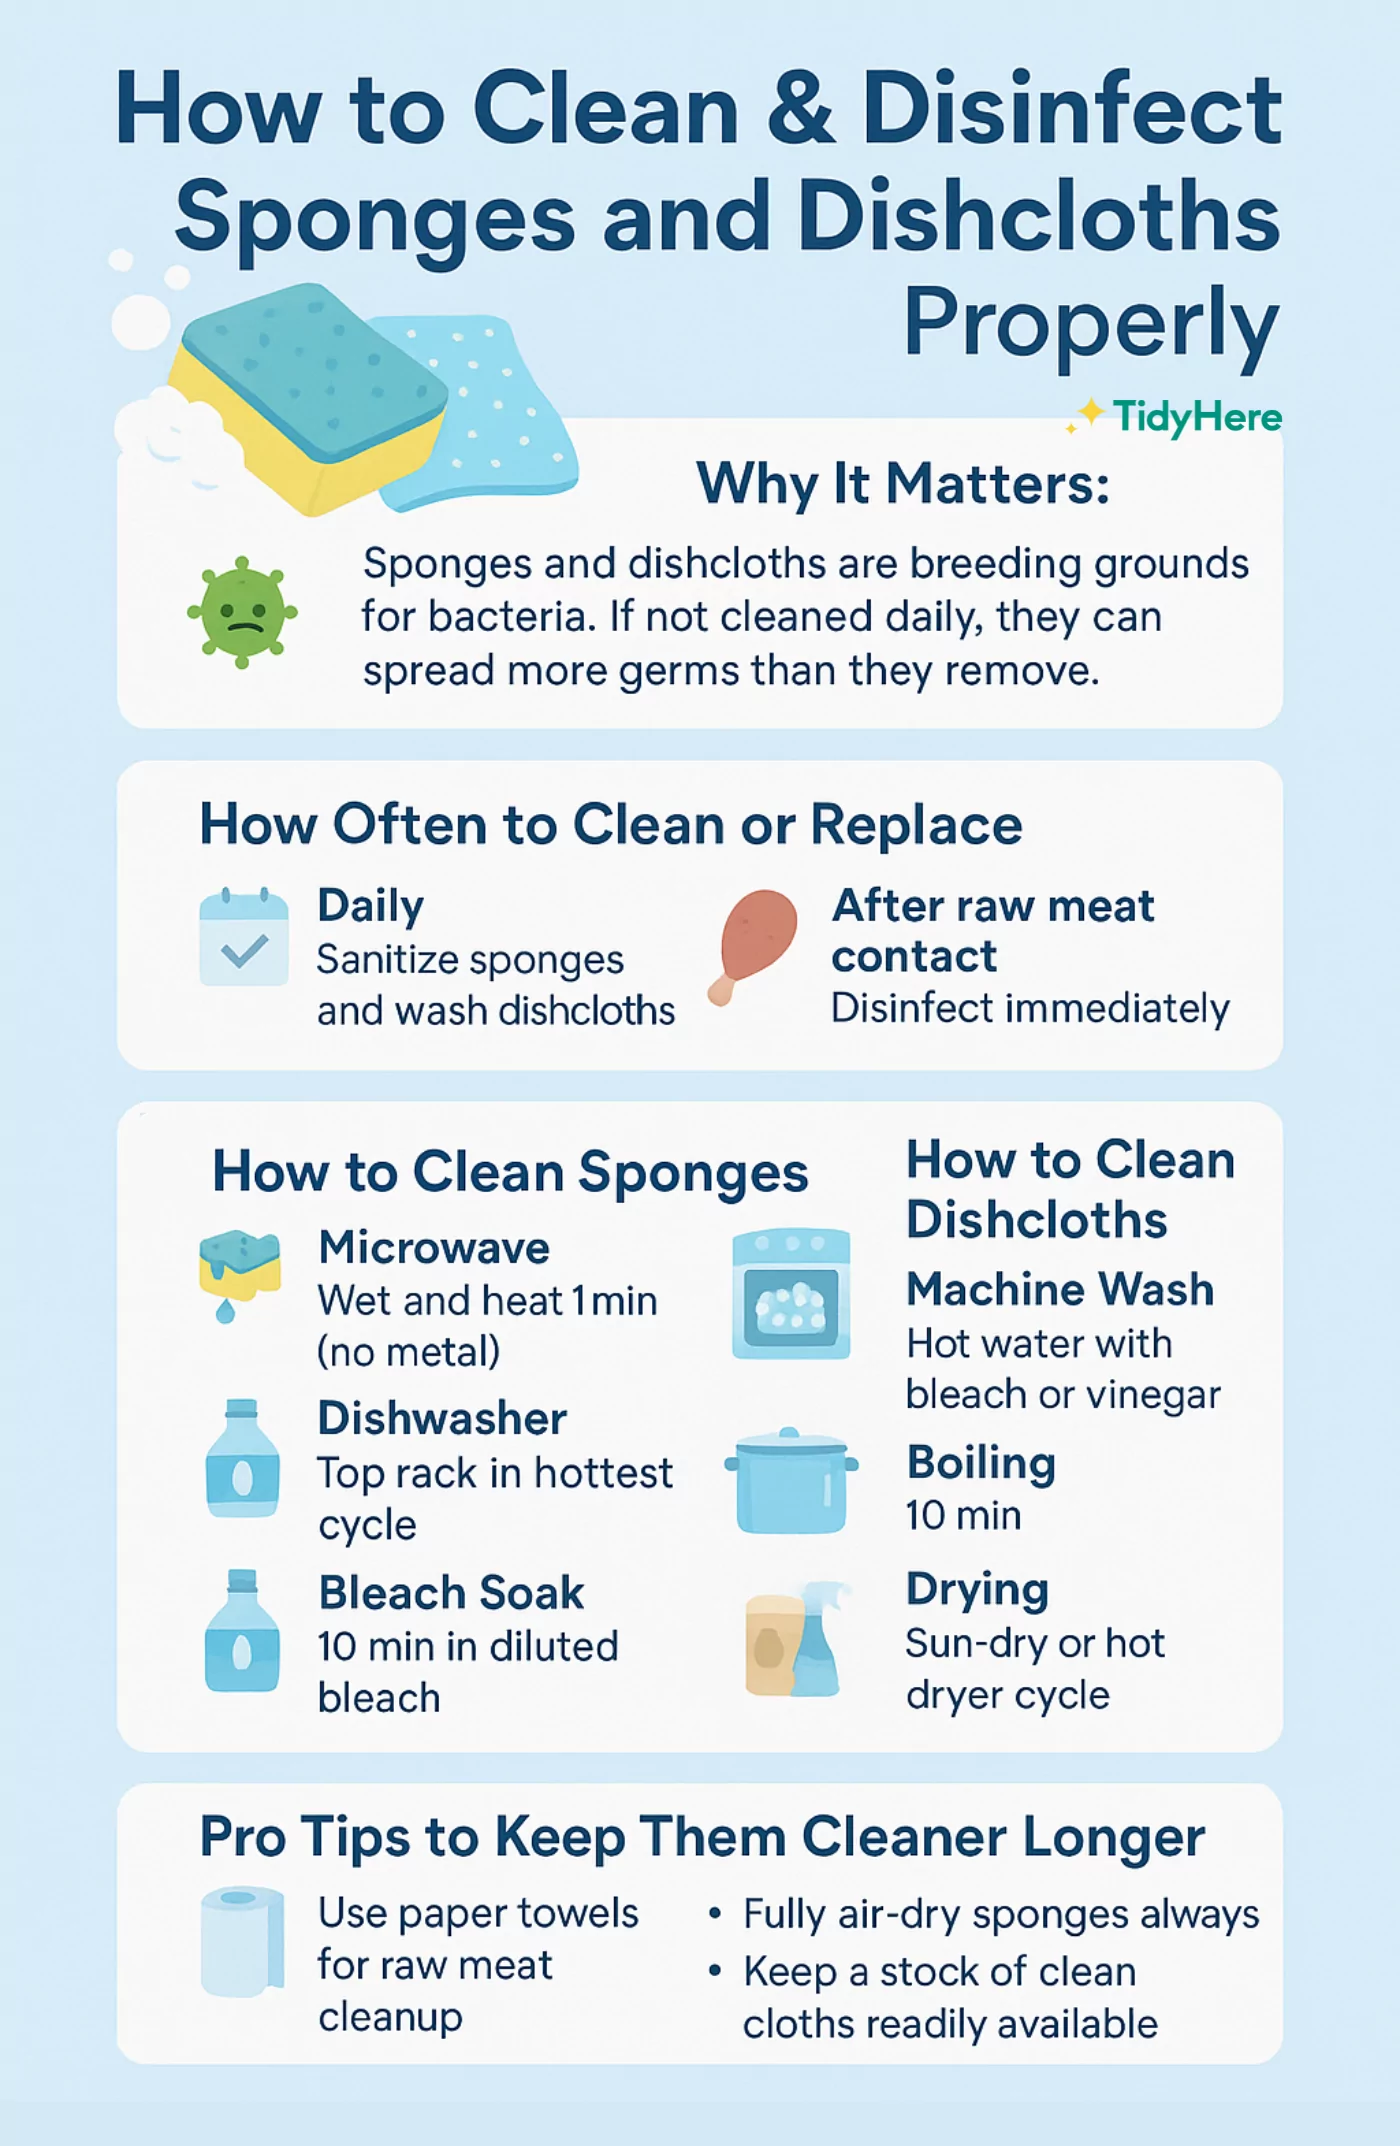
Why Clean Kitchen Sponges Matter
Kitchen sponges are a daily essential in every household. They clean dishes, wipe counters, and soak up spills. Yet, they can become a breeding ground for bacteria. Dirty sponges may spread germs across your kitchen surfaces.
Cleaning kitchen sponges regularly helps keep your home safe. It prevents bad odors and reduces the risk of food contamination. A clean sponge ensures a healthier environment for cooking and eating.
How Sponges Harbor Germs
Sponges stay damp, making them perfect for bacteria growth. Tiny food particles trapped inside feed germs. Warmth and moisture speed up bacteria multiplication. This can lead to harmful microbes living on your sponge.
Health Risks Of Dirty Sponges
Dirty sponges can transfer bacteria to your hands and food. This can cause stomach issues and infections. Children, elderly, and sick people are more vulnerable. Keeping sponges clean helps protect your family’s health.
Signs Your Sponge Needs Cleaning
- Unpleasant or sour smell
- Visible dirt or food residue
- Discoloration or slimy texture
- Spongy material breaking down quickly
Noticing these signs means it’s time to disinfect. Regular cleaning extends sponge life and maintains hygiene.
Credit: tidyhere.com
Signs Your Sponge Needs Disinfecting
Knowing when to disinfect your kitchen sponge can save you from spreading harmful bacteria in your home. Sponges are a breeding ground for germs, especially when they start showing clear signs of wear or odor. Paying attention to these signs helps you keep your kitchen clean and your family safe.
Unpleasant Odor
If your sponge smells bad even after rinsing, it’s time to disinfect it. That foul smell means bacteria and food particles are hiding inside. Don’t ignore it—this odor is a red flag that your sponge is contaminated.
Visible Stains Or Discoloration
Stains or color changes on your sponge often indicate the buildup of grime and bacteria. If you see dark spots or a faded color, it’s a sign the sponge is no longer clean. This visual cue means disinfecting is necessary to avoid cross-contamination.
Reduced Cleaning Performance
When your sponge stops scrubbing effectively or feels slimy, it’s struggling to do its job. This decline often occurs because of bacteria clogging its surface. Disinfecting can restore some of its efficiency, or it might be time to replace it.
Frequent Use With Raw Foods
Do you use your sponge regularly on raw meat or eggs? If yes, disinfect more often. These foods carry harmful pathogens that can multiply quickly in a damp sponge, increasing the risk of foodborne illness.
Time Since Last Disinfection
Even if your sponge looks fine, bacteria can still grow. If it’s been more than a few days since the last cleaning, disinfect it. Regular maintenance keeps your sponge safer and your kitchen healthier.
Microwave Method For Disinfection
Kitchen sponges can harbor harmful bacteria if not cleaned properly. The microwave method offers an easy and effective way to disinfect your sponge. This approach uses heat to kill bacteria, ensuring a safer cleaning tool in your kitchen.
Preparing The Sponge
Start by rinsing the sponge thoroughly. Make sure to remove food particles and excess soap. Squeeze out as much water as possible. The sponge should be damp, not dripping wet. A damp sponge heats more evenly in the microwave.
Microwaving Safely
Place the damp sponge in the microwave. Use a microwave-safe plate to catch any drips. Set the microwave to high power. Heat the sponge for one minute. This is usually enough to kill most bacteria. Always monitor the sponge to prevent overheating.
Cooling Before Use
Once microwaved, allow the sponge to cool. It will be very hot initially. Let it sit in the microwave for a minute or two. This prevents burns and ensures it’s safe to handle. After cooling, the sponge is ready for use. Repeat this process regularly for optimal hygiene.
Credit: household-tips.thefuntimesguide.com
Boiling Water Technique
The boiling water technique is a simple and effective way to disinfect your kitchen sponge without using harsh chemicals. It uses the power of high temperature to kill most bacteria and germs that hide in your sponge. This method is not only easy but also quick, making it a practical choice for busy kitchens.
How To Boil Your Sponge
Start by filling a pot with enough water to fully submerge your sponge. Place the pot on the stove and bring the water to a rolling boil. Once boiling, carefully put your sponge into the pot using tongs or a spoon to avoid burns.
Make sure the sponge is completely underwater so every part gets disinfected. Avoid tossing the sponge in cold water afterward, as this can bring bacteria back. Instead, let it cool naturally in a clean area.
Duration For Effectiveness
Keep your sponge boiling for about 5 minutes to ensure most germs are killed. Less than 3 minutes might not be enough to disinfect thoroughly, while more than 10 minutes could damage the sponge’s material. Timing matters to balance safety and sponge longevity.
Have you ever wondered why some sponges develop a bad smell quickly? It’s often because they aren’t disinfected long enough or frequently enough. Boiling for the right amount of time can help keep your sponge fresh and safe to use for longer.
Using Bleach Solution
Using a bleach solution is one of the most effective ways to disinfect your kitchen sponge. Bleach kills a wide range of bacteria and germs that easily accumulate on sponges after repeated use. Handling bleach safely and preparing the solution correctly can make a big difference in keeping your sponge hygienic without damaging it.
Mixing The Solution
Start by preparing a bleach solution using household bleach and water. The ideal ratio is about 3/4 cup of bleach per gallon of water. This concentration is strong enough to disinfect but gentle enough to avoid breaking down the sponge fibers quickly.
Make sure to mix the solution in a well-ventilated area to avoid inhaling fumes. Use a plastic or glass container—avoid metal, as bleach can corrode it. Have your sponge ready for soaking while you mix.
Soaking Steps
Submerge your kitchen sponge completely in the bleach solution. Let it soak for about 5 minutes to allow the bleach to kill bacteria effectively. Avoid soaking it longer than 10 minutes, as prolonged exposure can degrade the sponge.
While soaking, you might notice a slight bleach smell—this is normal but should not be overpowering. If it feels too strong, reduce the bleach amount slightly next time or ensure better ventilation.
Rinsing Properly
After soaking, rinse your sponge thoroughly under running water. Make sure to squeeze it multiple times to flush out all bleach residues. Any leftover bleach can damage your skin or contaminate food.
Once rinsed, allow the sponge to air dry completely in a clean, dry place. Drying prevents moisture buildup, which can encourage bacterial growth again. How often do you disinfect your sponge to keep your kitchen safe?
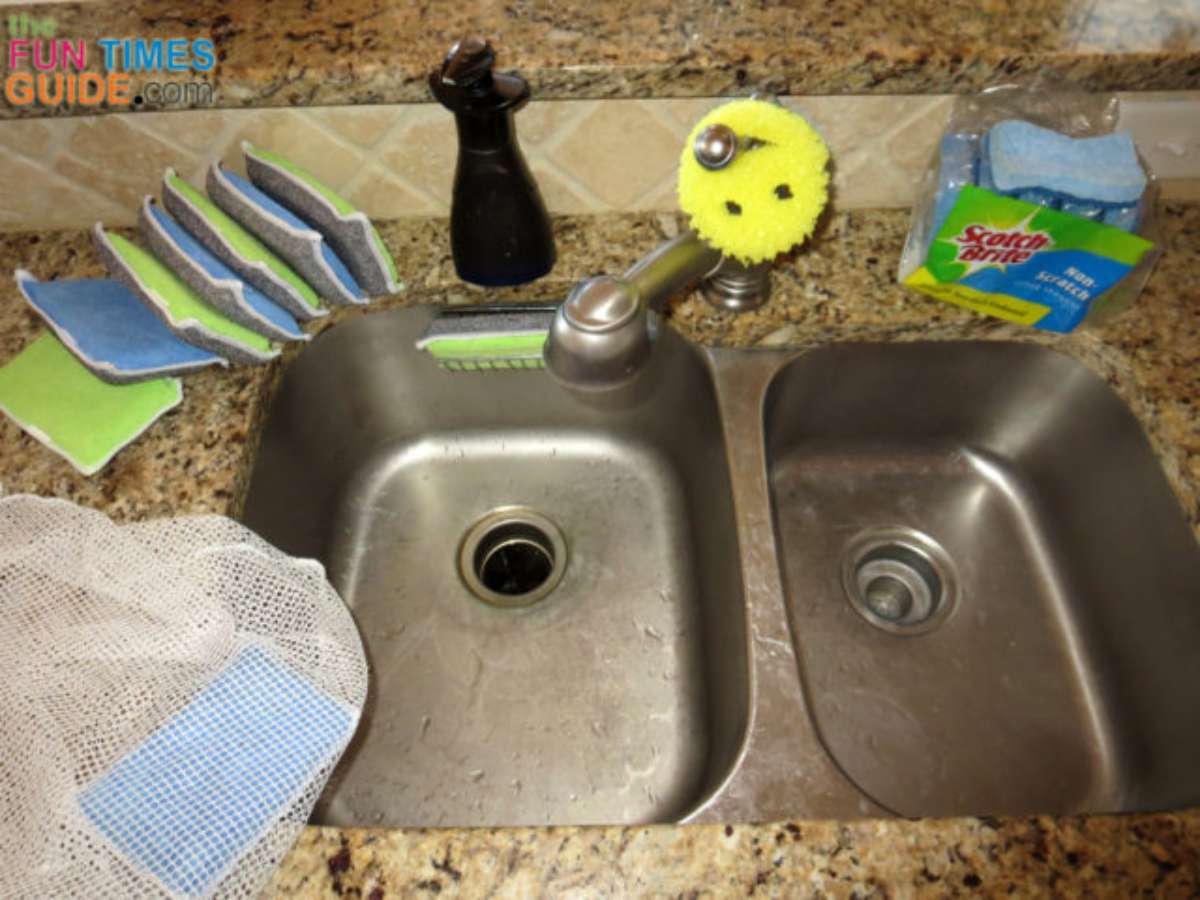
Dishwasher Cleaning Option
The dishwasher cleaning option offers a simple way to disinfect your kitchen sponge. It uses high heat and strong water jets to kill germs effectively. This method is quick and convenient, especially if you run your dishwasher daily. Proper placement and cycle choice ensure the best results.
Placing The Sponge
Put the sponge on the top rack of the dishwasher. Avoid placing it near sharp utensils or heavy pots. Use a small basket or mesh bag to keep the sponge secure. This prevents it from falling or tearing during the wash. Make sure the sponge is wet before placing it inside.
Choosing The Right Cycle
Select a high-temperature or sanitize cycle on your dishwasher. These cycles use hotter water to kill bacteria better. Avoid quick or eco-friendly cycles as they may not heat enough. The sanitize cycle is ideal for killing most germs and odors. Run the dishwasher with detergent for a thorough clean.
Drying Tips To Prevent Bacteria
Keeping your kitchen sponge dry is one of the simplest yet most effective ways to stop bacteria from multiplying. Moist environments are perfect for germs to thrive, so drying your sponge properly can make a huge difference in kitchen hygiene. Let’s look at some practical tips to make sure your sponge dries quickly and stays fresh.
Air-drying Best Practices
After each use, rinse your sponge thoroughly with hot water to remove food particles and soap. Then, squeeze out as much water as possible to speed up drying.
Place your sponge in a spot where air circulates well. A sponge holder with holes or a dish rack near a window can help air flow freely around it. Avoid laying it flat on a countertop since this traps moisture underneath.
Have you noticed that sponges left in a pile or closed containers smell worse faster? That’s because lack of airflow keeps them damp. Try to let your sponge sit in open air between uses—it dries faster and smells better.
Avoiding Damp Storage
Storing your sponge in a damp place, like under the sink or inside a closed cabinet, encourages bacterial growth. These areas are often humid and poorly ventilated.
Instead, keep your sponge in a well-ventilated area where it can dry completely. If space is limited, consider hanging it by a string or placing it on a rack designed for sponges.
Think about how often you check your sponge’s condition. If it stays damp for hours, it’s time to change your drying spot or method. Your kitchen sponge doesn’t need to be a bacteria hotspot—simple drying habits can keep it clean and safe.

Credit: tidyhere.com
How Often To Replace Kitchen Sponges
Kitchen sponges are a hotspot for germs. They soak up food particles and moisture, creating an ideal environment for bacteria. Cleaning a sponge helps, but it does not remove all germs. Replacing sponges regularly is crucial for kitchen hygiene.
Knowing how often to replace your sponge can keep your kitchen safer. It prevents the spread of harmful bacteria. The lifespan of a sponge depends on how often you use it and how well you clean it.
Signs Your Kitchen Sponge Needs Replacement
- Unpleasant smell even after cleaning
- Visible mold or mildew spots
- Spongy texture breaks apart easily
- Stains that do not wash out
- Frequent use in raw meat or fish cleaning
Recommended Time Frame For Replacing Sponges
Replace kitchen sponges every one to two weeks. Sponges used daily should be replaced weekly. Less frequent use allows for a two-week lifespan. This timing reduces bacteria buildup effectively.
Factors That Shorten Sponge Lifespan
- Cleaning raw meat or poultry residues
- Not drying the sponge between uses
- Using the sponge for multiple kitchen tasks
- Improper or no disinfecting
Tips To Extend Sponge Use Safely
- Rinse and squeeze out water after each use
- Disinfect regularly with boiling water or vinegar
- Store sponge in a dry, well-ventilated place
- Use different sponges for different tasks
Eco-friendly Alternatives To Sponges
Eco-friendly alternatives to kitchen sponges reduce waste and protect the environment. These options last longer and are safer for daily use. Choosing sustainable tools helps keep your kitchen clean without harming nature.
Reusable Cloths
Reusable cloths are a smart choice for cleaning dishes and surfaces. They are easy to wash and dry quickly. Made from cotton or microfiber, these cloths can be used many times. Replace cloths regularly to keep them fresh and hygienic. They use less plastic and create less trash than sponges.
Natural Scrubbers
Natural scrubbers come from plants and are biodegradable. Examples include coconut fiber brushes and loofah pads. These scrubbers clean effectively without chemicals or plastics. They break down naturally after use, making them eco-friendly. Natural scrubbers work well for tough stains and delicate items alike.
Frequently Asked Questions
How Often Should I Disinfect My Kitchen Sponge?
Disinfect your kitchen sponge daily or after heavy use. Frequent cleaning prevents bacteria buildup and keeps your sponge safe. Regular disinfection reduces odors and cross-contamination risks in your kitchen.
What Is The Best Method To Disinfect Kitchen Sponges?
Microwave your damp sponge for 1-2 minutes to kill germs effectively. Alternatively, soak it in diluted bleach or vinegar solution. These methods remove harmful bacteria and keep your sponge hygienic.
Can I Use A Dishwasher To Disinfect Sponges?
Yes, placing your sponge in the dishwasher with a heated dry cycle disinfects it. This method uses high temperatures to eliminate bacteria safely and conveniently. It’s an easy way to keep sponges clean regularly.
Is Boiling A Sponge Effective For Disinfection?
Boiling a kitchen sponge for 5 minutes kills most bacteria and germs. This heat method is simple and chemical-free. However, repeated boiling may wear out the sponge faster.
Conclusion
Cleaning your kitchen sponge keeps your space healthy and safe. Regular disinfection stops germs from spreading on dishes. Use simple methods like microwave or vinegar soak often. Replace sponges when they start to smell or tear. A clean sponge helps keep your kitchen fresh daily.
Small steps make a big difference in hygiene. Remember, a clean sponge protects your family’s health. Keep these tips in mind for a safer kitchen.


