
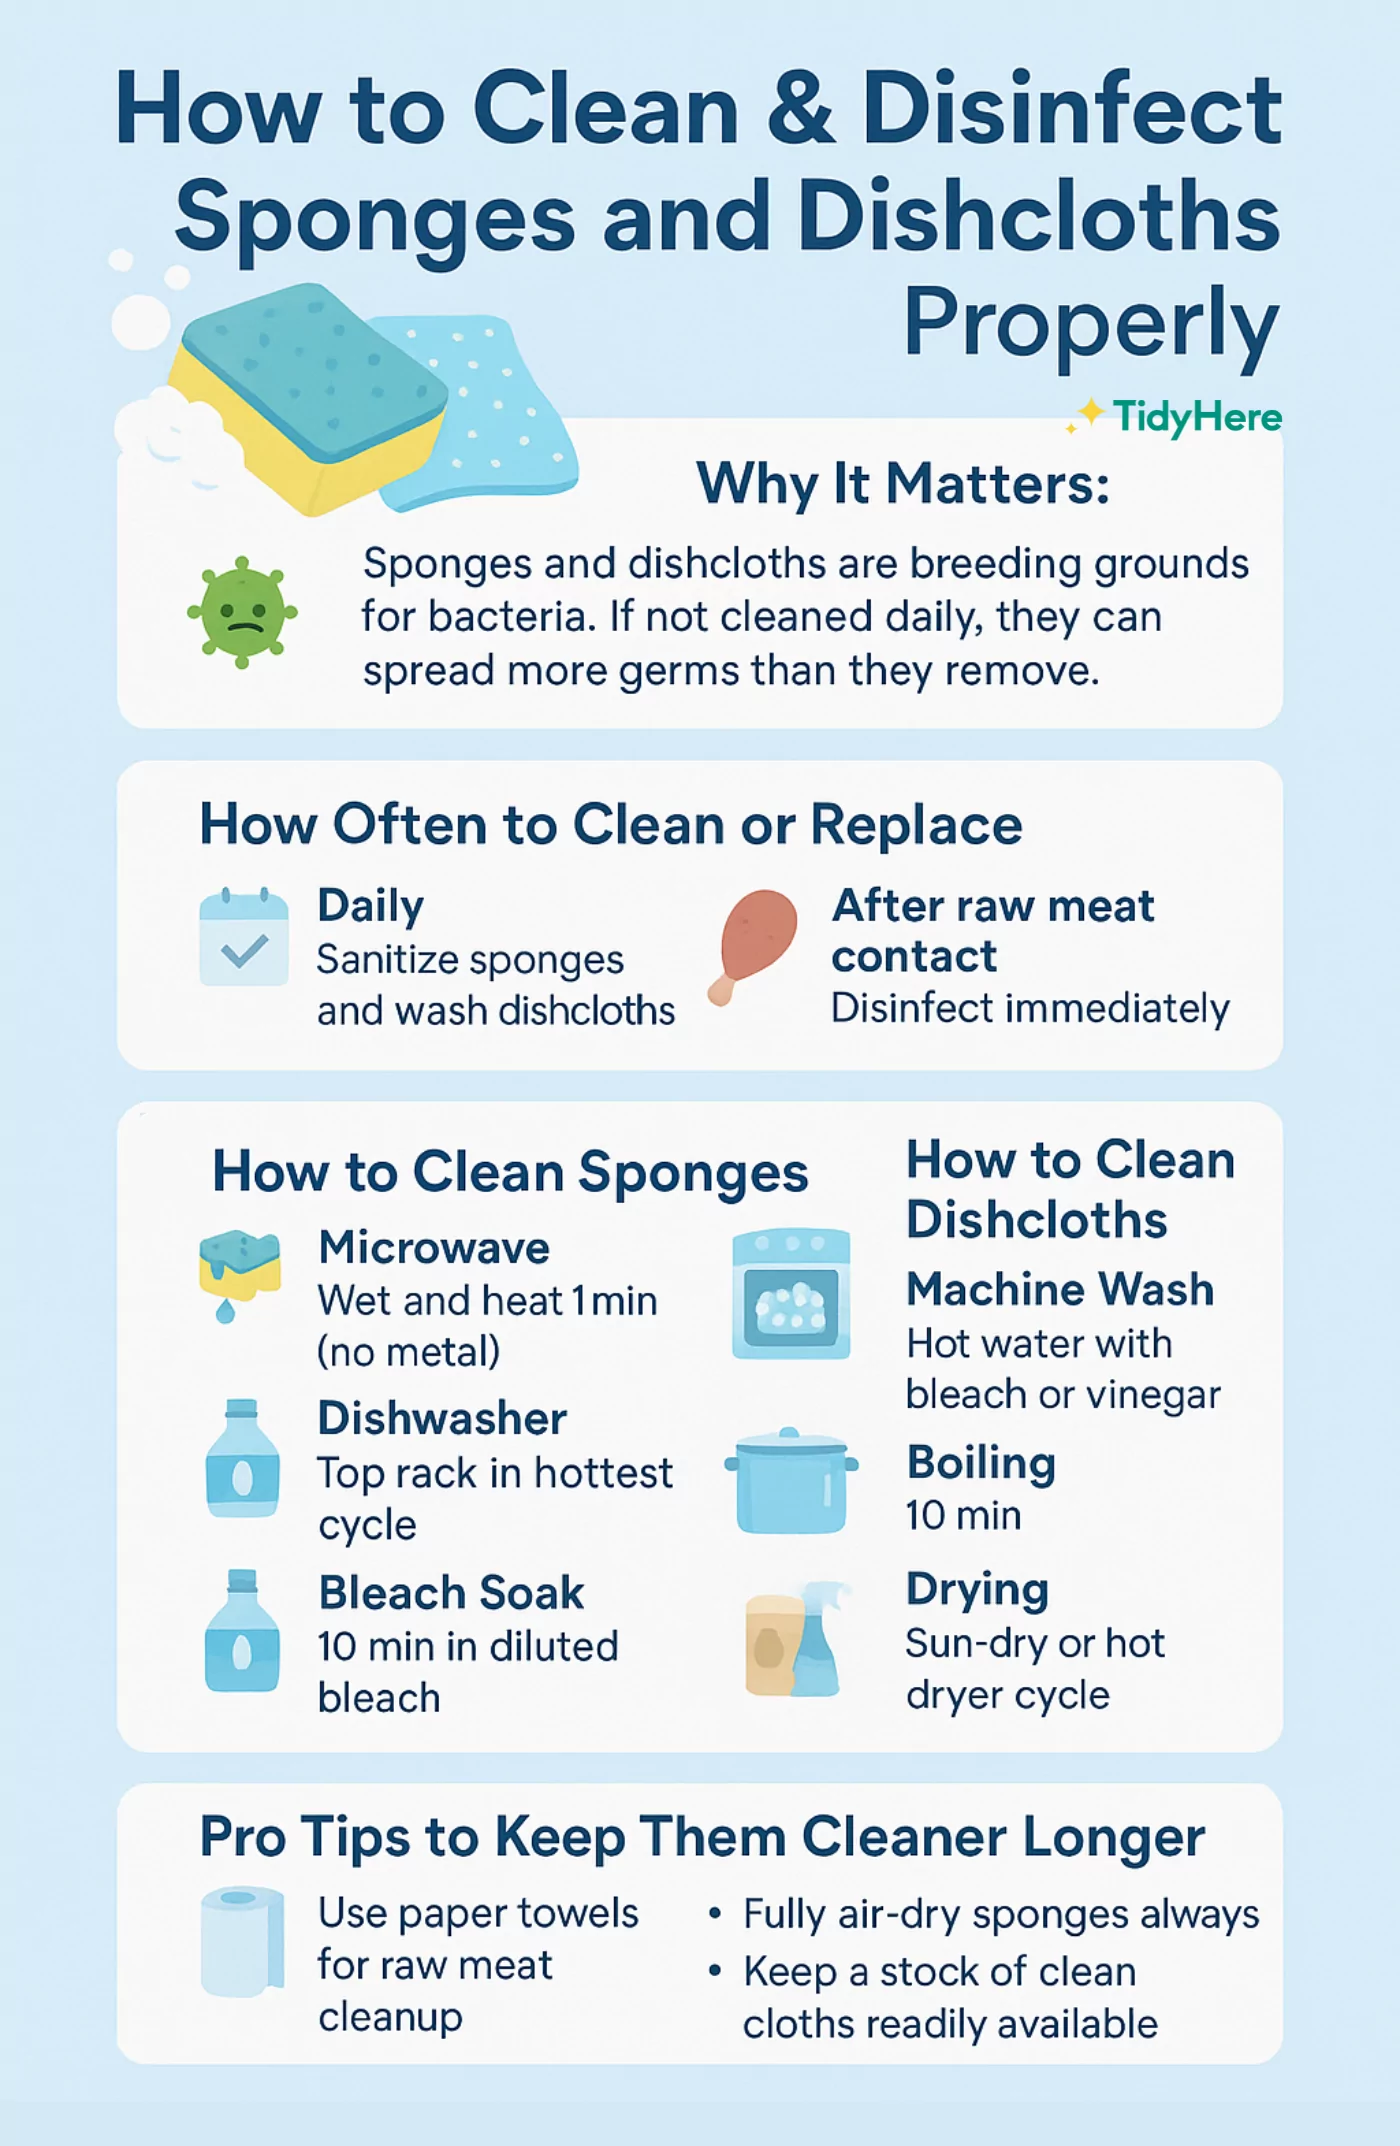
Your kitchen sponge is one of the dirtiest items in your home, even though you use it to clean your dishes and surfaces. If you don’t disinfect it regularly, harmful bacteria can build up and put your health at risk.
But don’t worry—there’s a quick and easy way to kill those germs using something you already have: your microwave. You’ll learn exactly how to disinfect your kitchen sponge safely and effectively. Keep reading to protect your family and keep your kitchen fresh!

Credit: household-tips.thefuntimesguide.com
Why Disinfect Kitchen Sponges
Kitchen sponges are used daily to clean dishes and surfaces. They often hold moisture and food particles. This environment helps bacteria and germs grow quickly. Disinfecting sponges stops harmful microbes from spreading. It keeps your kitchen safer and healthier.
Health Risks Of Dirty Sponges
Dirty sponges carry many germs and bacteria. These microbes can cause food poisoning and infections. Using a contaminated sponge spreads germs to dishes and countertops. This increases the chance of illness for your family. Germs can also cause bad smells and stains in the kitchen.
Benefits Of Regular Disinfection
Regularly disinfecting sponges kills harmful bacteria and viruses. It helps prevent cross-contamination between foods and surfaces. Disinfected sponges last longer and stay cleaner. This reduces the need to replace them often. Cleaning sponges properly supports overall kitchen hygiene and safety.
Microwave Disinfection Basics
Microwaving your kitchen sponge is a quick and effective way to reduce harmful bacteria and keep your kitchen hygienic. Understanding the basics of microwave disinfection helps you use this method safely and effectively. Let’s dive into how microwaves work to kill germs and what precautions you should take before heating your sponge.
How Microwaves Kill Germs
Microwaves generate heat by causing water molecules in the sponge to vibrate rapidly. This heat reaches temperatures that can destroy most bacteria, viruses, and mold living in the sponge’s damp environment.
Because sponges hold moisture, they heat evenly, making microwaving a powerful way to disinfect. However, this method works best when the sponge is wet, as dry sponges can catch fire.
Safety Tips Before Microwaving
- Always soak your sponge with water:A dry sponge can overheat and ignite. Make sure it’s fully saturated before placing it in the microwave.
- Use microwave-safe containers:If you prefer, place the sponge inside a microwave-safe bowl filled with water for extra protection.
- Heat in short intervals:Start with 1-2 minutes and check the sponge. Overheating can damage the sponge or cause fire.
- Handle with care after microwaving:The sponge and container will be hot. Use tongs or wait a few minutes before touching.
- Avoid metal:Never microwave sponges with metallic scrubbers or any metal objects attached.
Have you ever accidentally microwaved a dry sponge? That sharp smell is a warning sign you don’t want to ignore. Taking these safety steps ensures your sponge is sanitized without risking your kitchen’s safety.
Step-by-step Microwave Method
Dampen the kitchen sponge with water to prevent fires. Place it in the microwave and heat on high for two minutes. Let it cool before using to kill most germs and bacteria effectively.
Disinfecting your kitchen sponge using a microwave is a quick and effective way to ensure it stays germ-free. This method leverages the heat from the microwave to kill bacteria and germs lurking in the sponge fibers. Let's dive into the steps for this simple yet powerful cleaning hack.
Preparing The Sponge
Begin by thoroughly rinsing your kitchen sponge under running water. Make sure to squeeze out any food particles or soap residue. A clean sponge will heat evenly and effectively in the microwave. Next, soak the sponge in water until it is fully saturated. This is crucial as a dry sponge can catch fire when microwaved. Consider adding a little lemon juice to the water for a fresh scent and extra antibacterial properties.
Setting Microwave Time And Power
Place the wet sponge on a microwave-safe dish. Ensure the dish is large enough to catch any water that might spill. Set your microwave to high power. Microwave the sponge for about 1 to 2 minutes, depending on your microwave's wattage. Keep an eye on it to avoid overheating. Did you know that microwaving for just one minute can kill 99% of germs? It’s fascinating how such a simple step can make a big difference in your kitchen hygiene.
Cooling Down The Sponge
Once the microwave cycle is complete, carefully remove the dish with the sponge. It will be extremely hot, so consider using oven mitts. Allow the sponge to cool down for a few minutes before handling. The cooling process ensures that the sponge is safe to touch and ready for its next use. Have you ever noticed how a freshly disinfected sponge smells so much better? It’s a small reward for maintaining a clean and safe kitchen environment. By following these steps, you not only prolong the life of your sponge but also contribute to a healthier kitchen. What other kitchen hacks do you use to maintain cleanliness?

Credit: www.absolutesolutions.com.sg
Alternative Disinfection Techniques
Disinfecting your kitchen sponge doesn’t have to rely solely on the microwave. There are several alternative techniques that can be just as effective in killing bacteria and keeping your sponge fresh. These methods offer easy and practical solutions you can try with items you likely already have at home.
Boiling Method
Boiling your sponge in water is a straightforward way to disinfect it. Simply place your sponge in a pot of boiling water for about 5 minutes. This high heat kills most germs without any chemicals involved.
Make sure to fully submerge the sponge to get the best results. After boiling, let it dry completely before using it again to prevent bacteria growth. Have you ever noticed how much fresher a boiled sponge feels compared to a microwave-cleaned one?
Bleach Soak
Bleach is a powerful disinfectant that can sanitize your sponge quickly. Mix one tablespoon of bleach with one gallon of water, then soak your sponge for 5 minutes. This method kills nearly all bacteria and viruses on the sponge.
After soaking, rinse the sponge thoroughly to remove any bleach residue. Use this technique only occasionally to avoid damaging your sponge or exposing yourself to harsh chemicals. Do you feel comfortable handling bleach for kitchen cleaning, or do you prefer gentler options?
Vinegar And Baking Soda
Using vinegar and baking soda together creates a natural, effective disinfectant for your sponge. First, soak your sponge in white vinegar for 5 minutes to break down grime and kill germs. Then, sprinkle baking soda on the sponge and scrub it lightly.
This combination helps deodorize and remove stubborn stains while disinfecting. Rinse well and let the sponge dry completely. Have you tried natural cleaners like this for your kitchen tools before, and how did it work out?
Signs To Replace Your Sponge
Knowing when to replace your kitchen sponge is key to keeping your kitchen clean and safe. Sponges often hide bacteria even after cleaning. Spotting the signs early helps avoid spreading germs on dishes and surfaces.
Wear And Tear Indicators
Check your sponge regularly for visible damage. Look for:
- Frayed or torn edges
- Loss of shape or firmness
- Dark stains or discoloration that won’t wash away
- An unpleasant smell that remains after rinsing
These signs show the sponge is worn out and less effective. It may trap more bacteria, making it unsafe to use.
Frequency Of Replacement
Replace your kitchen sponge often to maintain hygiene. Follow these guidelines:
- Change the sponge every 1 to 2 weeks
- Replace sooner if used for raw meat or heavy cleaning
- Disinfect regularly but do not rely on microwaving alone
Regular replacement reduces bacteria build-up and keeps your kitchen healthier.

Credit: tidyhere.com
Maintaining Sponge Hygiene Daily
Maintaining sponge hygiene daily is key to keeping your kitchen clean and safe. Sponges can harbor bacteria quickly if not cared for properly. Simple daily habits can reduce germs and extend the life of your sponge.
Rinsing And Squeezing
Rinse your sponge thoroughly after each use. Use hot water to wash away food particles and soap. Squeeze out all excess water to keep the sponge dry. A wet sponge is a perfect place for bacteria to grow. Repeat this process every time you finish cleaning.
Storage Tips
Store your sponge in a dry, well-ventilated area. Avoid leaving it in the sink or on wet surfaces. Use a sponge holder that allows air to circulate. This helps the sponge dry faster and reduces bacteria growth. Change your sponge regularly, about every one to two weeks.
Using Sponge Alternatives
Try using alternatives like dishcloths or scrub brushes. These can be easier to clean and dry faster. Microfiber cloths also work well and can be washed often. Using different tools helps reduce the chance of spreading germs in the kitchen.
Frequently Asked Questions
How Long Should I Microwave A Kitchen Sponge?
Microwave the sponge for 1 to 2 minutes on high. Ensure the sponge is wet to avoid fire risk. This time effectively kills most bacteria and germs inside the sponge.
Can Microwaving Damage My Kitchen Sponge?
Microwaving a wet sponge briefly does not usually cause damage. Overheating a dry sponge can melt or catch fire. Always keep the sponge moist before microwaving to prevent damage.
Is Microwaving A Sponge Safe For Kitchen Hygiene?
Yes, microwaving a wet sponge kills harmful bacteria and improves hygiene. It is a quick and effective method to disinfect sponges regularly. However, replace sponges often for best results.
Should I Clean The Sponge Before Microwaving It?
Rinse the sponge thoroughly to remove food particles before microwaving. This helps the microwave disinfect bacteria effectively. Dirty sponges with debris may not sanitize fully.
Conclusion
Disinfecting your kitchen sponge in the microwave is quick and simple. It helps kill germs and keeps your kitchen safe. Make sure the sponge is wet before microwaving to avoid fire risk. Use short intervals and check carefully. Doing this regularly keeps your sponge cleaner and lasts longer.
Clean sponges mean healthier dishes and less bacteria. Try this easy step for a safer kitchen today.