
Have you ever run out of soap in your kitchen sink dispenser at the worst possible moment? It’s frustrating, right?
Knowing how to quickly and correctly fill your soap dispenser saves you time and keeps your kitchen running smoothly. In this guide, you’ll learn simple steps to refill your soap dispenser without any mess or hassle. By the end, you’ll feel confident handling this small but important task, making your daily kitchen routine easier than ever.
Keep reading to discover the easiest way to keep your soap dispenser full and ready whenever you need it.
Credit: naavagreen.com
Choosing The Right Soap
Choosing the right soap for your kitchen sink dispenser is important for easy cleaning and skin care. The type of soap affects how well it works and how long it lasts. Picking soap that fits your needs makes dishwashing more pleasant and efficient.
Liquid Soap Vs. Foam Soap
Liquid soap is thick and easy to pour. It cleans tough grease well. It lasts longer in the dispenser because it is concentrated. Foam soap is lighter and comes out as bubbles. It spreads quickly and rinses off fast. Foam soap uses less product per wash but may not cut heavy grease as well.
Considerations For Kitchen Use
Choose soap that is gentle on hands. Kitchen tasks can dry skin, so mild formulas help. Pick soap with a fresh scent but avoid strong perfumes. Look for antibacterial properties if you want extra cleaning power. Check if the soap works well with your dispenser type. Some soaps clog pumps or do not foam properly.
Preparing The Dispenser
Getting your soap dispenser ready is key to keeping your kitchen sink area clean and functional. Before you add soap, make sure the dispenser is free from old soap residue or dirt. This helps avoid clogs and keeps the soap flowing smoothly every time you press the pump.
Cleaning The Dispenser
Start by rinsing out the dispenser with warm water to remove leftover soap. If you notice any buildup inside, fill the dispenser with a mix of warm water and a few drops of vinegar. Let it sit for 10 minutes, then rinse thoroughly to clear out any stubborn residue.
Dry the dispenser completely before refilling it. Moisture inside can dilute your soap and reduce its effectiveness. Have you ever refilled a dispenser only to find the soap watery and weak? Cleaning beforehand stops that from happening.
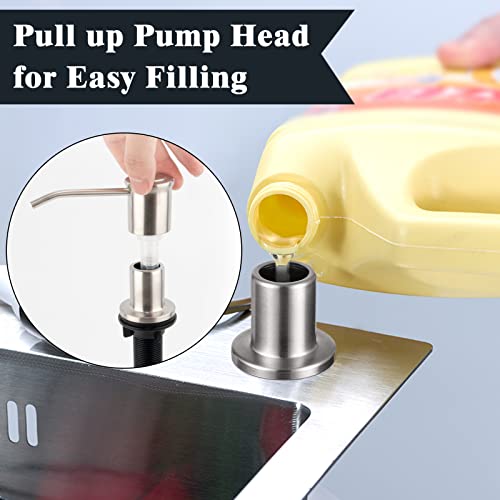
Removing The Pump
Unscrew the pump from the dispenser gently, turning it counterclockwise. If it feels stuck, try twisting it slowly while pulling up. Avoid using excessive force to prevent breaking the pump or dispenser neck.
Once removed, check the pump for soap buildup or blockages. You can clean the pump by soaking it in warm water and pumping the water through to clear any clogs. Keeping the pump clean ensures smooth operation and avoids frustrating soap jams.
Refilling Steps
Refilling your kitchen sink soap dispenser might seem straightforward, but a few careful moves can save you from messy spills and frustration. Knowing the right steps helps you keep your countertop clean and your soap dispenser working efficiently. Let’s break down how to refill it smoothly and avoid common pitfalls.
Filling Without Spills
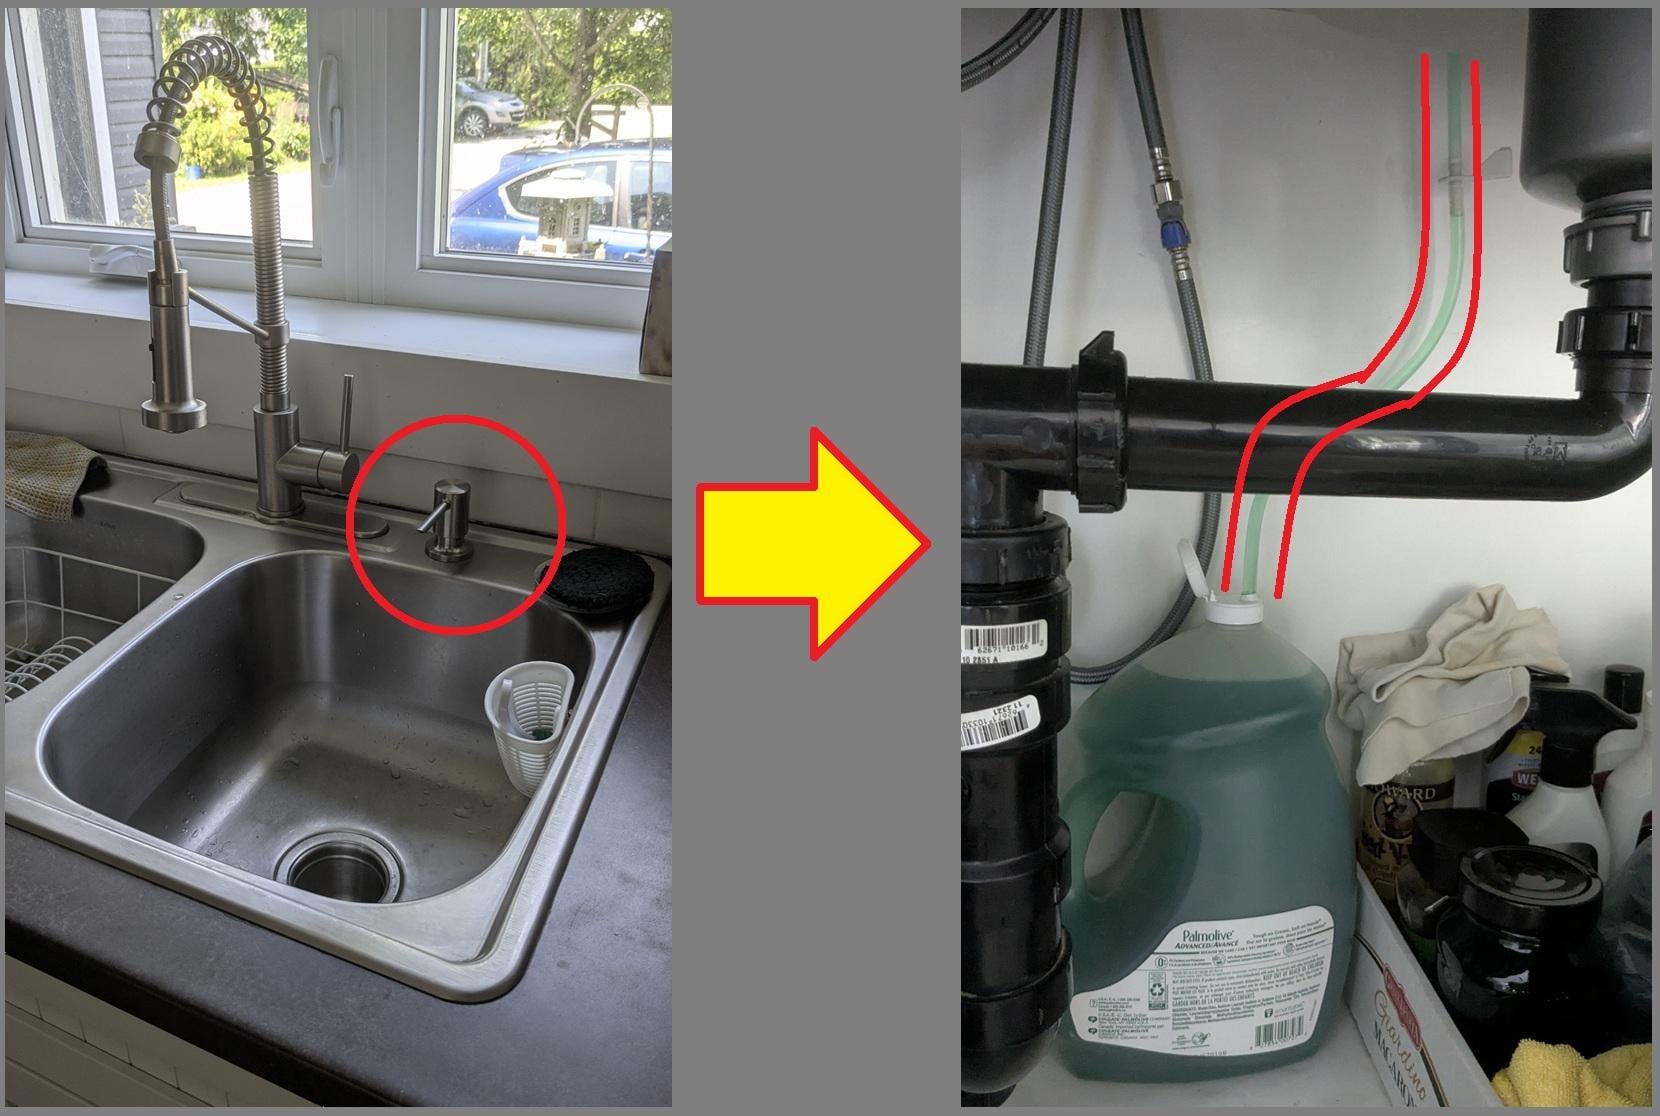
Start by removing the dispenser pump carefully. Hold the bottle steady with one hand while you pour the soap with the other. Using a small funnel can make this process neater and prevent soap from dripping down the sides.
Pour slowly and watch the liquid level rise. Stopping occasionally to let the soap settle reduces the chance of overflow. Have a paper towel ready to catch any accidental drips—this small habit keeps cleanup quick and easy.
Avoiding Overfilling
Overfilling can cause soap to leak out when you press the pump. Pay attention to the bottle’s neck and stop adding soap before it reaches the top. If your dispenser is transparent, use the sight of the soap level as your guide.
Ask yourself: Is there enough room for the pump mechanism to fit back without pushing soap out? Leaving a little space inside ensures smooth operation and prevents pressure buildup. This simple step extends the life of your dispenser and keeps your sink area tidy.

Credit: www.kraususa.com
Reassembling The Dispenser
Place the soap reservoir back into the dispenser base carefully. Secure it tightly to avoid leaks and ensure smooth pumping. Test the pump to confirm proper reassembly before use.
Reassembling the dispenser after cleaning or refilling may seem like a minor task, but it’s pivotal for the smooth operation of your kitchen sink. A well-reassembled dispenser ensures that your soap flows seamlessly, making kitchen chores much more efficient. Imagine the satisfaction of a perfectly functioning dispenser every time you press down on that pump.
Securing The Pump
Begin by aligning the pump over the dispenser bottle. Gently screw it back on, ensuring it's neither too tight nor too loose. A snug fit prevents leaks and maintains the pump's longevity. Have you ever had a dispenser that just didn’t sit right? Double-checking the alignment can make all the difference.
Testing The Soap Flow
Once the pump is secure, press it a few times to prime the pump. You might need to push it repeatedly until the soap flows smoothly. If you notice any resistance or inconsistency, adjust the pump and try again. A functional soap flow means fewer interruptions in your routine, keeping your hands clean without hassle. What’s your go-to test for ensuring everything’s working? A simple press can reveal a lot about your setup.
Maintenance Tips
Maintaining your kitchen sink soap dispenser keeps it working smoothly. Regular care stops issues like clogs and buildup. Simple habits extend the dispenser’s life and improve hygiene.
Regular Cleaning Schedule
Clean the soap dispenser at least once a month. Empty the dispenser before cleaning. Use warm water and mild soap to rinse the container. Wipe the pump nozzle with a damp cloth. Dry all parts completely before refilling. This prevents mold and unpleasant smells.
Preventing Clogs And Build-up
Use liquid soap that is not too thick. Thick soap can block the pump mechanism. Flush the dispenser with warm water every few weeks. This clears soap residue inside the tube. Avoid mixing different soap brands. Mixing can cause thick lumps and clogging. Check the pump for debris and remove it promptly.

Credit: www.temu.com
Frequently Asked Questions
How Do I Refill A Kitchen Sink Soap Dispenser?
Remove the soap reservoir from under the sink. Pour liquid soap slowly into the bottle. Avoid overfilling to prevent spills. Reattach the reservoir securely before use.
What Type Of Soap Is Best For Dispensers?
Use liquid hand soap or dish soap designed for dispensers. Avoid thick soaps or gels that may clog. Choose mild, biodegradable soap for kitchen safety and easy cleaning.
How Often Should I Refill The Soap Dispenser?
Refill your soap dispenser when soap levels are low. Typically, refilling once a month is enough. Frequency depends on household usage and dispenser size.
Can I Use Homemade Soap In Dispensers?
Yes, homemade liquid soap can be used if it’s thin enough. Avoid thick or chunky soap to prevent clogging. Strain homemade soap for smooth consistency.
Conclusion
Filling a soap dispenser on your kitchen sink is simple and quick. Just remove the pump, pour soap carefully, and replace the top. Keeping your dispenser full helps maintain cleanliness while cooking. A little care goes a long way in your daily kitchen routine.
Now, you can enjoy washing hands or dishes without any hassle. Give your kitchen a small boost with this easy task. Clean hands, happy kitchen!