
Are you ready to tackle your kitchen sink drain installation and connect your dishwasher like a pro? Installing a kitchen sink drain with a dishwasher might sound tricky, but with the right steps, you can do it yourself and save money.
Imagine having a smoothly working sink and dishwasher without waiting for a plumber. This guide will walk you through every step, making the process simple and stress-free. Keep reading, and you’ll discover how easy it is to get your kitchen plumbing set up perfectly.
Tools And Materials Needed
Installing a kitchen sink drain with a dishwasher connection requires the right set of tools and materials. Without them, you risk running into delays or making mistakes that could cause leaks or damage. Gathering everything before you start can save you time and frustration.
Basic Plumbing Tools
- Adjustable wrench:Essential for tightening nuts and bolts without stripping them.
- Pipe wrench:Provides extra grip on stubborn pipes and fittings.
- Plumber’s putty or silicone sealant:Creates watertight seals around sink drains.
- Pipe cutter or hacksaw:Needed if you have to trim drain pipes to size.
- Channel-lock pliers:Helps hold and turn small parts securely.
- Teflon tape:Prevents leaks on threaded pipe connections.
- Bucket and towels:Handy for catching water spills during removal or installation.
Having these basic tools on hand lets you handle most plumbing tasks smoothly. Ever tried to tighten a pipe without the right wrench? It can turn a quick job into a frustrating battle.
Drain And Dishwasher Parts
- Sink drain assembly:Includes the drain flange, tailpiece, and gaskets.
- P-trap kit:Connects the sink drain to your home’s plumbing and prevents sewer gases from entering your kitchen.
- Dishwasher drain hose:Carries waste water from the dishwasher to the sink drain.
- Dishwasher drain hose connector or adapter:Joins the dishwasher hose to the sink drain or garbage disposal.
- Hose clamps:Secure the dishwasher drain hose to the connector to prevent leaks.
Before you start, check if your sink drain and dishwasher parts match your existing plumbing setup. Mismatched parts can cause leaks or poor drainage. Do you have a garbage disposal? That might require a different connection method.
Safety Equipment
- Gloves:Protect your hands from sharp edges and dirty water.
- Safety glasses:Shield your eyes from debris or splashes.
- Face mask:Useful if you’re dealing with old pipes or moldy areas.
- Flashlight or headlamp:Helps you see clearly under the sink where lighting is limited.
Don’t underestimate safety gear. I once skipped wearing gloves and ended up with painful cuts from a metal pipe. Taking a few safety precautions ensures your project goes smoothly and painlessly.
Preparing The Sink Area
Preparing the sink area is a crucial part of installing a kitchen sink drain with a dishwasher connection. A clean and well-prepared workspace makes the entire installation process smoother and helps prevent leaks or other issues later on. Taking the time to properly prepare can save you frustration and costly repairs down the line.
Turn Off Water Supply
Before you start any work, make sure to turn off the water supply to your kitchen sink. This prevents water from spilling out while you remove or install drain components. Check both the hot and cold water valves under the sink and turn them clockwise until fully closed.
If your valves are stuck or hard to turn, try using a wrench carefully or apply some lubricant. Have you ever tried fixing a leak only to find water still flowing? Shutting off the water supply completely avoids that messy problem.
Remove Old Drain Components
Next, remove the old drain parts from the sink. This usually includes the drain flange, gasket, and tailpiece. Use a wrench or pliers to loosen the slip nuts connecting the drain pipes, and gently pull out the drain assembly.
Be prepared for some residual water to spill out, so keep a bucket and towels handy. Removing old components carefully prevents damage to your sink or pipes, which could cause leaks once the new drain is installed.
Clean The Sink Drain Opening
After removing the old drain, clean the sink drain opening thoroughly. Scrape away any old plumber’s putty, dirt, or debris that could prevent a proper seal with the new drain flange. Use a putty knife or sponge and warm soapy water to clean the surface well.
A clean opening ensures the new drain fits snugly and seals tightly, avoiding leaks. Have you noticed how even a small bit of grime can cause big problems with sealing? Taking these extra minutes to clean carefully pays off in the long run.
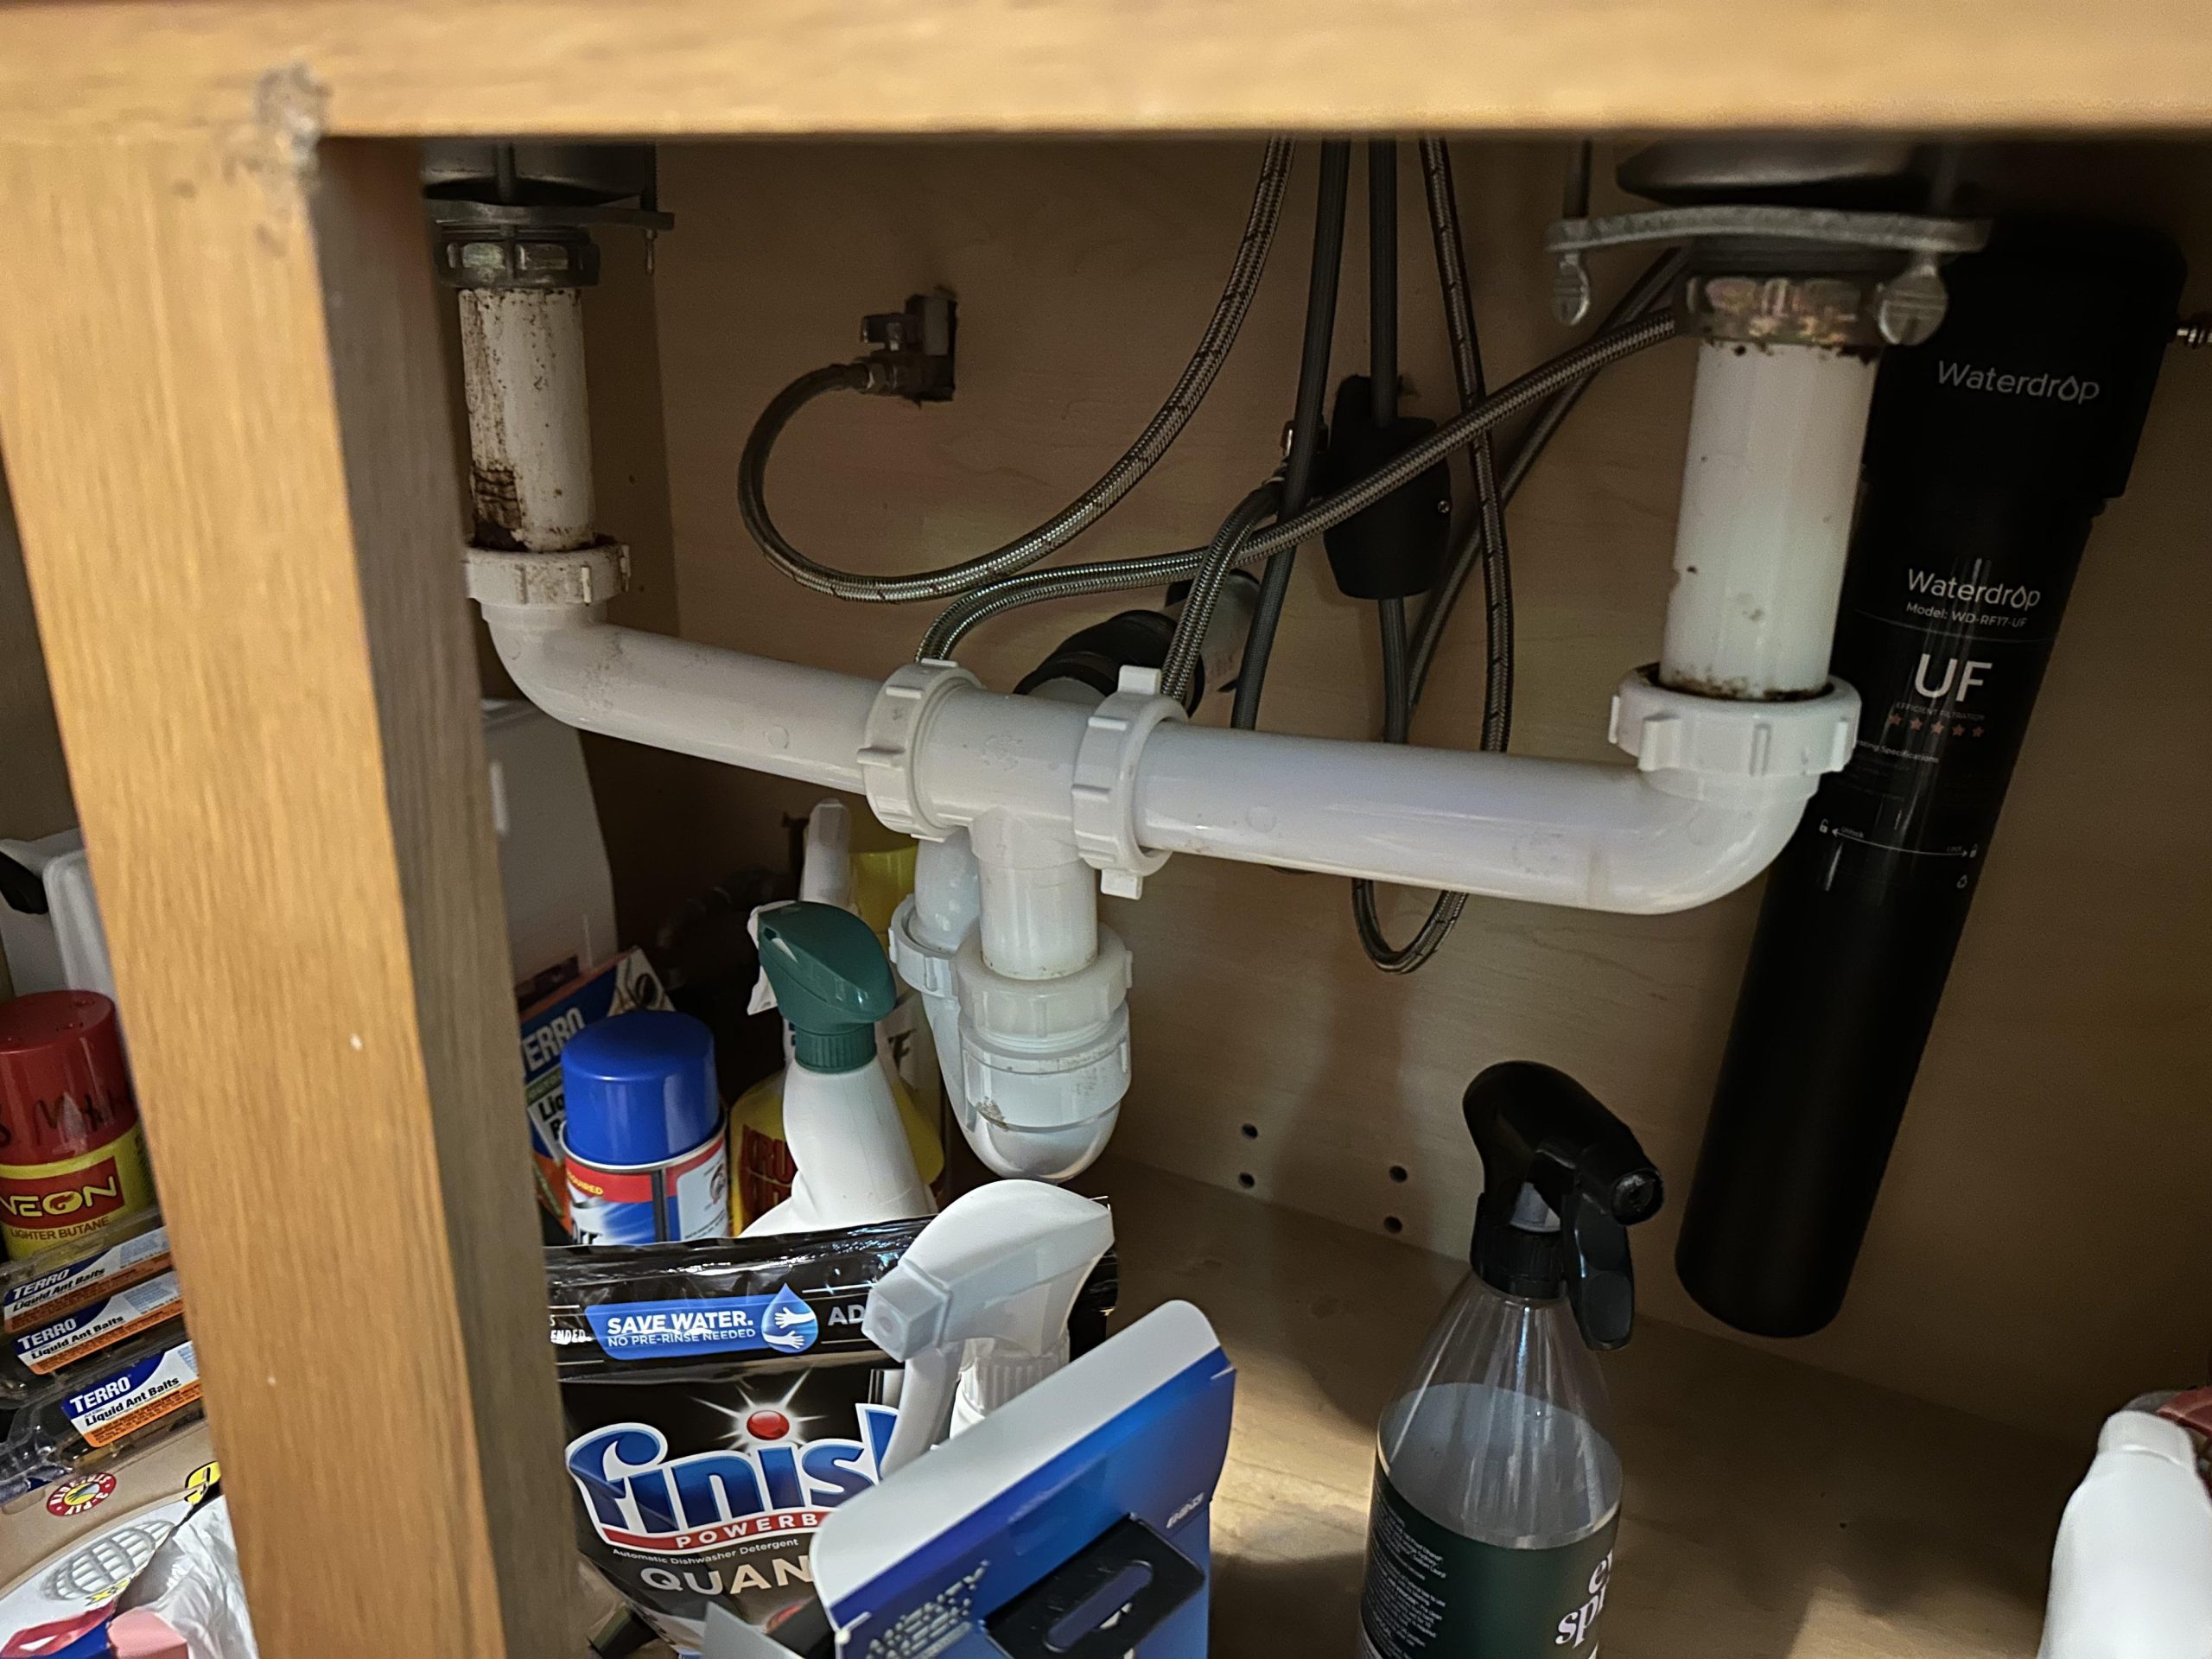
Installing The Drain Assembly
Begin by fitting the drain assembly to the sink’s drain hole securely. Connect the dishwasher drain hose to the drain assembly’s inlet, ensuring a tight seal to prevent leaks. Tighten all connections carefully for proper water flow and drainage.
Installing the drain assembly in your kitchen sink is a crucial step in ensuring a leak-free and efficient plumbing setup. Taking the time to get this right will save you from future headaches and costly repairs. Whether you're upgrading your kitchen or dealing with a pesky leak, mastering this process is essential.
Attach The Sink Strainer
Begin by inserting the sink strainer into the drain hole. Ensure the rubber gasket is correctly positioned underneath the sink. This acts as a seal to prevent water from leaking. Secure the strainer with a nut from below. Tighten it snugly, but avoid over-tightening, which can damage the sink.
Apply Plumber’s Putty
Next, roll a small amount of plumber’s putty between your palms. Form a thin rope and press it around the underside of the sink strainer flange. Press the strainer firmly into the drain hole. The excess putty will squeeze out, which you can wipe away with a cloth.
Secure The Drain Flange
Place the drain flange over the strainer from below the sink. This component helps in securing the drain assembly tightly. Tighten the flange by hand, then use a wrench to ensure it is firmly in place. Double-check for any gaps or misalignments that might cause leaks. Installing a kitchen sink drain with a dishwasher can seem daunting, but breaking it down into manageable steps makes it more approachable. Have you ever had to deal with a leaky sink because of poor installation? Taking the time now to do it right can save you from that hassle.
Connecting The Dishwasher Drain
Connecting the dishwasher drain is a crucial part of installing a kitchen sink drain with a dishwasher. This ensures that wastewater from your dishwasher flows properly into the sink drain without causing leaks or backups. Paying close attention to how you connect these components can save you from future plumbing headaches.
Locate The Dishwasher Drain Inlet
First, find the dishwasher drain inlet on your sink drain assembly. It’s usually a small port near the tailpiece or disposal unit designed specifically for the dishwasher hose connection. Double-check the size and position before proceeding to avoid any misfits.
Not all drain assemblies look the same, so take a moment to compare yours with the installation manual or photos online. Missing this step might mean cutting or forcing parts later, which could cause leaks or damage.
Install The Dishwasher Tailpiece
The dishwasher tailpiece connects the sink drain to the dishwasher drain hose. To install it, remove the existing tailpiece and replace it with the one that has the dishwasher inlet. Make sure to use plumber’s tape or a rubber gasket to create a watertight seal.
Ensure the tailpiece is tightly secured but avoid overtightening, which can crack the pipe or fittings. If you’ve ever struggled with a dripping pipe under your sink, you know how important this balance is.
Attach The Dishwasher Drain Hose
Next, connect the dishwasher drain hose to the dishwasher tailpiece inlet. Slide the hose over the inlet and secure it with a hose clamp. Tighten the clamp firmly to prevent leaks but be gentle enough not to damage the hose.
Check the hose for any kinks or sharp bends that might block water flow. You want the path from the dishwasher to the sink drain to be as smooth as possible. Have you ever noticed slow drainage in your dishwasher? That’s often due to hose issues like these.
Sealing And Tightening Connections
Sealing and tightening connections is one of the most crucial parts of installing a kitchen sink drain with a dishwasher. If the connections aren’t sealed properly, you risk leaks that can cause water damage and costly repairs. Tightening everything correctly ensures your plumbing lasts and works efficiently.
Use Slip Nuts And Washers
Slip nuts and washers form the backbone of a watertight seal in your drain system. Always use the right size slip nuts and place washers correctly between pipe connections. These washers act like cushions, preventing leaks by creating a tight seal.
Don’t skip this step, even if the pipes seem to fit snugly. I once ignored a worn washer and ended up with a slow leak that took weeks to find. Using fresh washers and properly threading slip nuts can save you from that hassle.
Check For Proper Alignment
Before tightening any connections, make sure the pipes and fittings line up perfectly. Misalignment puts stress on joints and can cause cracks or leaks over time. Take a moment to adjust pipes so they fit naturally without forcing them.
Ask yourself: are the dishwasher drain hose and sink drain pipe aligned smoothly? If not, try repositioning or trimming pipes slightly for a better fit. Proper alignment makes tightening easier and seals more reliable.
Tighten All Fittings Securely
Once everything is aligned, tighten all slip nuts and fittings firmly by hand, then give them an extra quarter turn with a wrench. Avoid over-tightening, which can crack plastic pipes or deform washers. It’s about finding the right balance between snug and secure.
After tightening, test for leaks by running water through the sink and dishwasher. If you spot any drips, slightly tighten the fitting more, but don’t force it. Your goal is a tight seal without damaging components.

Credit: www.reddit.com
Testing For Leaks
Testing for leaks is a vital step after installing a kitchen sink drain with a dishwasher connection. It ensures water flows properly without causing damage or mess. Careful inspection prevents costly repairs and maintains a safe kitchen environment.
Turn On Water Supply
Start by turning on the main water supply to the sink. Open the faucet and let water run for a few minutes. Watch the drain pipes closely to spot any drips or wet spots. Check under the sink where all connections are located.
Run Dishwasher Drain Cycle
Next, run the dishwasher through a drain cycle. This pushes water through the dishwasher drain hose and into the sink drain. Listen for unusual sounds and watch for leaks around the hose connection. A slow drip can cause big problems over time.
Inspect All Connections
Look carefully at every connection point: sink drain, dishwasher hose, and trap assembly. Use a flashlight for hard-to-see areas. Tighten any loose fittings gently. Replace washers or seals if you notice any water escaping. A dry and secure connection means your installation is successful.
Troubleshooting Common Issues
Troubleshooting your kitchen sink drain installation with a dishwasher can save you time and frustration. Issues like leaks, slow drainage, or dishwasher drainage problems are common but usually fixable with a bit of patience and the right approach. Let’s look at how to identify and resolve these problems effectively.
Leaks And Drips
Leaks around your sink drain or dishwasher connection often come from loose fittings or worn-out washers. Check all connections carefully and tighten any loose nuts. If the leak persists, replacing the rubber gaskets or plumber’s putty around the drain flange can make a big difference.
Another cause might be damaged pipes or cracks in the drain assembly. Inspect the pipes visually and run your fingers along them to detect moisture. Sometimes, even a small crack can cause a slow drip that worsens over time.
Slow Drainage
Slow drainage usually means there’s a clog or partial blockage somewhere in the pipes. Hair, food scraps, and grease can build up inside the drain or P-trap. Try removing and cleaning the P-trap first, as it’s often the easiest access point.
If cleaning the trap doesn’t help, use a plunger or a drain snake to clear the blockage further down the pipe. Avoid harsh chemical drain cleaners—they can damage your pipes and dishwasher connections.
Dishwasher Not Draining Properly
If your dishwasher isn’t draining, check the drain hose for kinks or clogs. The hose should have a loop or be installed with an air gap to prevent backflow of water. Make sure this loop is intact and positioned correctly.
Also, inspect the dishwasher’s drain filter and pump. Food debris can block these parts, preventing proper drainage. Cleaning them regularly keeps your dishwasher running smoothly and avoids water backup into your sink.

Credit: www.youtube.com
Maintenance Tips
Proper maintenance keeps your kitchen sink drain and dishwasher running smoothly. Regular care prevents clogs, leaks, and costly repairs. Simple habits extend the life of your plumbing system. Follow these tips to maintain your kitchen sink drain with dishwasher connection.
Regular Cleaning
Clean the drain and pipes often to avoid build-up. Use a mild cleaner or baking soda and vinegar mix. Flush with hot water after cleaning to clear debris. Wipe down the sink area to prevent mold and odors. Clean the dishwasher filter regularly to keep water flowing freely.
Checking For Wear And Tear
Inspect hoses and connections for cracks or leaks. Look under the sink and behind the dishwasher for moisture spots. Tighten loose fittings to prevent water damage. Check the drain trap for rust or corrosion. Early detection stops small issues from becoming bigger problems.
When To Replace Parts
Replace hoses every five years or if damaged. Change worn gaskets and seals to avoid leaks. Swap out corroded pipes promptly to keep water flowing. Upgrade outdated parts for better performance and safety. Use parts designed for kitchen sinks and dishwasher use to ensure compatibility.
Credit: www.diychatroom.com
Frequently Asked Questions
How Do I Connect A Dishwasher To Kitchen Sink Drain?
Connect the dishwasher drain hose to the sink drain’s dishwasher inlet. Secure it with a clamp to prevent leaks. Use a high loop or air gap to avoid backflow and maintain proper drainage.
What Tools Are Needed For Sink Drain Installation?
You need a wrench, pliers, plumber’s putty, screwdriver, and a bucket. Also, have Teflon tape and pipe sealant for leak-proof connections. Safety gloves and eye protection are recommended.
Can I Install A Kitchen Sink Drain Without Plumber’s Help?
Yes, with basic plumbing knowledge and the right tools, you can install it yourself. Follow instructions carefully to avoid leaks and drainage issues. If unsure, consult a professional to prevent costly mistakes.
How To Prevent Leaks When Installing Sink Drain?
Apply plumber’s putty or silicone sealant around the drain flange. Tighten connections securely but avoid over-tightening. Check all joints and hoses for proper fit and test with water to ensure no leaks.
Conclusion
Installing a kitchen sink drain with a dishwasher is simple with clear steps. Follow the instructions carefully to avoid leaks and ensure proper drainage. Use the right tools and materials for a secure fit. Take your time and check each connection twice.
This helps your sink and dishwasher work smoothly for years. A well-done job saves money and stress later. Enjoy your clean, functional kitchen with confidence. Ready to tackle the next home project?