
Looking to make your kitchen more convenient and stylish? Installing a kitchen sink soap dispenser is a simple upgrade that can save you time and keep your countertop clutter-free.
You don’t need to be a pro plumber to do this yourself. In this guide, you’ll find easy steps and helpful tips to install your soap dispenser quickly and without hassle. Keep reading, and you’ll have a sleek, functional addition to your kitchen in no time.
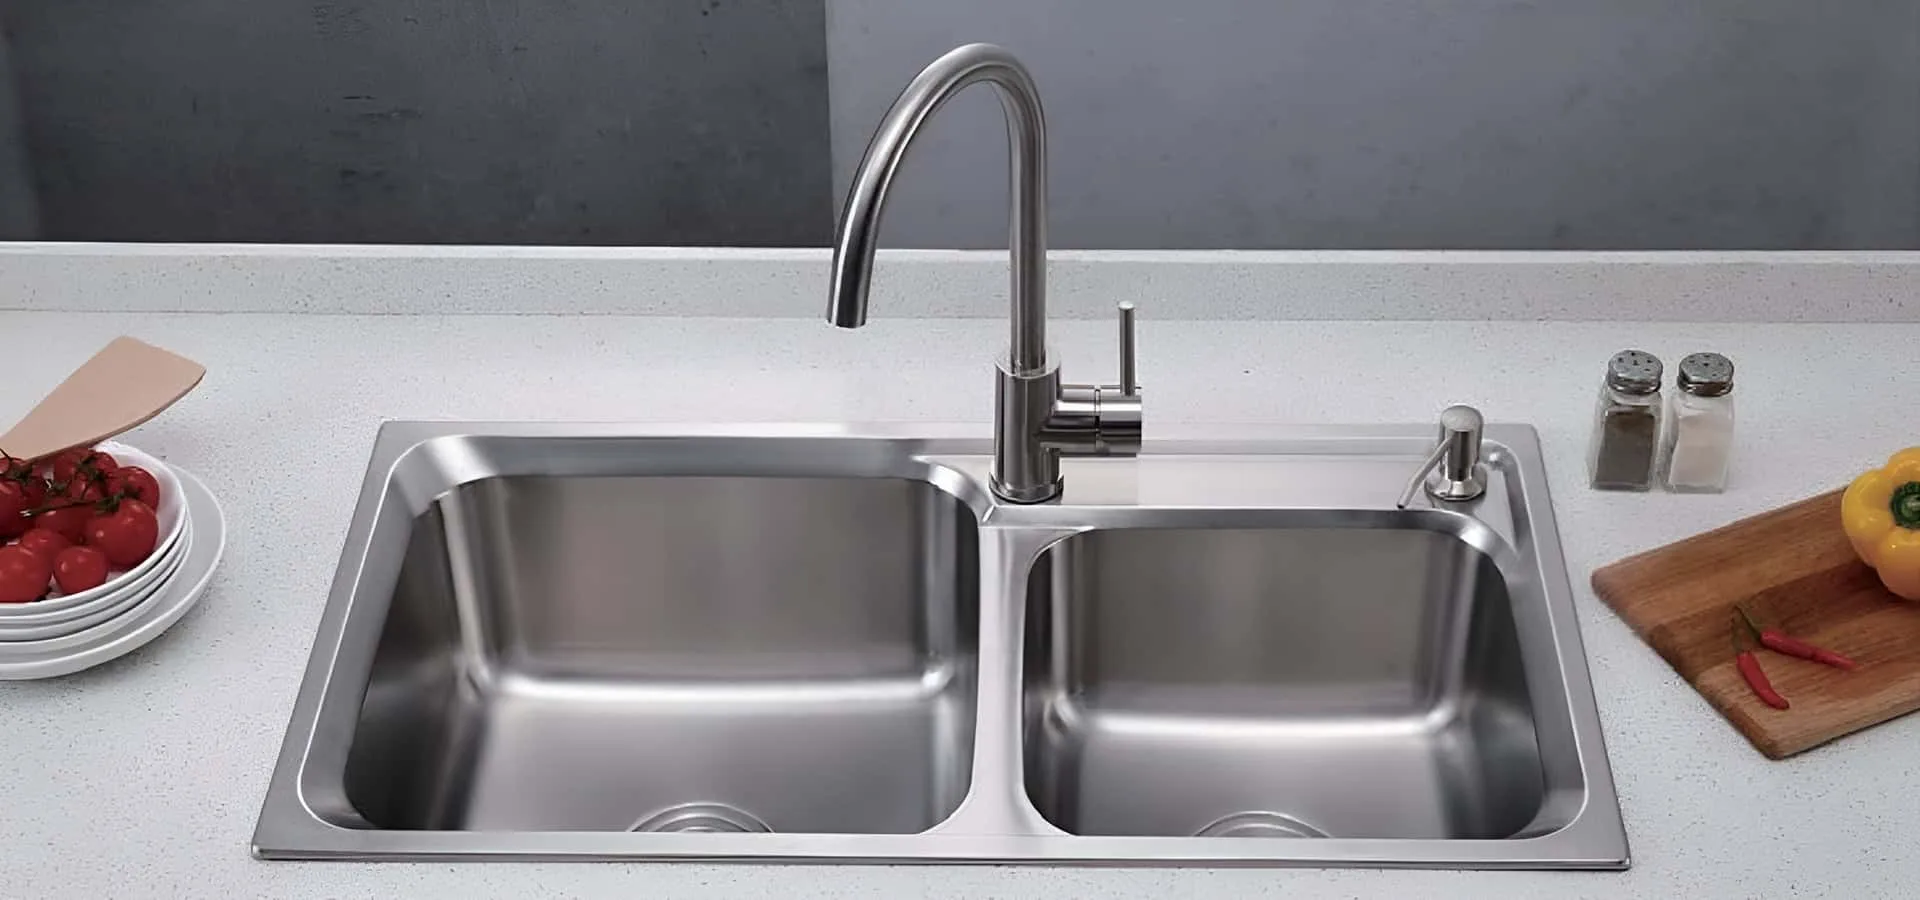
Credit: www.walmart.com
Tools And Materials Needed
Getting ready to install your kitchen sink soap dispenser means gathering the right tools and materials first. Having everything on hand makes the process smoother and helps you avoid those frustrating last-minute trips to the store. Let’s break down exactly what you’ll need so you can jump right into the installation with confidence.
Essential Tools For Installation
- Adjustable wrench:You'll use this to tighten nuts securely without damaging the fixture.
- Screwdriver (Phillips and flathead):These help in removing or securing screws, depending on your dispenser model.
- Drill with drill bits:Sometimes a hole needs to be drilled if your sink doesn’t have a pre-drilled hole for the dispenser.
- Plumber’s putty or silicone sealant:This prevents leaks around the dispenser base and keeps everything watertight.
- Bucket or towel:Handy to catch any water drips or spills during installation.
Materials Needed For Your Soap Dispenser
- Kitchen sink soap dispenser kit:This usually includes the pump, mounting hardware, and soap reservoir.
- Plumbing tape (Teflon tape):Wrap this around threaded connections to ensure a tight seal and avoid leaks.
- Soap refill:Choose your favorite liquid soap or hand wash to fill the dispenser once installed.
Why Gathering The Right Tools Saves Time
Have you ever started a home project only to realize you’re missing a key tool halfway through? It’s frustrating and can lead to mistakes. I once tried installing a soap dispenser without an adjustable wrench, and I ended up stripping a nut. That delay could have been avoided just by preparing properly.
Do you feel confident your toolbox is ready? If not, take a moment to check. You’ll thank yourself later when the installation goes smoothly and your kitchen looks cleaner and more organized.

Credit: www.amazon.com
Choosing The Right Soap Dispenser
Choosing the right soap dispenser is key for a smooth kitchen sink installation. It affects both your kitchen’s look and your daily routine. The perfect soap dispenser fits your sink style, offers good capacity, and lasts long. Consider these important factors before making your choice.
Types Of Soap Dispensers
Soap dispensers come in various styles to suit different needs and preferences.
- Built-in Dispensers:Installed directly into the sink or countertop for a clean look.
- Countertop Dispensers:Standalone units placed next to the sink; easy to move.
- Automatic Dispensers:Use sensors to release soap without touching, improving hygiene.
Material And Finish Options
Materials affect durability and appearance. Choose one that matches your kitchen decor.
- Stainless Steel:Resistant to rust and easy to clean.
- Plastic:Lightweight and affordable but less durable.
- Chrome or Brushed Nickel:Offers a modern, shiny look.
- Matte Finishes:Hide fingerprints and water spots better.
Size And Capacity Considerations
Size matters for convenience and refilling frequency. Pick a dispenser that fits your usage.
| Size | Best For | Refill Frequency |
|---|---|---|
| Small (8-12 oz) | Light kitchen use | Refill often |
| Medium (12-20 oz) | Average household use | Moderate refill |
| Large (20+ oz) | Heavy use or large family | Less frequent refill |
Preparing The Sink Area
Preparing the sink area is a crucial step before installing your kitchen sink soap dispenser. This phase ensures the installation goes smoothly and your workspace stays safe and efficient. Taking time to get this right saves you from headaches later, especially if your sink setup is older or has limited space.
Clearing The Workspace
Start by removing everything around your sink. This means dishes, cleaning supplies, and any personal items that clutter the countertop. Clearing the area gives you full access and prevents anything from falling into the sink or getting damaged during installation.
Don't forget to wipe down the sink and countertop. A clean surface helps you spot any cracks or damage that could affect the soap dispenser’s placement. Plus, it keeps your tools and parts from slipping or getting dirty.
Checking For Existing Holes
Before drilling any new holes, inspect your sink and countertop for pre-drilled ones. Many sinks come with extra holes designed for accessories like soap dispensers or sprayers. Using an existing hole can save you time and avoid unnecessary damage.
Look closely at the size and position of these holes. Will they fit your new dispenser? If the hole is too small or in the wrong spot, you might need to consider drilling a new one instead.
Measuring For New Holes
If you don’t have a suitable hole, you’ll need to measure carefully where to drill. Use a tape measure or ruler to find a spot close to the faucet but out of the way of plumbing underneath. The right placement makes refilling the dispenser easy and keeps it stable.
Mark the spot with a pencil or masking tape. Double-check your measurements to avoid mistakes. Drilling the wrong hole can be costly and frustrating, so take your time to get this right.
Removing The Old Dispenser
Begin by turning off the water supply to prevent leaks. Loosen the old dispenser’s mounting nut under the sink and disconnect the tube carefully. Remove the dispenser from the sink hole by lifting it straight up.
Removing the old soap dispenser is an essential step before you can install a new one. It may seem daunting at first, but with a bit of patience and the right approach, it can be a straightforward process. Whether you're upgrading your kitchen's look or replacing a broken dispenser, these steps will guide you through the removal process with ease.
Turning Off Water Supply
Before you start, ensure safety by turning off the water supply. Look under your sink for the shut-off valve. Turn it clockwise until it's completely closed. This prevents any accidental water flow during the removal process.
Disconnecting The Dispenser
Once the water is off, locate the dispenser’s pump mechanism underneath the sink. Typically, you'll find a nut or a clip securing it in place. Use a wrench or pliers to loosen and remove it. A little bit of elbow grease might be needed if it's stuck due to buildup.
Cleaning The Mounting Area
After disconnecting, lift the old dispenser out of its hole. You'll likely find some grime or residue where it sat. Use a gentle cleaner or a mixture of vinegar and water to wipe away any dirt. A clean surface ensures a snug fit for your new dispenser. How did it feel to finally get rid of that old, rusty dispenser? By tackling each step methodically, you make space for something new and functional. Plus, you gain a sense of accomplishment by doing it yourself.
Installing The New Soap Dispenser
Installing the new soap dispenser can feel straightforward, but paying attention to each part ensures it functions smoothly for years. Taking your time to assemble and secure it properly will save you from leaks or wobbling later. Let’s break down the process into simple, clear steps so you can handle it confidently.
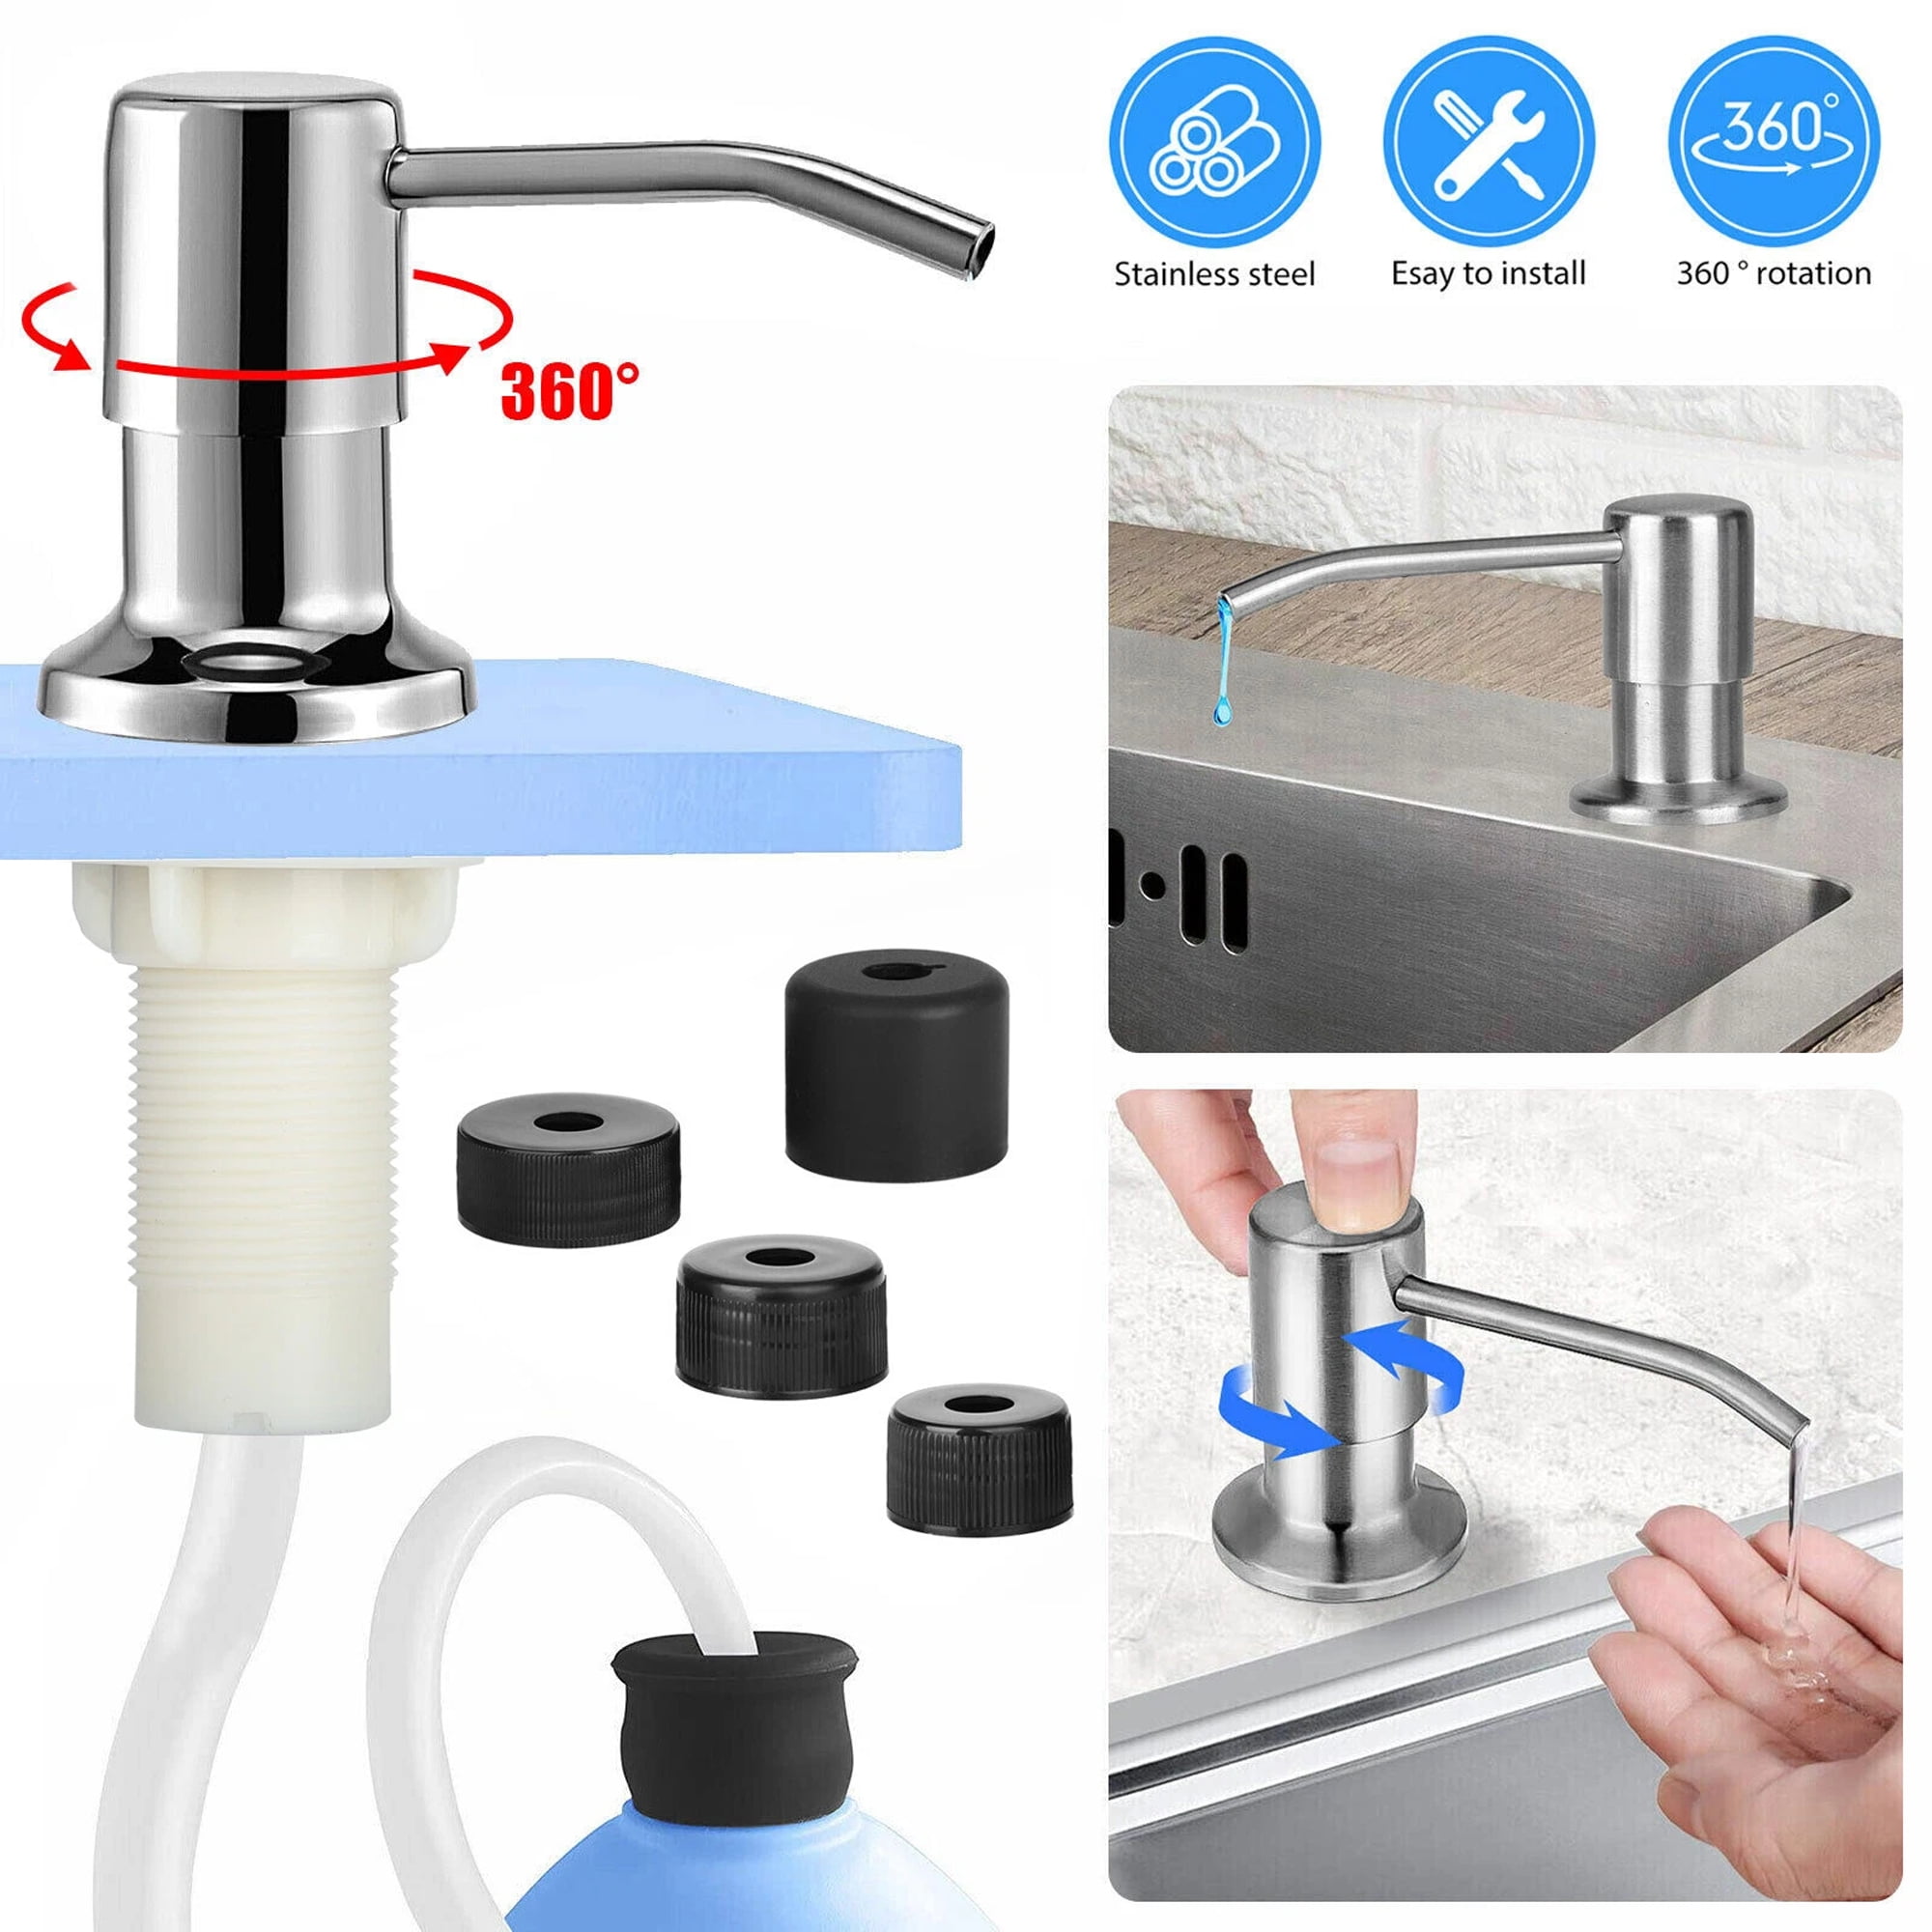
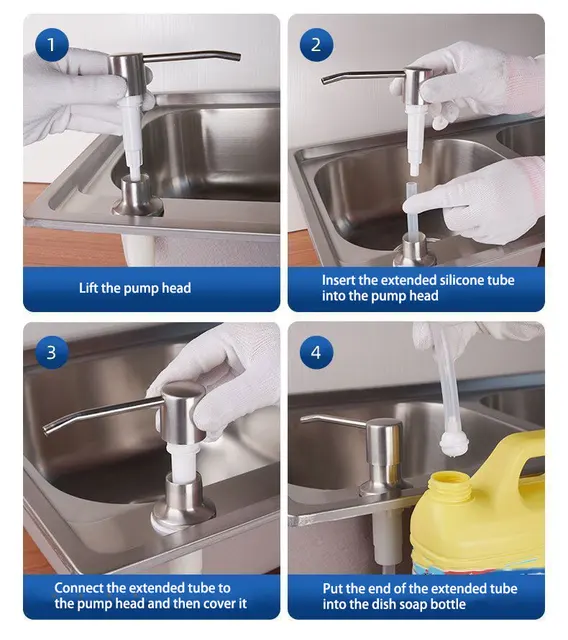
Assembling The Dispenser Components
Start by laying out all the parts on a clean surface—this usually includes the pump head, soap bottle, and mounting hardware. Attach the pump head to the soap bottle by screwing it on tightly, making sure the pump mechanism moves freely without resistance.
Check if your dispenser kit includes a spacer or gasket; these help prevent leaks and provide a snug fit. If you have one, place it between the pump head and the sink surface before moving on. Have you noticed how skipping this small step can cause soap to drip under the sink? It’s a common issue you can avoid easily.
Inserting The Dispenser Into The Sink
Locate the designated hole in your sink or countertop—usually next to the faucet. If your sink doesn’t have a pre-drilled hole, you might need to drill one, but make sure to measure carefully and check for any plumbing underneath.
Feed the soap bottle and pump assembly through the hole from above. Align the dispenser head so it’s centered and sits flat on the sink surface. Try pressing down gently to ensure it’s stable before securing it from below.
Securing The Dispenser From Below
Under the sink, slide the mounting nut onto the threaded part of the dispenser shaft. Hand-tighten it at first, then use a wrench or pliers to secure it firmly—but don’t overtighten, or you might crack the sink or strip the threads.
Attach the soap bottle by screwing it onto the dispenser shaft if it’s not already connected. Double-check that everything is tight and that the dispenser doesn’t wiggle. Before finishing, pump the dispenser a few times to make sure soap flows smoothly and the unit is stable.
Did you realize how a few simple checks can prevent a messy cleanup later? Taking a moment now saves you frustration down the road.
Connecting The Soap Reservoir
Connecting the soap reservoir is a key part of installing a kitchen sink soap dispenser. This step ensures the dispenser works smoothly and delivers soap without leaks. Proper connection helps maintain cleanliness and ease of use in your kitchen.
Attaching The Soap Bottle
Begin by placing the soap bottle beneath the sink. Align the dispenser’s pump tube with the bottle’s opening. Push the tube into the bottle firmly to create a tight seal. Avoid forcing it too hard to prevent damage. A secure fit keeps soap from spilling.
Ensuring Proper Alignment
Check that the soap bottle sits upright and stable. Make sure the pump tube is straight without kinks. Misalignment can block soap flow or cause leaks. Adjust the bottle or tube until everything fits smoothly. Proper alignment ensures consistent soap dispensing.
Filling The Reservoir
Remove the soap bottle cap if present. Pour liquid soap slowly into the bottle. Fill it up to about three-quarters full to prevent overflow. Avoid overfilling to allow air circulation. Replace the cap tightly to keep soap fresh.
Testing The Soap Dispenser
Testing the soap dispenser ensures it works correctly after installation. It checks the pump action and soap flow. Proper testing prevents leaks and clogs. This step saves time and effort later.
Pump Function Check
Press the dispenser pump several times. Watch the soap flow from the spout. The pump should move smoothly without sticking. Soap should come out easily with each press. If no soap appears, check the soap bottle is filled and connected.
Adjusting For Smooth Operation
Turn the pump head gently if it feels stiff. Make small adjustments to loosen the pump mechanism. Pump a few times after each adjustment. Soap should flow steadily without interruption. Adjust until the pump feels comfortable and consistent.
Troubleshooting Common Issues
- No soap coming out: Check soap bottle level and tube connection.
- Pump stuck or hard to press: Loosen pump head slightly and test again.
- Soap leaks under the sink: Tighten connections and check for cracks.
- Soap flow is weak: Clean the pump and tube to remove clogs.
Maintenance Tips
Maintaining your kitchen sink soap dispenser keeps it working smoothly. Proper care extends its life and ensures hygiene. Simple actions prevent common problems like clogs and leaks. Follow these tips to keep your dispenser clean and functional.
Regular Cleaning
Clean the dispenser pump regularly to remove soap buildup. Use warm water and mild soap for wiping the pump and nozzle. Avoid harsh chemicals that may damage the surface. Rinse well and dry with a soft cloth. This stops soap residue from clogging the dispenser.
Refilling The Soap
Refill the soap container before it runs completely dry. Use the recommended liquid soap type for your dispenser. Avoid thick or solid soaps that can block the pump. Pour slowly to prevent spills and overflow. Keep the refill area clean to avoid dirt entering the dispenser.
Preventing Clogs And Leaks
Check for soap buildup inside the pump and tube regularly. Flush the dispenser with warm water if flow slows down. Tighten any loose parts to stop leaks around the base or nozzle. Replace worn or broken parts as soon as possible. Regular checks help avoid bigger problems later.
Credit: www.aliexpress.com
Frequently Asked Questions
How Do I Install A Kitchen Sink Soap Dispenser?
First, remove the old soap dispenser if any. Insert the new dispenser through the sink hole. Secure it underneath with the mounting nut. Attach the soap bottle and connect the pump. Test the dispenser to ensure proper operation.
What Tools Are Needed For Installation?
You will need a wrench, screwdriver, and possibly pliers. A towel or sponge helps clean spills. Some models may require a drill if no hole exists. Always check the product manual for specific tools needed.
Can I Install A Soap Dispenser Without A Pre-drilled Hole?
Yes, but you must drill a hole in the sink or countertop. Measure carefully to avoid damage. Use a drill bit suitable for your material. Follow safety precautions when drilling to prevent injury or damage.
How Do I Maintain My Soap Dispenser?
Regularly clean the pump and bottle with warm water. Avoid harsh chemicals that can damage parts. Check for clogs and clean the nozzle. Refill soap before it runs out completely to prevent air bubbles.
Conclusion
Installing a kitchen sink soap dispenser is simple and quick. Follow each step carefully and take your time. Use the right tools to avoid mistakes. This small addition keeps your sink area neat and tidy. Enjoy easy access to soap while washing dishes.
A well-installed dispenser lasts long and works well. Now you can add convenience to your kitchen without hassle. Give it a try and see the difference yourself.