
Are you ready to upgrade your kitchen with a sleek faucet and a convenient soap dispenser? Installing these fixtures might seem tricky, but with the right steps, you can do it yourself and save time and money.
Imagine having everything you need right at your fingertips—no more fumbling with separate soap bottles or dealing with leaks. In this guide, you’ll find simple, clear instructions that make the process easy to follow. Keep reading, and soon your kitchen will look sharper and work smarter.
Tools And Materials Needed
Before you start installing your kitchen faucet with a soap dispenser, gathering the right tools and materials is crucial. Having everything on hand saves time and reduces frustration during the installation. You’ll want to make sure you have reliable tools that fit the job perfectly.
Essential Tools For Installation
- Adjustable Wrench:This tool is key for tightening nuts and bolts without damaging them. It adjusts to different sizes, making it versatile for various fittings.
- Basin Wrench:Designed specifically for faucets, this wrench helps you reach tight spots under the sink easily.
- Screwdrivers:Both flathead and Phillips screwdrivers are useful for securing small screws on the faucet and soap dispenser.
- Plumber’s Putty or Silicone Sealant:You’ll need this to create a watertight seal around the faucet base.
- Bucket and Towels:Keep a bucket ready to catch any water drips and towels to clean up spills quickly.
Materials To Have Ready
- Kitchen Faucet with Soap Dispenser Kit:Make sure your kit includes all parts, such as mounting hardware, hoses, and the soap dispenser pump.
- Supply Lines:These connect your faucet to the water valves. Sometimes they come with the faucet, but check to avoid surprises.
- Plumber’s Tape (Teflon Tape):This prevents leaks at threaded connections by sealing the threads tightly.
- Cleaning Supplies:Use mild soap and a sponge to clean the sink area before installation for a better seal.
Why Being Prepared Matters
Have you ever started a project only to realize you’re missing a vital tool? It’s frustrating and can cause delays. When I installed my kitchen faucet with a soap dispenser, not having a basin wrench meant I struggled for hours trying to tighten the mounting nuts.
Gathering everything beforehand keeps your installation smooth and efficient. It also helps you avoid unnecessary trips to the hardware store, keeping your momentum going.
Credit: www.blog.vigoindustries.com
Prepare The Sink Area
Preparing the sink area is a crucial step before installing your new kitchen faucet with a soap dispenser. It ensures a smooth installation process and helps avoid any water damage or leaks. Careful preparation saves time and effort during the actual fitting.
Start by making sure the workspace is clean and free from clutter. This will give you easy access to the pipes and mounting holes under the sink. Clearing the area also prevents accidents and keeps tools organized.
Turn Off Water Supply
Locate the shut-off valves under the sink. Turn both the hot and cold water valves clockwise to close them. This stops water flow and prevents leaks during removal and installation. Open the faucet to release any remaining water in the pipes.
Clear The Sink Space
Remove any items stored under the sink. Clear cleaning supplies and trash bins to create enough working room. Wipe the sink surface and surrounding countertop to remove dirt and grease. A clean area helps you spot leaks or damage easily.
Remove Old Faucet And Dispenser
Use a basin wrench or adjustable pliers to loosen the nuts holding the faucet and soap dispenser. Disconnect the water supply lines carefully. Lift out the old faucet and dispenser from the sink. Clean the mounting surface to remove old putty or grime for a tight seal.
Install The Kitchen Faucet
Installing a kitchen faucet with a soap dispenser improves convenience and saves space. Begin by securing the faucet and dispenser to the sink, then connect the water and soap lines carefully. Tighten all fittings to avoid leaks and test the system for smooth operation.
Installing a kitchen faucet with a soap dispenser can breathe new life into your culinary space. Imagine the joy of completing the task yourself, saving money, and adding a personal touch. The process might seem daunting at first, but breaking it down into manageable steps makes it simpler and more rewarding. Let's dive into the practical steps for installing your kitchen faucet.
Position The Faucet
Begin by placing the faucet into the designated hole in your sink. Ensure it sits comfortably and aligns correctly with the sink. If you have a multi-hole sink, use the included deck plate to cover the extra holes. I remember the first time I did this, I felt a sense of accomplishment when the faucet fit perfectly. Is there anything more satisfying than seeing your handiwork come to life?
Secure The Mounting Hardware
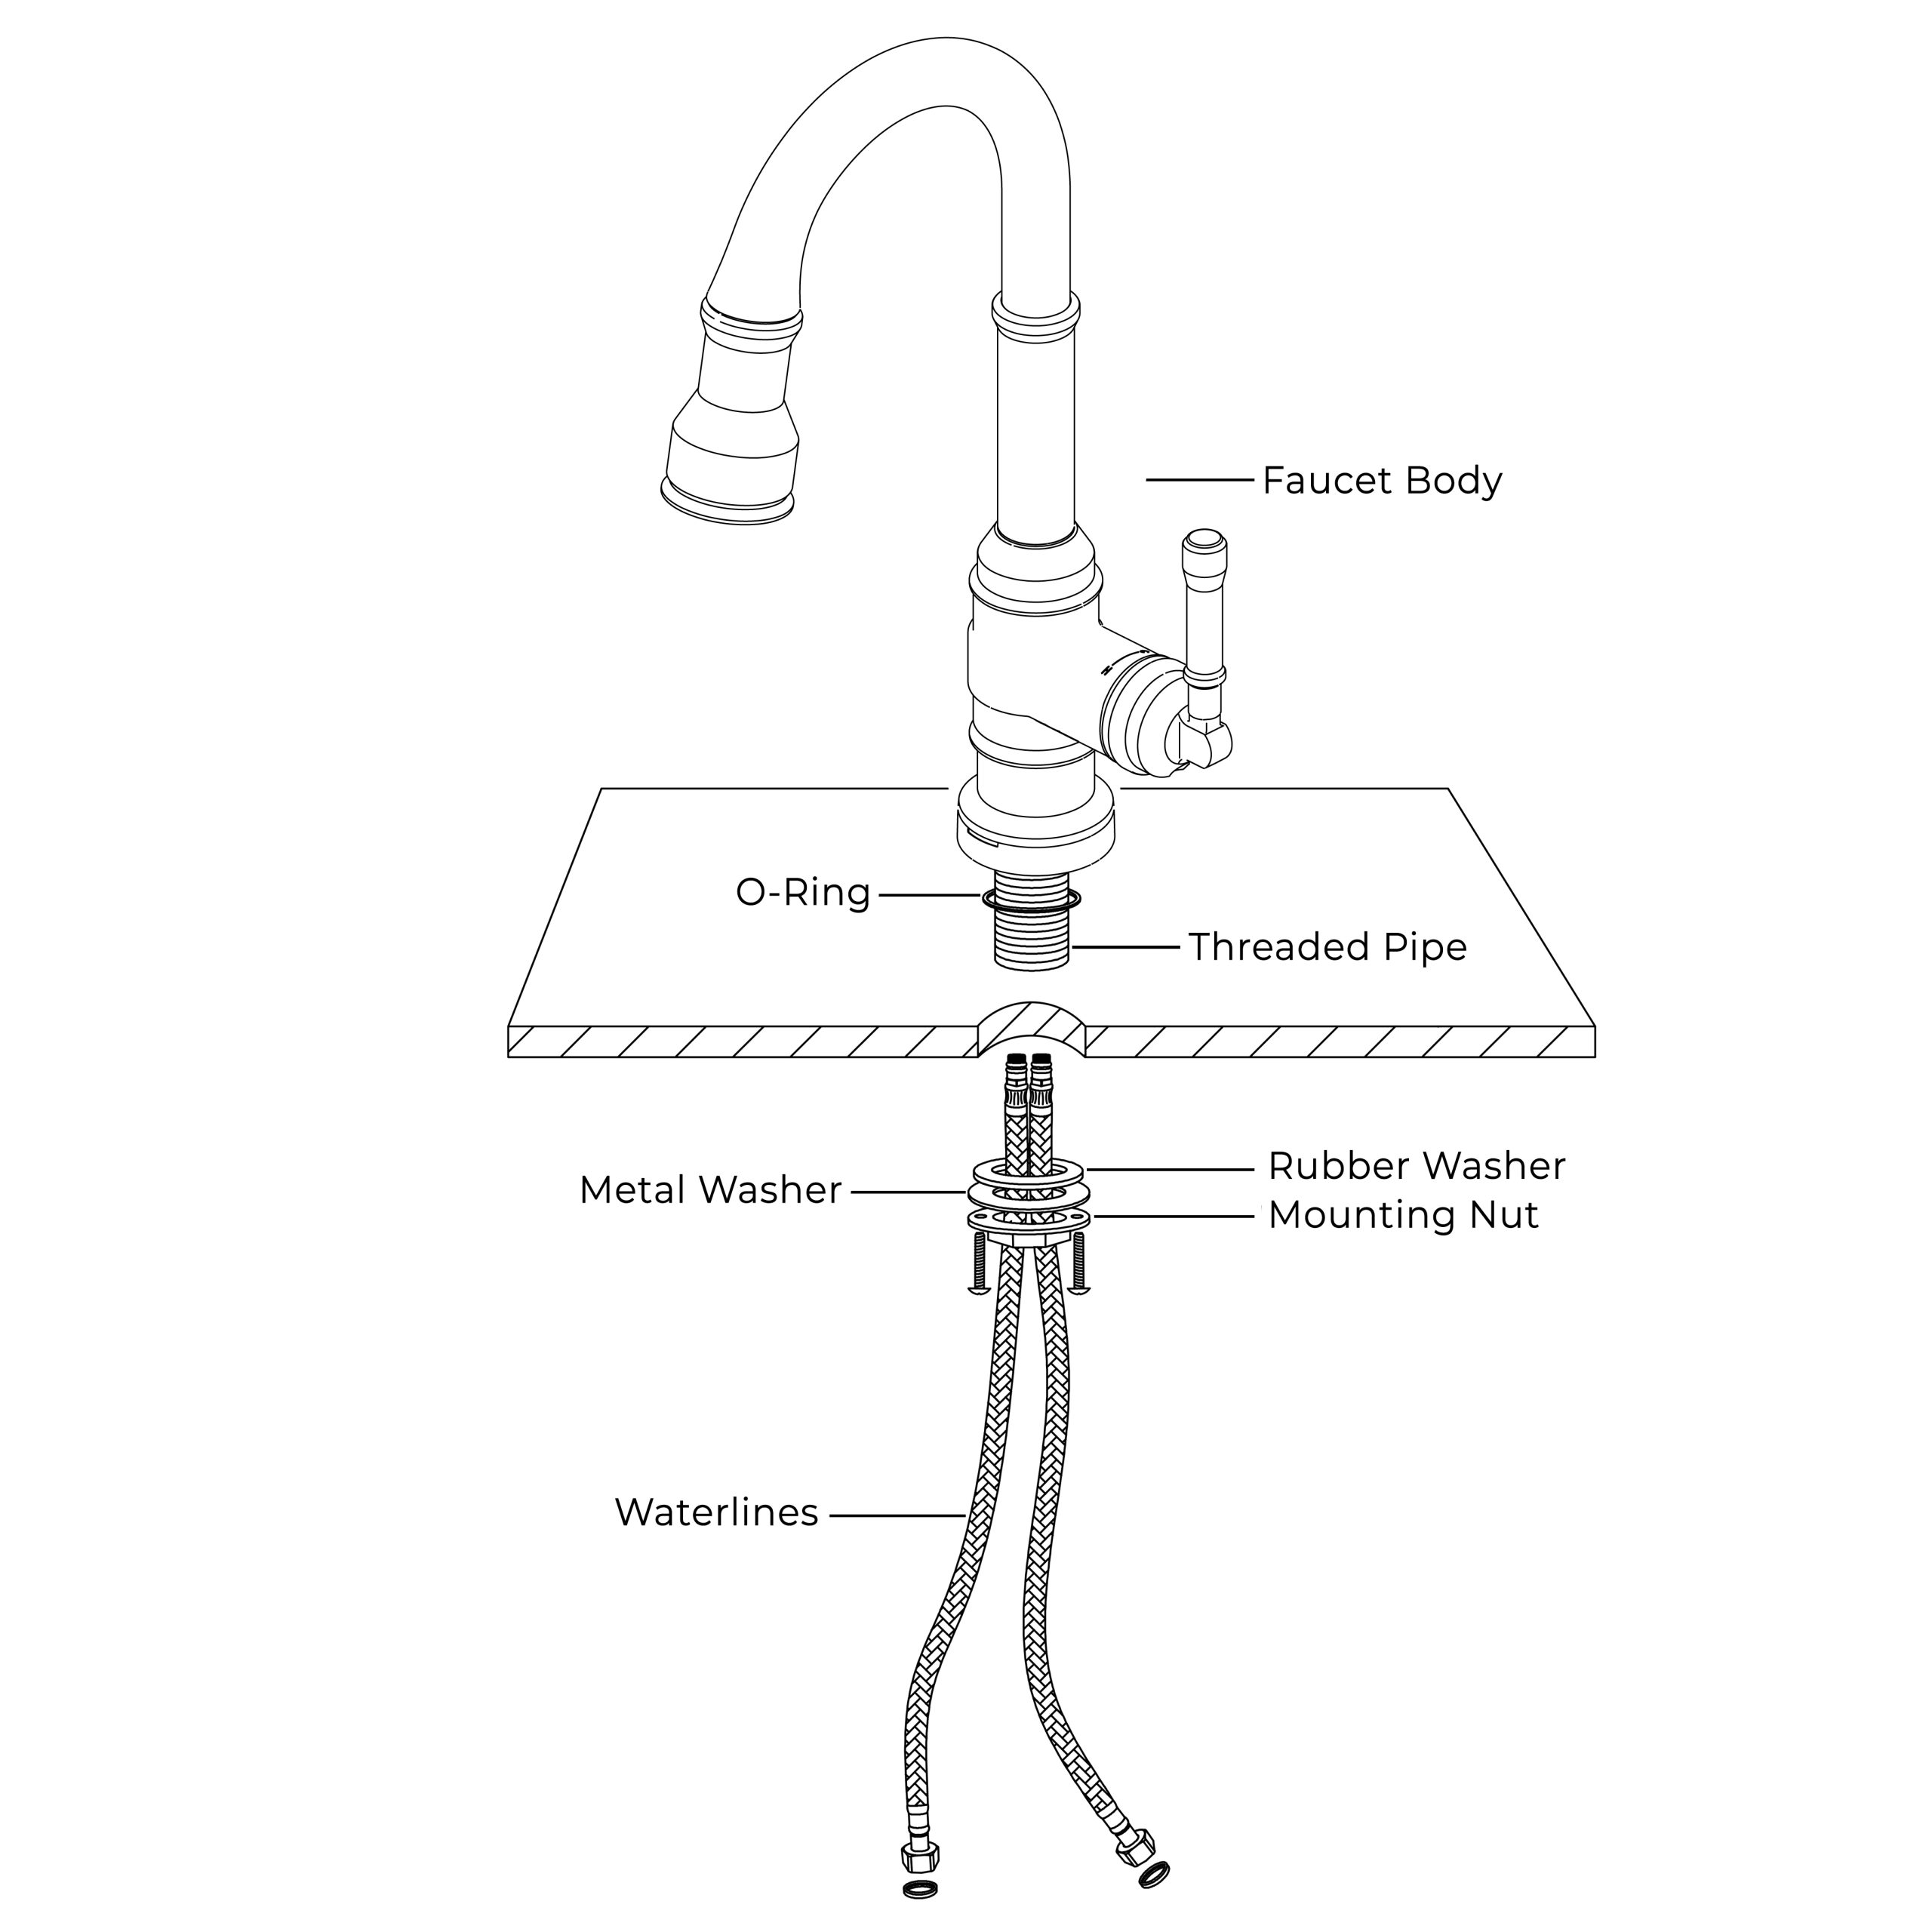
Underneath the sink, secure the mounting hardware by tightening the nuts onto the faucet's threaded shanks. Use an adjustable wrench to ensure they’re snug, but be careful not to overtighten. A friend once shared that overtightening can lead to cracks or damage, which could turn your project into a costly repair. A gentle yet firm approach is the key to success here.
Connect Water Lines
Attach the hot and cold water supply lines to the corresponding valves. Ensure the connections are tight to prevent any leaks. Once connected, turn on the water supply and check for leaks. If none are found, you’ve successfully connected your water lines! When I first connected the lines, I was amazed at how a simple twist could complete such a crucial task. Who knew plumbing could be so empowering? By carefully following these steps, you'll have your kitchen faucet installed and ready for use. The satisfaction you'll feel is unmatched, and you'll gain valuable DIY experience that could inspire future home projects.
Install The Soap Dispenser
Installing a soap dispenser alongside your kitchen faucet adds both convenience and a sleek look to your sink area. The process is straightforward but requires careful attention to detail to ensure the dispenser works smoothly and fits perfectly. Let’s look at how to install your soap dispenser step by step.
Select Installation Spot
Choose a spot on your sink or countertop that’s close to the faucet but doesn’t interfere with your daily tasks. You want easy access without cluttering your workspace. Check for any existing holes or determine if you’ll need to drill a new one.
Think about your hand movements when you wash dishes—does the spot feel natural to reach? Also, consider the space underneath the sink to make sure there’s room for the soap bottle without hitting pipes or cabinets.
Mount The Dispenser Pump
Start by inserting the dispenser pump through the hole from above the sink or countertop. It should fit snugly without wobbling. Underneath, secure it with the mounting nut, tightening it just enough to keep it stable.
Be careful not to overtighten the nut, or you might damage your sink surface. Hand-tightening usually does the trick unless your dispenser instructions specify otherwise. Test the pump to see if it moves smoothly without resistance.
Attach The Soap Bottle
After securing the pump, screw the soap bottle onto the threaded end under the sink. Most bottles simply twist on, but make sure the seal is tight to prevent leaks. Fill the bottle with your preferred soap before attaching if possible.
Once attached, press the pump a few times to prime it and get the soap flowing. If the soap doesn’t come out immediately, don’t worry—air might need to clear from the tube. What type of soap are you planning to use, thick or liquid? This can affect how well the dispenser works.
Check For Leaks And Test
After installing your kitchen faucet and soap dispenser, checking for leaks and testing their functions is essential. This step ensures everything works smoothly and helps you avoid water damage or soap messes later on. Taking a little extra time now saves you from costly repairs and frustration down the road.
Turn On Water Supply
Slowly open the shutoff valves under your sink to restore water flow. Watch closely for any drips or moisture where you connected the faucet and supply lines. Even a small leak can cause problems, so tighten connections if needed and check again.
Test Faucet Functions
Run both hot and cold water to confirm temperature control works properly. Check the spray head or pull-out spout if your faucet has one, making sure water pressure stays steady. Does the handle move smoothly, or do you feel resistance? Fix any stiffness or leaks immediately.
Test Soap Dispenser Pump
Press the soap dispenser pump several times to prime it and release soap. If the soap doesn’t come out easily, you might need to fill the reservoir or clear a clog. Pay attention to any drips around the base or under the sink after pumping—this could signal a loose connection or a faulty seal.

Credit: www.amazon.ca
Troubleshooting Tips
Troubleshooting common issues helps keep your kitchen faucet and soap dispenser working smoothly. Simple fixes often solve leaks, pressure problems, and dispenser malfunctions. Understanding these tips saves time and avoids costly repairs.
Fixing Leaks
Leaks usually come from loose connections or worn parts. Check under the sink for water pooling. Tighten any loose nuts or bolts carefully. Inspect the O-rings and washers inside the faucet. Replace any damaged parts with new ones to stop drips. Clean faucet aerators if water drips from the spout. Small leaks need quick attention to prevent water damage.
Adjusting Water Pressure
Low water pressure can affect faucet performance. Start by cleaning the aerator screen; debris often blocks flow. Check the shut-off valves under the sink to ensure they are fully open. If pressure stays low, inspect supply lines for kinks or damage. Replace faulty hoses to restore proper flow. High pressure may cause splashing; install a pressure regulator if needed.
Soap Dispenser Not Pumping
A soap dispenser may stop pumping if clogged or empty. Remove the pump head and rinse it with warm water. Clear any soap buildup inside the pump tube. Refill the soap reservoir with the correct liquid soap type. Press the pump several times to prime it. If it still does not work, check for airlocks or replace the pump mechanism.

Credit: www.amazon.com
Frequently Asked Questions
How Do I Install A Kitchen Faucet With Soap Dispenser?
Start by turning off the water supply under the sink. Mount the faucet and soap dispenser in pre-drilled holes. Connect water lines to the faucet and attach the soap dispenser tube. Finally, turn the water back on and test for leaks.
What Tools Are Needed For Faucet And Soap Dispenser Installation?
You’ll need an adjustable wrench, basin wrench, screwdriver, plumber’s tape, and a bucket. These tools help secure connections and prevent leaks. Having a flashlight can also assist in tight under-sink spaces.
Can I Install A Soap Dispenser With Any Kitchen Faucet?
Most soap dispensers fit standard kitchen faucets, but check compatibility before buying. Ensure the sink has an extra hole or drill one if needed. Match the dispenser’s size and style with your faucet for a seamless look.
How Do I Prevent Leaks During Installation?
Use plumber’s tape on threaded connections to create a tight seal. Tighten fittings securely but avoid overtightening, which can cause damage. Check all connections after installation by running water and inspecting for drips.
Conclusion
Installing a kitchen faucet with a soap dispenser is simple and useful. Follow each step carefully for a smooth process. Take your time to avoid mistakes and leaks. Use basic tools and check all connections well. Your kitchen will look neat and work better.
Enjoy the ease of having soap right by your sink. This small upgrade can save time and effort daily. Try it yourself and see the difference it makes.