
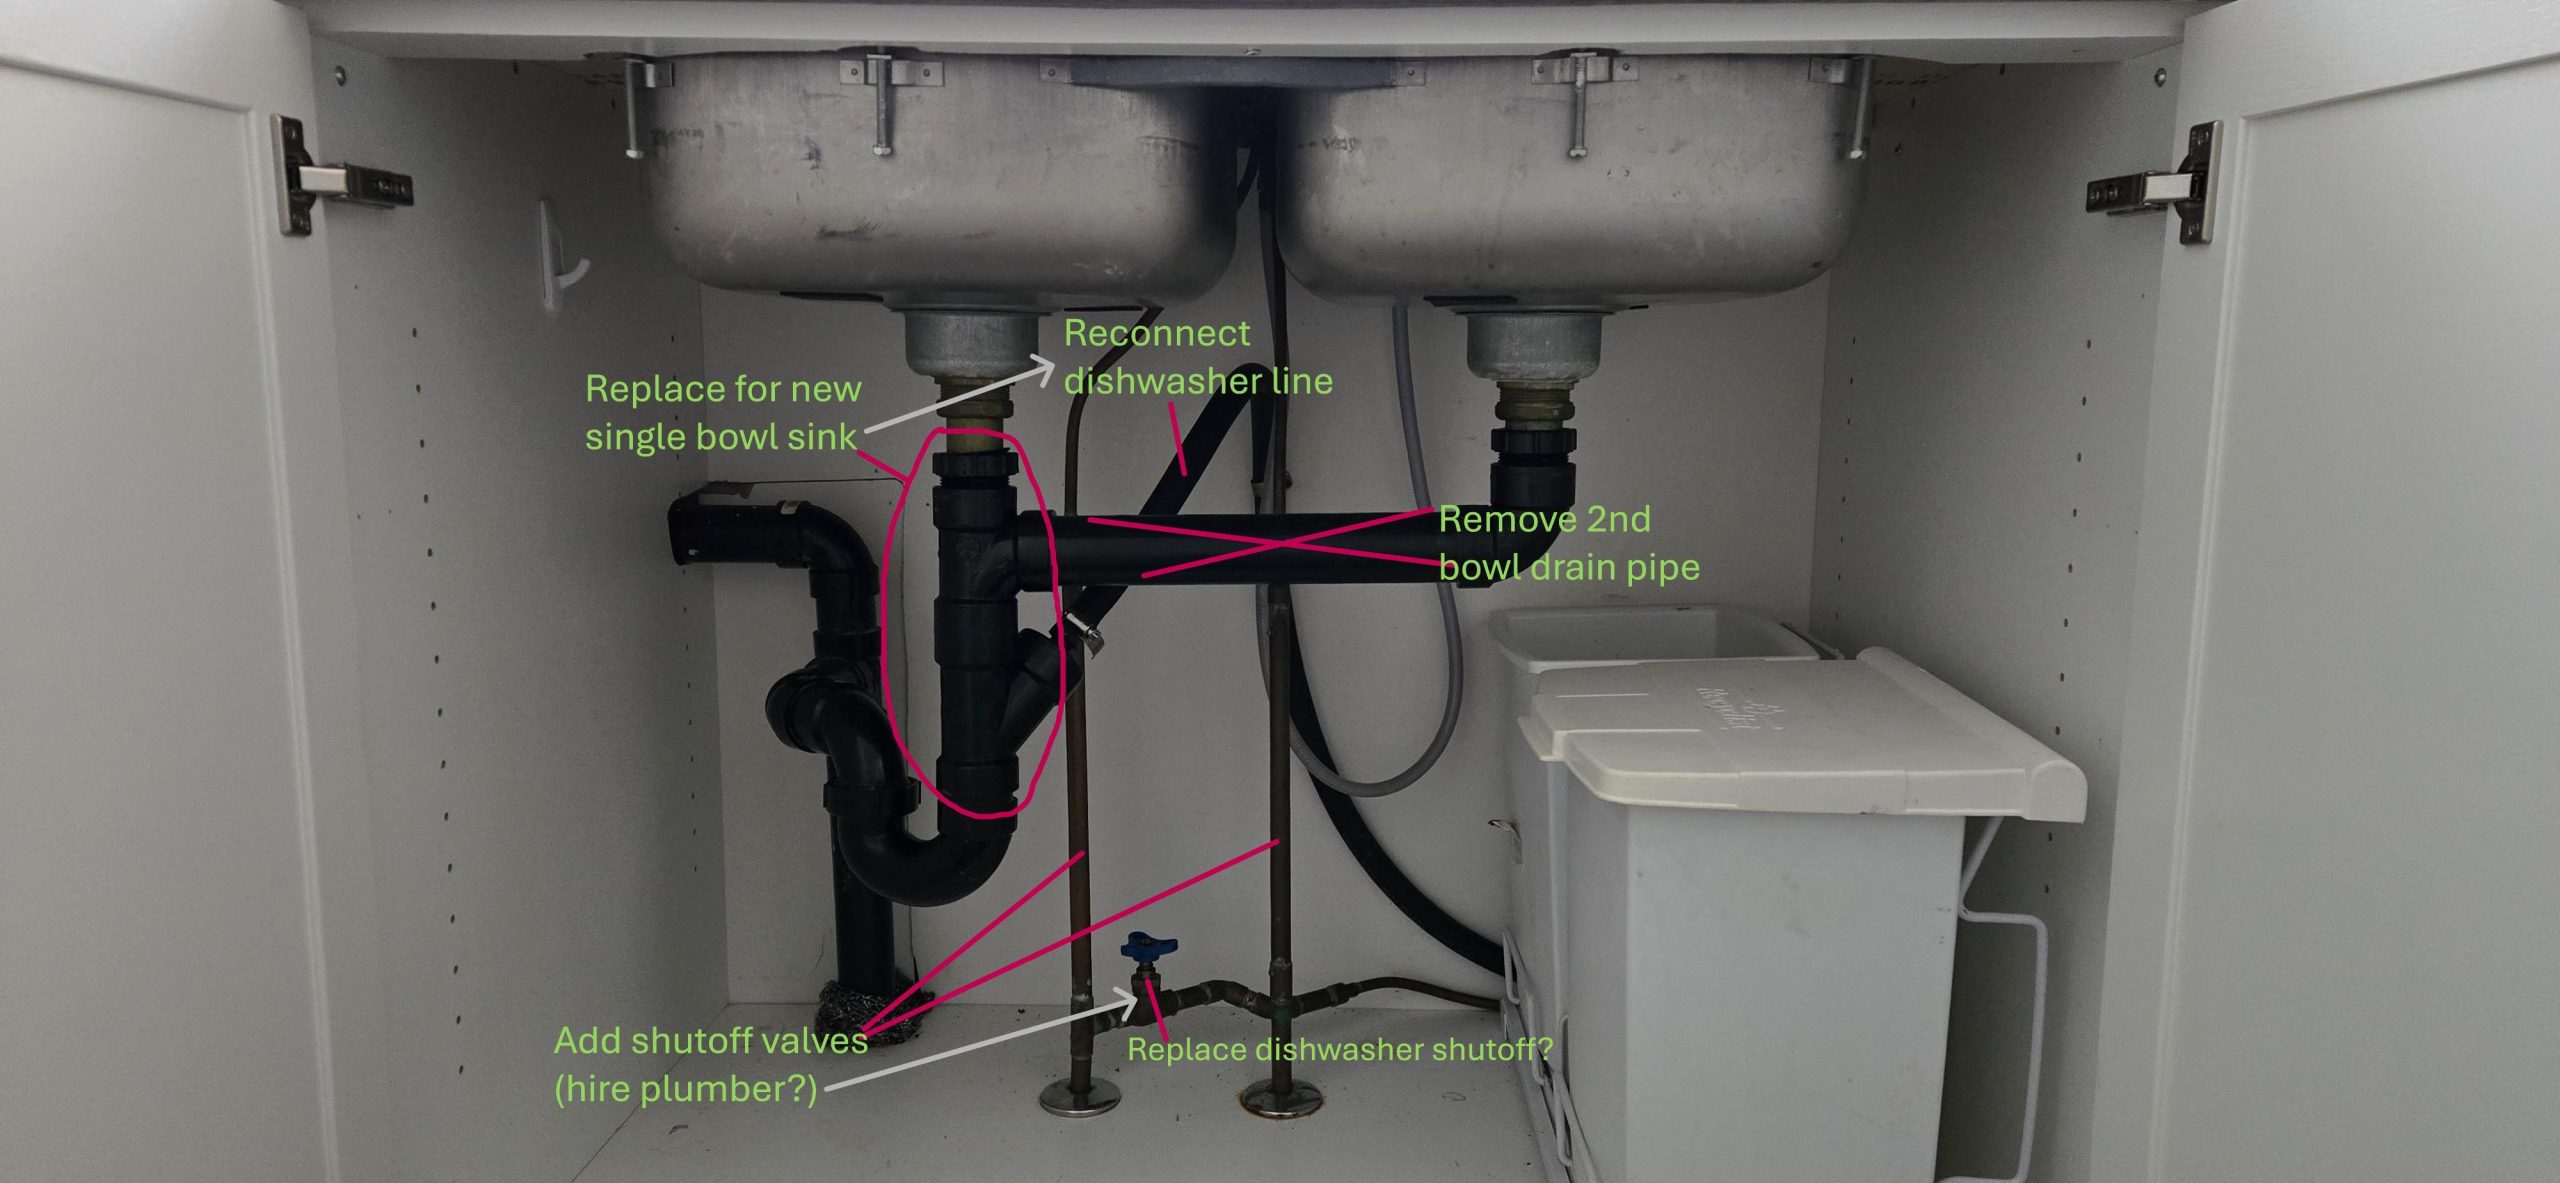
Are you ready to upgrade your kitchen by installing a new sink plumbing system with a dishwasher hookup? Doing this yourself can save you money and give you a sense of accomplishment.
But it might feel a bit overwhelming if you’re not sure where to start. Don’t worry—this guide will walk you through every step clearly and simply. By the end, you’ll have the confidence to tackle the job, avoid common mistakes, and enjoy a smoothly working kitchen setup.
Keep reading to discover how easy it can be to install kitchen sink plumbing with a dishwasher connection!
Tools And Materials Needed
Installing kitchen sink plumbing with a dishwasher requires the right tools and materials to ensure everything fits perfectly and functions smoothly. Having these items ready before you start saves you from frustrating trips to the hardware store. It also helps you work efficiently and avoid costly mistakes.
Essential Plumbing Tools
- Adjustable wrench:Perfect for tightening or loosening nuts and bolts of various sizes.
- Pipe wrench:Provides a strong grip on pipes, especially when dealing with metal ones.
- Plumber’s tape (Teflon tape):Prevents leaks by sealing threaded pipe connections.
- Pipe cutter or hacksaw:Allows you to cut pipes to the exact length needed.
- Basin wrench:Designed to reach nuts in tight spaces beneath the sink.
- Bucket and towels:Essential to catch water drips and keep your workspace clean.
Necessary Plumbing Parts
- Sink drain assembly:Includes the drain flange, tailpiece, and P-trap.
- P-trap:Prevents sewer gases from entering your kitchen by trapping water in its curve.
- PVC or ABS pipes:Used for connecting the drain to your home’s waste system.
- Compression fittings:Make it easier to connect pipes without soldering.
- Shut-off valves:Let you control water flow during installation and future repairs.
Dishwasher Connection Components
- Dishwasher drain hose:Carries wastewater from the dishwasher to the sink drain or garbage disposal.
- Dishwasher inlet valve hose:Connects the dishwasher to the hot water supply.
- Air gap or high loop:Prevents dirty water from flowing back into the dishwasher.
- Hose clamps:Secure the drain and inlet hoses to prevent leaks.
Have you ever started a plumbing project only to realize you’re missing a key tool or part? Gathering everything ahead of time not only keeps you focused but also gives you confidence as you work. How comfortable do you feel with your current toolkit for plumbing tasks?

Credit: www.reddit.com
Preparing The Workspace
Preparing your workspace is a crucial step before installing kitchen sink plumbing with a dishwasher. It sets the foundation for a smooth and safe installation process. Taking time to organize and protect your area can save you from unexpected hassles later on.
Shutting Off Water Supply
Start by turning off the main water supply to your kitchen sink. This prevents water leaks and flooding while you work. Check both the hot and cold water valves, ensuring they are completely closed.
If your home has a separate valve under the sink, use it for convenience. Otherwise, locate the main water shutoff valve for the entire house. Have a bucket and towels nearby just in case any water remains in the pipes.
Clearing Under-sink Area
Empty everything from under your sink to give yourself plenty of room to work. Cabinets can get cluttered quickly, but removing all items reduces the risk of damage. You’ll also avoid knocking things over or creating a mess.
Wipe down the cabinet interior if it’s dusty or wet. This small step helps you spot any leaks or damage early. Have a flashlight handy to inspect the pipes and connections clearly.
Gathering Safety Gear
Safety should be your top priority. Gather gloves, safety goggles, and knee pads before starting. Gloves protect your hands from sharp edges and chemicals, while goggles shield your eyes from debris.
Consider wearing old clothes as plumbing work can get messy. If you have a helper, make sure they are equipped too. Have a first aid kit nearby, just in case you need it.
Installing The Kitchen Sink Drain
Begin by connecting the kitchen sink drain securely to avoid leaks. Attach the dishwasher drain hose to the plumbing system carefully for proper water flow. Ensure all connections are tight and sealed to prevent water damage.
Installing the kitchen sink drain can seem like a daunting task, but with the right guidance, you can do it smoothly and efficiently. It's a crucial step in ensuring that water and waste flow effortlessly from your sink to the plumbing system. Getting it right the first time not only saves you from potential leaks but also ensures your kitchen functions seamlessly.
Fitting The Sink Strainer
Start by placing the sink strainer into the drain opening. Ensure it sits flush against the surface. This is crucial for preventing leaks later on. Use plumber's putty around the edge of the strainer. This creates a watertight seal. Press firmly to embed the putty into place. Underneath the sink, secure the strainer with a gasket and a locknut. Tighten the locknut with a wrench, but avoid over-tightening. You want a snug fit without causing damage.
Sealing And Securing The Drain
Check the seal around the strainer to ensure no gaps are present. Water should not seep through. If needed, apply additional putty. Next, attach the tailpiece to the strainer. This piece connects your sink to the drainpipes. Ensure it’s tightly screwed in, avoiding any potential leaks. Consider using a silicone sealant for added protection. It’s an extra step, but it provides peace of mind knowing your seal is secure.
Connecting Drain Pipes
Position the P-trap beneath the tailpiece. This curved section is essential for trapping debris and preventing sewer gases from entering your kitchen. Align it carefully. Attach the drainpipes, ensuring they slope slightly downward. This slope is vital for proper water flow. It prevents standing water and potential blockages. Tighten all the connections securely. Use slip nuts and washers for a reliable fit. Once everything is in place, turn on the water to test for leaks. Have you ever tackled a plumbing project before? Each step can feel like a victory. With patience and attention to detail, you'll have your sink plumbing, including the dishwasher, up and running in no time.
Credit: www.diychatroom.com
Setting Up The Dishwasher Drain
Setting up the dishwasher drain is a crucial part of your kitchen sink plumbing project. It ensures your dishwasher empties properly without causing leaks or backups. Getting this right can save you from future water damage and unexpected repairs.
Attaching The Dishwasher Drain Hose
Start by securing the dishwasher drain hose to the dishwasher’s drain outlet. Use a hose clamp to tighten it firmly, preventing leaks during draining. Make sure the hose isn’t kinked or twisted, as this can block water flow and cause problems.
Check the hose length before attaching it. Too short and it may pull loose; too long and it can sag or trap water. Adjust it so the hose runs smoothly from the dishwasher to the plumbing connection.
Installing The Air Gap Or High Loop
To prevent dirty water from flowing back into your dishwasher, you need an air gap or a high loop in the drain hose. The air gap is a small device mounted on your sink or countertop with two hose connections. It physically separates the dishwasher drain from the sink drain, stopping backflow.
If you don’t have an air gap, create a high loop by securing the hose as high as possible under the sink cabinet, ideally near the bottom of the countertop. This loop uses gravity to prevent water from flowing backward. Which option fits your setup better depends on your sink design and local plumbing codes.
Connecting To The Sink Drain
The dishwasher drain hose must connect to the sink drain or garbage disposal unit. Usually, this connection is made through a dishwasher inlet on the side of the disposal or a special branch tailpiece on the sink drain pipe. Remove the plug inside the inlet before attaching the hose.
Use a hose clamp to secure the hose to the inlet tightly. Double-check for leaks by running the dishwasher through a cycle once everything is connected. Have you noticed any water dripping or pooling? Fix these issues immediately to avoid water damage.
Connecting The Water Supply Lines
Connecting the water supply lines is a crucial step in installing your kitchen sink plumbing with a dishwasher. This phase ensures that both hot and cold water flow correctly to your sink and dishwasher, allowing them to function efficiently. Paying attention to detail here can save you from leaks and water damage later on.
Installing Shutoff Valves
Start by installing shutoff valves on both the hot and cold water lines. These valves give you control to stop water flow during maintenance or emergencies. You want to position them where you can easily reach under the sink.
Use a pipe cutter to trim the supply pipes if needed, then attach the valves using compression fittings or soldering, depending on your pipe type. Tighten connections snugly but be careful not to overtighten and damage the fittings.
Attaching Hot And Cold Water Lines
Next, connect the flexible supply lines from the shutoff valves to your sink faucet and dishwasher. Typically, the hot water line attaches to the left valve and the cold water line to the right. Make sure to use braided stainless steel lines for durability.
Hand-tighten the connections first, then use a wrench to give an additional quarter turn. Avoid over-tightening to prevent stripping the threads. Double-check that the dishwasher water inlet is correctly connected to the hot water supply for proper operation.
Checking For Leaks
Once everything is connected, turn on the shutoff valves slowly. Watch closely for any drips or wet spots around the fittings. Even a small leak can cause damage over time, so it’s worth the effort to inspect carefully.
If you spot leaks, gently tighten the fittings or reapply plumber’s tape on threaded connections. Testing the water flow by running both the sink faucet and dishwasher helps confirm your work is solid. Have you ever overlooked a tiny drip only to deal with a bigger issue later?
Testing The Plumbing System
Testing the plumbing system after installing your kitchen sink and dishwasher is essential to ensure everything works smoothly. This step helps you catch leaks, blockages, or faulty connections before they cause damage. Let’s walk through how you can thoroughly test your setup to avoid surprises down the line.
Running Water Through The Sink
Start by turning on the cold and hot water taps at the sink. Let the water run for several minutes to observe the flow and pressure. This simple action can reveal any issues like slow drainage or unusual noises.
Check under the sink carefully while the water runs. Look for any signs of leaks around the pipe joints or fittings. If you spot even a small drip, tighten the connections immediately to prevent bigger problems.
Operating The Dishwasher
Next, run a full wash cycle on the dishwasher to test its connection to the plumbing. Pay attention to how the water fills and drains during the cycle. Any hesitation or backup might indicate a clog or improper hose installation.
While the dishwasher is running, observe the drain hose and plumbing junctions. Make sure there are no leaks or water pooling around these areas. This real-time test is a perfect way to catch hidden issues you might miss otherwise.
Inspecting For Drips And Blockages
After running water and the dishwasher, inspect every visible pipe and joint once more. Use a dry cloth to wipe around connections and check for moisture spots. Even a tiny wet area can signal a slow leak that needs fixing.
To check for blockages, notice if water drains slowly or if there’s any gurgling sound. These signs suggest partial clogs that could worsen over time. Clearing these early saves you from costly repairs later.
Have you ever ignored small drips only to face a flooded kitchen? Testing your plumbing now can save you that headache. Take your time during this step; it’s your best chance to ensure your kitchen sink and dishwasher plumbing is reliable and leak-free.
Troubleshooting Common Issues
Installing kitchen sink plumbing with a dishwasher can sometimes lead to unexpected issues. Knowing how to troubleshoot common problems will save you time and frustration. Let’s look at some typical issues and how to handle them effectively so your setup works smoothly.
Dealing With Leaks
Leaks often happen around connections and joints. Check the water supply lines and drain pipes carefully. Tightening loose fittings usually stops leaks, but if you see water dripping from cracks or damaged seals, replace the affected parts immediately.
Using plumber’s tape around threaded connections can prevent leaks before they start. Have you checked your connections recently? Small drips can turn into big problems if ignored.
Fixing Drainage Problems
Slow drainage is a common headache. Hair, food particles, and grease buildup can clog pipes and slow water flow. Try using a plunger or a drain snake to clear blockages without harsh chemicals.
If water pools around your sink or dishwasher, inspect the drain hose for kinks or improper installation. Ensuring the hose has a proper loop or air gap can stop water from backing up. How often do you clean your sink drain to keep it flowing?
Handling Dishwasher Drain Backflow
Backflow happens when wastewater from the sink flows back into the dishwasher. This usually means the drain hose isn't installed correctly or the air gap is missing. Installing an air gap or a high loop in the hose prevents dirty water from coming back.
Check if your dishwasher drain hose is connected above the trap level. If not, adjust it to stop backflow. Have you noticed any foul smells or dirty water inside your dishwasher? That’s a clear sign to inspect your drain hose setup.
Maintenance Tips
Proper maintenance keeps your kitchen sink plumbing and dishwasher working smoothly. Small efforts prevent big problems. Regular care saves time and money. Follow these tips to maintain your setup and enjoy hassle-free use.
Regular Cleaning Practices
Clean the sink drain and dishwasher filter often. Remove food scraps and debris to stop bad smells. Use mild soap and warm water for cleaning. Avoid harsh chemicals that damage pipes and parts. Wipe down connections to keep them dry and clean.
Checking Connections Periodically
Inspect hoses and fittings every few months. Look for leaks, cracks, or loose parts. Tighten connections gently if needed. Replace worn or damaged hoses quickly. Proper checks avoid water damage and costly repairs.
Preventing Clogs
Use a drain strainer to catch large particles. Avoid pouring grease or oil down the sink. Run hot water after each dishwasher cycle. Flush the drain with baking soda and vinegar monthly. These habits keep pipes clear and flowing well.
Credit: www.diychatroom.com
Frequently Asked Questions
How Do I Connect A Dishwasher To Kitchen Sink Plumbing?
Connect the dishwasher drain hose to the sink’s drain or garbage disposal. Use a dishwasher branch tailpiece with a high loop for proper drainage.
What Tools Are Needed For Kitchen Sink Plumbing Installation?
You need a pipe wrench, adjustable pliers, plumber’s tape, a screwdriver, a hacksaw, and a bucket for installation tasks.
Can I Install Kitchen Sink Plumbing With Dishwasher Myself?
Yes, with basic plumbing knowledge, you can install it. Follow instructions carefully and ensure all connections are secure to avoid leaks.
How To Prevent Leaks When Installing Sink Plumbing And Dishwasher?
Use plumber’s tape on threaded connections, tighten fittings properly, and test the system for leaks before finishing the installation.
Conclusion
Installing kitchen sink plumbing with a dishwasher can be simple. Follow the steps carefully and take your time. Check all connections to avoid leaks. Use the right tools and parts for a secure fit. Test the system after installation to ensure it works well.
This project saves money and gives you confidence. Practice makes perfect, so don’t rush. Enjoy your new, functional kitchen setup every day.