
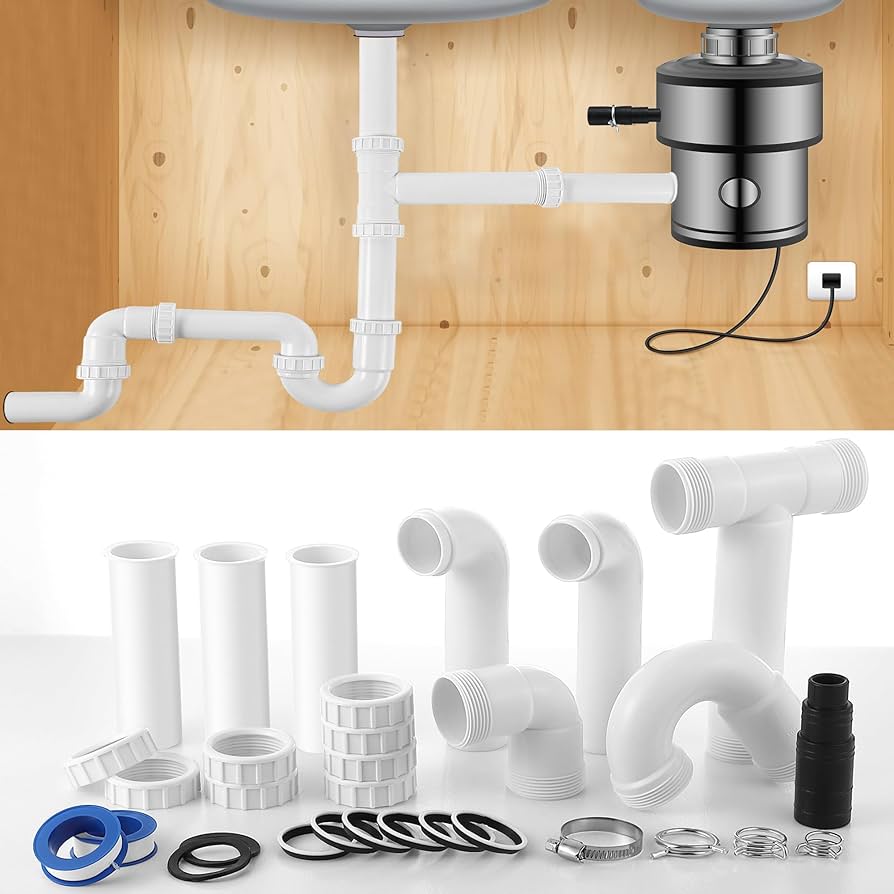
Are you ready to upgrade your kitchen by installing a new sink plumbing system with a disposal and dishwasher? It might sound complicated, but with the right steps, you can do it yourself and save money.
Imagine having a smoothly working kitchen where cleanup is faster and easier. In this guide, you’ll discover simple instructions that break down the process so you won’t feel overwhelmed. Keep reading to learn how to make your kitchen more efficient and enjoy the satisfaction of a job well done.
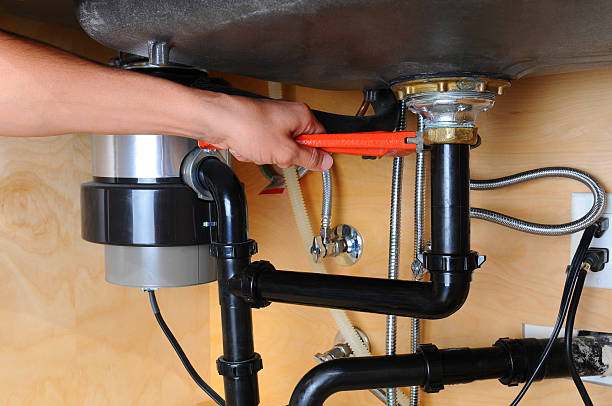
Credit: plumbsmart.com
Gather Tools And Materials
Gathering the right tools and materials is essential before installing kitchen sink plumbing with a disposal and dishwasher. Proper preparation saves time and avoids frustration. Having everything ready helps the installation go smoothly and safely.
Tools and materials vary depending on the setup. Some items are common for most installations, while others fit specific needs. Check your sink and appliance manuals to confirm any special requirements.
Basic Plumbing Tools
- Adjustable wrench
- Pipe wrench
- Slip-joint pliers
- Hacksaw
- Pipe cutter
- Plumber’s putty or silicone sealant
- Bucket for water drainage
- Measuring tape
- Phillips and flathead screwdrivers
- Plumber’s tape (Teflon tape)
Materials For Sink And Disposal Installation
- Kitchen sink drain assembly
- Garbage disposal unit
- Disposal mounting ring and gasket
- Discharge tube
- Dishwasher inlet hose
- Tailpiece and trap assembly
- PVC or ABS piping
- Drain connectors and couplings
- Wire nuts and electrical cord (if disposal is not pre-wired)
Safety Gear And Additional Supplies
- Safety glasses
- Work gloves
- Flashlight or work light
- Rags or shop towels
- Bucket or container for catching water
- Voltage tester (for electrical connections)

Credit: www.reddit.com
Turn Off Water And Power
Before starting any plumbing work under your kitchen sink, safety must come first. Turning off the water and power prevents accidents and damage. These simple steps protect you and your home from leaks, shocks, or short circuits.
Water and electricity are involved in kitchen sink plumbing with a disposal and dishwasher. Make sure both are completely off to work safely. This step saves time and avoids costly repairs later.
Turn Off The Water Supply
Find the water shut-off valves under the sink. Usually, there are two valves: one for hot water and one for cold water. Turn both valves clockwise until they stop. This closes the water flow to the sink.
If you cannot find the local valves, shut off the main water supply. The main valve is often near the water meter or where the water line enters your home.
Disconnect The Power Supply
Locate the circuit breaker for the kitchen or the disposal unit. Flip the breaker switch to the "off" position. This cuts power to the disposal and dishwasher.
Double-check that the power is off by trying to turn on the disposal or dishwasher. They should not start. If unsure, use a voltage tester for safety.
Safety Tips Before You Begin
- Wear gloves to protect your hands from sharp edges.
- Use safety goggles to shield your eyes from debris.
- Keep a towel or bucket handy to catch any water drips.
- Make sure the area under the sink is well-lit and clutter-free.
Remove Old Sink And Plumbing
Removing your old sink and plumbing sets the stage for a smooth installation of your new kitchen sink with disposal and dishwasher hookup. This step demands care and some patience because plumbing connections can be stubborn, and old parts might be fragile. Taking your time here prevents damage to surrounding cabinets and pipes and helps you avoid leaks or other problems later.
Turn Off Water Supply And Disconnect Plumbing
Before you touch any pipes, shut off the water supply valves under the sink. If those valves don’t work, turn off your home's main water supply to avoid unexpected flooding. Then, place a bucket or towels under the pipes to catch any leftover water.
Use an adjustable wrench to loosen and disconnect the water supply lines from the faucet and shutoff valves. Next, remove the drain pipes connecting the sink to the wall or floor drain. These might include the P-trap, tailpiece, and drain trap adapter.
Detach Garbage Disposal And Dishwasher Connections
If you have a garbage disposal, unplug it from the power source or switch off the circuit breaker. Disconnect the disposal unit by loosening the mounting ring or bolts holding it to the sink drain flange. Be prepared for some resistance; these parts often get stuck over time.
Locate the dishwasher drain hose connected to the sink drain or disposal. Loosen the clamp securing it and carefully pull the hose free. This clears the way for removing the sink without damaging your dishwasher plumbing.
Remove Sink Mounting Hardware And Lift Out Old Sink
Look under the sink for mounting clips or brackets holding the sink to the countertop. Use a screwdriver or nut driver to loosen and remove these fasteners. If the sink is sealed with silicone caulk, gently cut through the seal with a utility knife to avoid damage.
Once all attachments are free, carefully lift the sink out of the countertop opening. It might help to have a friend assist you, especially if the sink is heavy or awkwardly shaped. Inspect the countertop for any damage or residue that needs cleaning before installing your new sink.
Install New Sink Basin
Installing a new sink basin sets the foundation for your kitchen plumbing project. It’s the starting point that ensures everything else fits perfectly, from the disposal unit to the dishwasher connection. Getting this right saves you from leaks and misalignments later on.
Prepare The Sink Opening
Begin by cleaning the countertop opening thoroughly. Remove any old sealant or debris to create a smooth surface. This helps the new sink sit flush and prevents water from seeping underneath.
Check the size of your new basin against the countertop hole. If the opening is too small, you’ll need to carefully enlarge it using a jigsaw or appropriate cutting tool. Accuracy here means a snug fit and better stability.
Apply Sealant For A Secure Fit
Use a bead of plumber’s putty or silicone sealant around the edge of the sink opening. This acts as a waterproof barrier between the sink and countertop. Don’t skimp on the sealant—it’s your best defense against leaks.
Press the sink firmly into place, making sure it’s centered. Wipe away any excess sealant that squeezes out to keep your workspace neat. A clean seal prevents mold and keeps your kitchen smelling fresh.
Secure The Sink To The Countertop
Underneath the countertop, attach the mounting clips or brackets that came with your sink. Tighten them evenly to hold the basin securely without warping the countertop. Uneven pressure can cause cracks or gaps.
Double-check that the sink doesn’t move or rock when you apply gentle pressure. Stability here means your disposal and dishwasher connections will line up properly. Have you noticed how a wobbly sink can turn a simple task into a daily frustration?
Set Up Garbage Disposal
Installing kitchen sink plumbing with a garbage disposal and dishwasher requires careful connection of pipes and electrical parts. Proper setup ensures smooth waste disposal and dishwasher drainage without leaks or clogs. Simple tools and clear steps help complete the job efficiently.
Setting up a garbage disposal in your kitchen can significantly enhance your cooking and cleaning experience. It transforms waste management from a cumbersome task into a simple push of a button. With the right steps, you can efficiently install a disposal unit that seamlessly integrates with your kitchen sink and dishwasher.
Mount Disposal To Sink
Begin by attaching the mounting bracket to the sink's underside. Ensure the bracket is tightly secured to prevent any wobbles or leaks. Enlist a helping hand to hold the disposal steady while you lock it into place. Once the bracket is ready, align the disposal unit with it. Twist the disposal until it clicks securely into the mounting ring. A gentle shake will confirm it's firmly attached.
Connect Disposal Wiring
Before you handle any wiring, ensure the power is off at the circuit breaker. Safety is your top priority, so double-check that the disposal is not connected to any live electricity. Locate the wiring compartment on the disposal unit. Use a screwdriver to open it and find the black and white wires. Connect these wires to your home’s existing wiring using wire nuts, matching black to black and white to white. Once connected, carefully tuck the wires back into the compartment and secure the cover. This step ensures the disposal operates smoothly and safely. Have you ever wondered how a small device can manage so much waste efficiently? A well-installed disposal unit not only streamlines your kitchen tasks but also reduces the amount of food waste heading to landfills. By following these steps, you'll have a fully functional disposal that's ready to tackle all your kitchen waste challenges.
:max_bytes(150000):strip_icc()/spr-bone-crusher-bc-1000-1-25-hp-garbage-disposal-michaela-morris-05-931191d700b34ac9b0cac4345b88d806.jpeg)
Credit: www.thespruce.com
Install Dishwasher Drain Line
Installing the dishwasher drain line is a vital part of kitchen sink plumbing. It allows wastewater from the dishwasher to flow safely into the disposal unit. Proper connection avoids leaks and ensures smooth drainage. Follow these simple steps to attach and secure the drain hose correctly.
Attach Drain Hose To Disposal
Locate the dishwasher drain port on the disposal unit. Remove the knockout plug inside the port if it is still in place. Slide the dishwasher drain hose onto the port firmly. Make sure the hose fits snugly without gaps. This connection directs dirty water from the dishwasher into the disposal.
Secure Hose Clamps
Use a hose clamp to hold the drain hose tightly on the disposal port. Position the clamp over the hose where it covers the port. Tighten the clamp with a screwdriver until it feels secure. Avoid overtightening to prevent damage to the hose. A secure clamp stops leaks and keeps the hose stable during use.
Connect Sink Drain Pipes
Connecting the sink drain pipes is a crucial step in setting up your kitchen plumbing with a disposal and dishwasher. This process ensures that wastewater flows smoothly from your sink to the home's drainage system without leaks or clogs. Paying attention to each connection helps avoid common plumbing headaches later on.
Attach P-trap
The P-trap is a curved pipe beneath your sink that prevents sewer gases from entering your kitchen. To attach it, align the trap’s outlet with the drain pipe coming from the wall or floor.
Make sure the P-trap fits snugly onto the tailpiece of the sink drain. Hand-tighten the slip nuts and washers to secure the connection, then check for proper alignment before fully tightening.
Have you noticed a persistent odor near your sink? Often, a loose or missing P-trap is the culprit. Securing this piece correctly solves that issue instantly.
Seal Pipe Joints
Sealing the pipe joints prevents leaks and water damage under your sink. Use plumber’s putty or silicone sealant around the edges of each joint before tightening the connections.
For threaded pipes, wrap Teflon tape around the threads to enhance the seal. Avoid over-tightening as this can crack plastic fittings or strip threads, causing leaks.
After sealing, run water through the drain and inspect all joints closely. Catching leaks early saves you time and money down the road.
Test For Leaks And Functionality
Testing for leaks and functionality is a crucial step after installing kitchen sink plumbing with a disposal and dishwasher. This process ensures all connections are tight and everything works properly. Catching leaks early prevents water damage and costly repairs.
Testing also confirms the disposal and dishwasher drain correctly. It helps avoid clogs and drainage issues in the future. Follow a simple routine to check every component thoroughly.
Check All Water Connections
Turn on the water supply slowly. Watch every joint and pipe under the sink closely. Look for any signs of dripping or moisture.
- Inspect supply lines to the faucet and dishwasher.
- Examine the drain pipes and disposal connections.
- Feel for wet spots or dampness on pipe surfaces.
Any leak, no matter how small, needs fixing before proceeding.
Run The Garbage Disposal
Switch on the disposal to test its operation. Listen for unusual noises that could indicate a problem.
- Ensure the disposal runs smoothly without vibration.
- Check for leaks around the unit’s base.
- Use cold water while running the disposal to clear debris.
Test The Dishwasher Drain
Start a dishwasher cycle and watch the drain connection. Make sure water flows freely into the sink drain or disposal.
- Look under the sink for leaks during the cycle.
- Confirm that water drains quickly without pooling.
- Check that hoses are secure and properly connected.
Final Drainage And Leak Inspection
Run the faucet and disposal together for a full drainage test. Watch for leaks or slow draining.
- Check all pipes for drips during this combined test.
- Ensure water flows smoothly through every drain part.
- Tighten any loose fittings found during inspection.
Frequently Asked Questions
How Do I Connect A Dishwasher To Kitchen Sink Plumbing?
To connect a dishwasher, attach its drain hose to the sink’s drain tailpiece or garbage disposal. Use a dishwasher inlet on the disposal. Secure all connections to prevent leaks and ensure proper drainage.
Can I Install A Garbage Disposal Myself?
Yes, you can install a garbage disposal with basic plumbing skills. Turn off power, disconnect old plumbing, mount the disposal, and connect the drain and power. Follow manufacturer instructions carefully for safety and efficiency.
What Tools Are Needed For Sink Plumbing Installation?
You’ll need a wrench, plumber’s putty, screwdriver, pipe cutter, and plumber’s tape. These tools help you secure fittings, seal joints, and cut pipes for a proper installation.
How To Prevent Leaks In Sink Plumbing Connections?
Use plumber’s tape on threaded fittings and plumber’s putty around sink drains. Tighten connections securely but avoid overtightening, which can cause damage and leaks.
Conclusion
Installing kitchen sink plumbing with a disposal and dishwasher takes some care. Follow the steps carefully for a good fit. Check all connections to avoid leaks. Use the right tools and parts for safety. Take your time and be patient.
This project saves money and adds convenience to your kitchen. You can enjoy a clean sink and dishwasher working well. A well-done job lasts for years. Ready to try it yourself?