

Are you tired of cluttered countertops and constantly reaching for a separate soap bottle while washing dishes? Installing a soap dispenser right in your kitchen sink can make your daily routine smoother and your space tidier.
But how do you get started? Don’t worry—this guide will walk you through every simple step to install a soap dispenser yourself, saving you time and money. By the end, you’ll have a sleek, convenient addition to your kitchen that feels like it was always meant to be there.
Let’s dive in and make your kitchen work better for you!
Tools And Materials Needed
Installing a soap dispenser in your kitchen sink requires some basic tools and materials. Having everything ready before you start makes the job easier and faster. This section lists all the essentials you need for a smooth installation.
Basic Tools
- Adjustable wrench for tightening nuts and bolts
- Screwdriver, both flathead and Phillips types
- Measuring tape to check dimensions and spacing
- Utility knife for trimming any excess material
- Plumber’s putty or silicone sealant to prevent leaks
- Pliers for gripping and twisting small parts
- Bucket or bowl to catch any water drips
Materials Needed
- Soap dispenser kit including pump, bottle, and mounting hardware
- Flexible water supply tube or hose
- Mounting bracket or gasket if not included in the kit
- Cleaning cloth to wipe away excess putty or sealant
Safety Equipment
- Protective gloves to keep hands clean and safe
- Safety glasses to protect eyes from splashes
- Old towels to cover the sink area and catch drips
Choose The Right Soap Dispenser
Choosing the right soap dispenser for your kitchen sink isn’t just about style—it impacts your daily routine and kitchen efficiency. A well-chosen dispenser complements your sink setup and makes soap easily accessible, reducing mess and frustration.
Think about your kitchen habits and space before picking a dispenser. Are you looking for a sleek, built-in model or a simple, refillable pump? Your choice can change how smoothly your kitchen tasks flow.
Consider The Material And Finish
Soap dispensers come in various materials like stainless steel, plastic, and glass. Stainless steel options offer durability and a modern look, while plastic is lightweight and budget-friendly.
Matching the dispenser’s finish to your faucet or other fixtures creates a cohesive look. If you have brushed nickel faucets, a similar finish on the dispenser avoids visual clashes.
Check The Soap Capacity
The size of the soap reservoir matters, especially if you hate frequent refills. Larger tanks mean less topping up but can take up more space under your sink.
Consider how often you cook and wash dishes. If your kitchen sees heavy use, a bigger capacity dispenser will save time and hassle.
Decide On Manual Vs. Automatic
Manual dispensers are simple and reliable, requiring a push to release soap. They’re easy to install and usually cost less.
Automatic dispensers use sensors to release soap without touching the pump, which can reduce germs. However, they need batteries or power and might be pricier.
Ensure Compatibility With Your Sink
Measure your sink’s soap dispenser hole or find a spot to drill one. Some dispensers fit standard holes, while others need special sizes.
Also, think about how the dispenser will fit with your faucet and other accessories. Too crowded a space might make it awkward to use.
Prepare The Sink Area
Clear the sink area and remove any items nearby. Wipe the surface clean and dry to ensure a smooth installation. Check the sink for a suitable hole or mark where to drill for the soap dispenser.
Preparing the sink area is a crucial first step when installing a soap dispenser in your kitchen. A well-prepared workspace can make the installation process smooth and hassle-free. You don't want to fumble around with tools or parts in a cluttered space, do you?
Clear The Area
Begin by removing any items around the sink that might get in the way. Dishes, sponges, and cleaning supplies should be temporarily relocated. This will not only give you more room to work but also prevent any accidental damage or spills. Next, give your sink a quick clean. Wiping it down will help ensure that no dirt or grime gets trapped under the dispenser, which could affect the seal and lead to issues down the line. A clean surface is a good start to a successful installation.
Locate Installation Spot
Identifying the perfect spot for your soap dispenser is key. Typically, it should be within easy reach when you’re washing dishes. This might be a spot directly behind or to the side of your faucet. Consider the under-sink space as well. Ensure there's enough room for the dispenser's bottle without interfering with existing plumbing or storage. You might find it helpful to measure the available space to avoid any surprises. Also, think about your daily routine. Would a left-handed placement be more convenient for you, or is the right side better? A little forethought can make using your new dispenser a daily delight.

Credit: www.amazon.com
Drill The Installation Hole
Drilling the installation hole is a crucial part of setting up your soap dispenser at the kitchen sink. This step requires precision and care to ensure the dispenser fits perfectly without damaging your countertop. Taking your time here will save you from costly mistakes and make the installation process smoother.
Mark The Spot
Start by choosing the exact place where the soap dispenser will sit. Look for a spot near the sink but away from any plumbing or cabinet edges. Use a pencil to mark the center of the hole clearly.
Double-check the size of the dispenser’s base against the mark. Is there enough clearance for you to reach the pump comfortably? Visualize how you’ll use the dispenser daily before you drill.
Drill Carefully
Use a drill bit that matches the size recommended by the soap dispenser’s instructions. Start with a small pilot hole to prevent the bit from slipping on smooth surfaces. Then, gradually widen the hole to the correct diameter.
Take your time and apply steady pressure. Rushing can crack or chip your countertop, especially if it’s made of stone or tile. If you’re unsure, place a piece of painter’s tape over the mark to help the drill bit grip better and reduce splintering.
Have you considered what tools you have on hand? A variable-speed drill is ideal because it lets you control the speed and avoid damage. If you don’t have one, renting or borrowing might be worth it for this job alone.
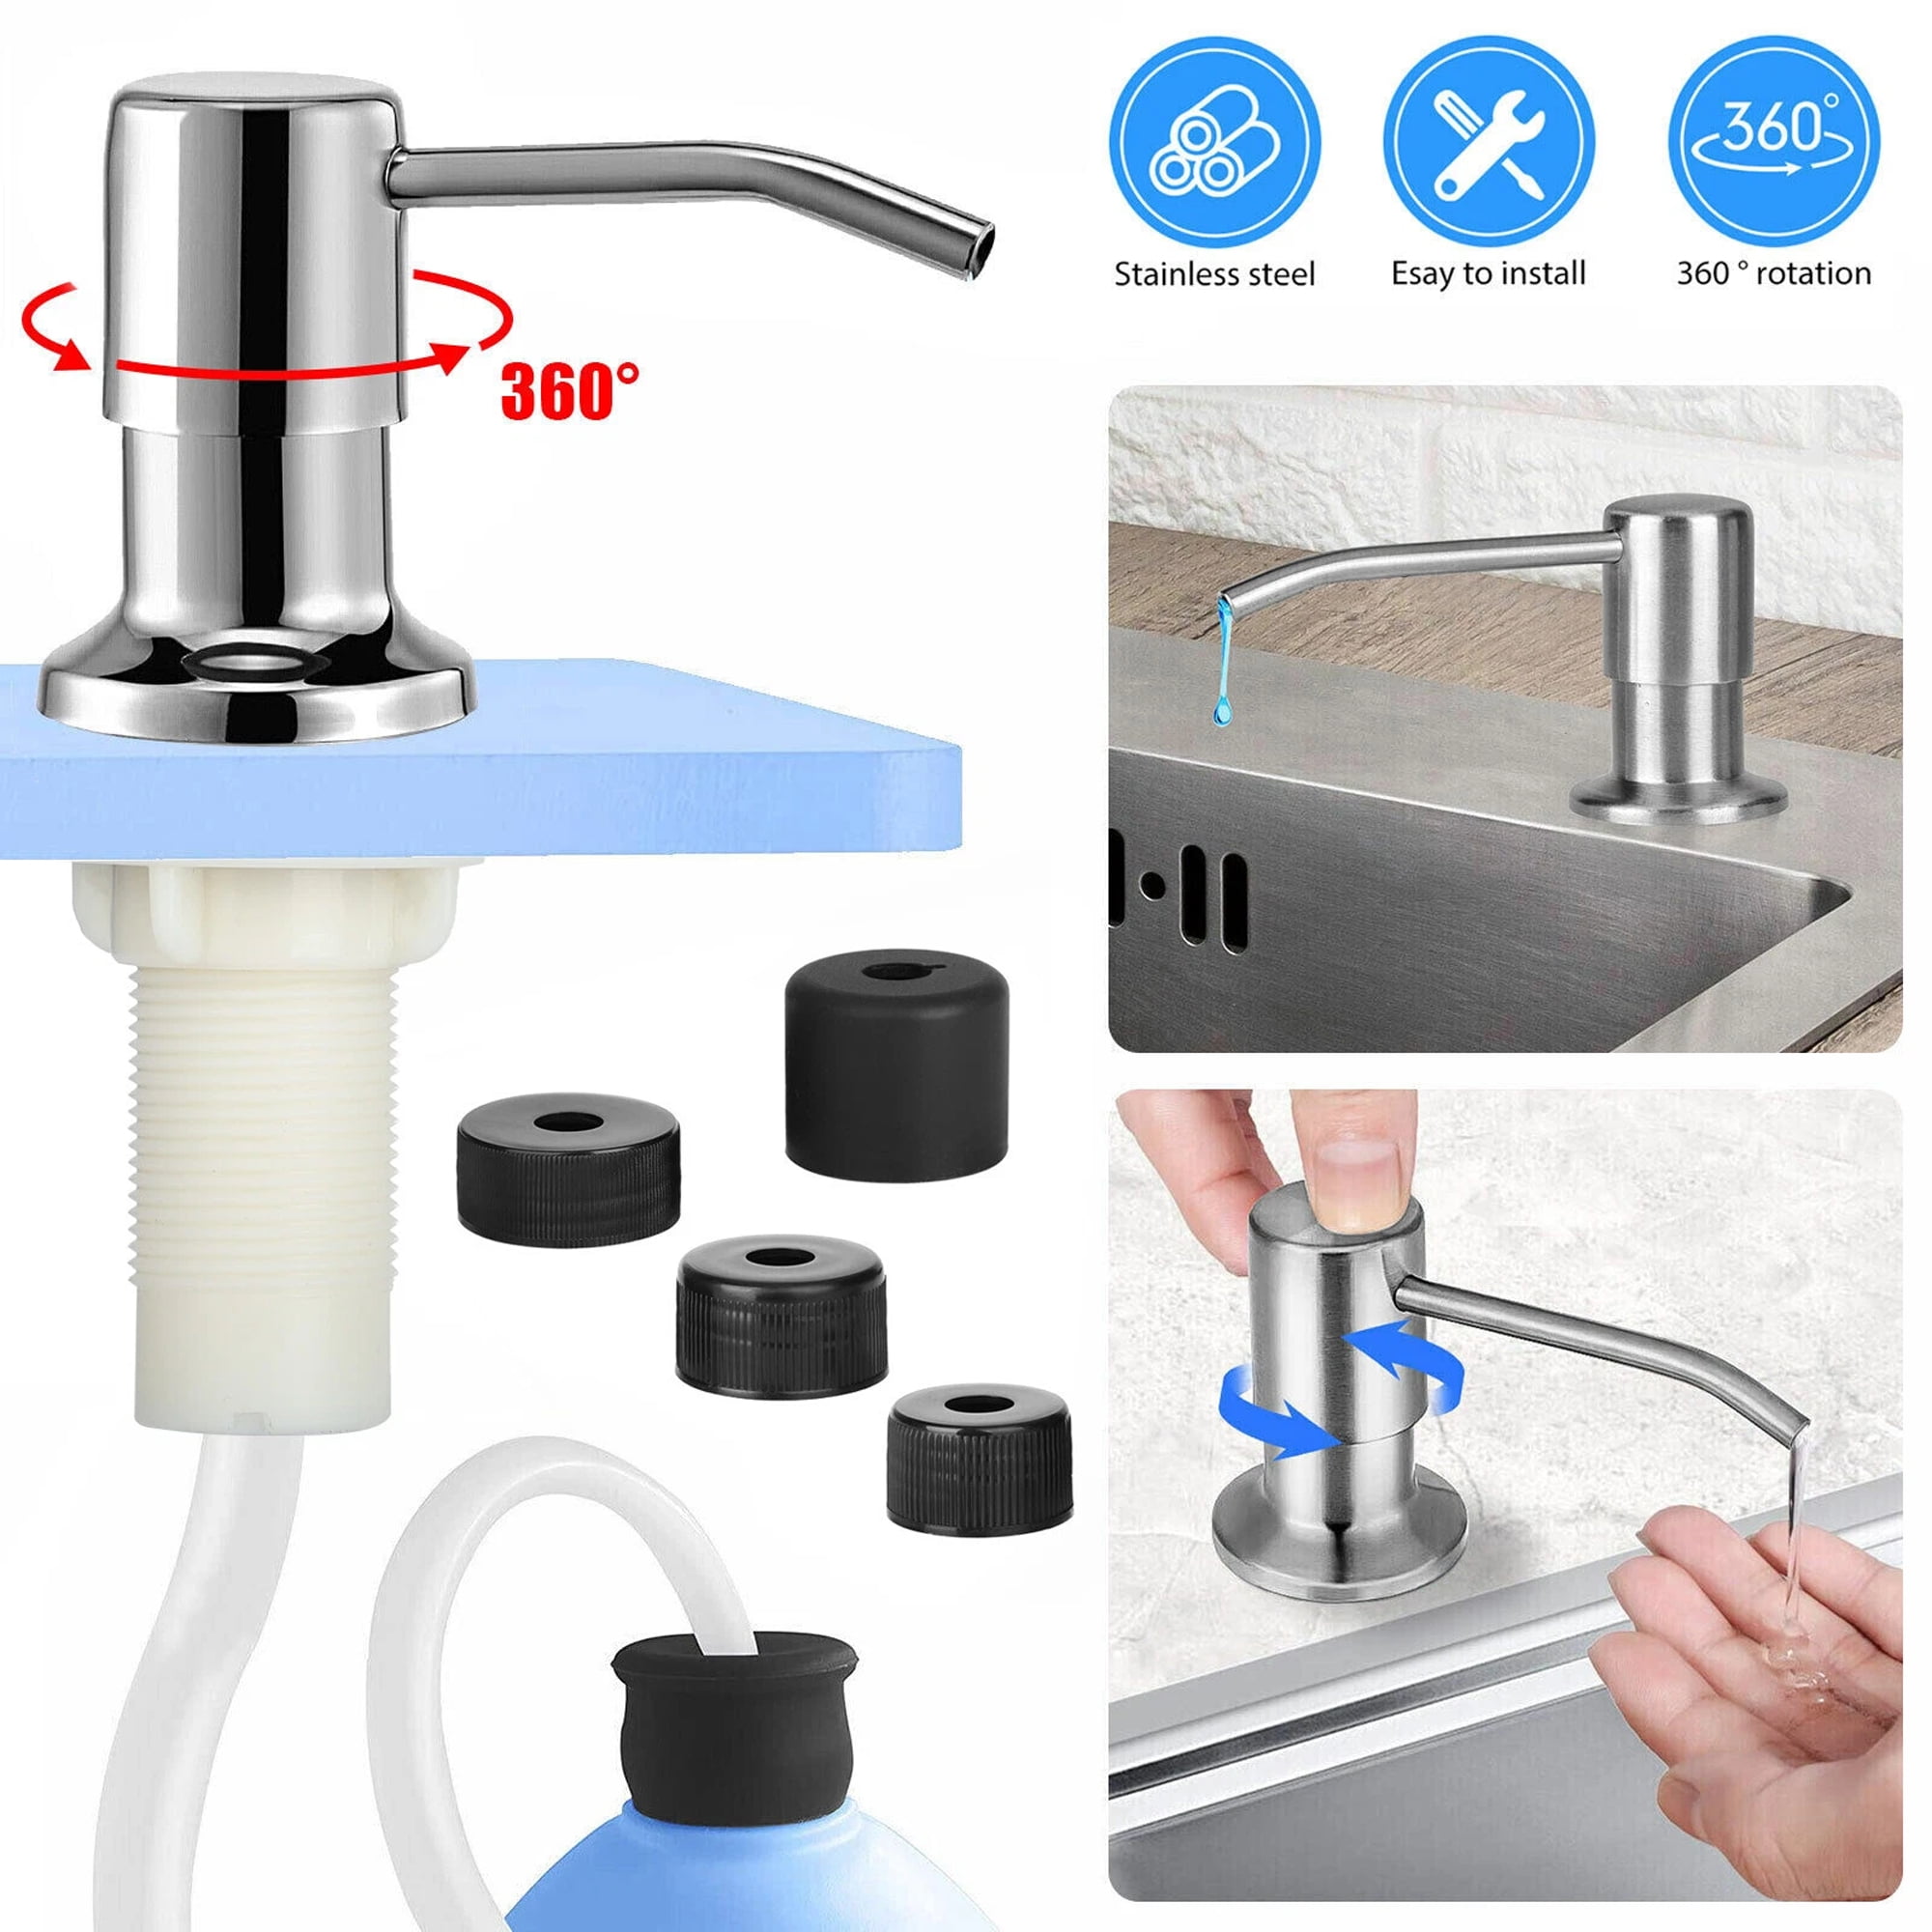
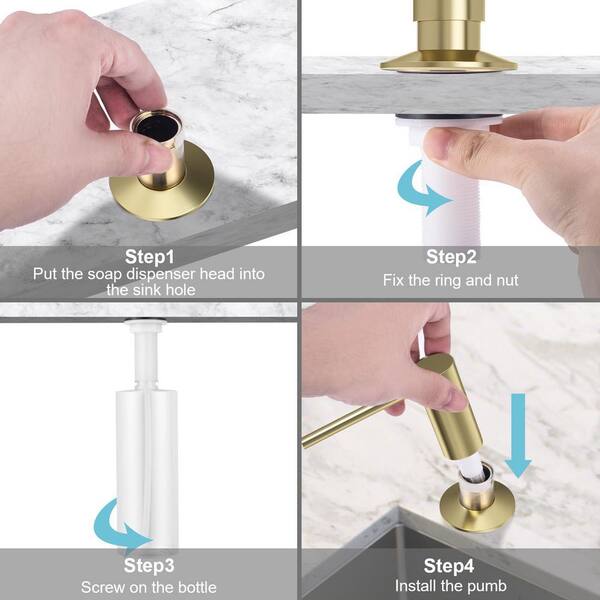
Install The Soap Dispenser
Installing the soap dispenser at your kitchen sink can make handwashing and dishwashing smoother and more convenient. Getting it right the first time saves you from leaks and wobbly fittings later on. Let's walk through how to properly position and secure your new soap dispenser.
Insert The Dispenser
Start by removing the soap dispenser pump from its base. Locate the hole on your sink or countertop designated for the dispenser. Gently slide the dispenser pump through this hole from above the sink.
Make sure the dispenser sits flush against the sink surface to prevent water from seeping underneath. If the hole is too large, use a rubber gasket or a mounting plate to fill the gap. Have you checked if the dispenser's neck fits snugly without forcing it?
Secure The Mounting Nut
From beneath the sink, thread the mounting nut onto the dispenser’s threaded shank. Tighten it by hand initially to keep the dispenser steady. Then use a wrench or pliers to secure it firmly—but avoid over-tightening, which could crack your sink or damage the dispenser.
Double-check that the dispenser pump remains aligned and upright as you tighten. If it starts to tilt, loosen the nut slightly and reposition the top part. Have you ensured the mounting nut is tight enough so the dispenser won’t move when you press the pump?
Credit: www.walmart.com
Attach The Soap Bottle
Attaching the soap bottle to your kitchen sink dispenser is a straightforward task that completes the installation process. This step ensures your dispenser is ready to use and keeps your soap accessible and tidy. Proper attachment prevents leaks and makes refills hassle-free, saving you time and frustration later on.
Fill With Soap
Before attaching the bottle, fill it with your preferred liquid soap. Use a funnel if the bottle’s opening is narrow to avoid spills. Choose a soap that’s designed for dispensers—thicker soaps might clog the pump.
Filling the bottle carefully also helps you avoid overfilling, which can cause soap to drip or overflow when you start using the dispenser. Have you ever had soap spill all over your countertop? This simple step can prevent that mess.
Connect To Dispenser Pump
After filling, screw the bottle securely onto the dispenser pump. Make sure the connection is tight to prevent leaks. Gently press the pump a few times to prime it—this pushes soap into the tube and prepares it for smooth dispensing.
If the pump doesn’t work right away, don’t panic. Sometimes air bubbles get trapped, and a few more pumps will fix that. Have you noticed how a loosely attached bottle can cause soap to drip? Avoid that by checking the seal after connecting.
Test The Soap Dispenser
Once your soap dispenser is installed, testing it ensures everything works smoothly before you rely on it daily. This step helps you catch any issues early and saves you from future frustration. Let’s walk through how to properly test your new kitchen soap dispenser.
Pump Soap Several Times
Start by pressing the pump repeatedly to get the soap flowing. It might take a few pumps for the soap to travel through the tube and appear at the spout. If the soap doesn’t come out right away, don’t panic—this is normal as air pockets clear out.
Keep pumping until you see a steady stream of soap. This action also primes the dispenser, making it easier to use later. Have you noticed if the pump feels too stiff or too loose? That can indicate if it’s installed correctly or needs adjustment.
Check For Leaks
After confirming the soap flows well, closely inspect the area under your sink where the dispenser’s hose connects. Look for any drips or wet spots that could mean a loose connection. Even a small leak can cause water damage over time, so this check is essential.
Try pumping the dispenser while watching for leaks. Sometimes, pressure from pumping reveals hidden drips. If you find any leaks, tighten the connections gently—you don’t want to overtighten and damage the fittings.
Testing your soap dispenser thoroughly ensures it works perfectly and protects your kitchen from unexpected messes. How confident are you that your dispenser will last without leaks after this test?
Credit: www.homedepot.com
Maintenance Tips
Keeping your kitchen sink soap dispenser in top shape ensures it works smoothly every time you need it. Maintenance isn’t just about fixing problems; it’s about preventing them. With a little care, your dispenser will stay clean, efficient, and ready to use.
Refill Regularly
Running out of soap at the worst time can be frustrating. Check your dispenser frequently and refill it before it’s completely empty. This helps avoid air bubbles that can block the pump and keeps the soap flowing freely.
Choose the right soap for your dispenser—thick soaps might clog the mechanism, while thinner liquids flow easily. If you notice the soap is too thick, try mixing it with a little water to improve flow. Have you ever had your dispenser stop working just because it ran dry? Staying ahead of refills can save you that hassle.
Clean The Dispenser
Soap residue and dirt can build up inside the dispenser over time, causing clogs and unpleasant smells. Clean the pump and reservoir every few weeks to keep everything fresh. Simply rinse the parts with warm water and mild soap, then dry thoroughly before reassembling.
If your dispenser has stubborn buildup, soak the pump in vinegar for 15 minutes to break down residue. Don’t forget to wipe the outside regularly too; a clean dispenser adds to your kitchen’s neat look. How often do you think about cleaning your soap dispenser? A little regular care prevents bigger problems later.
Frequently Asked Questions
How Do I Install A Soap Dispenser In My Kitchen Sink?
First, choose a suitable sink hole or drill one if needed. Insert the dispenser's pump from above, then secure it underneath with the mounting nut. Finally, attach the soap bottle and fill it with liquid soap for use.
What Tools Are Needed To Install A Soap Dispenser?
You will need a drill (if no hole exists), adjustable wrench, screwdriver, and pliers. Also, have a soap dispenser kit ready, including the pump, mounting hardware, and soap bottle.
Can I Install A Soap Dispenser Without Drilling?
Yes, if your sink has an existing hole, use it. Otherwise, drilling is required to fit the dispenser securely and ensure proper function.
How Do I Refill A Kitchen Sink Soap Dispenser?
Simply lift the pump head and pour liquid soap into the reservoir. Avoid overfilling to prevent leaks and ensure smooth dispensing.
Conclusion
Installing a soap dispenser in your kitchen sink is simple and quick. Follow each step carefully to avoid mistakes. Use the right tools and check all connections for leaks. A well-installed dispenser adds convenience and keeps your sink tidy. Enjoy easy access to soap every time you wash dishes.
This small upgrade makes daily chores smoother and cleaner. Take your time and make sure everything fits correctly. Soon, you’ll appreciate the neat look and handy function of your new soap dispenser.