
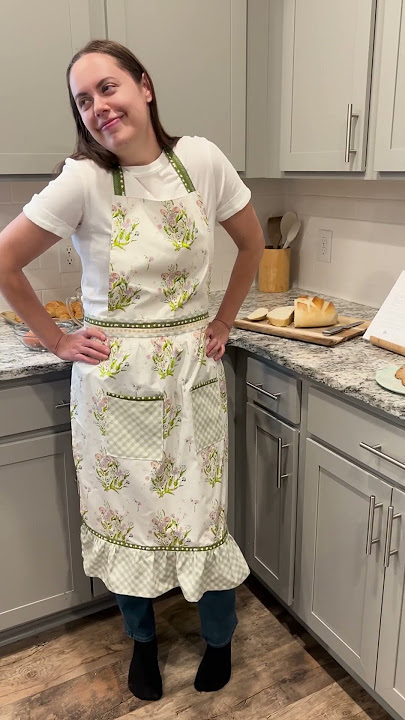
Are you ready to add a personal touch to your kitchen? Making your own kitchen apron is easier than you might think.
Imagine having an apron that fits you perfectly, matches your style, and saves you money. In this guide, you’ll discover simple steps to create a beautiful, practical apron that you’ll love to wear every time you cook or bake. Keep reading to unlock the secrets of crafting your very own kitchen apron—your cooking routine will never be the same!

Credit: www.youtube.com
Choosing The Right Fabric
Choosing the right fabric is a crucial first step in making a kitchen apron that lasts and feels comfortable. The fabric you pick affects not only the apron’s durability but also how easy it is to clean and how it looks while you cook. Think about how you use your apron daily and what qualities matter most to you—whether it's stain resistance, breathability, or style.
Best Fabrics For Aprons
Cotton is a popular choice because it’s soft, breathable, and easy to wash. It handles stains well if you treat them quickly, and it gets better with each wash. If you want something tougher, canvas or denim offers excellent durability and protects your clothes from spills and splatters.
Consider a cotton-polyester blend if you want something wrinkle-resistant and quicker to dry. Linen is another option, bringing a natural look and lightweight feel, but it wrinkles easily and requires more care. What kind of cooking do you do most? Greasy meals might call for a sturdier fabric like canvas.
Color And Pattern Tips
Dark colors hide stains better and keep your apron looking fresh longer. But bright colors and fun patterns can lift your mood while cooking and add personality to your kitchen. Stripes, florals, or even bold prints can reflect your style—just think about how often you want to wash it versus how much you want it to stand out.
If you cook frequently, a darker or patterned fabric is practical. But if you’re making aprons as gifts or for special occasions, feel free to choose lighter colors or delicate prints. Have you ever noticed how some aprons seem to brighten the whole kitchen? Your fabric choice can do that too.
Pre-washing And Preparation
Always pre-wash your fabric before cutting and sewing. Fabric shrinks, and washing it first prevents your finished apron from becoming too tight or misshapen after its first wash. Use the same water temperature you plan to wash the apron in later to make sure it won’t change size or color.
Iron your fabric after washing to get rid of wrinkles and make cutting easier. If you’re using printed fabric, check if the colors bleed by rubbing a damp white cloth on a hidden area. This simple step can save you from disappointing color runs in your finished apron. How often do you wash your kitchen textiles? Preparing your fabric properly can save you time and frustration.
Gathering Materials And Tools
Gathering the right materials and tools is the first step to making a kitchen apron. Having everything ready makes the sewing process smooth and enjoyable. This section lists essential supplies and some fun decorative items to personalize your apron.
Essential Sewing Supplies
- Fabric: Choose cotton or linen for durability and comfort.
- Thread: Match the thread color to your fabric.
- Scissors: Use sharp fabric scissors for clean cuts.
- Measuring tape: Measure fabric and body accurately.
- Pins: Hold fabric pieces together before sewing.
- Sewing machine: Speeds up stitching and ensures neat seams.
- Needles: Hand-sewing needles for finishing touches.
- Chalk or fabric marker: Mark cutting lines and sewing guides.
- Iron and ironing board: Press fabric and seams flat.
Optional Decorative Items
- Trim and lace: Add charm and style to edges.
- Buttons: Use as closures or decorations.
- Fabric paint or markers: Create custom designs or names.
- Patches or appliques: Attach fun or themed fabric shapes.
- Ribbon or bias tape: Perfect for straps and accents.
- Pockets: Use contrasting fabric for a stylish look.
Measuring And Cutting Fabric
Measure your fabric carefully to match the apron size you want. Use sharp scissors to cut along the marked lines for clean edges.
Embarking on the journey to make your own kitchen apron starts with the crucial task of measuring and cutting fabric. This step can be both exciting and intimidating, especially if you're new to sewing. However, with the right approach, you can ensure each piece is cut perfectly to fit your design.
Taking Accurate Measurements
Taking accurate measurements is the cornerstone of making a well-fitting apron. Begin by deciding the length and width you desire, keeping in mind how much coverage you want. You might want to measure from your chest to the knee or mid-thigh, depending on your preference. Use a flexible tape measure for precision and jot down your dimensions. Remember, a little extra room is better than a tight fit—consider adding an inch or two for seam allowances and comfort.
Creating A Pattern Template
Creating a pattern template ensures you have a guide to follow, minimizing mistakes. A simple way to start is by using a large piece of paper or cardboard. Draw your apron shape based on the measurements you’ve taken. Include spaces for pockets if desired. This step is like drawing a blueprint—each line you mark can save you time and frustration later. Once satisfied, cut out the pattern template and lay it on your fabric to trace the outline.
Cutting Fabric Pieces
Cutting fabric pieces is where your apron starts to take shape. Place your pattern template on the fabric, securing it with pins to avoid any shifting. Use sharp fabric scissors to ensure clean cuts along the edges. Take your time—precision here leads to a polished final product. Have you ever noticed how a small miscut can alter the entire look of a garment? Double-check your cuts and ensure each piece is symmetrical and even.
Sewing Basic Apron Shape
Sewing the basic apron shape is the first step to creating a useful kitchen apron. It shapes the apron’s main body and prepares it for straps and ties. This process is simple and perfect for beginners. Using a plain fabric helps you focus on sewing skills. Start with cutting the fabric into the apron shape you want. A rectangle or a simple rounded shape works well.
Stitching The Main Body
Fold the fabric edges inward about half an inch. Pin them in place to keep the fold neat. Sew along the folded edges with a straight stitch. This creates a clean finish and stops fraying. Sew slowly to keep the lines straight. The main body is now strong and ready for the next steps.
Adding Straps And Ties
Cut two long strips of fabric for the ties. Cut one shorter strip for the neck strap. Fold each strip lengthwise with the right sides facing each other. Sew along the long edge, then turn them right side out. Attach the neck strap to the top corners of the apron. Sew the ties to the sides at waist height. These straps hold the apron in place while cooking.
Reinforcing Seams
Check all seams for weak spots. Sew over them again to reinforce. Add small stitches at strap attachment points. This prevents the straps from pulling off. Use a backstitch at the start and end of each seam. Reinforced seams make the apron durable and long-lasting.
Adding Pockets And Details
Adding pockets and details makes a kitchen apron both useful and stylish. Pockets help keep tools close and hands free. Details like stitching and embroidery add a personal touch. These features turn a simple apron into a unique accessory.
Pocket Placement Ideas
Choose pocket spots that fit your cooking needs. Front pockets work well for holding utensils or a phone. A large center pocket can store recipe cards or a small towel. Side pockets offer easy access to smaller items like a timer or pen.
- Single large pocket at the center for convenience
- Two smaller pockets on each side for organization
- Slanted pockets for easier reach
Make sure pockets sit at a comfortable height and do not interfere with movement.
Decorative Stitching
Decorative stitching adds charm and strengthens seams. Use contrasting thread colors for more visual interest. Simple patterns like zigzags or scallops work well. You can also stitch around pocket edges to highlight them.
- Double stitching for durability and style
- Topstitching along the apron edges
- Using embroidery thread for bold lines
Keep stitches even and neat to maintain a polished look.
Using Appliques Or Embroidery
Appliques and embroidery give aprons a custom design. Choose shapes like vegetables, kitchen tools, or fun patterns. Embroidery adds texture and color without bulk. Appliques can be sewn or ironed on for easy decoration.
- Simple floral or fruit designs for a fresh look
- Kitchen-themed icons like forks or pots
- Personal initials for a unique touch
Place appliques on pockets, chest, or apron hem for balance.
Credit: www.agfblog.com
Finishing Touches
Finishing touches can transform a simple kitchen apron into a polished, professional-looking piece. These final details not only improve the durability of your apron but also enhance its style and comfort. Paying attention to these small steps will make your apron something you’re proud to wear every day.
Hemming Edges
Hemming the edges prevents the fabric from fraying and gives your apron a neat outline. Fold the raw edges twice, about a quarter-inch each time, and pin them in place. Use a straight stitch close to the fold to secure the hem, ensuring the stitches are even and tight.
If you want extra durability, try a double stitch or a zigzag stitch along the inside edge. This is especially useful if your apron will go through frequent washing. Have you noticed how a well-hemmed garment lasts significantly longer?
Ironing For A Crisp Look
Ironing your apron after sewing smooths out any wrinkles and sets the seams flat. Use the appropriate heat setting for your fabric type to avoid damage. Press the hems and straps carefully, holding the iron still for a few seconds rather than moving it constantly.
Ironing isn’t just about looks; it also helps the fabric hold its shape. You might find that a quick press before wearing makes your apron feel fresher and more comfortable. Have you tried steaming your apron for a softer finish?
Adding Buttons Or Clasps
Buttons or clasps add both function and flair to your apron. Choose buttons that complement your fabric or clasps that make it easy to adjust the fit around your neck or waist. Sew buttons securely with strong thread, and reinforce clasps with extra stitching to handle daily use.
Consider adding decorative buttons to pockets or straps for a personal touch. You can also use snap fasteners if you prefer a quick, fuss-free way to put on and take off your apron. What kind of closure feels most comfortable for you during long cooking sessions?
Caring For Your Diy Apron
Caring for your DIY apron ensures it lasts longer and stays looking fresh. Proper care helps maintain the fabric’s color and strength, keeping your apron ready for every kitchen adventure. Have you ever noticed how a well-kept apron feels more comfortable and boosts your cooking confidence?
Washing Instructions
Wash your apron in cold or warm water to protect the fabric and prevent shrinking. Use a mild detergent to keep colors bright and avoid harsh chemicals that can wear out the material. If your apron has stains, treat them promptly with a gentle stain remover before washing.
Avoid using bleach unless your apron is white and bleach-safe. Machine wash on a gentle cycle to reduce wear and tear. After washing, air dry your apron or tumble dry on low heat to prevent damage.
Storing And Maintenance Tips
Store your apron in a dry, clean place to avoid mildew or odors. Hanging it on a hook is better than folding, as it prevents wrinkles and creases. If you notice loose threads or minor tears, sew them up quickly—small repairs extend your apron’s life significantly.
Consider keeping a small lint roller nearby to remove pet hair or crumbs before wearing your apron again. How often do you check your apron’s condition? Regular maintenance saves you from last-minute apron troubles when cooking gets busy.

Credit: www.youtube.com
Frequently Asked Questions
What Materials Do I Need To Make A Kitchen Apron?
You need fabric, thread, scissors, measuring tape, pins, and a sewing machine or needle. Cotton fabric is ideal for aprons.
How Long Does It Take To Sew A Kitchen Apron?
Sewing a kitchen apron typically takes 1 to 2 hours. Time depends on your sewing skill and design complexity.
Can I Customize My Kitchen Apron Design?
Yes, you can personalize it with fabric patterns, pockets, straps, and embroidery for a unique look.
What Is The Best Fabric For Kitchen Aprons?
Cotton is best for kitchen aprons. It’s durable, breathable, and easy to wash, making it perfect for cooking.
Conclusion
Making your own kitchen apron can be fun and useful. You save money and get a custom fit. Choose fabric that feels comfortable and easy to clean. Follow simple steps to sew your apron quickly. Personalize it with pockets or patterns you like.
Wearing your handmade apron protects clothes while cooking. Try this easy project to add style to your kitchen. Enjoy crafting something practical and unique every time you cook!