
If you want to give your kitchen a fresh, professional look without the cost of a full remodel, spray painting your cabinets is a great option. But before you grab that spray gun, you need to know how to protect the parts you don’t want painted.
Masking your kitchen cabinets properly is key to getting clean, sharp lines and avoiding messy overspray. In this guide, you’ll discover simple, step-by-step tips that make masking quick and stress-free—so your cabinets come out looking flawless every time. Ready to transform your kitchen with confidence?
Let’s dive in.
Preparing Your Kitchen Cabinets
Preparing your kitchen cabinets before spray painting is essential for a smooth finish. Proper preparation helps paint stick better and lasts longer. It also prevents messes and damage to other surfaces. Follow these key steps to get your cabinets ready for masking and painting.
Clearing The Area
Start by clearing the kitchen workspace around the cabinets. Remove items from countertops and nearby shelves. Move any furniture or appliances that might get in the way. This creates a clean, open space for easy access and reduces the risk of paint splatters.
Removing Hardware
Take off all cabinet doors, drawers, and hardware like handles and hinges. Use a screwdriver to remove screws carefully. Keep all hardware parts in a labeled container to avoid losing them. Removing hardware ensures even paint coverage and prevents accidental paint on metal parts.
Cleaning Surfaces
Clean all cabinet surfaces thoroughly before painting. Use a mild detergent mixed with water or a degreaser to remove grease and dirt. Wipe with a soft cloth and let surfaces dry completely. Clean cabinets help the paint adhere well and create a smooth, lasting finish.

Credit: www.ultrimaxstore.com
Choosing The Right Masking Materials
Choosing the right masking materials is crucial for a smooth and clean spray painting job on your kitchen cabinets. Using the wrong tape or coverings can lead to paint bleed, damage to surfaces, or extra cleanup time. Your goal is to protect the areas you don’t want painted while ensuring easy removal without residue or damage.
Types Of Masking Tape
Not all masking tapes are created equal. Painter’s tape is your best bet because it sticks well but peels off cleanly. Look for tapes labeled as “low tack” for delicate surfaces like wood or freshly painted areas.
Wider tapes cover more area quickly, but narrow ones give you precision around edges and corners. Have both on hand so you can switch depending on the part of the cabinet you’re working on.
Protective Coverings
Protective coverings shield your floors, countertops, and appliances from overspray. Paper masking film is lightweight and easy to tape down, making it great for small areas. If you’re working around appliances, consider using adhesive-backed plastic films that stick securely without leaving marks.
Think about how long you’ll need the covering in place. Some materials tear easily or wrinkle, which can let paint slip through. Durable coverings save you frustration during longer projects.
Drop Cloths And Plastic Sheeting
Drop cloths are a must for covering floors and large surfaces. Canvas drop cloths absorb paint drips but can be heavy and harder to tape down. Plastic sheeting is lightweight and waterproof, perfect for quick cleanup and protecting against paint mist.
Choose drop cloths or sheeting based on your workspace and weather conditions. For example, plastic sheeting works well if you’re spraying outside or in a garage where wind might blow lighter materials around.
Step-by-step Masking Process
Painting kitchen cabinets can transform your space dramatically. A crucial step is proper masking. This process ensures clean lines and prevents paint from spreading. Follow these steps to mask your cabinets effectively for spray painting.
Taping Edges And Details
Begin by taping all edges with painter's tape. Use it on cabinet doors, drawers, and frames. Ensure tape is pressed firmly to avoid paint seepage. Pay attention to corners and intricate designs. A steady hand ensures precision and neatness.
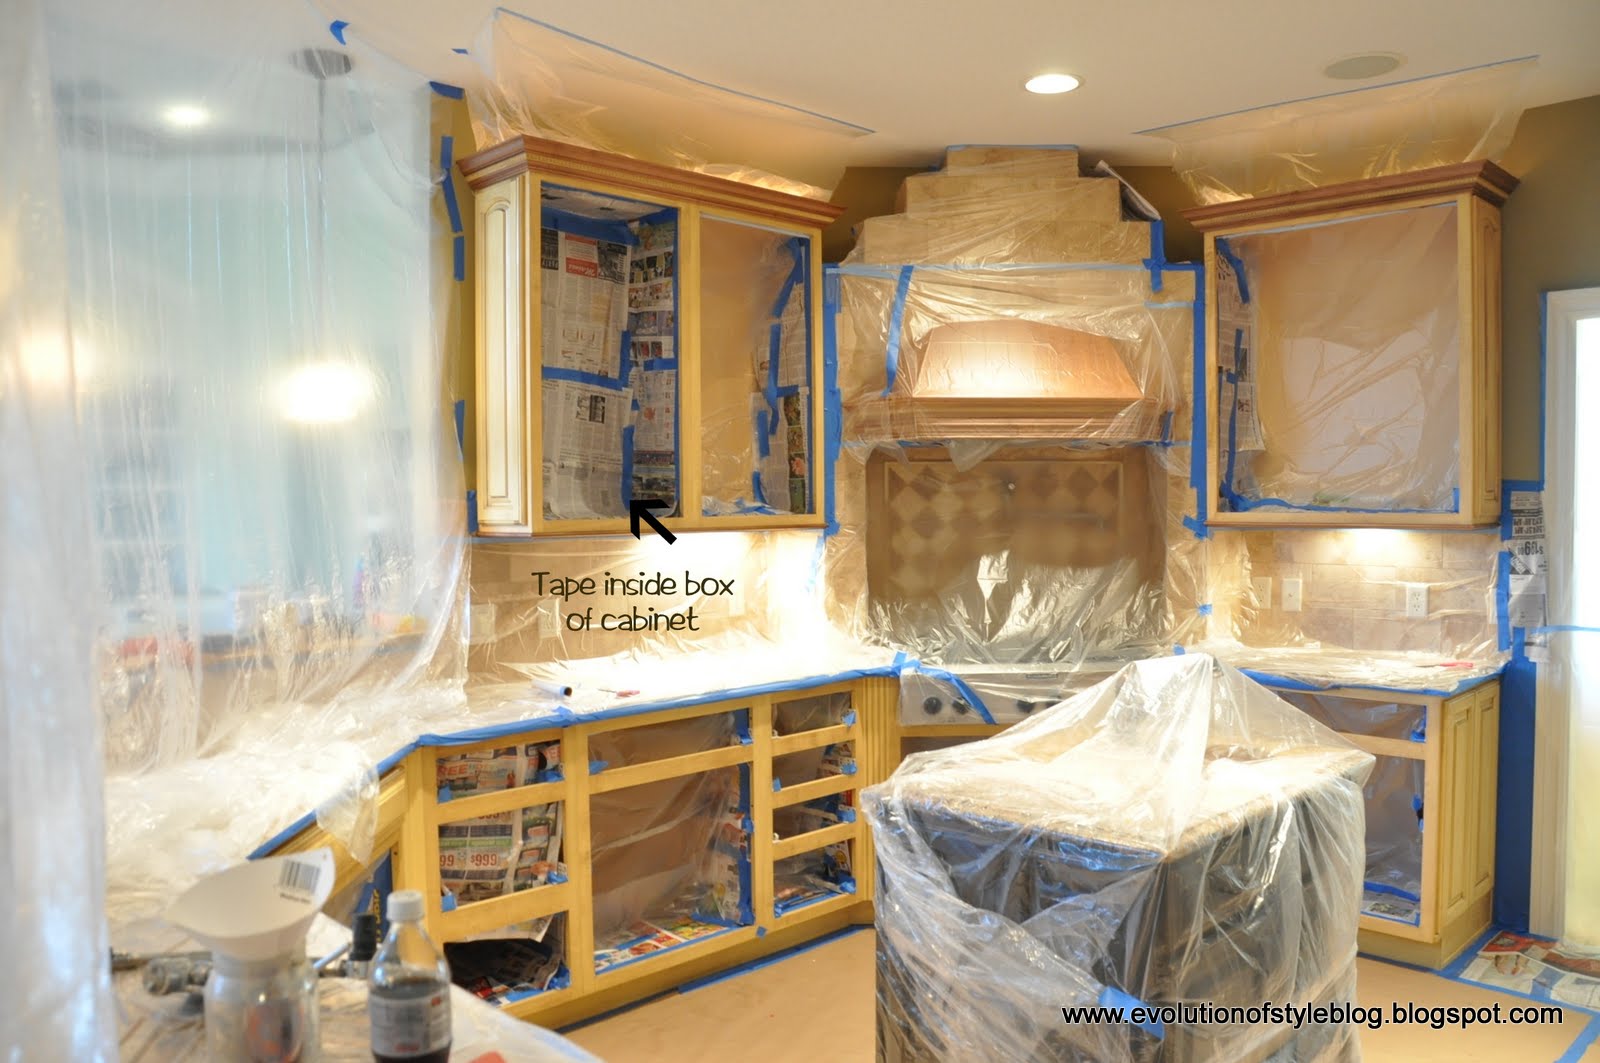
Covering Surrounding Areas
Next, protect your kitchen from overspray. Use plastic sheets or drop cloths. Cover countertops, floors, and nearby appliances. Secure sheets with tape to keep them in place. Overlap sheets slightly to avoid gaps.
Securing Protective Layers
Ensure all protective materials are tightly secured. Double-check tape and coverings. Consider using masking paper for small areas. It’s easy to handle and effective. A well-secured area reduces cleanup time later.

Credit: kitchenmakeovers.co.uk
Tips For Preventing Paint Bleed
Preventing paint bleed is key to getting clean, sharp lines on your kitchen cabinets. Paint bleed happens when paint seeps under the tape or masking materials. This can ruin the smooth finish and cause extra work. Use careful masking techniques to stop this problem.
Using High-quality Tape
Choose tape designed for painting projects. High-quality painter’s tape sticks well but removes cleanly. It forms a tight seal on cabinet surfaces. Avoid cheap tapes that let paint slip underneath. Test a small area before full masking.
Sealing Edges Properly
Press tape edges firmly to the cabinet surface. Use a plastic scraper or a credit card to smooth the edges. This step blocks paint from leaking under the tape. Check for gaps or wrinkles and fix them immediately. Sealing edges is essential for crisp paint lines.
Avoiding Overlapping Layers
Apply tape in single, straight strips without overlapping. Overlapping tape can cause uneven surfaces and gaps. These gaps may allow paint to bleed. Use longer strips to cover more area smoothly. Keep the tape flat and tight for best results.
Spray Painting Techniques
Mastering spray painting techniques can make a huge difference in the final look of your kitchen cabinets. The key is to apply paint evenly and choose the right materials for a smooth finish. Let's dive into some practical tips that will help you achieve professional results with spray painting.
Choosing The Right Spray Paint
Not all spray paints are created equal, especially for cabinets. Look for spray paints labeled specifically for wood or cabinets to ensure durability and adhesion. Consider finishes like satin or semi-gloss—they offer a nice balance between shine and durability without showing every fingerprint.
Have you ever struggled with paint that chips or peels after a few weeks? Using a high-quality spray paint designed for high-traffic surfaces can prevent that frustration. Also, check the color samples before buying; lighting in your kitchen can change how the color looks once dry.
Maintaining Even Coats
Applying paint in thin, even coats is crucial. Thick layers cause drips and uneven texture, which can ruin the cabinet surface. Hold the spray can about 8 to 12 inches away and use smooth, sweeping motions to cover the surface evenly.
Spray in a consistent direction rather than back and forth randomly. Overlapping each pass slightly ensures full coverage. If you notice any drips starting to form, stop and let that area dry before continuing. Patience here saves you from extra sanding later.
Drying And Curing Time
Allowing adequate drying and curing time between coats is often overlooked but essential. Drying means the paint feels dry to the touch, but curing is when it fully hardens and gains durability. Rushing this process can leave your cabinets vulnerable to scratches and damage.
Most spray paints suggest waiting about 1-2 hours between coats, but check the label for specific times. After the final coat, give your cabinets several days to cure before heavy use. Ever tried to use newly painted cabinets too soon? The result is often frustrating marks and dents you’ll regret.
Removing Masking Materials
Removing masking materials after spray painting kitchen cabinets is a delicate task. It requires timing and care to protect your fresh paint job. Doing it right keeps your cabinets looking clean and smooth. Rushing or neglecting this step can cause damage or mess.
Timing For Tape Removal
Remove the masking tape while the paint is still slightly wet. This prevents the paint from cracking or peeling. If the paint dries completely, peeling becomes more likely. Wait about 20 to 30 minutes after spraying, depending on your paint type.
Pull the tape back slowly at a 45-degree angle. This reduces the chance of lifting paint. Avoid pulling straight up or too fast. If paint sticks to the tape, stop and let it dry more before trying again.
Avoiding Paint Peeling
Peeling happens when tape pulls up dried paint. Use low-tack painter’s tape to lower this risk. Press the tape firmly when masking to seal the edges well. Do not let paint build up along the tape’s edge. Thin coats of paint help prevent peeling.
If you notice paint lifting, gently press it back down with a soft brush. Avoid using sharp tools to fix peeling. It can damage the cabinet surface.
Cleaning Up Residue
After tape removal, some adhesive residue may remain on the cabinets. Use a soft cloth dampened with warm, soapy water to wipe it away. For tougher residue, try a small amount of rubbing alcohol or a commercial adhesive remover.
Test the cleaner on a hidden area first to avoid damage. Clean gently to keep the paint intact. Finish by wiping with a dry cloth to remove any moisture or cleaner residue.
Common Mistakes To Avoid
Masking kitchen cabinets before spray painting is a critical step. Mistakes here can ruin the entire job. Avoid these common errors to get a clean, professional finish. Proper preparation saves time and effort in the long run.
Insufficient Masking
Not covering all areas fully lets paint seep through. This causes unwanted spots on walls or appliances. Cover hinges, edges, and hardware carefully. Use enough tape and paper to shield surfaces completely.
Rushing The Process
Hurrying leads to poor tape placement and missed spots. Take time to smooth edges and press tape firmly. Waiting for primer or paint to dry is essential. Patience ensures sharp lines and reduces paint bleed.
Using Wrong Materials
Cheap or inappropriate tape can peel paint or leave residue. Use painter’s tape designed for delicate surfaces. Avoid regular masking tape or duct tape. Also, choose quality plastic sheets or paper for covering larger areas.

Credit: kitchenmakeovers.co.uk
Frequently Asked Questions
How Do I Prepare Cabinets For Spray Painting?
Clean cabinets thoroughly to remove grease and dirt. Remove hardware and doors. Sand surfaces lightly for better paint adhesion. Use a tack cloth to wipe dust before masking.
What Materials Are Best For Masking Kitchen Cabinets?
Use painter’s tape for edges and plastic sheeting or paper to cover large areas. Choose low-tack tape to avoid paint peeling and ensure clean lines.
How To Avoid Paint Bleeding Under The Tape?
Press tape edges firmly and apply a thin primer coat along tape edges. Remove tape while paint is still slightly wet for sharp lines.
Can I Spray Paint Cabinets Without Removing Doors?
Yes, but remove hardware and mask thoroughly. Remove doors for best coverage and easier painting. Mask hinges and adjoining walls carefully.
Conclusion
Masking kitchen cabinets well protects surfaces from paint. Use painter’s tape carefully along edges and corners. Cover handles and hinges with plastic or paper. Take your time to avoid paint leaks and drips. Proper masking makes your spray painting look clean and neat.
This simple step saves you from extra cleanup later. Follow these tips, and your cabinets will look fresh and smooth. Ready for a new kitchen look? Mask right, paint easy, and enjoy the change!