
Are you ready to take control of your kitchen plumbing and save money on expensive repairs? Learning how to plumb a kitchen sink and dishwasher yourself is easier than you think.
Imagine the satisfaction of connecting your sink and dishwasher perfectly, without waiting for a plumber. In this guide, you’ll discover simple steps, clear tips, and expert tricks to get the job done right. Keep reading, and soon you’ll have a smoothly running kitchen that you built with your own hands.
Tools And Materials Needed
Preparing to plumb a kitchen sink and dishwasher requires specific tools and materials. Having the right items ensures a smooth and efficient installation. This section covers the essentials needed for the job.
Essential Plumbing Tools
- Adjustable wrench for tightening and loosening fittings
- Pipe wrench for gripping and turning pipes
- Pipe cutter to make clean, straight cuts
- Plumber’s tape to seal threaded joints
- Basin wrench for hard-to-reach nuts under the sink
- Slip-joint pliers for gripping and turning
- Drain snake to clear clogs during installation
- Measuring tape to ensure proper pipe lengths
- Level to keep pipes and fixtures straight
Required Pipes And Fittings
- PVC or ABS pipes for drain lines
- Flexible supply lines to connect water valves
- Pipe connectors like elbows, tees, and couplings
- Trap assembly to prevent sewer gases
- Dishwasher drain hose with clamp
- Compression fittings for water supply connections
- Slip nuts and washers for secure joints
Safety Equipment
- Safety goggles to protect your eyes
- Work gloves to protect your hands
- Mask to avoid inhaling dust or fumes
- Knee pads for comfort while working low
- Flashlight or headlamp for better visibility
Credit: pipeitrightrepipe.com
Preparing The Work Area
Preparing the work area sets the foundation for a smooth kitchen sink and dishwasher plumbing project. Taking the time to organize and secure your workspace prevents frustration and costly mistakes. Let’s focus on the essential steps that get you ready to dive into the actual plumbing.
Shutting Off Water Supply
Before touching any pipes, locate your home's main water valve or the specific valve under the sink. Turning off the water supply stops leaks and water damage while you work. Have a bucket or towel nearby—you might still find some water trapped in the lines after shutting off the valve.
Clearing The Sink Cabinet
Empty everything inside the cabinet below your kitchen sink. This gives you clear access to pipes and connections. Clearing the space also prevents your belongings from getting wet or damaged during the process.
Check for any signs of mold or leaks while the cabinet is empty. Fixing small issues now saves you headaches later.
Gathering Materials
Make sure you have all necessary tools and parts ready before you start. Common items include:
- Adjustable wrench
- Pipe wrench
- Plumber’s tape (Teflon tape)
- Drain pipes and fittings
- Dishwasher drain hose
- Bucket and towels
Running out mid-project is more than frustrating; it can cause improper installations. Have everything on hand, so you can focus fully on the job.
Installing The Kitchen Sink Drain
Properly connect the kitchen sink drain to ensure smooth water flow and prevent leaks. Secure all pipes tightly and check for any blockages before finalizing the installation. This step is key when plumbing both the sink and dishwasher together.
Installing the kitchen sink drain is a crucial step. A proper installation ensures smooth water flow and prevents leaks. Let’s break it down into simple steps.
Fitting The Sink Strainer
Begin by placing the sink strainer in the drain opening. Ensure the rubber gasket is below the sink. This gasket creates a seal and prevents leaks. Tighten the locknut under the sink to secure the strainer. Use pliers for a firm grip. Make sure the strainer sits evenly in the opening.
Connecting The Drain Pipe
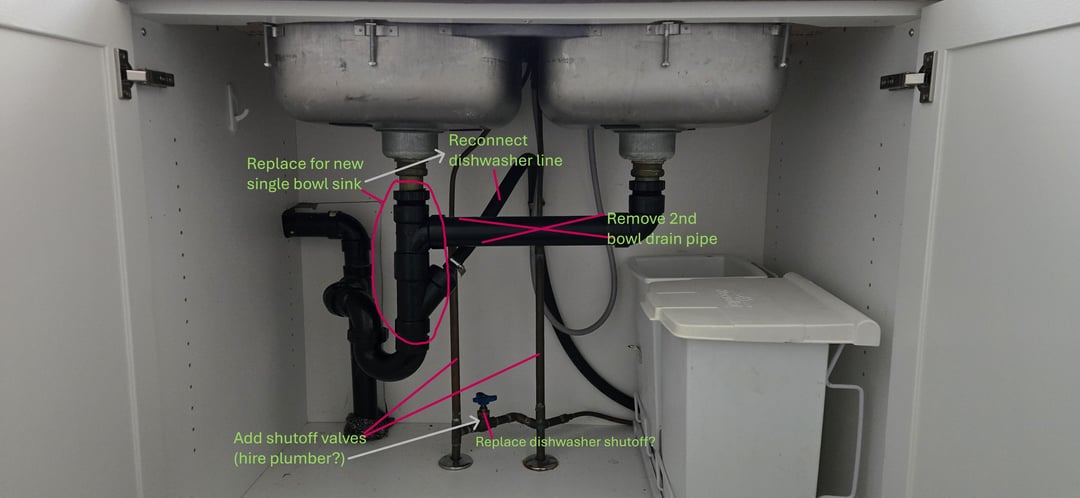
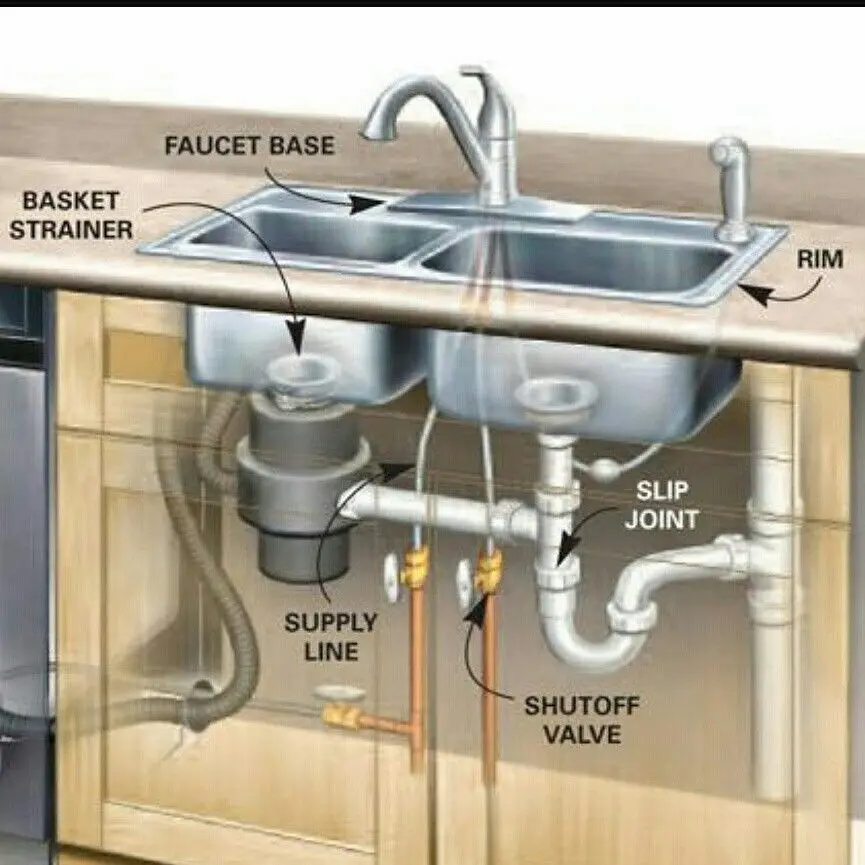
Attach the drain pipe to the strainer. Use a slip nut and washer for a secure fit. Align the pipe with the sink's drain outlet. Tighten the slip nut by hand. Ensure it feels snug but not overly tight. Connect the P-trap to the drain pipe. This traps debris and prevents clogs.
Sealing And Testing For Leaks
Seal the connections with plumber’s putty or silicone. This step is vital to prevent water leaks. Apply a thin layer around each joint. Allow it to set as per the product instructions. Once sealed, test for leaks by running water. Check each connection for drips or moisture. If leaks occur, tighten the connections gently.

Credit: www.reddit.com
Setting Up The Dishwasher Drain Line
Setting up the dishwasher drain line is essential for proper water flow and waste removal. This step prevents leaks and clogs in your kitchen plumbing. A well-installed drain line keeps your dishwasher running smoothly and your kitchen clean.
Attaching The Dishwasher Drain Hose
First, connect the dishwasher drain hose to the dishwasher's drain outlet. Use a clamp to secure the hose tightly. Make sure the hose is free of kinks or sharp bends. This ensures water flows out easily and avoids blockages.
Connecting To The Sink Drain
Next, attach the drain hose to the sink drain or garbage disposal. Locate the dishwasher inlet on the side of the sink drain pipe. Use a hose clamp to fix the hose firmly. This connection directs dirty water safely out of your dishwasher.
Ensuring Proper Drainage
Check that the drain hose runs in a high loop before reaching the drain. This loop stops backflow of water into the dishwasher. Secure the hose with clips or zip ties under the sink. Run a test cycle to confirm water drains smoothly without leaks.
Installing The Water Supply Lines
Installing the water supply lines is a crucial part of setting up your kitchen sink and dishwasher. This step ensures that both appliances receive water efficiently and safely. Handling this task properly can save you from leaks and water damage down the road.
Connecting Hot And Cold Water Lines
First, identify the hot and cold water supply pipes. The hot water line usually comes from the left and the cold from the right, but double-check to avoid mix-ups.
Use flexible braided hoses to connect the sink and dishwasher to the water supply. These hoses are easy to handle and help prevent leaks compared to rigid pipes.
Make sure the connections are snug but avoid overtightening, which can damage the fittings. A good tip is to hand-tighten first and then finish with a quarter turn using a wrench.
Installing Shutoff Valves
Adding shutoff valves lets you control water flow to the sink and dishwasher independently. This is handy for maintenance or emergencies without shutting off water to the whole house.
Choose ball valves or quarter-turn valves for easy operation and durability. Install them just before the flexible hoses, attaching securely to the water supply pipes.
Remember to wrap the valve threads with plumber’s tape before attaching to prevent leaks. If you’ve ever struggled with a dripping valve, this step will save you hassle.
Testing Water Flow
Once connected, turn on the shutoff valves slowly and watch for leaks around every joint. It’s easier to fix leaks before everything is tucked away.
Run both hot and cold water through the sink and the dishwasher’s water inlet. Check that water pressure feels normal and consistent.
If water flow seems weak or uneven, double-check the valve openings and hose connections. Small adjustments here can make a big difference in performance.

Credit: www.reddit.com
Securing And Finalizing Connections
Securing and finalizing connections ensures your kitchen sink and dishwasher work without leaks. This stage confirms every joint is tight and aligned. It prevents future water damage and costly repairs. Take time to check each fitting carefully. A solid finish means a reliable plumbing system.
Tightening All Fittings
Use a wrench or pliers to tighten all nuts and bolts. Avoid overtightening to prevent cracking pipes or fittings. Hand-tighten first, then give a firm turn with tools. Check compression fittings, slip nuts, and hose clamps. Secure dishwasher drain hose connections firmly. Tight connections stop leaks and keep water flowing correctly.
Checking For Proper Alignment
Look at pipes and hoses to ensure they line up straight. Misaligned parts can cause stress and leaks. Adjust pipes so they fit smoothly without bending or twisting. Check that the dishwasher drain hose has a proper high loop. This keeps wastewater from flowing back into the dishwasher. Proper alignment makes your plumbing last longer.
Cleaning Up The Work Area
Remove any debris, old tape, or tools from under the sink. Wipe down pipes and fittings to spot any small leaks easily. Dispose of packaging and scrap materials properly. Keep the area dry to avoid mold or mildew growth. A clean workspace helps maintain your plumbing and keeps the kitchen safe.
Troubleshooting Common Issues
Troubleshooting common plumbing issues can save time and money. Kitchen sinks and dishwashers often face leaks, slow drainage, or drainage problems. Knowing how to spot and fix these issues helps keep everything working smoothly. Here are simple solutions for typical problems.
Fixing Leaks
Leaks are a frequent problem under kitchen sinks and near dishwashers. Check all pipe connections for moisture or drips. Tighten loose fittings with a wrench. Replace worn-out washers or gaskets to stop water from escaping. Use plumber’s tape on threaded joints to seal gaps. For small cracks in pipes, apply waterproof epoxy as a temporary fix. Always turn off water supply before repairs.
Dealing With Slow Drainage
Slow drainage often means a clog in the pipes. Remove visible debris from the sink strainer. Use a plunger to push out minor blockages. A drain snake can reach deeper clogs inside pipes. Avoid chemical drain cleaners as they can damage pipes. Pour boiling water down the drain to help dissolve grease buildup. Regular cleaning prevents future slow drainage issues.
Handling Dishwasher Drain Problems
Dishwasher drain problems cause water to pool or back up. Check the drain hose for kinks or bends that block water flow. Clean the dishwasher filter and remove food particles. Make sure the drain hose connects properly to the sink drain or garbage disposal. If water still drains slowly, inspect the air gap for blockages. Clear any clogs to restore proper drainage.
Frequently Asked Questions
How Do I Connect A Dishwasher To The Kitchen Sink Drain?
To connect a dishwasher, attach its drain hose to the kitchen sink’s drain or garbage disposal. Use a high loop or air gap to prevent backflow, ensuring proper drainage and avoiding leaks.
What Materials Are Needed To Plumb A Kitchen Sink?
You will need P-traps, supply lines, shut-off valves, PVC or ABS pipes, pipe fittings, plumber’s tape, and a basin wrench. These materials help create secure water connections and proper drainage for your sink.
Can I Install A Dishwasher Without A Professional Plumber?
Yes, with basic plumbing skills, you can install a dishwasher. Follow manufacturer instructions carefully, turn off water supply, and ensure proper hose connections to avoid leaks and drainage issues.
How Do I Prevent Leaks When Plumbing A Kitchen Sink?
Use plumber’s tape on threaded connections and tighten fittings securely. Check for leaks after installation by running water and inspecting all joints and hoses carefully.
Conclusion
Plumbing a kitchen sink and dishwasher can be simple with clear steps. Always measure and check connections before starting work. Tight seals help stop leaks and keep water flowing well. Take your time and follow safety rules closely. Small mistakes can cause big problems later on.
This guide helps you save money and avoid hiring a plumber. With practice, you will gain confidence in plumbing tasks. Keep tools handy and stay organized throughout the process. Now, enjoy your fully working kitchen appliances without worry.