
Are you ready to take control of your kitchen plumbing and save money on costly repairs? Learning how to plumb a kitchen sink with a disposal and dishwasher might sound tricky, but with the right guidance, you can do it yourself.
Imagine having everything connected perfectly, so your sink, disposal, and dishwasher work smoothly without leaks or clogs. You’ll discover clear, step-by-step instructions that make the process simple—even if you’re new to plumbing. Keep reading, and you’ll gain the confidence to tackle this project like a pro.
Gathering Tools And Materials
Before you start plumbing your kitchen sink with a disposal and dishwasher, gathering the right tools and materials is key. Having everything at hand saves time and spares you from frustrating interruptions. Think about your last DIY project—did you ever pause just to find a missing wrench or a specific fitting?
Essential Plumbing Tools
Make sure your toolbox includes these essentials:
- Adjustable wrench:Perfect for tightening and loosening nuts of various sizes.
- Pipe wrench:Offers extra grip on stubborn pipes and fittings.
- Slip-joint pliers:Great for grabbing and twisting, especially in tight spots.
- Hacksaw:Needed if you have to cut metal or plastic pipes to size.
- Plumber’s putty:Seals joints and prevents leaks around the sink drain.
- Teflon tape:Wrap it around threaded connections to ensure a watertight seal.
- Screwdriver set:Both flathead and Phillips for various screws.
- Bucket and towels:Always handy to catch drips and wipe spills.
Do you have these tools ready? If not, getting them first will make the entire process smoother and more efficient.
Required Parts And Supplies
Beyond tools, you’ll need specific parts to connect your disposal and dishwasher correctly:
- Garbage disposal unit:Choose one that fits your sink size and power needs.
- Dishwasher drain hose:Connects your dishwasher to the disposal or sink drain.
- Tailpiece and drain fittings:These connect the sink drain to the disposal and plumbing.
- Dishwasher inlet adapter:Allows the dishwasher drain hose to attach securely to the disposal.
- P-trap assembly:Prevents sewer gases from entering your kitchen.
- Pipe connectors and clamps:Ensure tight, leak-free connections between pipes and hoses.
- Plumbing sealant or silicone caulk:Adds an extra layer of protection against leaks.
Missing even one part can slow down your project or cause leaks later. Have you checked your list twice?
Preparing The Workspace
Preparing the workspace is key before plumbing a kitchen sink with a disposal and dishwasher. A clean, safe area helps avoid accidents and makes the job easier. Taking time to organize tools and clear the space leads to better results. Proper preparation also protects your home from water damage and electrical hazards.
Turning Off Water And Power
Start by shutting off the water supply to the kitchen sink. Locate the shutoff valves under the sink and turn them clockwise until tight. If no valves exist, turn off the main water supply. This step prevents leaks and flooding during work.
Next, switch off the power to the disposal and dishwasher. Use the circuit breaker panel to cut electricity to these appliances. Double-check that power is off by trying to turn on the devices. This step avoids electrical shock and damage.
Clearing The Sink Area
Remove everything from under and around the sink. Clear cabinets, drawers, and countertops near the workspace. This provides room for tools and parts.
Lay down a towel or plastic sheet to catch spills and protect surfaces. Keep a bucket nearby to catch any water left in pipes. Organize tools and parts for easy access before starting the plumbing work.
Removing The Old Sink Fixtures
Removing old sink fixtures is the first task before installing a new kitchen sink with disposal and dishwasher. This process clears space and prepares plumbing for new connections. It involves careful disconnection and removal of plumbing parts to avoid damage. Proper steps ensure a smooth transition and prevent leaks later.
Disconnecting Plumbing Lines
Start by turning off the water supply valves under the sink. Open the faucet to drain any remaining water. Use a bucket to catch water from pipes while disconnecting.
- Loosen the slip nuts on drain pipes using a wrench.
- Disconnect the drain trap carefully to avoid spills.
- Unplug the dishwasher drain hose from the sink drain or disposal.
- Disconnect the water supply lines from the faucet with an adjustable wrench.
Check for any electrical connections to the disposal. Unplug the disposal from the power source before proceeding.
Taking Out The Sink And Disposal
Clear out items from under the sink to work freely. Remove any mounting clips or brackets holding the sink in place.
- Cut through old caulk or sealant around the sink edges with a utility knife.
- Lift the sink carefully from the countertop. Enlist help if the sink is heavy.
- Unscrew the disposal mounting ring and lower the disposal unit.
- Inspect the sink opening for damage or debris before installing new fixtures.
Dispose of old fixtures properly. Keep workspace clean to avoid accidents during installation.

Credit: www.reddit.com
Installing The New Sink
Installing a new sink involves connecting the plumbing for both the disposal and the dishwasher. Ensure all fittings are secure to prevent leaks. Proper alignment and sealing guarantee efficient water flow.
Installing the New Sink Upgrading your kitchen sink to include a disposal and dishwasher can be a game-changer. This task is not only about aesthetics but functionality too. With the right approach, installing your new sink can be a straightforward process that enhances your kitchen experience.
Securing The Sink Basin
Begin by ensuring your sink basin is positioned correctly within the countertop cutout. Double-check the alignment with the countertop edges for a seamless look. Using a level, confirm that the sink is even to avoid water pooling on one side. Once positioned, secure the sink using the mounting clips provided. Tighten the clips evenly to hold the basin firmly in place.
Sealing And Mounting
To prevent water from seeping into unwanted areas, apply a bead of silicone sealant around the edge of the sink. Press down gently but firmly to ensure the sealant spreads evenly, creating a watertight barrier. After sealing, attach the faucet and connect the disposal and dishwasher according to their respective instructions. Ensure all connections are tight to avoid leaks. Regularly inspect these connections to maintain optimal performance.
Connecting The Garbage Disposal
Connecting the garbage disposal is a key part of plumbing your kitchen sink, especially when you want both your disposal and dishwasher working smoothly. Getting this connection right ensures your kitchen stays clean and efficient without unexpected leaks or electrical issues. Let’s look closely at how to mount the disposal unit securely and handle the wiring and power connection safely.
Mounting The Disposal Unit
Start by aligning the disposal unit with the sink flange. It needs to fit snugly to prevent leaks and keep the unit stable during operation.
Secure the disposal by tightening the mounting ring. This usually involves turning it clockwise until it locks into place. Don’t overtighten; a firm hold is enough to avoid cracks or damage.
Check the dishwasher inlet if your disposal has one. You’ll need to remove a knockout plug inside the inlet to connect your dishwasher drain line. This step is often overlooked but crucial for proper drainage.
Wiring And Power Connection
Safety should be your top priority when handling electrical connections. Make sure the power is turned off at the breaker before you start wiring.
Most disposals come with a power cord that needs to be connected inside the unit’s junction box. Remove the cover, connect the wires matching colors (black to black, white to white, and green or bare wire to ground), then secure the connections with wire nuts.
Once connected, replace the junction box cover and plug the disposal into a grounded outlet. If you don’t have an outlet under your sink, consider installing one or hardwiring the unit with a professional’s help.

Credit: www.reddit.com
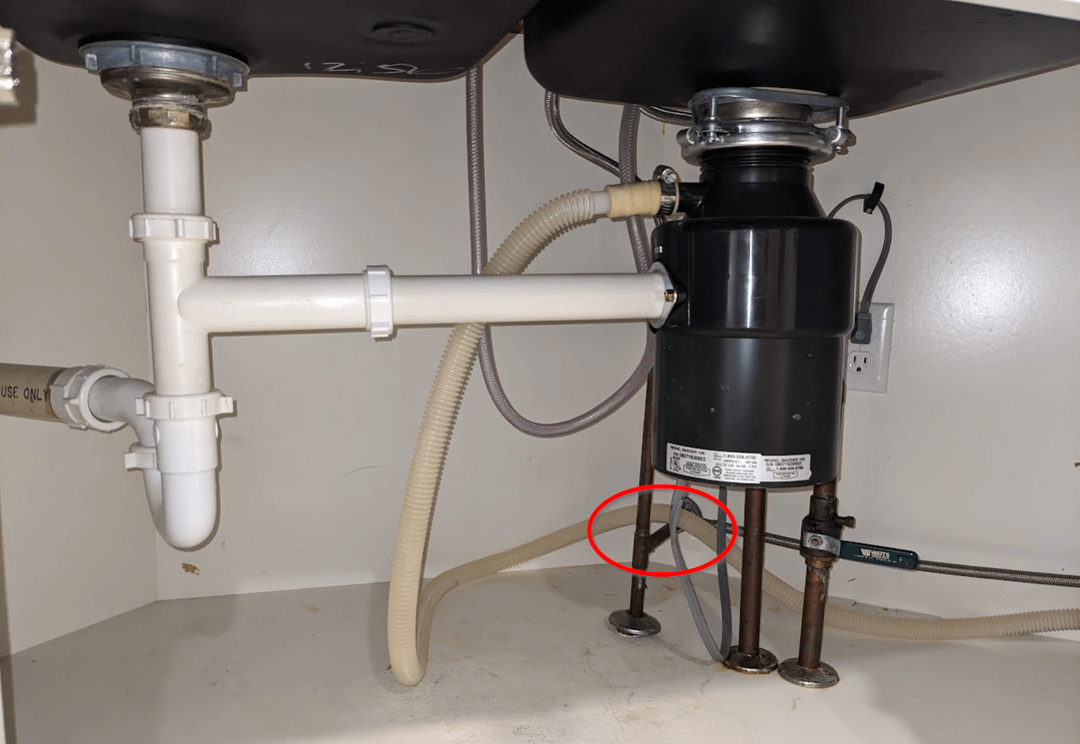
Hooking Up The Dishwasher Drain
Hooking up the dishwasher drain is a key part of kitchen sink plumbing. This connection allows wastewater from the dishwasher to flow safely into the plumbing system. Proper installation prevents leaks and clogs. It also ensures the disposal and dishwasher work together smoothly. Follow clear steps to connect the dishwasher drain hose to the disposal unit.
Attaching The Dishwasher Drain Hose
Start by locating the dishwasher drain hose. This flexible tube carries dirty water away from the dishwasher. Attach one end of the hose to the dishwasher drain outlet. Secure the connection with a hose clamp. Tighten the clamp with a screwdriver to avoid leaks.
Check the hose for any cracks or damage before attaching. Use a new hose if the old one looks worn. Run the hose along a safe path to avoid kinks or bends. Keep it away from heat sources or sharp edges.
Connecting To Disposal Inlet
Find the dishwasher inlet on the garbage disposal. Usually, it is a small opening on the side of the disposal unit. Remove the knockout plug inside the inlet if present. Use pliers to break and remove the plug carefully.
Slide the dishwasher drain hose onto the disposal inlet. Secure it tightly with a hose clamp. Tighten the clamp to prevent any leaks or disconnections. Ensure the hose has a slight upward loop before connecting. This loop stops dirty water from flowing back into the dishwasher.
Assembling The Drain Pipes
Assembling the drain pipes for your kitchen sink with a disposal and dishwasher is a key step that ensures everything flows smoothly and prevents leaks. It might seem tricky at first, but with a clear plan and attention to detail, you can handle this like a pro. Let’s break down the process so you can see exactly what needs to be done.
Installing The P-trap
The P-trap is essential because it traps debris and prevents sewer gases from coming up through your sink. Start by positioning it below the sink drain outlet, making sure it fits snugly with the tailpiece coming from the sink drain or disposal unit.
Attach the trap arm to the wall drain pipe, and tighten the slip nuts by hand. Avoid overtightening, as this can crack the pipes or damage the washers. A quick tip: test fit all pieces before final tightening to ensure proper alignment.
Ensuring Proper Alignment And Seals
Misaligned pipes or loose seals are common causes of leaks. Check that all pipes connect without forcing parts together, and that washers and gaskets are seated correctly inside the joints.
Use plumber’s tape on threaded connections to boost the seal and prevent drips. After assembly, run water through the system and watch closely for any leaks. If you spot any, tighten the joints a little more or reposition the washers.
Testing For Leaks And Functionality
Testing for leaks and functionality is a vital part of plumbing a kitchen sink with a disposal and dishwasher. This step ensures everything works correctly and prevents water damage.
Check all the connections carefully. Even a small drip can cause big problems later. Testing also confirms the disposal and dishwasher operate as expected.
Running Water Through The System
Turn on the water supply slowly. Let water flow through the sink drain and dishwasher hose.
- Watch under the sink for any leaks at joints or seals.
- Check around the disposal’s mounting and connections.
- Look for water pooling or dripping on the floor or cabinet base.
Run both hot and cold water to test all pipes thoroughly. Keep the water running for several minutes for a full check.
Checking Disposal Operation
Switch on the disposal with water running. Listen for unusual noises or grinding sounds.
- Ensure the disposal runs smoothly without vibrations or shaking.
- Check that water drains quickly while the disposal operates.
- Turn off the disposal and confirm no water leaks appear afterward.
Test the dishwasher drain by running a cycle. Confirm no leaks appear at hose connections.
Troubleshooting Common Issues
Troubleshooting common issues in kitchen sink plumbing saves time and money. Small problems can cause big headaches if ignored. Understanding common faults helps you fix them quickly. Most issues involve leaks or drainage troubles. Both affect sink use and kitchen hygiene. This guide covers easy fixes for these problems.
Dealing With Leaks
Leaks often happen at pipe joints or connections. Check all fittings under the sink for moisture. Tighten any loose nuts with a wrench carefully. Use plumber’s tape on threaded connections to seal gaps. Replace worn-out washers inside compression fittings. Inspect the garbage disposal unit for cracks or loose bolts. If leaks persist, unplug the disposal and examine seals. Look for water pooling around the sink drain. Clean and reseal with plumber’s putty if needed. Regular checks prevent water damage and mold growth.
Fixing Drainage Problems
Slow drainage signals a blockage in pipes or the disposal. Avoid pouring grease or food scraps down the drain. Use a plunger to clear minor clogs in the sink basin. Remove the P-trap under the sink to clean trapped debris. Run cold water during disposal use to flush waste properly. For stubborn clogs, a plumber’s snake can reach deeper blockages. Check dishwasher drain connections for kinks or leaks. Ensure the air gap or high loop is installed correctly. Proper drainage keeps the sink running smoothly and odor-free.
Credit: www.diychatroom.com
Frequently Asked Questions
How Do I Connect A Dishwasher To A Kitchen Sink?
To connect a dishwasher, use the dishwasher inlet on the disposal’s dishwasher port. Secure with a hose clamp. Connect the drain hose to the disposal’s dishwasher inlet, ensuring a tight fit to prevent leaks.
Can I Install A Garbage Disposal With My Kitchen Sink?
Yes, a garbage disposal can be installed under the kitchen sink. It connects to the sink drain and power supply. Follow manufacturer instructions carefully for safe installation and proper sealing to avoid leaks.
What Tools Are Needed To Plumb A Kitchen Sink?
You will need a wrench, plumber’s putty, screwdriver, pipe cutter, and plumber’s tape. These tools help install the faucet, connect drain pipes, and secure the disposal and dishwasher plumbing.
How Do I Prevent Leaks When Plumbing A Kitchen Sink?
Use plumber’s tape on threaded connections and plumber’s putty around drain flanges. Tighten all fittings securely but avoid overtightening. Double-check all connections after installation for any signs of leaks.
Conclusion
Plumbing a kitchen sink with a disposal and dishwasher is doable. Follow the steps carefully and take your time. Use the right tools and parts to avoid leaks or problems. Test everything well before finishing. Small mistakes can cause big troubles later.
Keep safety in mind and turn off water supply first. This project saves money and gives a good feeling. You can enjoy a well-working kitchen sink every day. Simple effort, good results. Ready to try?