
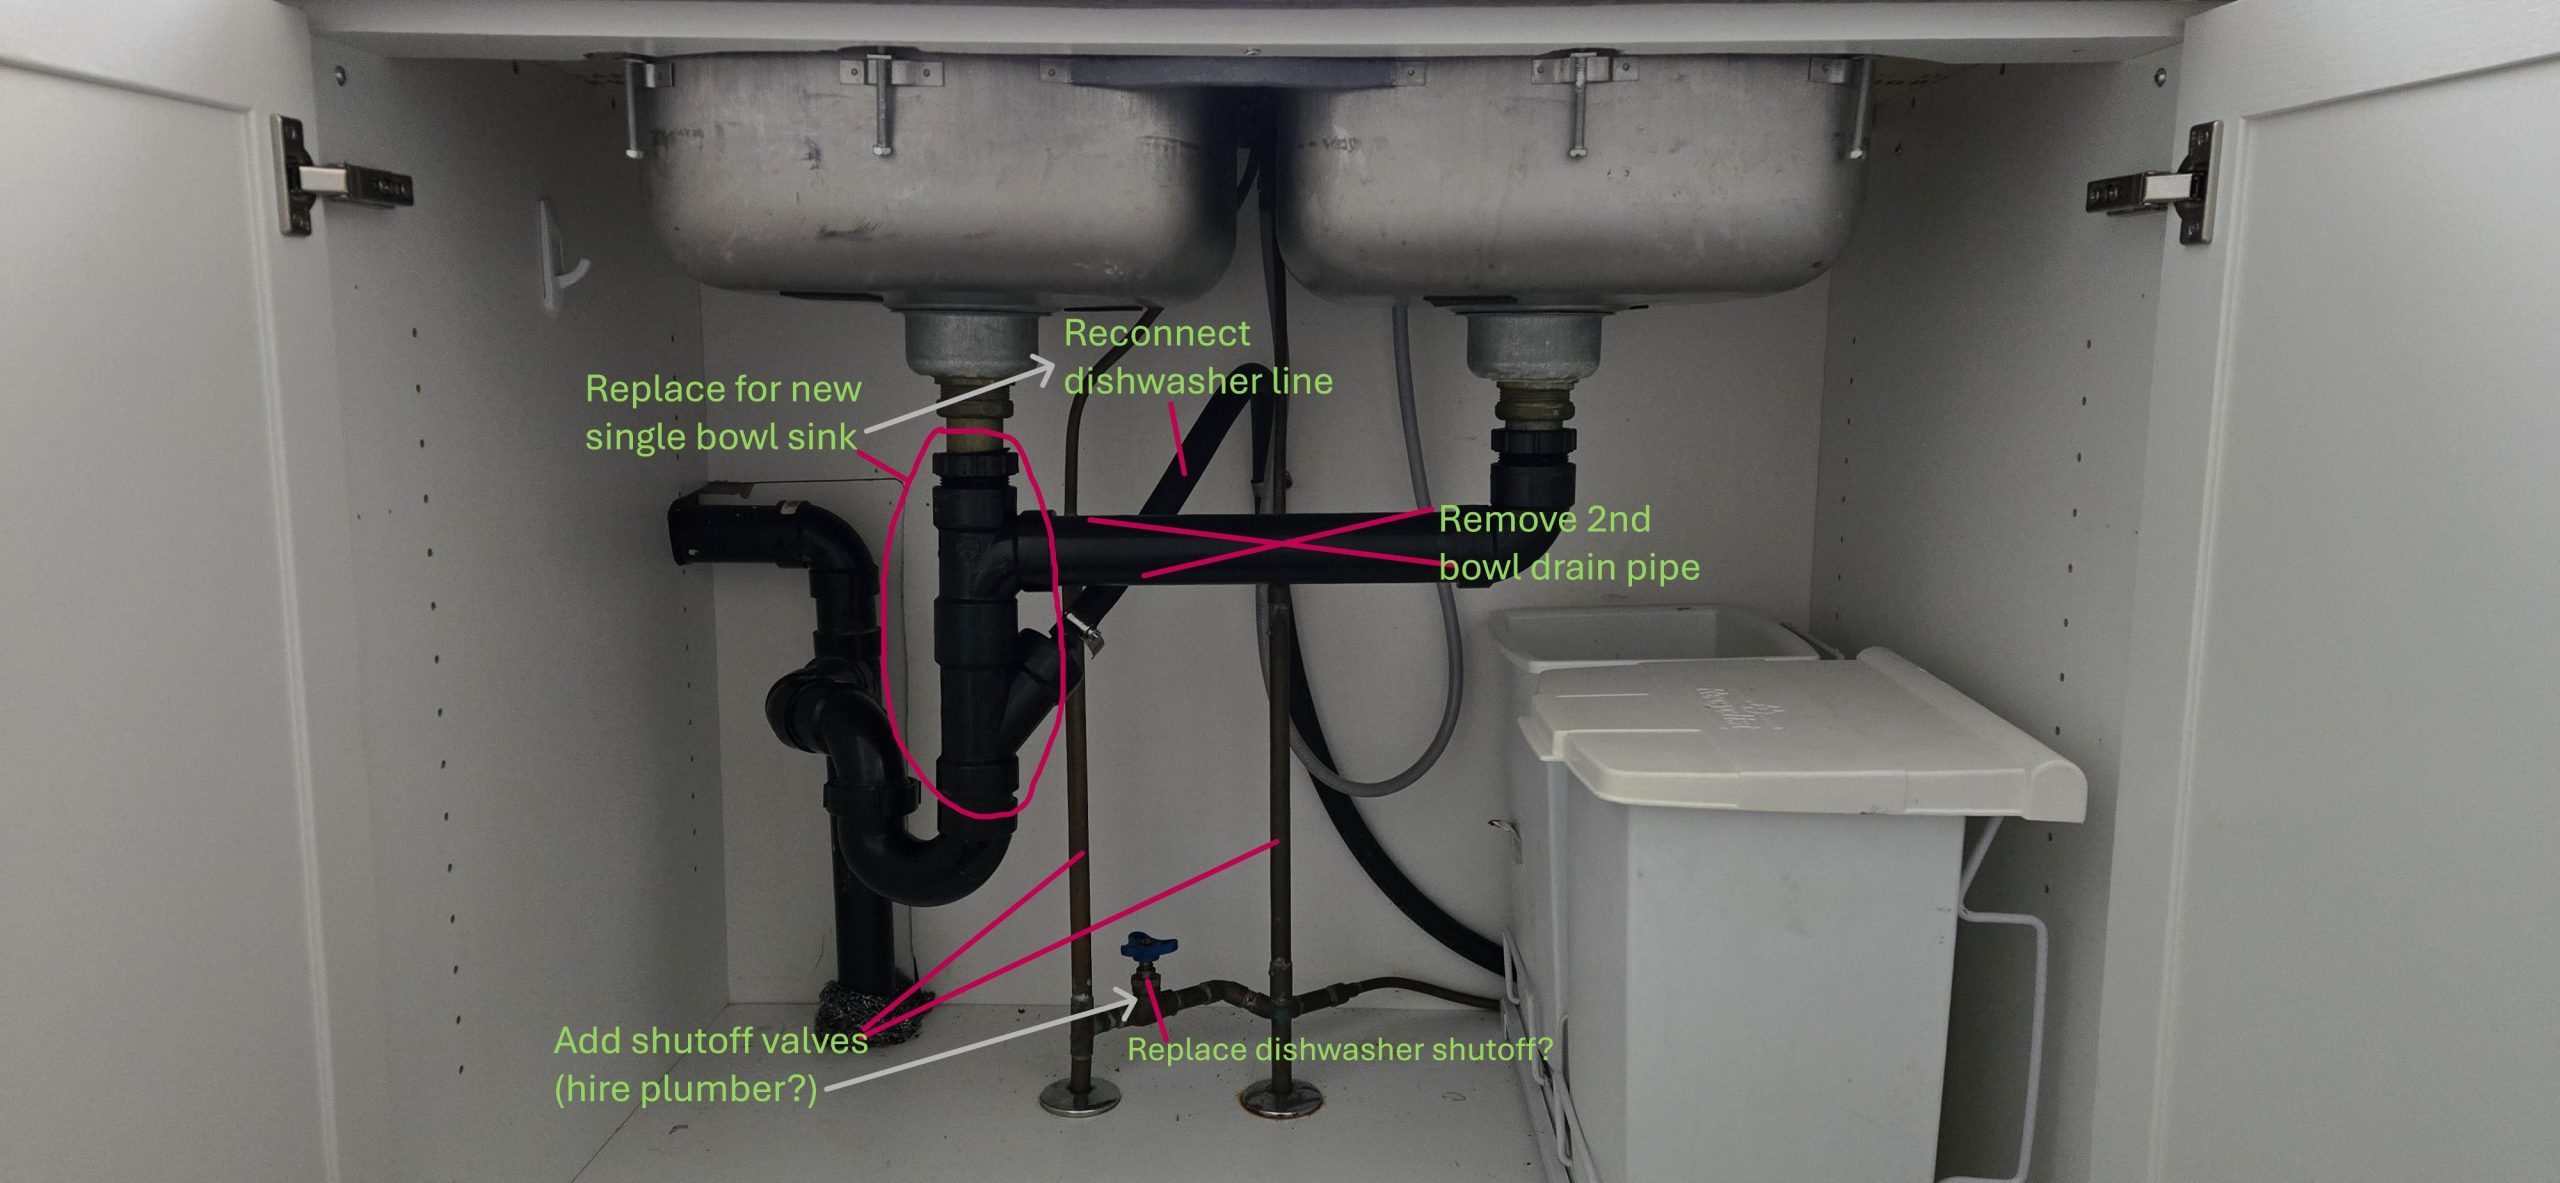
Are you ready to tackle your kitchen plumbing project but unsure where to start? Plumbing a single bowl kitchen sink with a dishwasher might seem tricky, but with the right steps, you can do it yourself and save time and money.
Imagine turning on your faucet and dishwasher with everything flowing smoothly, no leaks, no clogs. In this guide, you’ll discover easy-to-follow instructions that make the process clear and manageable. Keep reading, and by the end, you’ll have the confidence to handle your kitchen sink plumbing like a pro.
Tools And Materials Needed
Having the right tools and materials makes plumbing a single bowl kitchen sink with a dishwasher much easier. It ensures a smooth installation and avoids common mistakes. Prepare everything before starting to save time and effort.
Essential Plumbing Tools
- Adjustable wrench for tightening connections
- Pipe wrench to grip and turn pipes
- Plumber’s tape to seal threaded joints
- Hacksaw for cutting pipes to size
- Pipe cutter for clean, straight cuts
- Slip-joint pliers for gripping small parts
- Basin wrench to reach tight sink fittings
- Bucket to catch water during installation
- Measuring tape for accurate pipe lengths
Required Pipes And Fittings
- PVC drain pipes for waste water flow
- Trap assembly to prevent sewer gas odors
- Compression fittings to join pipes securely
- Slip nuts and washers for tight seals
- Elbows and tees to direct pipe paths
- Pipe hangers or supports to hold pipes
- Pipe sealant or plumber’s putty for joints
Dishwasher Connection Parts
- Dishwasher drain hose to remove waste water
- Branch tailpiece to connect dishwasher drain
- Air gap or high loop to prevent backflow
- Hose clamps to secure dishwasher hose
- Water supply line for dishwasher inlet
- Shut-off valve to control water flow

Credit: www.amazon.com
Prepare The Sink Area
Preparing the sink area is an important first step when plumbing a single bowl kitchen sink with a dishwasher. It ensures a smooth installation and prevents leaks or damage. Take the time to get the workspace ready before starting any plumbing work.
Turn Off Water Supply
Locate the main water valve under the sink or near the water meter. Turn the valve clockwise to shut off the water supply. Open the faucet to drain any remaining water in the pipes. This step stops water flow and avoids spills during plumbing.
Clear And Clean The Workspace
Remove items from under and around the sink. Clear the countertop to give yourself enough room to work. Wipe down surfaces to remove dirt and grime. A clean workspace helps prevent accidents and keeps tools organized.
Remove Old Plumbing Components
Disconnect the drain pipes and water lines attached to the old sink. Use a wrench or pliers to loosen fittings carefully. Remove the old sink and any mounting hardware. Inspect the area for damage or mold and clean if needed before installing new parts.
Install The Drain Assembly
Installing the drain assembly is a key part of plumbing your single bowl kitchen sink with a dishwasher. This process ensures that wastewater flows smoothly without leaks or clogs. Getting this right saves you time and frustration later, especially when connecting your dishwasher drain line.
Attach The Sink Strainer
The sink strainer is the first component you attach to the drain hole in your sink. Before you start, check that the strainer fits snugly without wobbling. If it feels loose, your drain assembly might not seal properly.
Place the strainer into the drain hole from the top of the sink. Hold it steady while you flip the sink over and secure it underneath with the rubber gasket and mounting nut. Tighten the nut by hand first, then use a wrench to give it a final snug turn—just enough to compress the gasket without cracking the sink.
Secure The Drain Flange
The drain flange is the visible part inside the sink that connects to the strainer. After attaching the strainer, make sure the drain flange sits flat against the sink surface. A poorly seated flange can cause leaks or water pooling around your sink.
Use the mounting hardware included with your drain assembly. Tighten evenly to avoid tilting the flange. Don’t rush this step; an uneven flange is a common cause of future drainage problems.
Apply Plumber’s Putty Correctly
Plumber’s putty creates a watertight seal between the sink and the drain flange. Roll a small amount of putty into a rope shape and press it evenly around the flange’s underside. Too much putty can squeeze out messily, while too little may not seal properly.
Once the putty is in place, press the flange firmly onto the sink drain hole. Hold it for a minute so the putty starts to set. After tightening the mounting nut below, clean up any excess putty that oozes out to keep your sink looking neat.
Have you ever ignored these details and ended up with a leak? Taking a few extra minutes here prevents a lot of headaches and keeps your kitchen dry and functional.

Credit: us.amazon.com
Connect The P-trap
Attach the P-trap securely under the sink drain to prevent leaks and odors. Ensure it aligns well with the drain pipe for smooth water flow. Tighten all connections by hand, then use a wrench for a snug fit without over-tightening.
Connecting the P-trap is an essential part of plumbing a kitchen sink. It helps keep sewer gases out of your kitchen. This task may seem daunting, but it becomes manageable with guidance. The P-trap connects the sink drain to the main drainage system. This connection ensures a smooth water flow and traps debris. Let's break down the steps involved.
Align The Drain Pipes
Start by aligning the sink drain pipes. Ensure the pipes are at the same level. This alignment prevents water blockages. Use a tape measure for accuracy. Check the distance between the sink drain and wall pipe. This distance is crucial for fitting the P-trap correctly.
Attach The P-trap To The Drain
Position the P-trap below the sink drain. Connect the trap arm to the wall pipe. Ensure the trap bend aligns with the sink drain. Secure the connections with slip nuts. Hand-tighten the nuts initially. Use a wrench for a tighter fit. Avoid over-tightening to prevent cracks.
Check For Proper Sealing
Run water through the sink to test. Check for any leaks around the P-trap. If leaks appear, tighten the connections. Ensure the seals are intact. Inspect the slip nuts for looseness. Adjust them if necessary. A leak-free connection ensures efficiency.
Hook Up The Dishwasher Drain
Hooking up the dishwasher drain is a key step in plumbing your single bowl kitchen sink with a dishwasher. It ensures that wastewater from your dishwasher flows correctly into the plumbing system without causing leaks or backflow. Paying attention to how you connect the drain can save you from future headaches like clogs or water damage.
Locate The Dishwasher Drain Inlet
Start by finding the dishwasher drain inlet, usually located on the side or back of your dishwasher. It looks like a small, round opening where the drain hose will connect. If you're unsure, check the dishwasher’s manual or look for a rubber or plastic fitting near the bottom.
Knowing exactly where this inlet is helps you avoid forcing the hose into the wrong spot, which could cause leaks. Have you ever struggled with a tight space under your sink? This is where patience and a flashlight become your best friends.
Install The Dishwasher Drain Hose
Next, take the dishwasher drain hose and attach it to the drain inlet. Make sure the hose is long enough to reach the sink drain or garbage disposal without kinks or sharp bends. A smooth path allows water to flow freely and prevents clogs.
Push the hose firmly onto the inlet so it fits snugly. If you have a garbage disposal, the hose usually connects to a special inlet on it. Double-check that the hose is routed away from any heat sources or sharp edges that could damage it over time.
Secure With Hose Clamps
Once the hose is in place, use hose clamps to secure it tightly. These clamps prevent the hose from slipping off and causing leaks. Tighten the clamp with a screwdriver until it feels secure, but avoid overtightening, which could damage the hose.
Don’t skip this step—even a small loose connection can lead to water spraying under your sink. Have a friend run the dishwasher after you finish to watch for any leaks. Catching a drip early can save you a lot of trouble later on.

Credit: www.sinkple.com
Connect The Water Supply
Connecting the water supply is a key part of plumbing a single bowl kitchen sink with a dishwasher. This step ensures water flows correctly to the faucet and dishwasher. Proper connections prevent leaks and water damage. Take care to attach all lines firmly and check each connection.
Attach Supply Lines To Faucet
Start by attaching the hot and cold water supply lines to the faucet. Use flexible braided lines for easy installation. Screw the lines onto the faucet’s threaded inlets. Tighten with a wrench but avoid overtightening. Check that washers are in place to stop leaks.
Connect Dishwasher Water Line
Find the dishwasher’s water inlet valve near the sink. Attach the dishwasher water line to this valve. Use a clamp or quick-connect fitting to secure the line. Make sure the connection is tight. This line will supply water from the sink plumbing to the dishwasher.
Test For Leaks
Turn on the main water supply slowly. Watch all connections for drips or moisture. Tighten any loose fittings if needed. Run the faucet and dishwasher to check water flow. Inspect again for leaks during operation. Fix leaks immediately to avoid damage.
Final Testing And Adjustments
Final testing and adjustments ensure your kitchen sink and dishwasher work smoothly. This step checks for leaks, drainage speed, and proper dishwasher operation. It helps catch problems before daily use.
Run Water To Check Drainage
Turn on the faucet and let water flow into the sink. Watch the water drain quickly without pooling. Slow drainage may indicate a clog or poor pipe alignment. Listen for gurgling sounds that suggest trapped air or blockages. Repeat the process to confirm consistent flow.
Operate Dishwasher Drain Cycle
Start the dishwasher’s drain cycle to test its plumbing connection. Watch the drain hose and sink drain for water flow. Ensure water exits without backing up into the sink. Check for leaks under the sink during and after the cycle. Proper dishwasher drainage prevents water damage and odors.
Tighten Any Loose Connections
Inspect all fittings, including drain pipes and hose clamps. Use a wrench to gently tighten any loose nuts or bolts. Avoid over-tightening, which can crack fittings or strip threads. Secure all connections to stop leaks and keep the system stable. Double-check after running water and dishwasher cycles.
Frequently Asked Questions
How Do I Connect A Dishwasher To A Single Bowl Sink?
To connect, install a dishwasher drain adapter on the sink’s drain tailpiece. Attach the dishwasher drain hose to the adapter. Ensure proper tightness to avoid leaks.
What Tools Are Needed For Single Bowl Sink Plumbing?
You’ll need a wrench, plumber’s tape, screwdriver, pipe cutter, and a bucket. These tools help in connecting pipes and securing fittings properly.
Can I Use The Garbage Disposal With A Dishwasher?
Yes, if your sink has a garbage disposal, connect the dishwasher drain hose to its inlet. Remove the knockout plug inside the disposal inlet before attaching.
How Do I Prevent Leaks When Plumbing A Dishwasher?
Use plumber’s tape on threaded connections. Tighten all fittings securely but avoid overtightening. Check connections carefully after installation to catch any leaks early.
Conclusion
Plumbing a single bowl kitchen sink with a dishwasher can be simple. Follow the steps carefully, and take your time. Use the right tools and materials for best results. Check all connections to avoid leaks and clogs. Testing the system after installation helps catch problems early.
With patience, you can complete this task yourself. Enjoy your fully functional sink and dishwasher setup. Plumbing doesn’t have to be hard. Just stay organized and work step by step. Your kitchen will work better and look neat. Keep this guide handy for future plumbing needs.