
Is your kitchen sink clogged and slowing you down? You don’t need to call a plumber just yet.
Learning how to plunge a kitchen sink is easier than you think—and it can save you time, money, and frustration. In this guide, you’ll discover simple steps that anyone can follow to clear that stubborn blockage quickly. Imagine turning on your faucet and having the water drain smoothly again.
Ready to get your sink flowing like new? Keep reading, and let’s tackle that clog together.
Tools You’ll Need
Having the right tools makes plunging a kitchen sink easier and faster. A few basic items help clear clogs without causing damage. You don’t need many tools, but each one plays a key role. Prepare these before you start to save time and avoid frustration.
Choosing The Right Plunger
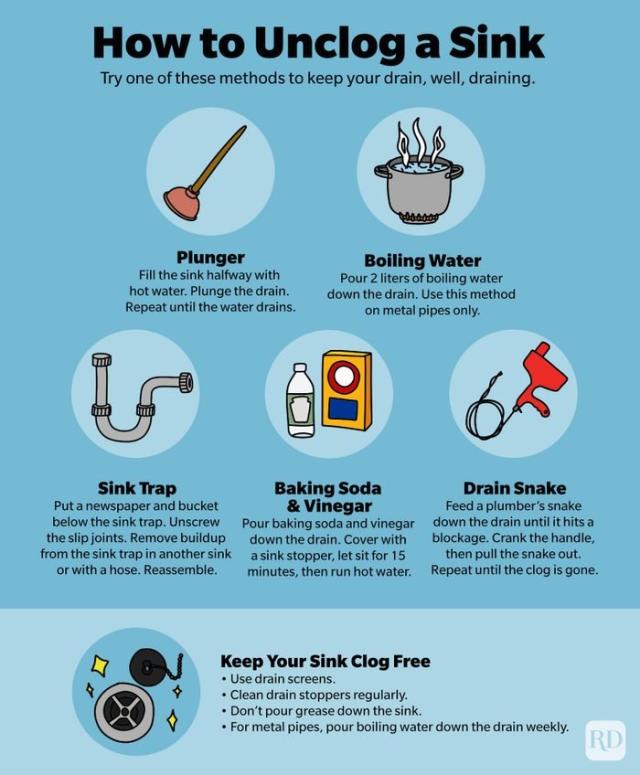
A standard cup plunger works well for flat surfaces like sinks. It has a simple rubber cup and a wooden handle. This type creates pressure to push clogs through the drain.
A flange plunger has an extra rubber flap at the bottom. This fits better into curved pipes and creates a tighter seal. It is often used for toilets but can help with kitchen sinks too.
Pick a plunger with a sturdy handle and a flexible rubber cup. Avoid cheap plastic plungers, as they might break or leak air. A good plunger seals the drain well and builds strong pressure for clearing blockages.
Additional Helpful Tools
- Bucket:To catch any water that spills out during plunging.
- Rubber gloves:To keep your hands clean and protected.
- Old towels or rags:To wipe up spills and protect your floor.
- Drain snake:A flexible tool to remove tough clogs if plunging does not work.
- Flashlight:To see inside the drain or under the sink if needed.
Having these tools ready helps you tackle a clogged kitchen sink quickly and safely. Keep them close by before starting the job.
Preparing The Sink
Preparing the sink is the first important step to clear a clogged kitchen drain. Proper preparation makes plunging easier and more effective. It also helps avoid mess and protects your sink area.
Clearing The Area
Remove any items around the sink. Clear soap, dishes, and cleaning tools. This creates space to work and prevents objects from falling into the drain. Also, protect the surrounding countertop with a towel or cloth. It catches any spills or splashes during plunging.
Removing Standing Water
Check if water is standing in the sink basin. Too much water can reduce plunging power. Use a small container or cup to scoop out excess water. Leave some water in the sink to help create suction. This water acts as a seal between the plunger and drain, improving pressure to clear the clog.
Plunging Techniques
Plunging a kitchen sink requires the right technique to clear blockages effectively. Using proper methods saves time and prevents damage. Focus on creating a tight seal, using the correct plunging motion, and knowing how long to plunge.
Creating A Tight Seal
Ensure the plunger fits the drain opening perfectly. The cup should cover the hole completely. Press down gently to push out air and create suction. If your sink has a double basin, plug the other drain with a wet cloth. This stops air from escaping and improves pressure.
Proper Plunging Motion
Push the plunger down slowly and pull up sharply. Avoid lifting the plunger completely off the drain. Keep the seal tight throughout the process. Use short, controlled motions to move water. This helps loosen the clog without splashing.
How Long To Plunge
Plunge for about 20 seconds at a time. Take breaks if needed to check progress. Repeat plunging cycles until water drains freely. Avoid over-plunging, which can damage pipes. Usually, three to five cycles clear most blockages.
Credit: www.aol.com
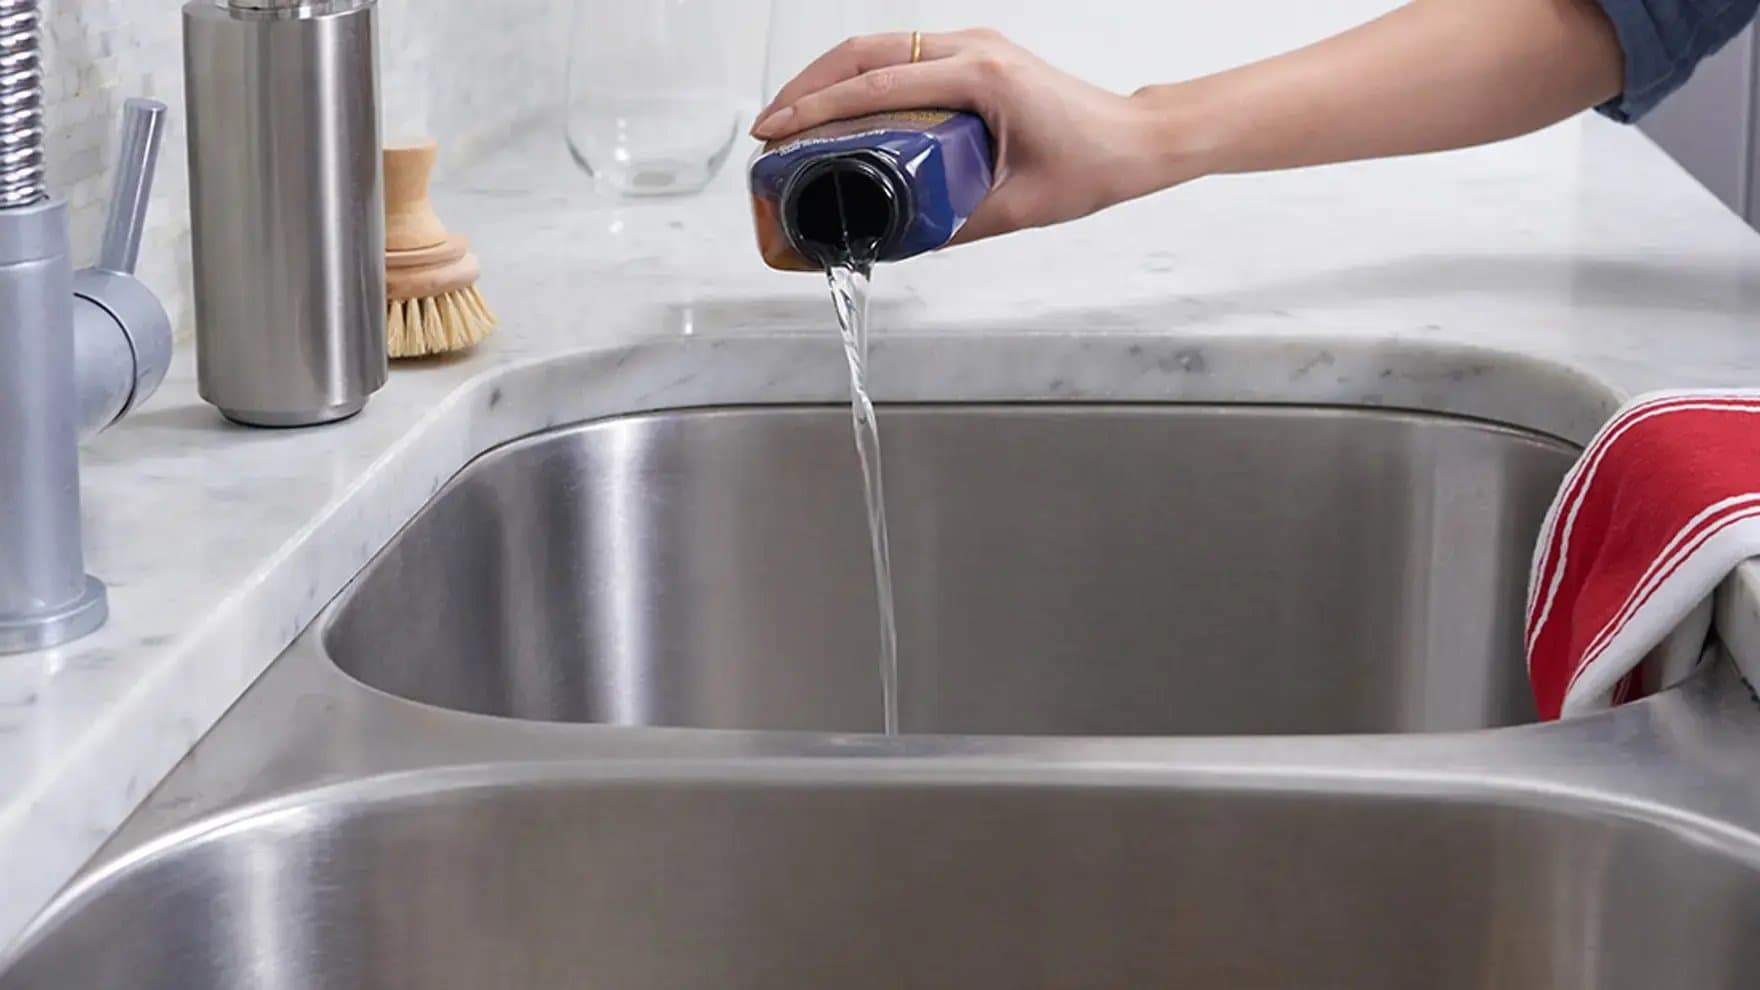
When To Use Hot Water And Soap
Hot water and soap help break down grease and food stuck in the drain. Use them before plunging to clear light clogs. This makes plunging easier and more effective.
When your kitchen sink drains slowly, it could be due to a mild clog. Before reaching for the plunger, try a simple solution: hot water and soap. This method is effective for grease or soap buildup. It’s a gentle approach that often works wonders without harsh chemicals.
How Hot Water Helps
Boil water in a kettle or pot. Pour it slowly down the drain. Hot water melts grease buildup. It can break down soap scum too. This helps clear minor blockages naturally.
The Power Of Soap
Use liquid dish soap. Pour a generous amount into the drain. Allow it to sit for a few minutes. The soap lubricates the pipes. It helps break down greasy residues.
Combining Hot Water And Soap
After adding soap, pour hot water again. The combination works effectively. It clears mild clogs and freshens the drain. Repeat if necessary for stubborn buildup.
When To Avoid This Method
Do not use hot water on PVC pipes. It may cause damage. If the sink is completely blocked, try another method. This approach suits mild clogs only.
Dealing With Stubborn Clogs
Stubborn clogs can block water flow and cause sink backups. These blockages often resist simple plunging. They need extra care and specific techniques. Persistence is key to clear these tough clogs effectively.
Using Baking Soda And Vinegar
Baking soda and vinegar create a natural cleaning reaction. This mix helps break down grease and grime inside pipes. Start by pouring half a cup of baking soda down the drain. Follow with half a cup of vinegar slowly.
Let the mixture fizz and sit for 15 to 30 minutes. Then, flush the drain with hot water. Repeat if needed to improve results. This method is safe and eco-friendly for your kitchen sink.
Manual Removal Options
Sometimes chemical reactions are not enough. Manual removal can clear clogs that are close to the drain opening. Use a plunger with a tight seal around the sink drain. Pump it several times to create suction and dislodge blockages.
For deeper clogs, try a drain snake or a wire hanger. Insert it carefully into the drain and twist to catch the clog. Pull out debris slowly to avoid pushing it further down. Wear gloves to keep hands clean and safe.

Credit: ca.style.yahoo.com
Preventing Future Clogs
Stopping clogs before they start saves you from a lot of trouble and keeps your kitchen running smoothly. Preventing future clogs means paying attention to what goes down your drain and keeping things clean regularly. You don’t need fancy tools or expensive chemicals—just a bit of care and simple habits.
Regular Maintenance Tips
Make it a habit to flush your sink with hot water once or twice a week. This helps melt away grease and soap that start sticking to your pipes.
Try pouring a mixture of baking soda and vinegar down the drain monthly. It bubbles up and clears minor buildup without harsh chemicals.
Keep a drain strainer in place to catch food bits and debris. Empty it often to avoid blockages before they form.
Have you noticed slow drainage? Don’t wait for a full clog. Use a plunger or a drain snake to clear the problem early.
What Not To Put Down The Drain
Think twice before washing these items down your kitchen sink:
- Grease and Cooking Oils:They cool and harden, sticking inside pipes.
- Coffee Grounds:They clump and cause buildup.
- Eggshells:Tiny fragments can accumulate and block pipes.
- Stringy Vegetables:Things like celery and onion skins wrap around other debris.
- Pasta and Rice:They expand and can clog drains.
Have you ever dumped leftover grease down the sink? That’s often the start of a clog. Instead, wipe pans with paper towels before washing.
Protecting your drain is about knowing what to avoid and acting before trouble starts. What small changes can you make today to keep your sink flowing freely?

Credit: www.thecooldown.com
Frequently Asked Questions
How Do I Know When To Plunge A Kitchen Sink?
If your sink drains slowly or is completely clogged, it’s time to plunge. Avoid harsh chemicals first. Use a plunger to clear common blockages and restore flow efficiently.
What Is The Best Way To Plunge A Kitchen Sink?
Fill the sink with enough water to cover the plunger’s cup. Place the plunger over the drain and push down firmly, then pull up sharply. Repeat several times until water drains freely.
Can I Use A Regular Plunger For My Kitchen Sink?
Yes, a standard cup plunger works well for kitchen sinks. Avoid flange plungers made for toilets. Ensure the plunger creates a good seal over the drain for effective plunging.
How Often Should I Plunge My Kitchen Sink?
Only plunge when the sink is slow or clogged. Regular plunging is unnecessary and can damage pipes. Proper maintenance and avoiding debris reduce the need for plunging.
Conclusion
Plunging a kitchen sink can solve many common clogs quickly. Use the right plunger and follow simple steps carefully. Patience is key; repeat plunging if needed. Avoid harsh chemicals that may damage pipes. Regular cleaning helps prevent future blockages. With a little effort, you can fix most sink clogs yourself.
Save time and money by handling small problems early. Keep your kitchen running smoothly and enjoy less hassle.