
Have you ever tossed out leftover ginger scraps without realizing they could grow into a fresh supply right in your kitchen? Imagine turning those small pieces into a thriving ginger plant that keeps giving you spicy, aromatic roots whenever you need them.
Growing ginger from kitchen scraps is easier than you think, and it saves you money while adding a touch of green to your home. If you want to know the simple steps to regrow ginger yourself, keep reading—your kitchen garden is just a few scraps away!
Credit: www.gardenary.com
Choosing The Right Ginger Piece
Choosing the right ginger piece is key to successful regrowth. Not all ginger scraps will sprout new plants. Picking healthy, viable pieces increases your chances of growing fresh ginger. Focus on the quality and features of the rhizome before planting.
Identifying Healthy Rhizomes
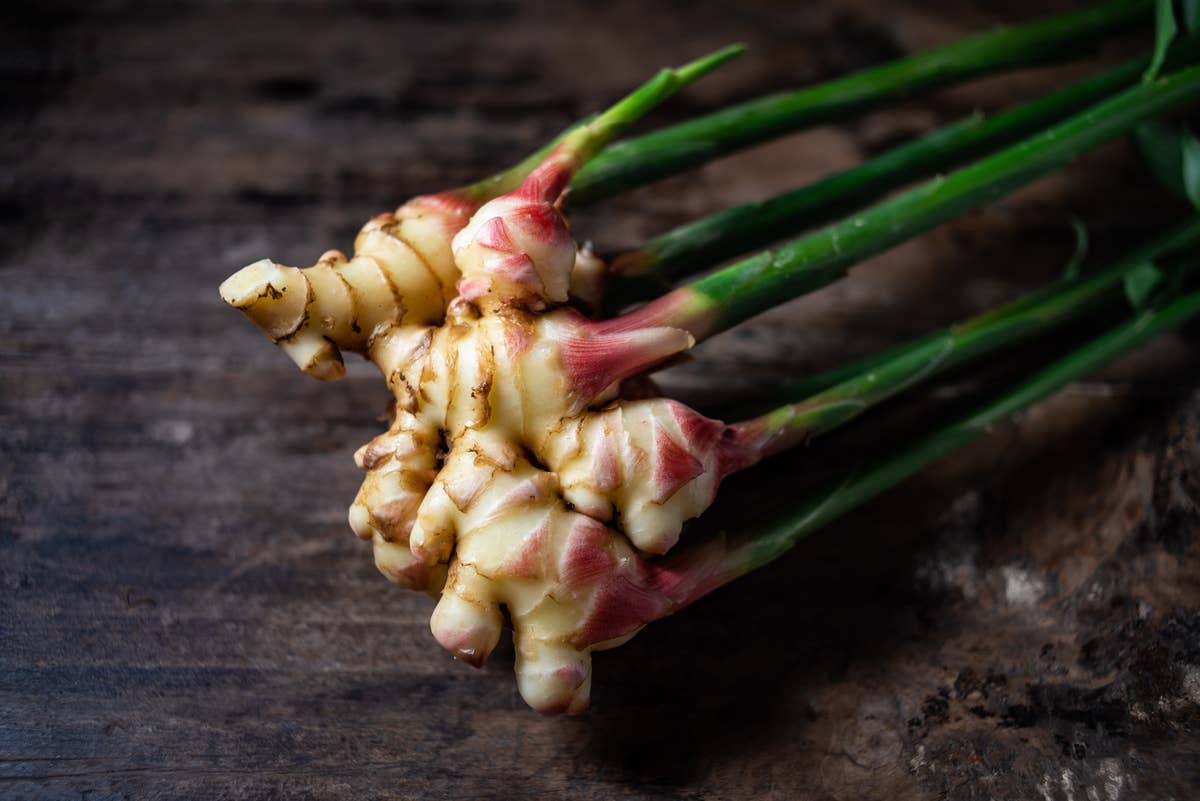
Look for ginger that feels firm and plump. Avoid pieces that are soft, shriveled, or moldy. Healthy rhizomes have smooth skin without dark spots or wrinkles. The skin color should be light brown or beige. Fresh ginger often has a mild, earthy smell, not sour or rotten.
Selecting Pieces With Buds
Buds are small, knobby growth points on the ginger piece. These are the areas where new shoots emerge. Choose pieces with visible buds or eyes that look like tiny bumps or nodes. The buds may be pale yellow or pinkish. Without buds, the ginger will not sprout new growth.
Credit: www.gardenary.com
Preparing Ginger For Planting
Preparing ginger for planting is a key step that can make all the difference in how well your ginger grows. Taking the time to properly ready your ginger scraps helps them sprout faster and develop healthier roots. By handling your ginger carefully, you set the stage for a successful regrowth journey right from your kitchen scraps.
Soaking To Encourage Sprouting
Before planting, soak your ginger pieces in warm water for 24 hours. This helps soften the skin and wakes up the dormant buds inside. Soaking also washes away any dirt or chemicals that might inhibit growth.
Try changing the water halfway through soaking to keep it fresh. You’ll notice small bumps or “eyes” on the ginger start to swell—this means sprouting is about to begin. Have you ever wondered why some ginger pieces sprout quicker? Soaking gives them a head start.
Cutting Into Suitable Sizes
Choose plump, healthy ginger pieces with visible eyes or buds. Using a sharp knife, cut them into chunks about 1 to 2 inches long, each containing at least one eye. Smaller pieces might dry out or fail to sprout, while larger ones can be harder to manage in pots.
Make clean cuts to avoid bruising the ginger, which can lead to rot. Let the cut pieces dry for a day or two so the edges heal before planting. This simple step reduces the risk of fungal infections and gives your ginger a better chance to thrive in soil.
Best Soil And Pot Selection
Choose loose, well-draining soil rich in organic matter to help ginger grow strong roots. A wide, shallow pot with drainage holes works best for healthy growth.
Selecting the best soil and pot is crucial for successfully regrowing ginger from kitchen scraps. A well-chosen pot and the right soil composition can make all the difference in yielding a healthy ginger plant. Let's dive into the specifics to ensure you give your ginger the best start possible.
Soil Composition For Ginger
Ginger thrives in loose, well-draining soil that retains moisture but doesn't stay waterlogged. A mixture of potting soil, sand, and organic compost is ideal. This combination ensures good drainage while providing essential nutrients and keeping the soil airy. Consider adding perlite or vermiculite to further improve aeration. These materials help prevent compacting, which can hinder ginger root growth. Remember, healthy soil is the foundation of a robust ginger plant.
Choosing The Ideal Container
Opt for a container with ample drainage holes to prevent water from pooling at the bottom. A pot that is at least 12 inches deep and wide will provide enough space for the ginger rhizomes to spread. Terracotta pots are a great choice because they allow excess moisture to evaporate, reducing the risk of root rot. However, if you live in a particularly dry climate, you might want to choose a plastic pot to retain moisture better. Think about the space your ginger will need. As it grows, the plant can become quite lush and leafy, so ensure your container is sturdy enough to support its weight and height. Are you ready to watch your ginger thrive in its new home?
Planting Steps
Getting your ginger ready to grow from kitchen scraps is simpler than you might think. The key lies in how you plant the ginger root. Planting it correctly sets the stage for strong growth and a bountiful harvest.
Planting Depth And Orientation
Plant your ginger root about 2 to 4 inches deep in the soil. This depth protects it from drying out while allowing the shoots room to emerge. Always place the buds or eyes facing upward; these are the points where new shoots will sprout.
If you’ve ever planted ginger and found little to no growth, check the orientation first. I learned this the hard way when I initially planted my ginger sideways, resulting in weak shoots. Turning the root so the buds face up made a noticeable difference in sprout strength.
Spacing For Optimal Growth
Give each ginger piece enough space to spread out. Plant them about 8 inches apart to avoid overcrowding. This spacing helps roots develop fully and allows air circulation, reducing the risk of mold or rot.
Think about your garden or pot size. Are you cramming in multiple roots too close? Adjusting the space between each piece can improve the overall health of your ginger plants and increase your yield.
Watering And Light Needs
Getting the watering and light right is key to regrowing ginger successfully from kitchen scraps. Too much water or too little sunlight can stunt your plant’s growth or even cause rot. Let’s break down how to keep your ginger happy and thriving in your home.
Maintaining Moisture Levels
Ginger loves consistent moisture but hates soggy soil. Keep the soil damp, not soaked, by watering gently when the top inch feels dry.
A good trick I learned is to check moisture with your finger or a wooden stick daily. If it’s dry just below the surface, it’s time to add water.
Too much water can cause the rhizome to rot. Make sure your pot has drainage holes to let excess water escape easily.
Providing Adequate Sunlight
Ginger prefers indirect sunlight—bright but filtered light works best. Direct sun can scorch the leaves, especially through windows.
Place your ginger near a north or east-facing window where it gets gentle morning sun. If natural light is limited, a grow light for 10-12 hours a day can fill the gap.
Have you noticed your ginger stretching or leaning toward a light source? That’s a sign it needs more consistent light to stay strong and healthy.
Temperature And Humidity Tips
Getting the temperature and humidity right is crucial when you want to regrow ginger from kitchen scraps. Ginger is a tropical plant that thrives in warm, moist environments. If your indoor conditions are off, your ginger root won’t sprout well, or it might grow very slowly.
Ideal Growing Conditions
Ginger grows best in temperatures between 75°F and 85°F (24°C to 29°C). If it gets cooler than 50°F (10°C), the growth will slow down significantly or stop altogether. At the same time, ginger loves humidity levels around 60% to 70%.
Too dry air causes the soil to dry out quickly, which stresses the ginger root. On the other hand, too much moisture without airflow can lead to mold or rot. So, finding the right balance is key to healthy growth.
Managing Indoor Environments
If you don’t have a greenhouse or a naturally warm spot, you can create a suitable environment indoors. Place your ginger pot near a sunny window, but avoid direct hot sunlight that might dry the soil fast.
To increase humidity, try grouping your ginger plant with other houseplants. You can also place a shallow tray filled with water and pebbles under the pot. As the water evaporates, it adds moisture to the air around your ginger.
Have you noticed how your home’s heating system affects your plants? During winter, indoor air can become very dry. Using a humidifier or misting the leaves occasionally helps maintain the moisture levels ginger needs.
Fertilizing For Faster Growth
Fertilizing ginger helps it grow strong and healthy. Proper nutrients boost root development and leaf growth. Using the right fertilizer supports faster sprouting from kitchen scraps. The soil stays rich and plants get what they need to thrive.
Natural Fertilizer Options
Choose natural fertilizers to keep your ginger plant safe and healthy. Organic options improve soil without harmful chemicals. Here are some easy natural fertilizers:
- Compost: Adds nutrients and improves soil texture.
- Banana peel: Rich in potassium and phosphorus.
- Eggshell powder: Supplies calcium for strong cell walls.
- Used coffee grounds: Boost nitrogen levels in the soil.
- Fish emulsion: Provides a quick nutrient boost.
Feeding Schedule
Feed your ginger plant regularly for best results. Start fertilizing after new shoots appear. Keep the soil moist but not waterlogged. Follow this schedule for healthy growth:
| Stage | Frequency | Notes |
|---|---|---|
| Early growth | Every 2 weeks | Use diluted natural fertilizer |
| Mid growth | Monthly | Increase fertilizer strength slightly |
| Late growth | Once a month | Reduce nitrogen to encourage root growth |
Troubleshooting Common Issues
Growing ginger from kitchen scraps can sometimes present challenges. Problems like mold, rot, and pests may slow down or stop growth. Recognizing these issues early helps save your ginger plant. Quick action can restore its health and keep it thriving.
Dealing With Mold And Rot
Mold and rot usually happen in damp, poorly drained soil. The ginger rhizome may become soft or dark. Remove any affected parts immediately to stop spread. Use a clean knife to cut away bad sections.
Improve air circulation around the plant. Avoid overwatering; keep soil moist but not soggy. Use well-draining soil to prevent water buildup. Place ginger in indirect sunlight to reduce dampness.
Pest Prevention And Control
Common pests include spider mites, aphids, and fungus gnats. Check ginger leaves and stems for tiny bugs or webs. Remove pests by wiping leaves with a damp cloth.
Natural pest control options work well. Spray diluted neem oil or insecticidal soap on plants. Introduce beneficial insects like ladybugs to eat harmful bugs.
Keep the growing area clean. Remove dead leaves and debris often. Healthy plants resist pests better and grow strong.
Harvesting Regrown Ginger
Harvesting regrown ginger is an exciting part of growing your own spice at home. Knowing the right time to harvest ensures the best flavor and texture. Using proper techniques helps keep your ginger plant healthy for future growth. Careful harvesting means you can enjoy fresh ginger again and again from your kitchen scraps.
Signs Ginger Is Ready
Look for thick, firm rhizomes with a strong aroma. The leaves will start to turn yellow and dry out. The skin of the ginger should be slightly wrinkled but not shriveled. These signs mean the ginger has matured and is ready to dig up. Young ginger has a milder taste, while mature ginger is more pungent.
Proper Harvesting Techniques
Use a small garden fork or trowel to gently loosen the soil. Carefully lift the ginger rhizomes without damaging them. Shake off excess soil, but avoid washing until ready to use. Cut off any old or damaged parts with clean scissors. Leave some rhizomes in the soil to keep the plant growing.
Credit: dengarden.com
Tips For Continuous Ginger Supply
Maintaining a constant ginger supply from your kitchen scraps can be rewarding. Fresh ginger elevates your culinary creations and promotes sustainability. By following some simple practices, you can ensure a steady ginger supply throughout the year.
Saving Rhizomes For Replanting
Select the healthiest ginger pieces with visible buds. Buds are often referred to as 'eyes.' These are critical for regrowth. Cut the ginger into smaller sections, ensuring each piece has a few buds. Allow the cut pieces to dry for a day or two. This helps prevent rot when planted. Plant them in pots or directly in the garden. Water them lightly and keep them in a warm spot. In a few weeks, you'll notice new shoots. Regularly check for pests and signs of disease. Healthy rhizomes ensure a continuous harvest.
Storing Ginger For Future Use
Storing ginger properly extends its shelf life. Use airtight containers or plastic bags to store fresh ginger. Keep them in the refrigerator for up to three weeks. For longer storage, freeze ginger pieces. Peel and slice them before freezing. Use a resealable bag to prevent freezer burn. You can grate the ginger directly from frozen. Dried ginger also stores well. Slice the ginger thinly and air dry it. Once dry, store in a cool, dark place. Proper storage ensures you always have ginger on hand.
Frequently Asked Questions
How Do I Prepare Ginger Scraps For Regrowing?
Cut ginger scraps with visible buds into 1-2 inch pieces. Let them dry for 24 hours to prevent rot. Plant them in moist, well-draining soil with buds facing upward. Keep soil warm and water lightly for best growth.
How Long Does It Take To Regrow Ginger From Scraps?
Ginger typically takes 2 to 3 weeks to sprout. Full maturity requires 8 to 10 months. Growth depends on temperature, soil, and watering. Patience and proper care ensure healthy ginger roots.
Can Ginger Regrow Without Soil?
Yes, ginger can regrow in water. Submerge the bottom of the scrap with buds in water. Change water every few days to avoid stagnation. Transplant to soil once roots develop for better growth.
What Is The Best Season To Regrow Ginger?
Spring and early summer are ideal for regrowing ginger. Warm temperatures and longer daylight encourage sprouting. Avoid cold or frost-prone seasons for healthy growth. Maintain consistent warmth for optimal results.
Conclusion
Growing ginger from kitchen scraps saves money and reduces waste. It takes patience and care but is very rewarding. You can enjoy fresh ginger at home anytime. Just keep the soil moist and place the root in sunlight. Watch new shoots grow over weeks.
This simple method makes gardening easy and fun. Try it today and see how ginger grows!