
Is your kitchen exhaust fan cover looking dirty or clogged? Removing it might seem tricky, but you can do it yourself with the right steps.
Taking off the cover allows you to clean it thoroughly and keep your kitchen air fresh and clear. In this guide, you’ll learn exactly how to remove your kitchen exhaust fan cover safely and easily. Stick with me, and you’ll have it off in no time—no stress, no hassle.
Ready to get started? Let’s dive in!
Credit: www.electriciantalk.com
Tools Needed
Removing your kitchen exhaust fan cover is easier when you have the right tools at hand. Without them, you might struggle or even damage the cover or fan. Gathering the proper tools first saves time and frustration.
Basic Hand Tools
Start with a reliable screwdriver set. Most exhaust fan covers use either Phillips or flathead screws. Having a multi-bit screwdriver means you won’t need to search for the right size mid-job.
Sometimes, the screws can be stubborn or rusted. In those cases, a pair of pliers can help you get a better grip and turn the screws smoothly. Don’t forget a small flashlight to see screws clearly in dim corners.
Safety Gear
Safety goggles are a must. Dust and debris often collect inside exhaust fans, and you don’t want anything getting into your eyes. Gloves protect your hands from sharp edges or dirt.
Working with electricity nearby requires caution. Even if you turn off the power, insulated gloves add an extra layer of safety. Are you comfortable working with electrical components? If not, consider asking for help.
Cleaning Supplies
Once the cover is off, you’ll want to clean it before putting it back. Have a soft cloth, mild detergent, and a brush ready. These tools ensure you remove grease and grime without scratching the surface.
Don’t underestimate how much cleaner your kitchen will feel after this step. A clean cover improves airflow and reduces fire hazards. What cleaning tools do you usually reach for in the kitchen? Keep those handy too.

Credit: appliancerepairshymon.ca
Safety Precautions
Removing a kitchen exhaust fan cover requires care to avoid injuries and damage. Safety precautions protect you from electrical hazards and sharp edges. Follow simple safety tips to keep the process smooth and safe.
Always switch off the power to the exhaust fan at the circuit breaker. Confirm the fan is not running before you start. This stops any chance of electric shock.
Use Proper Tools
Gather the right tools like screwdrivers and gloves. Using the correct tools prevents slips and accidents. Avoid makeshift tools that may damage the cover or fan.
Wear Protective Gear
Wear gloves to protect your hands from sharp edges. Safety glasses help shield your eyes from dust and debris. Dress in comfortable clothes that cover your arms.
Work In A Well-lit Area
Good lighting lets you see screws and small parts clearly. It reduces the risk of mistakes and injuries. Use a flashlight if the kitchen light is dim.
Handle Parts Carefully
Hold the cover firmly to avoid dropping it. Place removed screws in a safe spot to avoid losing them. Handle the fan blades gently to prevent damage.
Locate The Exhaust Fan Cover
The exhaust fan cover is usually located on the ceiling or wall above the stove. It often looks like a square or round grille. Check around the fan area to find where the cover attaches.
Removing the kitchen exhaust fan cover can seem daunting, especially if you've never done it before. But with a little guidance, you can easily locate the cover and get started on your cleaning or replacement task. The key is knowing where to start and what to look for.
Identify The Exhaust Fan Location
First, determine where your kitchen exhaust fan is located. Most often, it's above your stove or cooking area. However, in some kitchens, it might be integrated into an overhead cabinet or wall. Look for a section that seems separate from your usual cabinets, often with a grill or vent.
Look For Visible Screws Or Fasteners
Once you've pinpointed the general area, examine the fan cover for any visible screws or fasteners. These are usually placed along the edges of the cover. Grab a flashlight if your kitchen lighting isn't sufficient, as these tiny screws can be easy to miss.
Check For A Hidden Latch Or Clip
In some designs, the exhaust fan cover might be held by a hidden latch or clip instead of screws. Gently feel around the edges for any subtle give or movement. Remember, patience is key here—forcing it might cause damage.
Refer To Your User Manual
If you're still having trouble, it's time to bring out the user manual that came with your kitchen exhaust fan. Most manufacturers include diagrams or instructions that can guide you in locating and removing the cover. If you’ve misplaced it, check the manufacturer’s website for a digital version.
Consider The Design Of Your Exhaust Fan
Different brands and models have varied designs, which means the method to remove the cover can differ. Some modern designs might have a slide mechanism, while traditional models rely on screws. Knowing the design specifics of your exhaust fan can make the task smoother.
Seek Online Tutorials For Visual Aid
If you're a visual learner, online tutorials can be incredibly helpful. Platforms like YouTube have countless videos demonstrating how to locate and remove an exhaust fan cover. Watching someone else do it can build your confidence and ensure you’re on the right track. By taking these steps, you'll be able to locate your kitchen exhaust fan cover with ease, setting you up for a successful cleaning or replacement task. Remember, the real challenge is not just in finding the cover but doing so without causing any damage to your kitchen setup.

Credit: www.onixcleaning.com
Turn Off Power Supply
Before you touch any part of your kitchen exhaust fan, turning off the power supply is absolutely essential. This step protects you from electrical shocks and prevents any accidental fan activation while you work. Skipping this can lead to serious injury or damage.
Locate The Circuit Breaker
Start by finding your home's main electrical panel. Look for the breaker labeled for the kitchen or the exhaust fan itself. If you’re unsure which one controls the fan, switch off the main breaker to cut all power safely.
Use A Voltage Tester
After switching off the breaker, double-check that the power is truly off. A simple voltage tester can confirm there’s no live electricity running to the fan. This extra check helps you feel confident and safe as you proceed.
Unplug The Fan If Possible
If your exhaust fan is plugged into an outlet rather than hardwired, unplug it directly. This is the easiest way to ensure no electricity flows to the fan. It also makes the removal process quicker and safer.
Inform Others In Your Household
Let everyone at home know you’re working on the fan and have turned off the power. This prevents someone from accidentally turning the breaker back on while you’re still working. A quick heads-up can avoid unexpected hazards.
Remove Screws Or Clips
Removing the screws or clips is a crucial first step to take off your kitchen exhaust fan cover safely. These fasteners hold the cover in place, so understanding their type and location will make the process smooth. You’ll avoid damage and frustration by handling this step carefully.
Identify The Type Of Fasteners
Look closely at your exhaust fan cover to see what kind of fasteners are holding it. Some covers use small screws, while others might have clips or tabs. Knowing what you’re dealing with helps you pick the right tools and approach.
For screws, you’ll typically need a screwdriver—either a flathead or a Phillips. Clips might require a gentle push or a slight pry with a flat tool like a butter knife. Have these tools ready before you start to avoid interruptions.
Gather The Right Tools
Having the right tools makes the job faster and safer. If your cover has screws, a magnetic screwdriver can prevent dropping screws inside the fan. For clips, a plastic pry tool can prevent scratching or bending.
Think about where you’ll put the screws or clips once removed. A small container nearby keeps everything organized and prevents losing these small parts. This simple step saved me from a lot of hassle during my last kitchen cleanup.
Remove Screws Or Release Clips Carefully
Begin by loosening each screw slowly, turning counterclockwise. Keep a steady hand to avoid stripping the screw heads. If clips hold the cover, press or slide them gently—forcing them can break the plastic.
Check if the cover feels loose after removing each fastener. Sometimes, covers have hidden clips or screws you might miss. Asking yourself, “Is it still firmly attached?” helps avoid damage from pulling too hard.
Handle The Cover Once Fasteners Are Removed
After all screws or clips are out, the cover should come off easily. Hold it firmly and pull it straight down or out, depending on your model. If it sticks, double-check for any missed screws or clips before applying more force.
Remember, your kitchen exhaust fan cover can be fragile. Treat it gently to keep it intact for reinstallation. How often do you inspect your exhaust fan cover? Regular cleaning prevents buildup and keeps your kitchen air fresh.
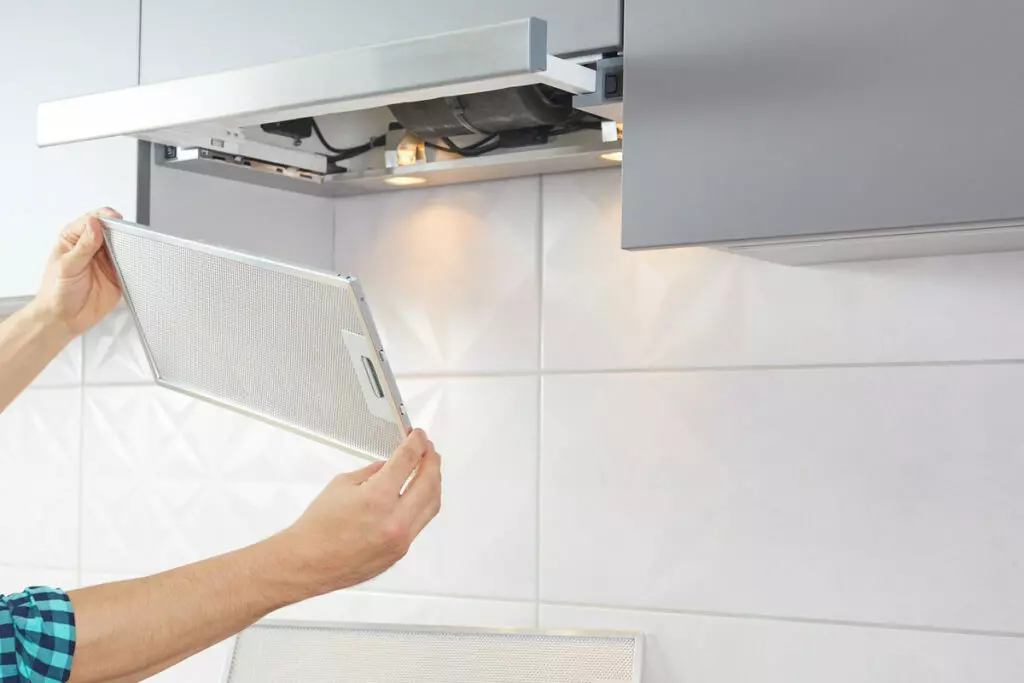
Detach The Fan Cover
Detaching the kitchen exhaust fan cover is a straightforward task, but it requires care and the right approach. The cover protects the fan blades and motor from grease and debris, so removing it safely helps you clean or replace parts without damage. Are you ready to handle this yourself? Let’s look at how to detach the fan cover effectively.
Locate The Fasteners Securing The Cover
Start by identifying how the fan cover is attached. Most covers are held by screws or clips around the edges. Use a flashlight if needed to spot all fasteners clearly.
Check if any screws are hidden under labels or grease buildup. This little detail can save you from unnecessary frustration when the cover won’t budge.
Gather The Right Tools
Before you begin, make sure you have the proper tools. A screwdriver set with different heads, like Phillips and flathead, usually covers most fasteners. If clips are holding the cover, a putty knife or flat tool can help pry it gently.
Having the right tools on hand speeds up the process and prevents damage. Do you keep a basic toolkit in your kitchen for quick fixes?
Remove The Screws Or Release The Clips
Carefully unscrew each fastener, keeping them in a small container so they don’t get lost. If clips are present, gently push or pry them to release the cover. Avoid using excessive force to prevent breaking plastic parts.
Sometimes the cover may stick due to accumulated grease. In this case, try wiggling it slightly while pulling to loosen the grip.
Detach And Set Aside The Fan Cover
Once all fasteners are removed or clips released, slowly pull the cover away from the fan assembly. Hold it firmly to avoid dropping or damaging it. Place the cover on a clean surface where it won’t collect dust or get scratched.
This step is satisfying because you can finally access the fan blades and motor for cleaning or maintenance. How often do you clean your kitchen exhaust fan to keep it running efficiently?
Clean And Inspect The Cover
Cleaning and inspecting your kitchen exhaust fan cover is essential for maintaining a healthy cooking environment. Grease, dust, and grime can build up quickly, reducing the fan’s efficiency and potentially causing unpleasant odors. Taking the time to thoroughly clean and check the cover helps your exhaust system work better and last longer.
Gather The Right Cleaning Supplies
Before you start scrubbing, make sure you have everything you need. A soft brush, warm soapy water, a sponge, and a microfiber cloth are great tools. Avoid harsh chemicals that can damage the cover’s material.
Using a degreaser can make a huge difference if the cover is heavily coated with grease. Just be sure to test it on a small area first to avoid discoloration.
How To Clean The Cover Effectively
Soak the cover in warm, soapy water for about 10 minutes to loosen dirt and grease. Use a soft brush to gently scrub away the grime, paying special attention to corners and crevices. Rinse thoroughly with clean water and dry it completely with a microfiber cloth to prevent rust or mold.
Have you noticed how much easier cleaning becomes when you let the cover soak first? That small step saves you a lot of elbow grease.
Inspecting For Damage And Wear
Once the cover is clean, check it for cracks, warping, or rust spots. These issues can reduce the effectiveness of your exhaust fan or even cause it to break. If you spot any damage, consider replacing the cover to keep your kitchen safe and fresh.
Look closely at the attachment points and screws. Loose or missing hardware can cause rattling noises and affect the fan’s performance.
Signs It's Time To Replace Your Exhaust Fan Cover
- Cracks or breaks that can’t be repaired
- Rust that has eaten through the metal
- Warping that prevents a proper seal
- Persistent odors despite cleaning
If your cover shows any of these signs, replacing it might be the best option. A new cover ensures your exhaust fan works efficiently and keeps your kitchen air clean.
Tips For Reinstalling
Reinstalling the kitchen exhaust fan cover requires care and attention. Proper steps ensure the cover fits well and works safely. Follow simple tips to avoid damage and keep your kitchen clean and fresh.
Check The Cover And Screws
Inspect the cover for cracks or dirt before reinstalling. Clean the cover with a soft cloth. Make sure you have all screws and fasteners ready. Replace missing or damaged screws with the correct size.
Align The Cover Correctly
Hold the cover in place carefully. Match the holes on the cover with those on the fan housing. Do not force the cover if it does not fit easily. Proper alignment prevents damage and ensures good airflow.
Tighten Screws Evenly
Start by hand-tightening screws to hold the cover. Tighten screws in a diagonal pattern to keep pressure even. Avoid overtightening to prevent cracking the cover. Use a screwdriver that fits the screws well.
Test The Fan After Reinstallation
Turn on the exhaust fan to check for noise or vibration. Make sure the cover stays secure and does not rattle. Listen for any unusual sounds that may signal loose screws. A smooth-running fan means successful installation.
Clean Around The Cover
Wipe the area around the cover to remove dust and grease. Regular cleaning helps maintain fan performance. Use a mild cleaner and soft cloth to avoid damage. Clean surfaces improve air quality in your kitchen.
Frequently Asked Questions
How Do I Safely Remove A Kitchen Exhaust Fan Cover?
Turn off the power to the fan first. Use a screwdriver to remove screws or clips holding the cover. Gently pull the cover off without forcing it to avoid damage.
What Tools Are Needed To Remove The Fan Cover?
A screwdriver, usually Phillips or flathead, is essential. Sometimes, a ladder or step stool helps reach the fan. Gloves can protect your hands during removal.
How Often Should I Clean The Kitchen Exhaust Fan Cover?
Clean the cover every 3 to 6 months. Regular cleaning prevents grease buildup and improves fan efficiency. More frequent cleaning is needed if you cook daily.
Can I Remove The Exhaust Fan Cover Without Turning Off Power?
No, always turn off power before removal. This prevents electric shock and injury. Safety should be your top priority during maintenance.
Conclusion
Removing your kitchen exhaust fan cover is simple with clear steps. Start by turning off the power to stay safe. Use the right tools to avoid damage. Gently loosen screws or clips holding the cover. Clean the cover and fan area for better air flow.
Reattach the cover carefully after cleaning. Regular maintenance keeps your kitchen fresh and smoke-free. Follow these steps to keep your exhaust fan working well. Easy and safe. You can do it yourself.