
Is your kitchen sink drain cover stuck or dirty? Removing it might seem tricky, but with the right steps, you can do it quickly and safely.
You don’t need special tools or a plumber to get the job done. In this guide, you’ll learn simple, clear methods to remove your kitchen sink drain cover without damage. Keep reading, and you’ll save time, avoid frustration, and make your sink shine like new.
Ready to get started?

Credit: www.temu.com
Tools Needed
Removing a kitchen sink drain cover might seem simple, but having the right tools makes the job faster and less frustrating. Using improper tools can damage your sink or the cover itself. Before you start, check that you have everything needed within reach.
Basic Tools
- Screwdriver:Most drain covers are held in place by screws. A flathead or Phillips screwdriver often does the trick. Make sure the screwdriver fits the screw head perfectly to avoid stripping.
- Pliers:Needle-nose or regular pliers help grip and turn parts that are hard to reach. They’re especially useful if the cover is stuck or if you need to hold a nut while unscrewing.
- Utility Knife:Sometimes, old plumber’s putty or caulk seals the cover. A sharp utility knife can carefully cut through it without damaging the sink surface.
Specialized Tools
- Drain Cover Wrench:Some covers require a special tool designed to fit their unique shapes. If your drain has a locking mechanism, this wrench is a lifesaver.
- Adjustable Wrench:Useful for loosening nuts under the sink that hold the drain assembly together. Its adjustable jaw fits various sizes, making it versatile.
Optional Tools For Tough Jobs
- Rubber Mallet:Gentle taps with a rubber mallet can help loosen a stuck cover without causing damage.
- WD-40 or Penetrating Oil:If screws or nuts are rusted or stuck, a little penetrating oil helps loosen them up. Let it sit for a few minutes before trying to remove parts.
Think about your last DIY project. Did you start without the right tools and end up frustrated? Having the right gear from the start saves time and protects your sink. Which of these tools do you already have, and which might you need to pick up before you begin?
Prepare The Area
Preparing the area before removing a kitchen sink drain cover saves time and prevents damage. Clear space around the sink for easy access. Protect nearby surfaces from water or dirt. This step creates a safer and cleaner working environment.
Clear The Sink Area
Remove dishes, soap, and other items from the sink. Wipe the sink dry to avoid slipping. A clear area helps you focus on the task without distractions.
Gather Necessary Tools
Have tools like a screwdriver, pliers, and a cloth ready. Using the right tools makes the removal process smoother. Keep everything within arm’s reach to avoid interruptions.
Protect Surrounding Surfaces
Place a towel or plastic sheet around the sink. This prevents scratches and water damage. It also keeps your counters clean during the work.
Turn Off The Water Supply
Locate and close the water valves under the sink. This stops water flow and avoids leaks or spills. Double-check by turning on the faucet briefly.
Identify Drain Cover Type
Drain covers come in various types like pop-up, screw-in, or snap-on. Recognizing the type helps choose the right removal method. Check for visible screws or a simple twist mechanism before starting.
Identifying the type of kitchen sink drain cover is crucial. Each cover type has a unique removal method. Knowing your drain cover type saves time and effort. Below are common drain cover types and how to identify them.
Pop-up Drain Covers
Pop-up drain covers have a small knob or lever. They open and close with a simple push. These are common in modern kitchens. Check for a lever near the faucet.
Lift-and-turn Drain Covers
Lift-and-turn covers require a twist to open. They have a small knob at the center. The knob needs lifting before turning. These covers are usually metallic.
Push-pull Drain Covers
Push-pull covers operate by pushing or pulling. They don't need twisting. These covers are easy to identify. Look for a smooth top without a lever.
Toe-touch Drain Covers
Toe-touch covers open with a light foot tap. They are spring-loaded and easy to use. These covers are flat and smooth. No knobs or levers are present.
Flip-it Drain Covers
Flip-It covers have a toggle switch on top. You flip the switch to open or close. They come in various designs. The toggle switch is the key identifier.
Grid Drain Covers
Grid covers have a fixed design with holes. They do not open or close. These are usually metallic or plastic. Ideal for preventing large debris entry.

Credit: www.youtube.com
Remove Screws Or Clips
Removing screws or clips is often the first task when taking off a kitchen sink drain cover. These parts hold the cover tightly in place. Knowing how to remove them safely prevents damage to your sink and tools. The process is simple with the right approach and tools.
Identify The Type Of Fasteners
Look closely at the drain cover to find screws or clips. Screws usually have a slot or cross shape on the head. Clips often appear as small metal or plastic clamps around the edge. Identifying the right fastener helps you choose the proper tool.
Gather The Necessary Tools
Prepare a screwdriver that matches the screw head, such as a flathead or Phillips. For clips, use needle-nose pliers or a flat tool to pry them gently. Having the correct tools makes the removal easier and safer.
Unscrew Or Unclip Carefully
Turn screws counterclockwise to loosen them. Apply steady pressure but avoid stripping the screw heads. For clips, gently pry them outward without bending or breaking. Work slowly to avoid damage to the sink or drain cover.
Store Screws Or Clips Safely
Keep the screws or clips in a small container or bag. This prevents loss and makes reinstallation easier. Label the container if needed to remember which parts belong to the drain cover.
Lift Off The Drain Cover
The drain cover sits tightly on your kitchen sink's drain opening. Removing it is simple with the right approach. Start by checking how the cover fits. Some covers just lift off, while others may twist or need a tool.
Focus on gently lifting the cover to avoid damage. Use your fingers or a flat tool for better grip. Be careful not to scratch the sink surface. Lift slowly and steadily to loosen the cover from the drain.
Check For Screws Or Fasteners
Look closely at the drain cover for screws or clips. Some covers have a small screw in the center. Use a screwdriver to remove screws before lifting the cover. If no screws are found, the cover might just snap off.
Use A Flat Tool For Leverage
Insert a flat tool like a butter knife or flathead screwdriver under the cover edge. Gently pry upward to lift the cover. Move the tool around the edge if it feels stuck. Avoid using too much force to prevent damage.
Lift With Your Fingers
Grip the drain cover firmly with your fingers. Pull straight up to remove it. If it resists, try wiggling it slightly while lifting. This helps loosen any grime or seal holding it in place.
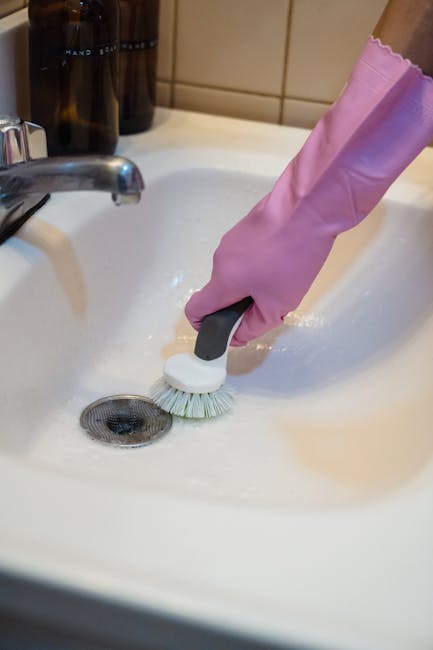
Clean The Drain Area
After removing the cover, clean the drain opening. Remove any debris or buildup that may block water flow. A clean drain helps prevent clogs and odors.
Clean The Drain Opening
Cleaning the drain opening after removing your kitchen sink drain cover is essential to prevent clogs and keep your sink fresh. Dirt, grease, and food particles often build up around the drain, creating blockages and unpleasant odors. Taking time to clean this area thoroughly can save you from costly plumbing issues later.
Gather The Right Cleaning Supplies
Before you start, make sure you have basic supplies ready: a soft brush, baking soda, white vinegar, and a clean cloth. Avoid harsh chemicals that might damage your pipes or finish. These simple household items work effectively and safely for most drain openings.
Scrub Away Debris Gently
Use the soft brush to remove visible grime and residue around the drain edges. Be gentle to avoid scratching the sink surface. Focus on corners and crevices where buildup tends to hide.
Use A Natural Cleaning Solution
Sprinkle baking soda over the drain opening, then pour white vinegar slowly on top. The fizzing action helps break down grease and loosen dirt. Let it sit for a few minutes before rinsing with hot water.
Rinse And Dry Thoroughly
Flush the drain with plenty of hot water to clear out loosened debris. Use a clean cloth to wipe the area dry, preventing water spots and mineral buildup. This step also helps you spot any remaining dirt that needs attention.
Check For Hidden Blockages
Have you noticed slow drainage before? After cleaning, observe how water flows down the drain. If it’s still sluggish, there might be deeper blockages to address. Consider using a plunger or a drain snake if needed.
Troubleshooting Common Issues
Removing a kitchen sink drain cover can sometimes be tricky. Several common issues may arise during the process. Understanding these problems helps you handle them quickly. This section covers the main troubles and how to fix them.
Stuck Or Rusted Drain Cover
Rust often causes the drain cover to stick firmly. Use a rust remover or apply vinegar to loosen it. Let the solution sit for 10-15 minutes. Then, try to twist or lift the cover gently. Avoid using too much force to prevent damage.
Cover Screws Are Stripped
Stripped screws make removal difficult. Use a rubber band for extra grip on the screwdriver. Another option is a screw extractor tool. Turn slowly and carefully to avoid breaking the screw head.
Drain Cover Does Not Fit Standard Tools
Some covers have unique shapes or sizes. Find tools designed for odd drain covers. A pair of adjustable pliers can help in tight spots. Handle tools carefully to avoid scratching the sink surface.
Difficulty Lifting The Cover After Loosening
The cover may stay stuck after screws are removed. Tap around the edges lightly with a rubber mallet. Use a flat tool to gently pry it up. Work slowly to prevent bending or cracking the cover.
Debris Blocking The Removal Process
Grease and debris buildup can block access to screws or edges. Clean the area with warm, soapy water before starting. A small brush helps remove dirt from tight spots. Clear the workspace to avoid slipping or dropping parts.

Credit: www.youtube.com
Frequently Asked Questions
How Do I Remove A Stuck Kitchen Sink Drain Cover?
To remove a stuck drain cover, use a screwdriver or pliers to gently pry it off. Apply penetrating oil if it's rusted. Twist and pull carefully to avoid damage. Always wear gloves for safety and protect the sink surface with a cloth.
What Tools Are Needed To Remove A Drain Cover?
Common tools include a flathead screwdriver, pliers, and penetrating oil. A putty knife can help loosen caulk or sealant. Having a flashlight and gloves improves safety and visibility. These tools make removing the kitchen sink drain cover easier and safer.
Can I Remove A Drain Cover Without Plumbing Experience?
Yes, you can remove a drain cover with basic DIY skills. Follow simple steps like loosening screws or prying gently. Avoid using excessive force to prevent damage. If unsure, consult a professional plumber for help to avoid costly mistakes.
How To Clean Under The Kitchen Sink Drain Cover?
After removal, use a brush and mild cleaner to scrub off debris and grime. Rinse with warm water and dry thoroughly. Regular cleaning prevents clogs and bad odors. Replace the drain cover securely once cleaning is complete.
Conclusion
Removing a kitchen sink drain cover is easier than it seems. With the right tools and steps, you can do it yourself. Take your time and follow each part carefully. This helps avoid damage and saves money on repairs. Clean the area well once the cover is off.
Regular maintenance keeps your sink working smoothly. Now, you are ready to handle this simple task anytime. No need to call a plumber for this small job. Simple skills like this make home care less stressful.