
Are you ready to make cooking and baking easier and more fun? Your KitchenAid stand mixer is a powerful tool that can save you time and effort in the kitchen.
Whether you’re whipping up a batch of cookies or kneading dough for fresh bread, knowing how to use your mixer correctly can transform your cooking experience. In this guide, you’ll discover simple steps and tips to get the most out of your KitchenAid stand mixer.
By the end, you’ll feel confident and excited to create delicious meals with less hassle. Keep reading to unlock the full potential of your mixer!
Choosing The Right Mixer Model
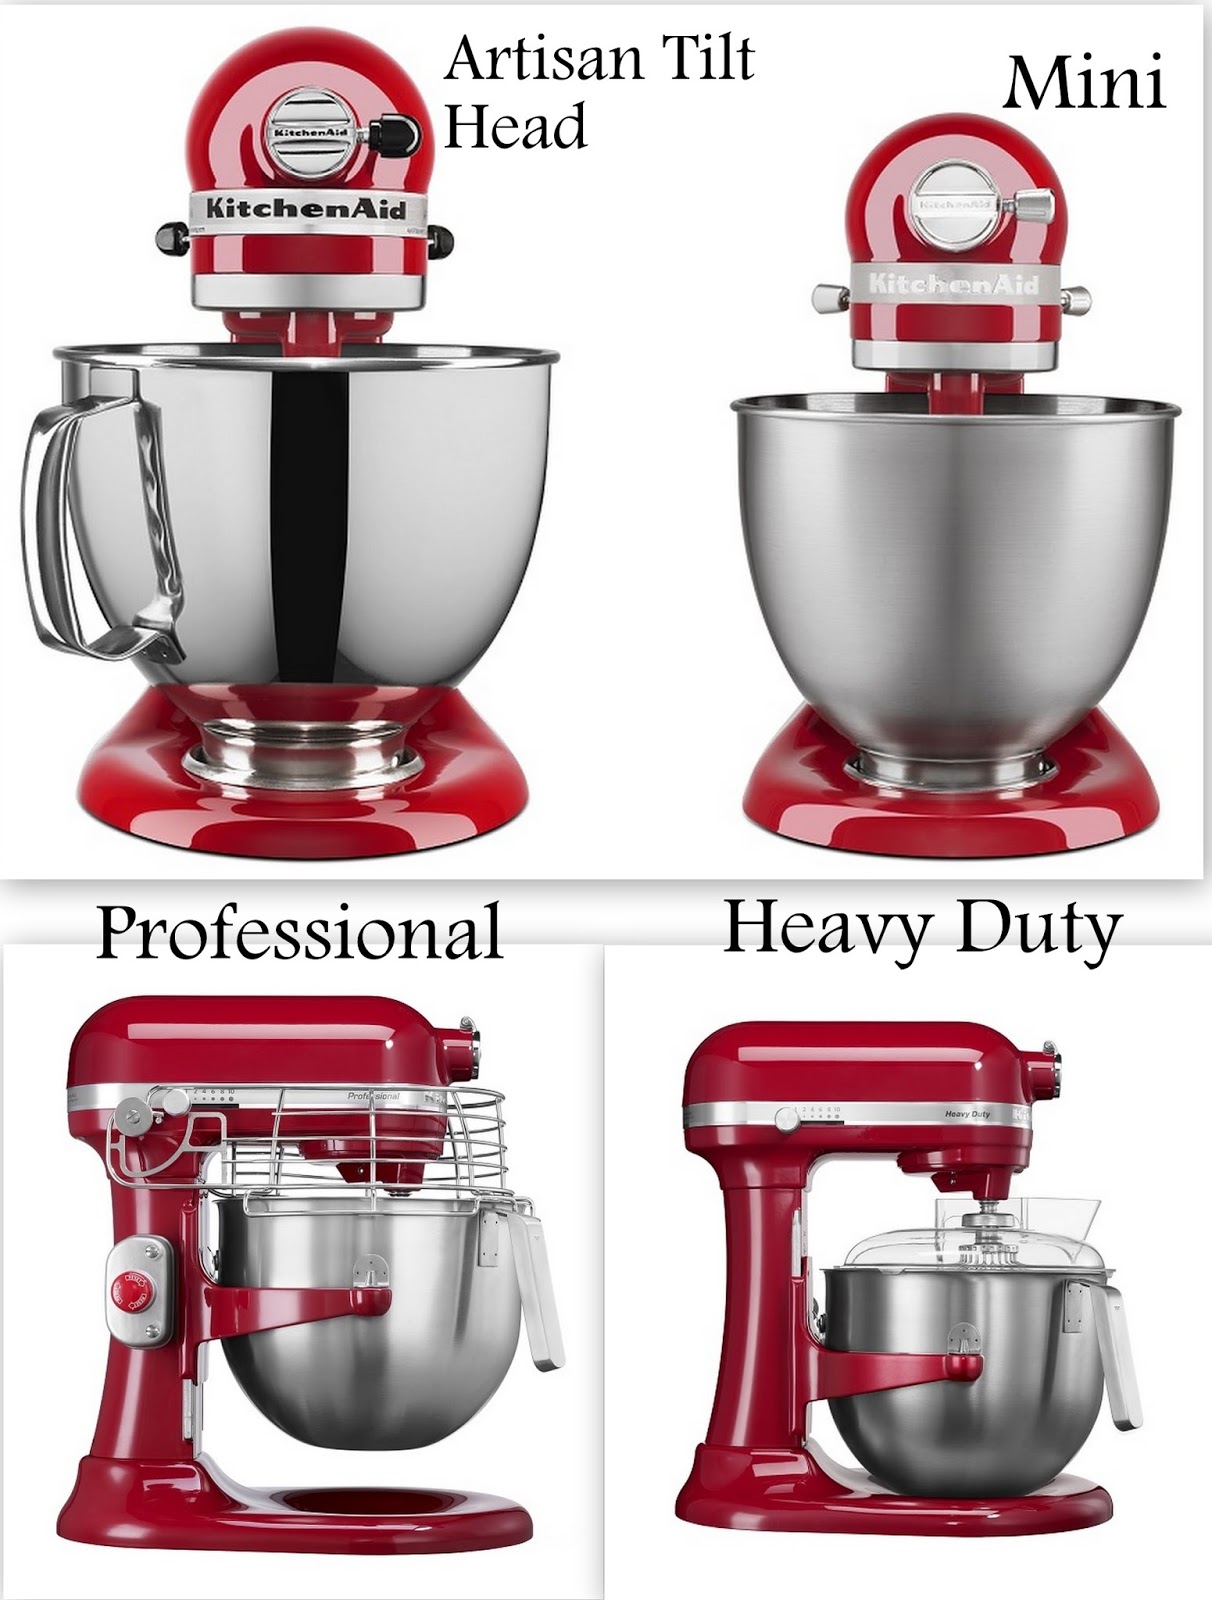
Choosing the right Kitchen Aid stand mixer model is key for every kitchen. A good mixer fits your cooking style and kitchen space. It saves time and makes baking easier. Some mixers suit small tasks, others handle big batches. Knowing your needs helps pick the best model.
Comparing Sizes And Capacities
Kitchen Aid mixers come in different sizes. Small models have bowls around 3.5 to 4.5 quarts. They work well for small families or light baking. Larger models hold 5 to 7 quarts. These fit bigger recipes and frequent use. Think about your typical recipe size and storage space. A bigger bowl lets you mix dough or batter without spills.
Essential Attachments To Consider
Attachments add power to your mixer. The basic set includes a flat beater, dough hook, and wire whisk. These handle most mixing jobs. Other attachments like pasta makers, meat grinders, and spiralizers expand your options. Choose attachments that match your cooking style. If you bake bread often, a dough hook is vital. For whipping cream or eggs, the wire whisk works best.
Budget And Features
Prices vary by model and features. Basic mixers cost less and cover simple mixing tasks. Advanced models offer more speed settings and stronger motors. Some have tilt-head designs for easy bowl access. Consider how often you will use the mixer. Spending more makes sense if you bake regularly. Look for durable materials like metal parts for longer life.
Credit: www.kitchenaid.ca
Setting Up Your Mixer
Place the mixer on a stable surface and plug it in. Attach the bowl securely and choose the right mixing tool for your recipe. Make sure the mixer is locked in place before turning it on.
Setting up your KitchenAid stand mixer is an important first step. Doing it right ensures safe and efficient use. Let’s explore how to set up your mixer properly.
Unboxing And Assembly
Carefully open the mixer box. Remove all packaging materials. Inside, you’ll find the mixer, bowls, and tools. Check the manual for any extra parts. Place the mixer on a stable surface. Make sure nothing is missing.
Placing Your Mixer Safely
Choose a flat, sturdy counter. Ensure there’s enough space around the mixer. Keep it away from the edge. This prevents accidents during use. Ensure nearby outlets for easy plug-in.
Attaching Bowls And Tools
Select the right bowl size for your needs. Align it with the mixer base. Turn the bowl clockwise to lock it. Attach the mixing tool by inserting it into the hub. Turn until it clicks securely. Double-check that everything is tight. Now, your mixer is ready for use!
Basic Mixer Controls
Understanding the basic controls of your Kitchen Aid stand mixer is key to using it effectively and safely. These controls help you adjust the mixer’s speed, manage the bowl, and power the device on and off without any hassle. Mastering these simple steps will make your baking and cooking experience smoother and more enjoyable.
Speed Settings Explained
The speed dial on your Kitchen Aid mixer lets you choose how fast or slow the beaters move. Speeds range from a slow stir to a fast whip, giving you control over how ingredients combine.
Lower speeds are perfect for gently mixing flour into wet ingredients without creating a mess. Higher speeds work well for whipping cream or beating egg whites to fluffy peaks.
Have you ever noticed how mixing too fast can send flour flying everywhere? Using the right speed prevents that and keeps your kitchen clean.
Using The Tilt-head Vs. Bowl-lift
Kitchen Aid stand mixers come with two main designs: tilt-head and bowl-lift. The tilt-head model allows the mixer’s head to tilt back, making it easier to add ingredients or change attachments.
The bowl-lift model raises and lowers the bowl to lock it securely in place. This design is often preferred for heavy doughs because it keeps the bowl stable during mixing.
Think about what you cook most. Do you need easy access to the bowl, or do you want maximum stability? Your choice affects how you use your mixer daily.
Powering On And Off Safely
Always make sure the speed dial is set to "off" before plugging in your mixer. This prevents the beaters from starting unexpectedly and causing injury or mess.
To turn the mixer on, set the speed dial to your desired setting slowly. Avoid switching speeds abruptly; it helps protect the motor and keeps your batter from splashing out.
When finished, turn the speed dial back to "off" before unplugging. This simple habit ensures your mixer stays in good condition and your kitchen stays safe.
Mixing Techniques For Beginners
Using a Kitchen Aid stand mixer is easier with the right mixing techniques. These tips help beginners get smooth and even results. Proper mixing improves texture and flavor in baked goods.
Starting With Low Speeds
Begin mixing at low speeds to avoid splashing ingredients. This helps blend items gently and keeps your kitchen clean. Low speeds also prevent overworking the dough or batter early on.
Once ingredients start to combine, gradually increase the speed. This ensures a consistent mix without damaging delicate components.
Incorporating Ingredients Gradually
Add dry and wet ingredients step by step, not all at once. This prevents lumps and uneven mixing. For example, sprinkle flour slowly while the mixer runs on low.
For sticky or thick mixtures, pause mixing to scrape down the bowl sides. This keeps all ingredients well incorporated and avoids clumps.
Avoiding Common Mistakes
- Do not overload the bowl; mix in batches if needed.
- Avoid running the mixer too fast at the start.
- Always use the right attachment for your recipe.
- Stop and check the mixture often to avoid overmixing.
- Secure the bowl and attachments properly before starting.
Using Attachments Effectively
Using the right attachments with your Kitchen Aid stand mixer can save you time and improve your results. Each attachment is designed for specific tasks, so understanding how to use them effectively will elevate your cooking and baking experience. Let’s look at how you can get the most out of the whisk, dough hook, and flat beater attachments.
Whisk For Whipping And Beating
The whisk attachment is perfect for tasks that require incorporating air into your mixture. Use it to whip cream until it holds soft peaks or beat egg whites to a fluffy consistency. I once tried whipping cream with the flat beater and ended up with a dense mess—don’t make the same mistake!
Remember to start at a low speed to avoid splattering, then gradually increase. The whisk’s design helps create light, airy textures quickly, making it ideal for meringues and fluffy frostings.
Dough Hook For Kneading
Kneading dough by hand can be tiring, but the dough hook attachment does the hard work for you. It’s specifically shaped to stretch and fold dough, developing gluten for better texture and rise. When I used the dough hook for bread dough, I noticed my loaves had a more consistent crumb and perfect chewiness.
Make sure to add ingredients in the order your recipe suggests, usually liquids first. Keep an eye on the dough’s consistency—if it sticks too much, add flour slowly to avoid over-drying.
Flat Beater For Mixing
The flat beater is your all-rounder for mixing heavier batters and doughs like cookie dough, cake batter, and mashed potatoes. It mixes ingredients thoroughly without overworking them. When I switched from hand mixing to using the flat beater, my cookie dough was more even, which made baking more predictable.
Use the flat beater at medium speed to blend ingredients smoothly. If you’re mixing something delicate like cake batter, start slow to avoid splashes and keep the texture light.

Credit: www.amazon.ca
Cleaning And Maintenance Tips
Keeping your Kitchen Aid stand mixer clean and well-maintained ensures it lasts longer and works better. Regular cleaning stops food buildup and keeps the mixer hygienic. Simple care routines help avoid damage and maintain performance. Follow these tips to clean and care for your mixer properly.
Safe Detachment Of Parts
Always unplug the mixer before removing any parts. Gently twist and lift attachments like the beater or whisk to detach. Avoid using force, which can damage the mixer or parts. Remove the bowl by turning it slightly, then lifting it off the base. Handle all parts carefully to prevent cracks or breaks.
Washing And Drying Components
- Wash removable parts in warm, soapy water right after use.
- Use a soft cloth or sponge to avoid scratches.
- Rinse thoroughly to remove soap residue.
- Dry parts completely with a clean towel before reassembling.
- Most attachments are dishwasher safe, but check the manual first.
Never immerse the mixer base in water. Wipe it clean with a damp cloth instead.
Routine Care For Longevity
Wipe the mixer after every use to remove splashes and crumbs. Check the power cord for damage regularly. Store the mixer covered to avoid dust buildup. Lubricate moving parts only if the manual advises it. Regular care reduces wear and keeps your mixer running smoothly for years.
Troubleshooting Common Issues
Even the most reliable Kitchen Aid stand mixers can face hiccups during use. Troubleshooting common issues not only saves time but also prevents damage to your mixer. Understanding these problems helps you keep your mixer running smoothly and extends its lifespan.
Mixer Won’t Start
If your mixer doesn’t turn on, first check the power source. Is it plugged in securely? Sometimes the outlet might be the issue, so try plugging in another device to test it.
Inspect the mixer’s cord for any visible damage. A frayed or cut cord can prevent power flow and is a safety hazard. If the cord looks fine, the internal fuse or motor might need professional attention.
Have you ever forgotten to engage the safety lock? Kitchen Aid mixers won’t start if the bowl or attachments aren’t properly locked in place. Double-check these settings before troubleshooting further.
Unusual Noises Or Smells
Strange sounds or burning smells are signs that something is wrong inside your mixer. If you hear grinding or squealing, it might mean the gears are worn out or something is stuck inside.
Turn off and unplug the mixer immediately if you smell burning. Overheating can damage the motor and pose a fire risk. Let the mixer cool down before inspecting it, and avoid running it continuously at high speeds for too long.
Have you recently added heavy dough or ingredients? Sometimes, pushing your mixer beyond its capacity causes stress noises. Reducing batch size or mixing speed can prevent these issues.
Attachments Not Fitting Properly
Attachments are designed to fit snugly, so if yours feel loose or don’t attach well, check for dirt or residue blocking the connection points. Cleaning these areas can often solve the problem quickly.
Another common cause is using attachments from a different model or brand. Kitchen Aid attachments vary, so ensure you’re using the correct ones for your mixer model.
Are you aligning the attachment correctly? The locking mechanism requires precise positioning. Gently rotate the attachment until it clicks into place—forcing it can cause damage.
Creative Recipes To Try
The Kitchen Aid stand mixer is more than a tool; it’s a kitchen companion. It helps create delicious dishes with less effort. Using it for creative recipes brings joy and variety to everyday meals. Below are easy recipes to try that highlight the mixer's versatility.
Simple Bread Dough
Start with basic bread dough that the mixer kneads perfectly. Combine flour, yeast, salt, sugar, and warm water in the bowl. Use the dough hook attachment to mix on low speed. Knead for about 8 minutes until the dough is smooth and elastic. Let it rise in a warm place until doubled. Shape and bake for fresh, homemade bread.
Fluffy Whipped Cream
Use the whisk attachment to make light and airy whipped cream quickly. Pour cold heavy cream into the bowl. Add a little sugar and vanilla extract for sweetness. Whip on medium-high speed until soft peaks form. Perfect for topping desserts or fresh fruit. Whipped cream made easy in minutes.
Homemade Pasta Dough
Create fresh pasta dough with just a few ingredients. Mix flour and eggs in the mixer bowl using the paddle attachment. Combine until the dough starts to come together. Switch to the dough hook and knead until smooth. Wrap in plastic and rest before rolling out. Fresh pasta tastes better and is fun to make.

Credit: www.youtube.com
Frequently Asked Questions
How Do I Assemble A Kitchenaid Stand Mixer?
To assemble, attach the mixing bowl and chosen attachment securely. Lock the bowl in place and lower the mixer head. Ensure all parts fit firmly before starting the mixer for safe operation.
What Speed Settings Should I Use On My Mixer?
Use low speeds for mixing dry ingredients or starting dough. Medium speeds work well for creaming and blending. High speeds are best for whipping and aerating mixtures. Always start slow and increase speed gradually.
How Do I Clean A Kitchenaid Stand Mixer?
Unplug the mixer before cleaning. Wipe the exterior with a damp cloth. Remove attachments and wash them with warm, soapy water. Dry thoroughly before reattaching. Avoid immersing the mixer base in water.
Can I Use The Mixer For Dough Kneading?
Yes, use the dough hook attachment for kneading. It mixes and kneads dough efficiently without overworking it. Follow recipe instructions for speed and mixing time to get the best results.
Conclusion
Using a Kitchen Aid stand mixer makes cooking easier and faster. It helps mix, whip, and knead ingredients with little effort. Attach the right tool for each task to get the best results. Clean the mixer after use to keep it working well.
Practice often to feel comfortable using it. This mixer saves time and effort in the kitchen. Enjoy making your favorite recipes with less work. Give it a try and see how simple cooking can be.