
Is your kitchen sink clogged, and you’re wondering if plunging it is the right move? You might be hesitant, unsure if it will work or if you could make things worse.
The good news is, plunging is often the quickest and simplest way to clear a stubborn blockage. But before you grab that plunger, there are a few things you should know to avoid frustration and damage. Keep reading, and you’ll discover exactly when and how to plunge your kitchen sink safely and effectively—so you can get back to your daily routine without the mess.
When To Use A Plunger
Knowing when to use a plunger on your kitchen sink can save you time and prevent bigger plumbing problems. Not every slow drain or minor drip calls for plunging. Understanding the right signs and scenarios helps you decide if the plunger is your best tool or if you need a different approach.
Signs Of A Clogged Sink
You might notice water draining slower than usual or pooling around the sink basin. Strange gurgling noises when water goes down are another red flag. Sometimes, unpleasant odors coming from the drain hint at trapped food or grease buildup.
If your sink starts to back up when you run the dishwasher or garbage disposal, it’s a clear warning. These signs tell you that the clog is close enough to the surface for a plunger to work effectively.
Types Of Blockages
Kitchen sink clogs often involve food scraps, grease, soap scum, or even small objects accidentally dropped down the drain. Grease can solidify and stick to pipe walls, creating stubborn blockages. Food particles may clump together, especially in combination with soap residue.
Knowing what’s causing the clog helps you decide if plunging is the right move. A plunger works best with soft blockages near the drain opening but won’t clear out tough grease deep inside pipes.
Safety Precautions
Before you start plunging, remove any standing water to avoid splashing dirty water onto your counters or floor. Never use a plunger immediately after pouring chemical drain cleaners, as this can cause dangerous splashes or damage your pipes.
Make sure to cover the overflow hole with a wet cloth to maintain pressure while plunging. Always wear gloves to protect your hands from germs and debris.
Credit: www.aol.com
Choosing The Right Plunger
Choosing the right plunger can make a huge difference in how quickly and effectively you clear a clogged kitchen sink. Not all plungers are built the same, and picking the wrong type might leave you frustrated or even damage your plumbing. Knowing what to look for helps you tackle the clog with confidence and less mess.
Cup Vs. Flange Plungers
There are two main types of plungers: cup and flange. Cup plungers have a simple rubber cup shape and work well on flat surfaces like bathroom sinks or tubs.
Flange plungers add a soft rubber extension that fits into pipes, creating a better seal for drains like those in your kitchen sink. This design often makes flange plungers more effective for kitchen clogs since they can reach deeper and create stronger suction.
Ask yourself: Is your plunger sealing well around the drain? If not, switching to a flange plunger might save you time and effort.
Material And Quality
Not all plungers are created equal in terms of material. Look for ones made from durable rubber that won’t crack or lose flexibility after a few uses.
Cheap plastic handles can break under pressure, so choose a plunger with a sturdy wooden or solid plastic handle. This gives you better leverage and reduces the chance of slipping during plunging.
Would you rather spend a little more now or keep buying replacements? Investing in quality pays off when you face stubborn clogs.
Size Considerations
The size of the plunger should match the size of your sink drain. A plunger that’s too big won’t fit well, and one that’s too small won’t create enough suction.
Kitchen sinks usually require a medium-sized plunger—around 4 to 6 inches in diameter. This size balances ease of use with effective clog clearing.
Think about your sink’s size before buying. Could a slightly larger or smaller plunger improve your results?
Preparing Your Sink For Plunging
Before you start plunging your kitchen sink, preparing the area properly can save you time and frustration. Taking a few simple steps ensures the plunger works effectively and prevents making a mess. Let’s look at what you need to do to get your sink ready.
Clearing The Area
Remove any dishes, utensils, or cleaning supplies from around the sink. This gives you enough space to work comfortably and avoids knocking things over while plunging. Also, clear the cabinet under the sink if you need to check the pipes later.
Removing Standing Water
If the sink is full of water, try to remove as much as possible before plunging. Use a small container or cup to scoop out the water and pour it into a bucket or another sink. Having too much water can reduce the plunger’s suction, making it less effective.
Sealing The Overflow Hole
Many kitchen sinks have an overflow hole that lets water drain away if the sink fills too high. Cover this hole tightly with a wet cloth or duct tape to prevent air from escaping during plunging. Sealing the overflow helps create the pressure needed to dislodge the clog more quickly.

Credit: www.angi.com
Step-by-step Plunging Technique
Place the plunger firmly over the sink drain to create a seal. Push and pull the handle with quick, strong motions. Repeat until water drains freely and the clog clears.
Clearing a clogged kitchen sink is a task that many homeowners face. If you're staring at a pool of murky water, don’t panic. The step-by-step plunging technique is a straightforward and effective method to tackle this issue. By following a few simple steps, you can restore your sink to its normal function without breaking a sweat.
Positioning The Plunger
Start by ensuring your plunger is clean and dry. A plunger with a snug fit on your sink’s drain creates an effective seal. Position the plunger directly over the drain, ensuring the rubber lip covers it completely. This creates the necessary vacuum to dislodge the blockage.
Proper Plunging Motion
Once positioned, apply firm pressure and push down on the plunger. Quickly pull up, maintaining the seal. Repeat this motion with steady, rhythmic thrusts. This up-and-down motion is crucial, as it loosens and pushes the debris causing the clog.
Repeating The Process
If the water doesn’t drain after a few plunges, don’t give up. Consistency is key. Repeat the plunging motion several times, giving it a break if necessary. After a few attempts, check to see if the water begins to recede. If successful, run hot water down the drain to clear any remaining debris. Have you ever found a surprising item causing the clog? Sometimes, it’s the unexpected things that cause the most trouble. With patience and persistence, even the most stubborn clogs can be defeated.
When Plunging Doesn't Work
Sometimes, plunging your kitchen sink just doesn’t clear the clog. You might feel the resistance lessen for a moment, then the water stays stubbornly still. This can happen if the blockage is too deep or made of materials that a plunger can’t break up.
So, what should you do next? Don’t get frustrated just yet—there are other ways to tackle the problem before calling in a pro.
Alternative Diy Fixes
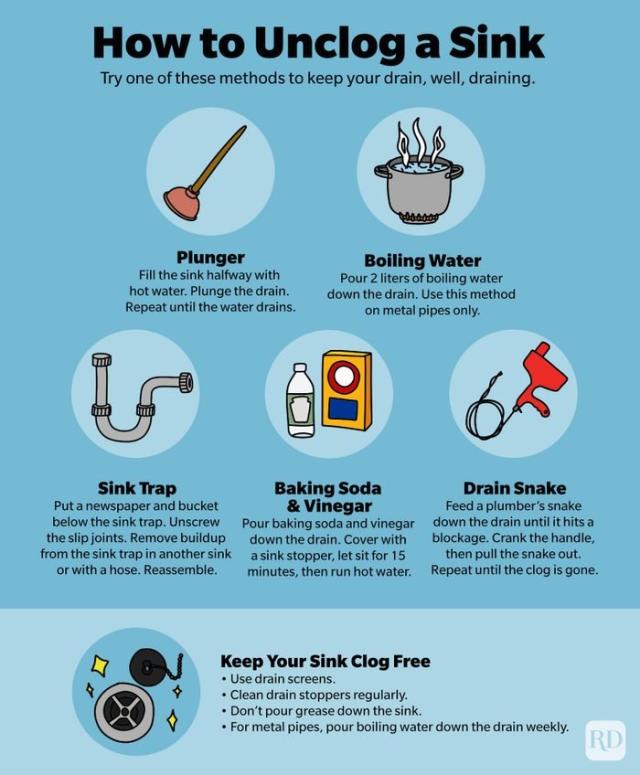
If plunging isn’t cutting it, try pouring a mixture of baking soda and vinegar down the drain. Let it fizz for about 15 minutes, then flush with hot water. This natural combo can sometimes dissolve grease or soap buildup that’s causing the clog.
Another quick fix is to remove and clean the sink trap (the curved pipe under the sink). Over time, debris collects there, and cleaning it out can restore flow. Just make sure to place a bucket underneath to catch any water.
Using A Drain Snake
A drain snake is a flexible tool designed to reach clogs far beyond what a plunger can reach. You feed it into the drain and rotate it to break up or pull out the blockage. It’s especially useful for hair, food particles, or other stubborn debris stuck deeper in the pipes.
Many hardware stores sell affordable drain snakes, and they’re easy to use once you get the hang of it. Have you tried one before? It might surprise you how effective this simple tool can be.
When To Call A Professional
If your sink remains clogged after these attempts, it might be time to call a plumber. Persistent blockages could indicate a bigger problem, like pipe damage or a serious obstruction further down the line.
Professional plumbers have specialized equipment to diagnose and fix tough clogs quickly. Sometimes, trying to fix it yourself can cause more damage or waste time. Ask yourself: is this the moment to save time and stress by getting expert help?
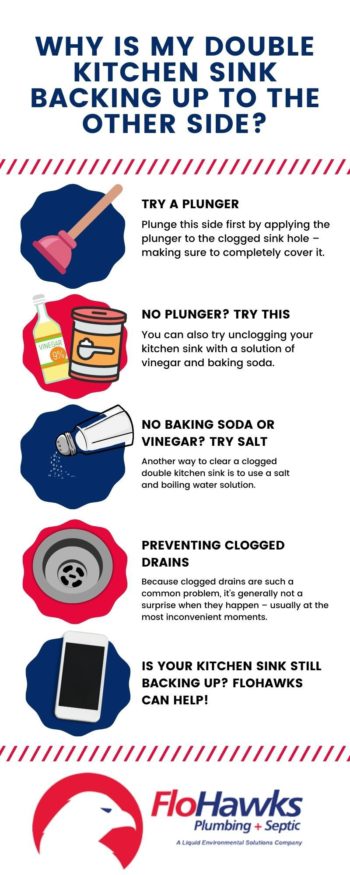
Credit: flohawks.com
Preventing Future Clogs
Preventing future clogs in your kitchen sink saves time and money. Regular care keeps your drains clear and water flowing freely. Simple habits can make a big difference in avoiding blockages. Here are some easy tips to maintain a clog-free sink.
Regular Maintenance Tips
- Flush drains with hot water once a week.
- Use a mixture of baking soda and vinegar monthly.
- Clean the sink strainer after each use.
- Check pipes for leaks or slow drainage often.
- Remove hair and food scraps promptly.
Avoiding Common Mistakes
- Don’t pour grease or oil down the drain.
- Avoid using chemical drain cleaners frequently.
- Never dispose of coffee grounds in the sink.
- Don’t overload the garbage disposal with large amounts.
- Keep foreign objects away from the drain opening.
Proper Waste Disposal
Dispose of food waste in the trash or compost bin. Use a sink strainer to catch debris. Scrape plates before washing to reduce waste in the drain. Avoid flushing fibrous vegetables like celery or potato peels. These can easily cause blockages over time.
Frequently Asked Questions
Can Plunging A Kitchen Sink Cause Damage?
Plunging can damage pipes if done improperly. Use a proper plunger and avoid excessive force to prevent leaks or pipe breaks.
How Do I Know If I Should Plunge My Sink?
If water drains slowly or is clogged, plunging is a good first step. Persistent issues may require professional help.
What Is The Correct Way To Plunge A Kitchen Sink?
Seal the drain with a plunger cup, create a tight seal, and plunge vigorously several times to dislodge clogs effectively.
When Should I Avoid Plunging My Kitchen Sink?
Avoid plunging if you have a garbage disposal or suspect a broken pipe. In these cases, call a plumber to avoid damage.
Conclusion
Plunging your kitchen sink can solve many common clogs fast. It works best for minor blockages near the drain. Avoid forcing the plunger too hard to prevent damage. Sometimes, a plunger is not enough for tough clogs. Knowing when to call a plumber saves time and hassle.
Keep your sink clean to reduce future clogs. Simple tools like a plunger can often fix small problems. Try plunging first before using chemicals or calling for help.