
Have you ever wanted to bring your kitchen ideas to life before making any changes? Learning how to draw a 3D kitchen cabinet can help you do just that.
Imagine seeing your design from every angle, making it easier to choose the perfect style and layout. In this guide, you’ll discover simple steps to create a realistic 3D cabinet drawing—even if you’ve never tried drawing before. Keep reading, and you’ll unlock a skill that turns your kitchen dreams into clear, visual plans you can trust.

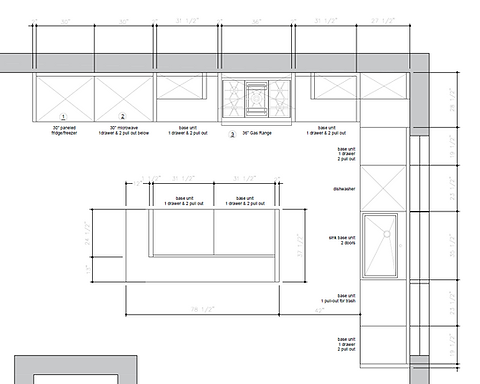
Credit: www.dreamstime.com
Materials And Tools Needed
Gathering the right materials and tools sets the foundation for your 3D kitchen cabinet drawing. Having everything ready not only speeds up your workflow but also helps you focus on bringing your design to life. You might think you need fancy equipment, but often, basic tools can deliver impressive results.
Essential Drawing Supplies
- Pencils:Use a range of pencils from HB to 6B for sketching and shading. Softer pencils help with darker lines and shadows, while harder pencils are great for precise outlines.
- Erasers:A kneaded eraser works wonders for subtle corrections without damaging the paper. A regular eraser is handy for larger mistakes.
- Rulers and Straightedges:Accurate lines are crucial for 3D drawings. A clear plastic ruler or a metal straightedge ensures your cabinet edges look sharp and clean.
- Drawing Paper:Choose smooth, medium-weight paper that can handle erasing and shading without tearing.
Tools For Adding Depth And Dimension
- Blending Stumps:These help create smooth shadows and gradients on your cabinets, giving them a realistic 3D effect.
- Colored Pencils or Markers:Adding color can highlight different materials like wood or metal finishes. Select tones that match your kitchen design.
- Compass and Protractor:These tools assist in drawing precise curves and angles, especially for cabinet handles or decorative elements.
Digital Tools You Might Consider
- Drawing Tablet:If you prefer digital drawing, a tablet lets you sketch with precision and easily correct mistakes.
- 3D Modeling Software:Software like SketchUp or AutoCAD allows you to create detailed 3D cabinet models. It’s helpful if you want to visualize your design from all angles.
Have you noticed how having the right tools changes your drawing experience? When I first started, I struggled with uneven lines until I invested in a quality ruler. It made a huge difference in the clarity of my designs. What small upgrade could improve your drawing process today?
Basic 3d Drawing Techniques
Basic 3D drawing techniques help bring flat sketches to life. These skills create depth and realism in your kitchen cabinet drawings. Learning these methods makes your designs clear and attractive. Simple tools and shapes form the base of every 3D drawing. Practice these techniques to improve your drawing confidence.
Understanding Perspective
Perspective shows how objects appear smaller as they get farther away. It creates a sense of space and depth in your drawing. Use one-point or two-point perspective for kitchen cabinets. One-point uses a single vanishing point on the horizon. Two-point uses two points, often on the left and right sides. Draw light guidelines to keep the angles correct.
Using Basic Shapes
Start by sketching simple shapes like rectangles and cubes. Cabinets mainly consist of boxes, so this step is key. Draw these shapes lightly to adjust proportions easily. Break down complex parts into smaller shapes. This approach keeps the drawing organized and easy to follow.
Adding Depth With Shading
Shading gives volume to your cabinets by showing light and shadow. Decide where the light source is in your drawing. Shade the areas opposite the light to create contrast. Use soft pencil strokes or hatching to build gradual shadows. This technique makes the cabinet look three-dimensional.
Drawing Details And Textures
Details like handles, wood grain, and panel lines add realism. Use fine lines for edges and small features. Texture can be suggested with patterns or slight shading. Keep details subtle to avoid cluttering the drawing. This step completes the 3D effect and enhances the design.
Sketching The Cabinet Frame
Begin by outlining the basic shape of the cabinet frame using simple lines. Focus on drawing straight edges and clear angles to create a solid 3D structure. Keep proportions accurate to make the kitchen cabinet look realistic and balanced.
Sketching the cabinet frame is the foundation of creating a realistic 3D kitchen cabinet drawing. This step requires precision and attention to detail, ensuring that your final design is both functional and visually appealing. Understanding the basic structure of a cabinet frame can make the drawing process more intuitive and enjoyable.
Understanding The Basic Structure
To begin, familiarize yourself with the standard components of a kitchen cabinet frame. Generally, a cabinet consists of vertical stiles, horizontal rails, and a back panel. Visualizing these elements in your mind helps in laying them out accurately on paper.
Choosing Your Perspective
Decide from which angle you want to draw the cabinet. A front view offers simplicity, while a three-quarter perspective can add depth. The angle you choose affects the realism and complexity of your drawing.
Mapping Out Dimensions
Use a ruler or a straight edge to sketch the basic outline of the cabinet frame. Ensure the proportions are accurate by measuring actual cabinet dimensions or using a scale. Precision in this step lays the groundwork for a professional-looking 3D representation.
Adding Depth With Lines
Create the illusion of depth by drawing parallel lines that converge at a vanishing point. This technique, known as perspective drawing, is crucial for 3D realism. Experiment with different vanishing points to see how they impact the overall look of your cabinet.
Refining The Sketch
Once your basic frame is complete, refine the lines to enhance clarity. Erase any unnecessary guidelines to clean up your sketch. Highlight important features like cabinet doors and shelves by adding darker lines or shading.
Seeking Feedback
Show your sketch to a friend or share it online to get feedback. Fresh eyes can often spot areas for improvement that you might have missed. Incorporating constructive criticism can significantly elevate the quality of your final drawing. How do you feel about your sketch? Does it meet your expectations? Keep practicing and adjusting based on feedback, and your skills will undoubtedly improve.
Adding Depth And Perspective
Adding depth and perspective is what transforms a flat sketch of a kitchen cabinet into a lifelike 3D drawing. It helps you create the illusion that the cabinet has volume and exists in real space. Without these elements, your drawing risks looking dull and unrealistic.
Understanding Vanishing Points
Vanishing points are key to creating accurate perspective in your drawing. They are points on the horizon line where parallel lines seem to converge. Identifying these points early guides the angles and proportions of your cabinet, making it look natural.
Try drawing two vanishing points on your horizon line. Then, sketch lines from these points to outline the cabinet’s edges. This will help you see how depth works and keeps your drawing consistent.
Using Light And Shadows To Enhance Volume
Light plays a huge role in adding depth. Decide where your light source is coming from and shade the cabinet accordingly. Shadows can show curves, edges, and recesses, making your drawing pop.
Experiment with different shading techniques like hatching or blending. Notice how subtle changes in shadow make parts of the cabinet appear closer or farther away. Can you feel the cabinet’s shape emerging as you add shadows?
Layering Details For Realism
Adding small details at varying depths creates a sense of space. Draw handles, hinges, and panel lines with attention to perspective. Items closer to you should appear larger and more detailed than those further back.
- Use thicker lines for front edges
- Make distant parts lighter and less detailed
- Add texture like wood grain sparingly to avoid clutter
This subtle layering tricks the eye into seeing a three-dimensional object rather than a flat drawing.
Drawing Doors And Drawers
Drawing doors and drawers brings life to your 3D kitchen cabinet sketch. These elements show the cabinet's function and style. Focus on their size, shape, and placement to create a realistic look.
Start by outlining the door frames and drawer fronts on your cabinet base. Keep lines straight and clean to maintain the 3D perspective. Use light strokes at first for easy adjustments.
Sketching Door Panels
Draw rectangles or squares for door panels inside the cabinet frame. Add depth by sketching inner edges slightly smaller than the outer frame. This creates a layered effect.
For raised panels, draw a smaller rectangle inside the door panel. Use shading to show thickness and edges. Flat panels need only simple outlines and subtle shadows.
Designing Drawers
Draw horizontal rectangles on lower cabinet sections for drawers. Keep the height consistent for uniformity. Add a thin gap between drawers to separate them visually.
Show drawer depth by sketching side edges and adding slight shadow. This gives the drawer a solid, 3D feel.
Adding Handles And Knobs
Small shapes represent handles or knobs. Circles, rectangles, or simple bars work well. Place them near the edge of each door or drawer front.
Use light shading to suggest round or recessed handles. Position handles consistently for a neat appearance.
Shading And Highlights
Apply shading along edges and under handles to enhance depth. Use soft strokes to show light hitting surfaces. Highlight areas facing the light source for realism.
Balance shadows and highlights to keep the doors and drawers looking natural and three-dimensional.
Incorporating Handles And Hardware
Adding handles and hardware to your 3D kitchen cabinet drawing brings it to life. These small details make a big difference in how realistic and functional your design appears. You want to show not just the cabinet shape but also how it would look and feel in a real kitchen.
Choosing The Right Style For Handles
Think about the overall style of your kitchen before selecting handle shapes. Sleek, modern kitchens often use simple bar pulls or minimalist knobs. Traditional kitchens might have ornate handles with curves and patterns.
Try sketching different handle styles next to your cabinet doors to see what fits best. Have you noticed how a handle style can change the entire vibe of a kitchen?
Placing Handles Correctly On Cabinet Doors
Positioning handles correctly is crucial for realism. Handles usually go on the opposite side of the hinges, about 2 to 3 inches from the edge. This placement makes the cabinet easy to open and looks balanced.
Use light guidelines to mark where each handle should go before drawing them fully. This helps avoid awkward or inconsistent placements that can distract from your drawing’s quality.
Drawing Hardware With Depth And Shadow
To make handles pop in your 3D drawing, add shadows and highlights. Look closely at how light hits real metal or wood handles. Shadows under the handle and highlights on the edges create a sense of depth.
Try using a softer pencil or lighter strokes for these effects. How much detail you add can depend on the style of your drawing and how close the viewer’s perspective is.
Using Color And Texture To Enhance Hardware
Color can set your hardware apart from the cabinet surface. For example, silver or black handles contrast well with white or wooden cabinets. Adding subtle textures, like brushed metal or polished chrome, makes your design feel tangible.
Experiment with different shading techniques or digital brushes if you’re working on a computer. What textures do you think would fit your kitchen theme best?
Shading And Texturing
Shading and texturing bring your 3D kitchen cabinet drawing to life. They create depth and realism. Good shading shows how light hits the surfaces. Textures add details like wood grain or metal shine. Both make the cabinet look more natural and solid.
Understanding Light And Shadow
Identify the main light source in your drawing. Shade the areas that the light cannot reach. Use softer shading for gentle shadows and darker tones for deep shadows. Shadows help show the cabinet's shape and position.
Creating Wood Grain Texture
Draw thin, irregular lines to mimic wood grain. Follow the direction of the cabinet panels. Use light strokes to keep the texture subtle. Add knots or small imperfections for realism. Avoid making the texture too busy or dark.
Adding Metal Or Glass Surfaces
Use smooth shading for metal or glass parts. Add small highlights where the light reflects. Use sharp white spots for shiny reflections. For glass, add slight transparency by showing objects behind it faintly.
Blending Techniques For Smooth Transitions
Use a blending tool or finger to soften shading edges. This creates smooth color changes. Avoid harsh lines between light and shadow. Blending makes the cabinet appear rounded and three-dimensional.
Using Patterns And Details
- Draw panel borders clearly but simply.
- Add screws or handles with small shapes.
- Keep patterns consistent across the cabinet.
- Details help viewers understand the cabinet’s structure.
Refining Details And Clean Lines
Refining the details and ensuring clean lines are what transform a simple 3D kitchen cabinet drawing into a realistic and professional-looking design. These final touches bring depth and clarity, making your work stand out. Paying close attention to edges, textures, and proportions will help you create a polished piece that feels tangible.
Adjusting Edge Sharpness For Realism
Sharp edges give your cabinet structure definition, but not all edges should be razor-thin. Notice how real cabinets have slightly softened corners due to wear or design choices. Use your drawing tool to gently smooth out overly harsh lines, especially on corners and handles.
Try zooming in on your drawing to check each edge. Does it look too artificial? Tweak it until it feels natural. This small effort adds authenticity to your 3D render.
Enhancing Surface Texture And Material Effects
Textures breathe life into your cabinet surfaces. Consider the grain of wood, the gloss of paint, or the matte finish of laminate. Adding subtle texture with shading or fine line work can make a huge difference.
Use light strokes or shading gradients to simulate these materials. Don’t overdo it — too much detail can clutter your drawing. Instead, focus on key areas like door panels or drawer fronts to highlight texture.
Ensuring Symmetry And Consistent Proportions
Symmetry is vital for kitchen cabinets to look balanced and functional. Double-check your measurements and angles to keep drawers and doors aligned. Even a minor mismatch can break the illusion of a solid 3D object.
Use guides or grids in your drawing software to maintain consistency. Ask yourself: Does each part feel like it fits perfectly with the others? If not, adjust until the proportions feel right to your eye.
Cleaning Up Lines For A Polished Finish
Messy lines distract from your design’s quality. Use your eraser or line-smoothing tool to remove stray marks and overlapping strokes. Sharp, clear lines keep the focus on the cabinet’s form and details.
Look at your drawing from a distance. Are the outlines clean and easy to follow? If anything looks cluttered, simplify those areas. A neat drawing invites viewers to appreciate your work fully.
Coloring The Cabinet
Coloring your 3D kitchen cabinet brings your drawing to life. It adds depth and realism that simple outlines can’t achieve. Choosing the right colors and applying them carefully can make your cabinet look like it’s ready to open and store your favorite dishes.
Choosing The Right Colors
Start by deciding the style of your kitchen. Do you want a modern look with sleek, neutral tones? Or perhaps a classic feel with warm wood colors? Your choice affects the mood of the entire space.
Think about common kitchen cabinet colors like white, gray, or natural wood. These colors are popular because they fit many kitchen styles. But don’t be afraid to experiment with bold shades if that matches your vision.
Applying Base Colors
Begin by filling the main surfaces of the cabinet with a flat color. Use a single tone to keep the base consistent. This step sets the foundation and makes adding shadows and highlights easier.
Keep your brush strokes smooth and even. Uneven coloring can distract from the 3D effect you want to create. If you’re using digital tools, try layering colors to build richness.
Adding Shadows And Highlights
Shadows give your cabinet depth. Identify where your light source is and darken areas that would be less exposed to light. This could be under the cabinet doors or inside the cabinet edges.
Highlights should be applied where light hits directly. Adding a lighter color along edges or on handles makes your cabinet pop. This contrast is key to making your drawing appear three-dimensional.
Incorporating Texture
Texture makes your cabinet feel real. If you’re drawing a wood cabinet, add subtle grain lines or knots. For painted cabinets, smooth gradients work better.
Use small, deliberate strokes or patterns to mimic the material. This extra detail often separates a good drawing from a great one.
Final Touches To Enhance Realism
Look closely for small details like screws, handles, or slight wear and tear. Adding these touches can make your cabinet look more authentic. Don’t overdo it; subtlety is more convincing.
Ask yourself: Does this cabinet look like it could be part of a real kitchen? Adjust colors and details until you feel the answer is yes.

Credit: www.youtube.com
Common Mistakes To Avoid
Common errors include ignoring perspective and failing to keep lines straight. Overcomplicating details can make drawings confusing. Focus on simple shapes and clean edges for clear 3D cabinets.
Drawing 3D kitchen cabinets can be exciting but challenging. Many beginners make common mistakes. Understanding these errors can help you improve. Learn to avoid them for better results.
Ignoring Perspective
Many overlook perspective in 3D drawings. Without proper perspective, drawings look flat. Use vanishing points. They guide lines toward a single point. This adds depth and realism.
Overcomplicating Details
Too many details can confuse the viewer. Focus on the main shapes. Add simple details that enhance the design. This keeps your drawing clean and understandable.
Inaccurate Proportions
Proportions are crucial in 3D drawing. Inaccurate proportions can distort the image. Use a grid to maintain correct sizes. This ensures your cabinet looks realistic.
Improper Lighting And Shadows
Lighting affects how 3D objects appear. Incorrect shadows can make objects look unnatural. Determine the light source early. Draw shadows consistent with this source.
Neglecting Surface Texture
Texture adds realism to drawings. A cabinet without texture seems artificial. Use shading to show wood grain or paint finish. This adds depth to your work.
Unbalanced Composition
Balance is key to a pleasing drawing. Uneven elements can distract the eye. Arrange objects symmetrically or use the rule of thirds. This creates harmony in your artwork.
Using Hard Lines
Hard lines can make drawings look stiff. Use softer lines for a more natural look. Vary line thickness to show depth and dimension. This enhances the 3D effect. Avoid these mistakes for an improved 3D kitchen cabinet drawing. Practice regularly to refine your skills.
Tips For Realistic 3d Effects
Creating realistic 3D effects in kitchen cabinet drawings brings your design to life. It adds depth and makes the cabinets appear tangible. Achieving this requires attention to light, shadow, and perspective. Small details enhance the overall look and make the drawing believable.
Use Proper Perspective
Start by drawing the cabinet using one or two-point perspective. This creates the illusion of depth. Lines should converge toward the vanishing points. Keep angles consistent to maintain realism. Perspective guides the viewer’s eye into the drawing.
Apply Light And Shadow
Identify a light source before shading. Shadows create depth and volume. Shade the side opposite the light source darker. Use gradients for smooth transitions between light and shadow. This contrast makes the cabinet pop out.
Add Texture Details
Textures like wood grain or metal finishes add realism. Use fine lines or dots to suggest material surfaces. Vary the texture direction based on cabinet panels. Details help viewers imagine the cabinet’s feel.
Highlight Edges And Corners
Edges catch more light, so add highlights there. Use a lighter shade or white pencil for highlights. Corners often show subtle shadow differences. This small touch boosts three-dimensionality.
Include Reflections And Gloss
Glossy surfaces reflect light differently. Add small bright spots for reflections. Keep reflections soft and subtle. They give a polished, real-world effect to cabinets.

Credit: www.youtube.com
Frequently Asked Questions
How Do I Start Drawing A 3d Kitchen Cabinet?
Begin by sketching the basic cabinet shape using light lines. Use perspective techniques for depth. Add details like doors, handles, and shelves afterward.
What Tools Help Create 3d Kitchen Cabinet Drawings?
Use pencils, rulers, erasers, and drawing paper. Digital tools like CAD software or drawing tablets also enhance accuracy and detail in 3D designs.
How To Add Realistic Depth To 3d Kitchen Cabinets?
Apply perspective rules with vanishing points. Use shading and highlights to emphasize depth and texture. This creates a lifelike and dimensional appearance.
Can Beginners Learn To Draw 3d Kitchen Cabinets Easily?
Yes, by practicing basic shapes and perspective drawing. Follow step-by-step tutorials and gradually add details to improve skills.
Conclusion
Drawing 3D kitchen cabinets becomes easier with practice and patience. Start with simple shapes and add details step by step. Use guidelines to keep proportions correct and create depth. Don’t rush; take your time to improve each part. Try different angles to make your drawing more realistic.
Keep practicing regularly to build your skills and confidence. Soon, you will enjoy creating detailed 3D kitchen cabinet designs with ease. Drawing can be fun and rewarding with steady effort. Keep going and watch your drawings come to life.