
Are your kitchen cupboard doors looking tired or outdated? You don’t have to replace them to give your kitchen a fresh, new look.
Covering your cupboard doors is a simple and affordable way to transform your space instantly. Imagine opening your kitchen to find doors that match your style perfectly—sleek, bright, or rustic—without the hassle of a full renovation. In this guide, you’ll discover easy, step-by-step methods to cover your cupboard doors, making your kitchen feel like new.
Ready to unlock the secret to a stylish kitchen makeover? Keep reading to learn how you can do it yourself, quickly and easily.

Credit: www.kitchenrestoration.co.uk
Materials For Covering Cupboard Doors
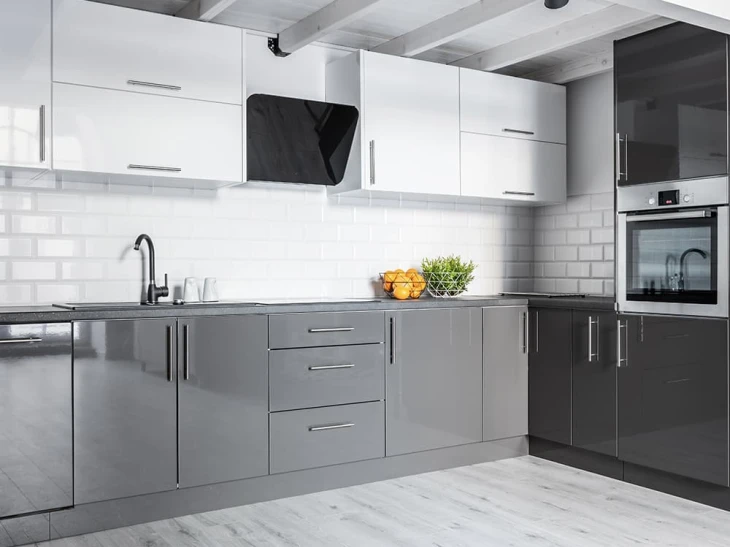
Covering kitchen cupboard doors can transform your space quickly and affordably. Choosing the right material affects style, durability, and ease of installation. Various options suit different tastes and budgets. This section explores popular materials for covering cupboard doors.
Adhesive Vinyl Sheets
Adhesive vinyl sheets are thin, flexible, and easy to apply. They come in many colors and patterns. Vinyl covers scratches and hides imperfections well. Cleaning is simple with a damp cloth. It works best on smooth surfaces. Vinyl is water-resistant, making it ideal for kitchens.
Peel And Stick Wallpaper
Peel and stick wallpaper adds texture and design variety. It is easy to install and remove without damage. Wallpaper can refresh old cupboards with patterns or solid colors. Choose washable types for kitchen use. It is a budget-friendly way to change cupboard looks.
Wood Panels And Planks
Wood panels bring warmth and natural beauty to cupboards. Solid or engineered wood fits classic and rustic styles. Panels can be nailed or glued onto doors. Wood needs sealing to resist moisture. It lasts long and can be painted or stained.
Fabric And Upholstery
Fabric adds softness and unique texture to cupboard doors. Use staple guns or adhesive spray to attach it tightly. Choose washable or treated fabrics for durability. Fabric offers endless color and pattern choices. It works well for cottage or eclectic kitchens.
Chalkboard Paint
Chalkboard paint turns cupboard doors into a writable surface. It is perfect for notes, lists, or drawings. Apply multiple coats for a smooth finish. Chalkboard paint adds fun and function to kitchens. Clean with a damp cloth to erase chalk marks.
Tools You’ll Need
Before you dive into covering your kitchen cupboard doors, gathering the right tools is essential. Having everything on hand not only saves time but also makes the process smoother and more enjoyable. Below is a breakdown of the key tools you’ll need to get started and why each one plays a crucial role.
Measuring Tape And Ruler
Accurate measurements are the foundation of any successful project. Use a measuring tape to get the exact dimensions of your cupboard doors. A ruler helps with smaller, detailed measurements, especially if you’re cutting adhesive films or panels.
Think about how frustrating it is to cut a material too short or too long. Taking the time to measure twice can save you from costly mistakes.
Utility Knife And Scissors
Cutting tools are a must-have when working with covering materials like vinyl wraps, contact paper, or fabric. A sharp utility knife offers precision for straight cuts, while scissors are handy for trimming curves or smaller sections.
Make sure your blades are sharp; dull tools can tear materials and ruin the finish. Have spare blades ready just in case.
Sandpaper And Primer
Preparing your cupboard doors properly ensures the new covering sticks well and lasts longer. Sandpaper smooths out rough surfaces or removes old paint, creating a clean base.
Applying primer afterward seals the surface and improves adhesion. Skipping this step might make your covering peel off sooner than you expect.
Paint Brushes And Rollers
If you’re painting your cupboard doors or applying primer, brushes and rollers are your best friends. Brushes work well for edges and corners, while rollers cover larger flat surfaces quickly and evenly.
Choosing the right size and quality can affect your finish significantly. Don’t rush this part—smooth, even coats make a big difference.
Screwdriver And Drill
Removing cupboard doors before covering them makes the job easier and neater. A screwdriver lets you take off hinges and handles without damage.
If you need to install new hardware or make adjustments, a drill speeds up the process. Having both tools ready means you won’t get stuck halfway through your project.
Prepping Your Cupboard Doors
Clear dirt and grease from cupboard doors using a mild cleaner. Remove any handles or knobs for smooth covering. Lightly sand the surface to help paint or adhesive stick better.
Prepping your cupboard doors is a crucial first step when you’re looking to give your kitchen a fresh look. Proper preparation ensures a smooth, long-lasting finish that you’ll be proud to showcase. This stage involves a few key tasks that will set the foundation for a flawless transformation.
Cleaning And Degreasing
Before anything else, ensure your cupboard doors are spotless. Grease and grime can prevent paint from adhering properly. Use a mixture of warm water and a gentle dish soap to clean the surfaces, paying special attention to the areas around handles where dirt accumulates. For stubborn grease, a degreaser or vinegar solution can work wonders. Make sure you rinse and dry the doors thoroughly. A clean surface is your canvas for creativity.
Removing Hardware
Taking off hardware like handles and hinges is a small step with a big impact. Not only does it make sanding and painting easier, but it also prevents unwanted paint drips on your hardware. Store screws and small parts in a labeled container so you don’t lose them. This makes reassembly a breeze and ensures everything fits back perfectly when you’re done.
Sanding Surfaces
Sanding might seem tedious, but it’s essential for a smooth finish. Lightly sand the surface of your cupboard doors with a medium-grit sandpaper. This helps the new paint adhere better. Don’t forget the edges and corners, as these areas are often overlooked. Wipe down the doors with a damp cloth after sanding to remove any dust particles.
Filling Holes And Imperfections
Take a moment to inspect your cupboard doors for any dents or holes. Filling these imperfections creates a seamless look once painted. Use wood filler to patch up any holes or deep scratches. Once the filler is dry, sand the area lightly to ensure it is level with the rest of the door. This attention to detail sets apart a professional-looking job from an amateur one. Prepping your cupboard doors might take some time, but it’s worth every minute. What’s your favorite part of a DIY project—the planning or the execution? Consider this as you dive into transforming your kitchen space.
Diy Covering Techniques
Covering your kitchen cupboard doors yourself opens up a world of design possibilities without breaking the bank. You can customize your space to match your style and mood with just a few materials and some creativity. Each DIY technique offers a unique way to transform your kitchen, whether you want a sleek modern look or a cozy, textured feel.
Applying Adhesive Vinyl
Adhesive vinyl is a popular choice because it’s affordable, easy to apply, and comes in countless colors and patterns. You simply cut the vinyl to fit your cupboard doors, peel off the backing, and smooth it on. Using a squeegee or a credit card helps prevent bubbles and wrinkles.
Have you tried vinyl wrapping on any surface before? If not, start with a small door to build your confidence. Vinyl also peels off cleanly if you want to change your design later.
Installing Wallpaper Panels
Wallpaper isn’t just for walls anymore—it can add texture and color to your cupboard doors. Choose a durable, washable wallpaper to handle kitchen humidity and spills. Cut panels to size and use wallpaper adhesive or double-sided tape to secure them.
If you want extra protection, consider covering the wallpaper with a clear varnish or laminate. This way, your wallpaper stands up to daily wear and tear. What pattern would brighten your kitchen most?
Attaching Wood Overlays
Wood overlays add depth and warmth to your cupboard doors, making them look custom-made. You can buy thin wood veneer sheets or create your own with plywood cutouts. Attach them with wood glue or small nails, depending on the thickness.
This technique works great if you prefer a natural or rustic style. Plus, you can stain or paint the wood to perfectly match your kitchen’s color scheme. How would wood change the feel of your kitchen?
Wrapping With Fabric
Fabric covering is a soft and unique way to refresh cupboard doors. Stretch fabric over the doors and secure it with spray adhesive or a staple gun on the inside edges. Choose fabrics that are washable and resistant to kitchen moisture.
Adding trim or decorative tacks can enhance the look and keep the fabric taut. Have you ever thought about mixing different textures on your doors for a bold statement?
Painting With Chalkboard Finish
Chalkboard paint turns your cupboard doors into a functional and fun canvas. After cleaning and priming the surface, apply the chalkboard paint in thin layers. Once dry, season the surface by rubbing chalk all over it and wiping clean.
This option is perfect if you like jotting down grocery lists, recipes, or reminders right on your cupboards. Could your kitchen benefit from this interactive feature?
Creative Design Ideas
Transforming your kitchen cupboard doors can completely change the vibe of your space. Creative design ideas offer a fresh way to express your style while making your kitchen feel more inviting. Whether you want something modern, cozy, or bold, these design ideas give you clear options to customize your cupboards.
Geometric Patterns
Geometric patterns bring a sharp, modern edge to kitchen cupboards. You can use stencils or decals to add triangles, hexagons, or chevrons in contrasting colors. This design works well if you want a subtle yet eye-catching update without a full renovation.
Think about pairing black and white shapes for a classic look or using vibrant hues to energize the room. Have you ever tried mixing small and large shapes to create depth? It’s a simple trick that adds personality and movement to your cupboards.
Rustic Wood Look
If warmth and charm are what you’re after, a rustic wood finish can do wonders. You don’t need real wood; peel-and-stick wood grain vinyl wraps are budget-friendly and easy to apply. They mimic natural textures and bring cozy farmhouse vibes to your kitchen.
Try sanding edges or adding distressed paint for more authenticity. This look pairs beautifully with open shelving and vintage hardware, turning your cupboards into a conversation starter. Imagine the compliments you’ll get when guests notice the detail.
Bold Colors And Contrasts
Bold colors make a striking statement and instantly brighten up the kitchen. Choosing a rich navy, emerald green, or even a fiery red can create a dramatic effect. Pair these colors with neutral walls and countertops to keep the balance and avoid overwhelming the space.
Contrasting colors on handles or trim can highlight the cupboard design further. Ever thought about painting just the lower cupboards in a bold shade while keeping the upper ones neutral? It’s a clever way to add color without overpowering the room.
Vintage And Distressed Styles
Vintage and distressed styles add character and a sense of history to your kitchen cupboards. Use sanding techniques to wear down paint or apply crackle finish for an aged look. This approach works perfectly if you love shabby chic or cottage aesthetics.
Pairing distressed cupboards with antique knobs or glass inserts enhances the nostalgic feel. What if you blend this style with modern appliances? The contrast between old and new creates a unique, inviting space.
Mixing Materials
Combining different materials on cupboard doors adds texture and interest. Try mixing wood panels with frosted glass or metal inserts for a contemporary look. This approach breaks the monotony and makes your cupboards stand out.
For example, metal mesh inserts can give an industrial touch, while glass adds lightness. Have you considered how mixing smooth and rough surfaces can create a tactile experience every time you open a cupboard? It’s a detail that delights beyond just looks.

Credit: www.kitchenrestoration.co.uk
Maintaining Your Covered Doors
Maintaining your covered kitchen cupboard doors keeps them looking fresh and lasting longer. Regular care prevents dirt buildup and damage. Simple steps can help preserve their appearance and function.
Cleaning Tips
Use a soft cloth to wipe the doors gently. Avoid harsh chemicals that can ruin the cover material. A mix of mild soap and water works well for most surfaces. Dry the doors with a clean towel to stop water spots. Clean spills quickly to prevent stains. Dust often to keep dirt from settling.
Repairing Minor Damage
Small scratches or peeling edges can be fixed easily. Use matching touch-up paint or adhesive patches for covers. Smooth out bubbles under vinyl or laminate with a flat tool. Replace loose edges with strong glue made for your cover type. Check hinges and handles regularly and tighten screws as needed.
Replacing Covers When Needed
Replace covers when they show heavy wear or damage. Remove old covers carefully to avoid damaging the doors. Measure your doors accurately before buying new covers. Choose durable materials that fit your kitchen style. Take time for careful installation to avoid bubbles or wrinkles. Fresh covers can give your kitchen a new look fast.
Budget-friendly Tips
Updating kitchen cupboard doors does not have to be costly. Simple ideas can give a fresh look without spending much. Budget-friendly tips help save money and make your kitchen charming.
Sourcing Affordable Materials
Look for materials at discount stores or online sales. Choose plywood or MDF sheets instead of solid wood. These options cost less but still look good. Local hardware stores often have clearance items perfect for cupboard projects.
Repurposing Old Items
Use old fabric, shutters, or wooden crates to create unique cupboard doors. Sand and paint old doors for a new style. Small changes to what you already have can refresh your kitchen.
Using Leftover Paint And Wallpaper
Check for leftover paint from previous projects. Use it to add color or patterns to your cupboard doors. Wallpaper scraps can create fun designs or accents. These materials reduce waste and cut costs.

Credit: kitchenmakeovers.co.uk
Frequently Asked Questions
How Do I Prepare Kitchen Cupboard Doors For Covering?
Clean the doors thoroughly to remove grease and dirt. Lightly sand the surface to help adhesive stick better. Remove hardware like handles or knobs before starting. Proper preparation ensures a smooth, lasting finish when covering cupboard doors.
What Materials Can I Use To Cover Kitchen Cupboard Doors?
You can use vinyl wrap, contact paper, paint, or adhesive films. Each option offers different textures and finishes. Choose based on durability, style, and ease of application. These materials help refresh your kitchen without full replacement.
How Long Does It Take To Cover Kitchen Cupboard Doors?
Covering cupboard doors typically takes 2-4 hours for small kitchens. Time varies based on door number and covering type. Proper drying or curing times may add extra hours. Planning helps achieve professional-looking results efficiently.
Can I Cover Kitchen Cupboard Doors Without Removing Them?
Yes, you can cover doors without removal, but removal is easier. Taking doors off allows better access and neater edges. If not removed, carefully apply covering to avoid bubbles or wrinkles. Choose the method that suits your comfort level.
Conclusion
Covering kitchen cupboard doors can change your space quickly. Simple steps bring fresh looks without much cost. Choose materials and colors that match your style. Take your time to measure and cut carefully. A neat finish makes all the difference.
Small updates bring big improvements to your kitchen. Try different ideas to find what fits best. Enjoy your new kitchen look every day.