
Is your kitchen cabinet drawer stuck, loose, or making annoying noises? You don’t have to live with that frustration or call a costly repair service.
Fixing your kitchen cabinet drawer yourself is easier than you think. With a few simple tools and clear steps, you can restore smooth, quiet, and reliable drawer function. Keep reading, and you’ll learn exactly how to repair your drawer quickly and confidently—saving time, money, and hassle.
Your kitchen deserves it!

Credit: www.angi.com
Identify Common Drawer Problems
Identifying common problems in kitchen cabinet drawers helps fix issues quickly. Knowing what causes drawer trouble saves time and effort. These problems often affect how smoothly a drawer opens and closes. Early detection prevents bigger damage.
Loose Or Broken Handles
Handles can become loose from regular use. Screws may loosen or fall out. Sometimes, handles crack or break. This makes opening the drawer hard or unsafe. Tightening or replacing handles restores easy access.
Drawer Sticking Or Jamming
Drawers may stick due to dirt or swelling wood. Moisture causes wood to expand and jam. Misaligned parts also cause sticking. Removing debris and adjusting the drawer helps it slide smoothly.
Worn Out Drawer Slides
Slides wear down after long use. Metal or plastic parts may bend or break. This leads to uneven movement or falling drawers. Replacing slides improves drawer function and safety.
Damaged Drawer Bottom
The drawer bottom can sag or crack from heavy loads. Loose panels or nails cause instability. A damaged bottom lowers the drawer’s strength. Repairing or reinforcing it maintains durability.

Credit: www.familyhandyman.com
Gather Essential Tools And Materials
Before you dive into fixing your kitchen cabinet drawer, it’s crucial to gather the right tools and materials. Having everything on hand not only saves time but also ensures the repair goes smoothly. Missing even a small part can turn a quick fix into a frustrating project.
Basic Hand Tools
Start with a set of basic hand tools that you likely already own. A screwdriver, both flathead and Phillips, is essential for removing screws and adjusting hardware. A hammer can help with realigning parts or gently tapping pieces back into place.
Don’t forget a tape measure to check dimensions and a utility knife for trimming any damaged edges. A small level might come in handy to ensure your drawer slides evenly. These tools create the foundation for most drawer repairs.
Replacement Parts
Identify which parts of your drawer need replacing before you shop. Drawer slides, rollers, and handles often wear out or break. Knowing the exact size and type of your drawer components helps you avoid buying incompatible parts.
Consider checking the manufacturer’s website or taking the old parts to a hardware store for comparison. Sometimes, a worn-out screw or bracket is all that needs swapping. Have spares ready so you don’t get stuck halfway through the repair.
Adhesives And Fasteners
Strong adhesives can fix cracked wood or secure loose joints. Wood glue is perfect for reinforcing wooden parts without damaging the surface. Choose a fast-drying type to speed up your repair work.
Besides glue, keep an assortment of nails, screws, and brackets close by. Different sizes might be needed depending on the drawer’s condition. Ask yourself: Are the fasteners rusted or stripped? Replacing them can make a significant difference.
Remove The Drawer Safely
Removing a kitchen cabinet drawer safely is crucial before you start any repairs. If you rush or handle it carelessly, you might damage the drawer slides or the cabinet itself. Taking your time to carefully detach the drawer can save you effort and frustration later on.
Unlocking Drawer Slides
Most kitchen drawers use either side-mounted or under-mounted slides that have a locking mechanism. Check the slides for small levers or tabs—these usually need to be pressed or lifted to release the drawer.
Try gently pushing the drawer in slightly while pressing the release lever. This action frees the drawer from the track without forcing it.
If your drawer slides don’t have obvious levers, look for metal clips or catches. Sometimes, you need to tilt the drawer up or down to disengage the catch. Have you noticed how different cabinets use various mechanisms? Identifying yours early prevents unnecessary damage.
Lifting And Taking Out The Drawer
Once the slides are unlocked, support the drawer from underneath with both hands. Avoid pulling it out straight with force—it often needs a slight lift or tilt.
Lift the front slightly while pulling the drawer outward. If it resists, double-check the slides again; they might still be locked.
When the drawer clears the cabinet, set it down gently on a flat surface. This keeps the slides and the drawer box intact and ready for inspection or repair.
Have you ever struggled with a stuck drawer only to find a hidden latch? Paying attention to these small details makes the whole repair process smoother.
Fix Loose Or Broken Handles
Loose or broken handles can make kitchen drawers hard to open. Tighten screws or replace damaged parts to fix handles quickly. This simple repair improves drawer function and appearance.
Fixing loose or broken handles on kitchen cabinet drawers can instantly rejuvenate your kitchen’s look and functionality. It's a common issue, yet surprisingly simple to fix. Whether you’re dealing with loose screws or a broken handle, these tasks are quite manageable even for beginners.
Tightening Screws
Loose handles often result from screws that have wiggled free over time. To tighten them, all you need is a screwdriver. First, identify the type of screw used—Phillips or flathead—and choose the right tool. Remove the drawer from the cabinet. This step allows you to access both sides of the handle. Tighten the screws by turning the screwdriver clockwise until they are snug but not overly tight. Double-check all screws, as sometimes only one might be loose. This quick fix can make your drawer handles feel brand new. Ever notice how a small task like this can make you feel accomplished?
Replacing Handles
If your handle is broken, replacement is the way to go. It's an opportunity to refresh your kitchen's style too. Start by unscrewing the old handle entirely. Visit your local hardware store or browse online for a new handle that matches your kitchen’s aesthetic. Consider the size and spacing of the screw holes to avoid any mismatch. Once you have the new handle, align it with the screw holes on the drawer. Secure it in place by tightening the screws from inside the drawer. Isn’t it amazing how a small change can make a big difference in your kitchen’s appearance? Are you ready to tackle your kitchen cabinet drawer handles? Sometimes, a little DIY can turn an average day into a productive one.
Smooth Out Sticking Drawers
Sticking kitchen cabinet drawers can be frustrating, especially when you’re in the middle of cooking or cleaning. Often, the issue isn’t the drawer itself but the slides or alignment that cause it to catch or jam. Fixing this problem doesn’t require a full replacement; simple adjustments and maintenance can make your drawers glide smoothly again.
Cleaning And Lubricating Slides
Dust, dirt, and grime build up over time on drawer slides, causing resistance and stickiness. Start by pulling out the drawer and wiping down the slides with a damp cloth to remove debris. Avoid using harsh chemicals; a mild soap solution works well without damaging the metal or wood.
After cleaning, add a lubricant designed for drawer slides, like a silicone spray or a dry graphite lubricant. Avoid using oil-based lubricants as they attract more dust and can gum up the mechanism over time. Apply a thin, even layer and then open and close the drawer several times to spread the lubricant evenly.
Adjusting Drawer Alignment
Misaligned drawers often stick because the slides don’t line up properly. Check if the drawer sits crooked or if it rubs against the cabinet frame. Loosen the screws holding the slides and gently adjust their position until the drawer moves smoothly.
Sometimes, the drawer front may be loose or off-center. Tighten or reposition the screws on the drawer front to ensure it’s aligned with the cabinet face. Small tweaks can make a big difference, but don’t force the drawer if it still sticks—reassess the alignment and try adjusting again.
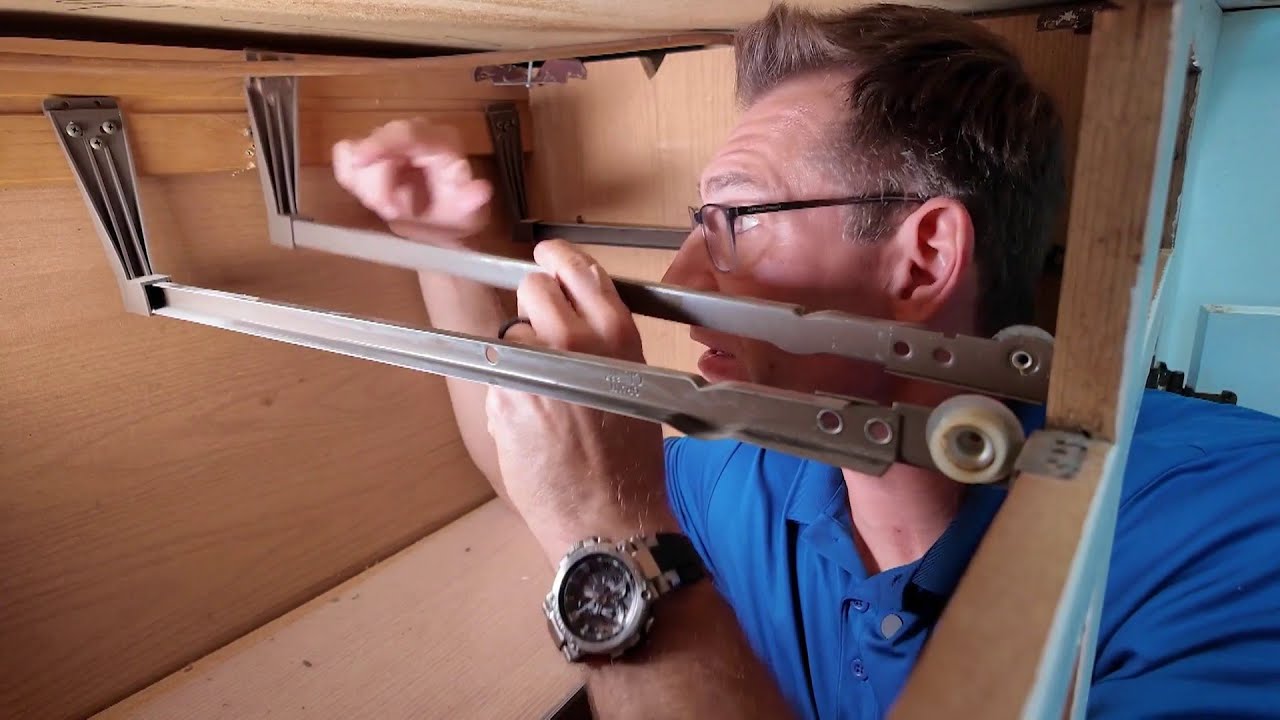
Replace Or Repair Drawer Slides
Replacing or repairing drawer slides can breathe new life into your kitchen cabinet drawers. Faulty slides cause drawers to stick, wobble, or even fall out, making your daily kitchen tasks frustrating. Knowing how to handle the slides yourself saves time and money, and gives you a smoother, more reliable drawer operation.
Removing Old Slides
Start by fully pulling out the drawer and locating the screws holding the slides in place. Use a screwdriver to carefully remove these screws from both the drawer and the cabinet frame. If the slides are glued or stuck, gently pry them loose with a flat tool to avoid damaging the wood.
Keep the removed slides for reference to match the size and type when buying replacements. Notice how the old slides attach—some come in two parts, others are a single piece. This observation will make installing new slides much easier.
Installing New Slides
Choose slides that match your drawer’s weight and size for smooth function. Before attaching, test fit the new slides to ensure alignment with the drawer and cabinet sides. Use a level to keep slides straight, preventing the drawer from sticking or tilting.
Screw the slides firmly into place, starting with the cabinet side and then the drawer. After installation, slide the drawer in and out several times to check for smoothness. If you feel resistance, loosen screws slightly and adjust until the movement feels effortless.
Reinforce Or Replace Drawer Bottom
The bottom of your kitchen cabinet drawer often takes the brunt of daily use. Over time, it may sag, crack, or even break completely. Reinforcing or replacing the drawer bottom can restore its strength and extend the life of your drawer.
Adding Support Strips
If the drawer bottom is still intact but feels weak, adding support strips underneath can make a big difference. Use thin wooden strips or metal braces cut to fit the drawer’s width. Attach them with wood glue and small nails along the underside where the bottom meets the sides.
This simple reinforcement stops sagging and distributes weight evenly. You’ll notice your drawers feel sturdier and hold heavier items without bending. Have you ever tried lifting a heavy pot only to hear your drawer creak? Adding support strips can prevent that unsettling sound.
Installing New Drawer Bottom
When the drawer bottom is damaged beyond repair, installing a new one is the best choice. Start by removing the old bottom carefully with a flathead screwdriver or chisel. Measure the drawer’s inner dimensions precisely before cutting a replacement piece from plywood or hardboard.
Lay the new bottom inside the drawer frame and secure it using wood glue and small nails or screws. Sand the edges to ensure a smooth fit and avoid splinters. You’ll gain a fresh, solid surface that feels like new and supports your kitchen essentials confidently.

Credit: www.reddit.com
Reassemble And Test The Drawer
After fixing the parts of your kitchen cabinet drawer, putting it back together is the next step. This phase is important because it shows if the repair worked well. Taking time to reassemble and test the drawer ensures it works smoothly and fits perfectly.
Reattaching Drawer To Cabinet
Start by sliding the drawer back into the cabinet tracks. Align the drawer sides carefully with the runners inside the cabinet. Push gently until the drawer is fully inside. Check the screws or clips that hold the drawer in place. Tighten any loose screws to secure the drawer firmly. Avoid forcing the drawer, as this can cause damage.
Checking Smooth Operation
Open and close the drawer several times to test its movement. Listen for any unusual sounds like squeaks or grinding. Notice if the drawer sticks or feels hard to pull out. Make sure it slides straight without tilting or wobbling. Adjust the runners or screws if the drawer does not move smoothly. A well-tested drawer saves future hassle and keeps your kitchen neat.
Tips For Preventing Future Damage
Keep drawer slides clean and free from dirt to ensure smooth movement. Avoid overloading drawers to prevent strain and damage. Tighten screws regularly to maintain stability and avoid loose parts.
Repairing a kitchen cabinet drawer is only half the battle. Once you've got your drawer running smoothly again, it's time to think about how to keep it that way. Implementing simple prevention strategies can save you time and money in the long run. Let's dive into some practical tips to ensure your kitchen cabinet drawers remain in tip-top shape for years to come.
Regular Maintenance
Regular maintenance is key to extending the life of your kitchen drawers. Check your drawers once a month for loose screws or worn-out sliders. Tighten anything that's loose and replace parts as needed. A friend of mine learned this the hard way when her drawer collapsed during a dinner party. She realized that a quick monthly check could have saved her from the embarrassment and hassle. Would you rather spend a few minutes tightening screws or hours fixing a broken drawer?
Proper Usage Practices
Proper usage practices can prevent a lot of wear and tear on your drawers. Avoid overloading them with heavy items. Instead, distribute weight evenly to prevent strain on the sliders and bottom panel. Teach your family members to open drawers gently. Slamming can cause damage over time, leading to costly repairs. Encourage everyone in your household to practice these habits for long-lasting kitchen drawers. These small changes can make a big difference. By incorporating these tips, you ensure that your kitchen cabinet drawers not only serve you well but also stand the test of time.
Frequently Asked Questions
How Do I Fix A Drawer That Won't Close Properly?
Check for obstructions inside the drawer or cabinet. Tighten loose screws on the drawer slides. Replace damaged slides if needed for smooth operation.
What Tools Are Needed To Repair Cabinet Drawers?
You’ll typically need a screwdriver, hammer, wood glue, clamps, replacement screws, and sometimes new drawer slides. These tools help fix common drawer issues efficiently.
How Can I Repair A Broken Drawer Bottom?
Remove the drawer and take out the broken bottom panel. Cut a new panel to size, apply wood glue, and clamp it until dry. This restores drawer strength and functionality.
Why Is My Kitchen Drawer Sticking Or Hard To Open?
Sticking drawers often result from warped wood or dirt buildup on slides. Clean slides and apply a silicone-based lubricant. Sand any swollen wood areas gently for smoother movement.
Conclusion
Repairing a kitchen cabinet drawer is simple with the right steps. Start by finding the problem clearly. Use basic tools and take your time. Small fixes can make your drawer work like new. This saves money and avoids buying new cabinets.
Try repairs yourself to keep your kitchen neat and functional. Remember, patience and care lead to the best results. Keep your tools ready for future fixes. A working drawer adds comfort to your daily life.