
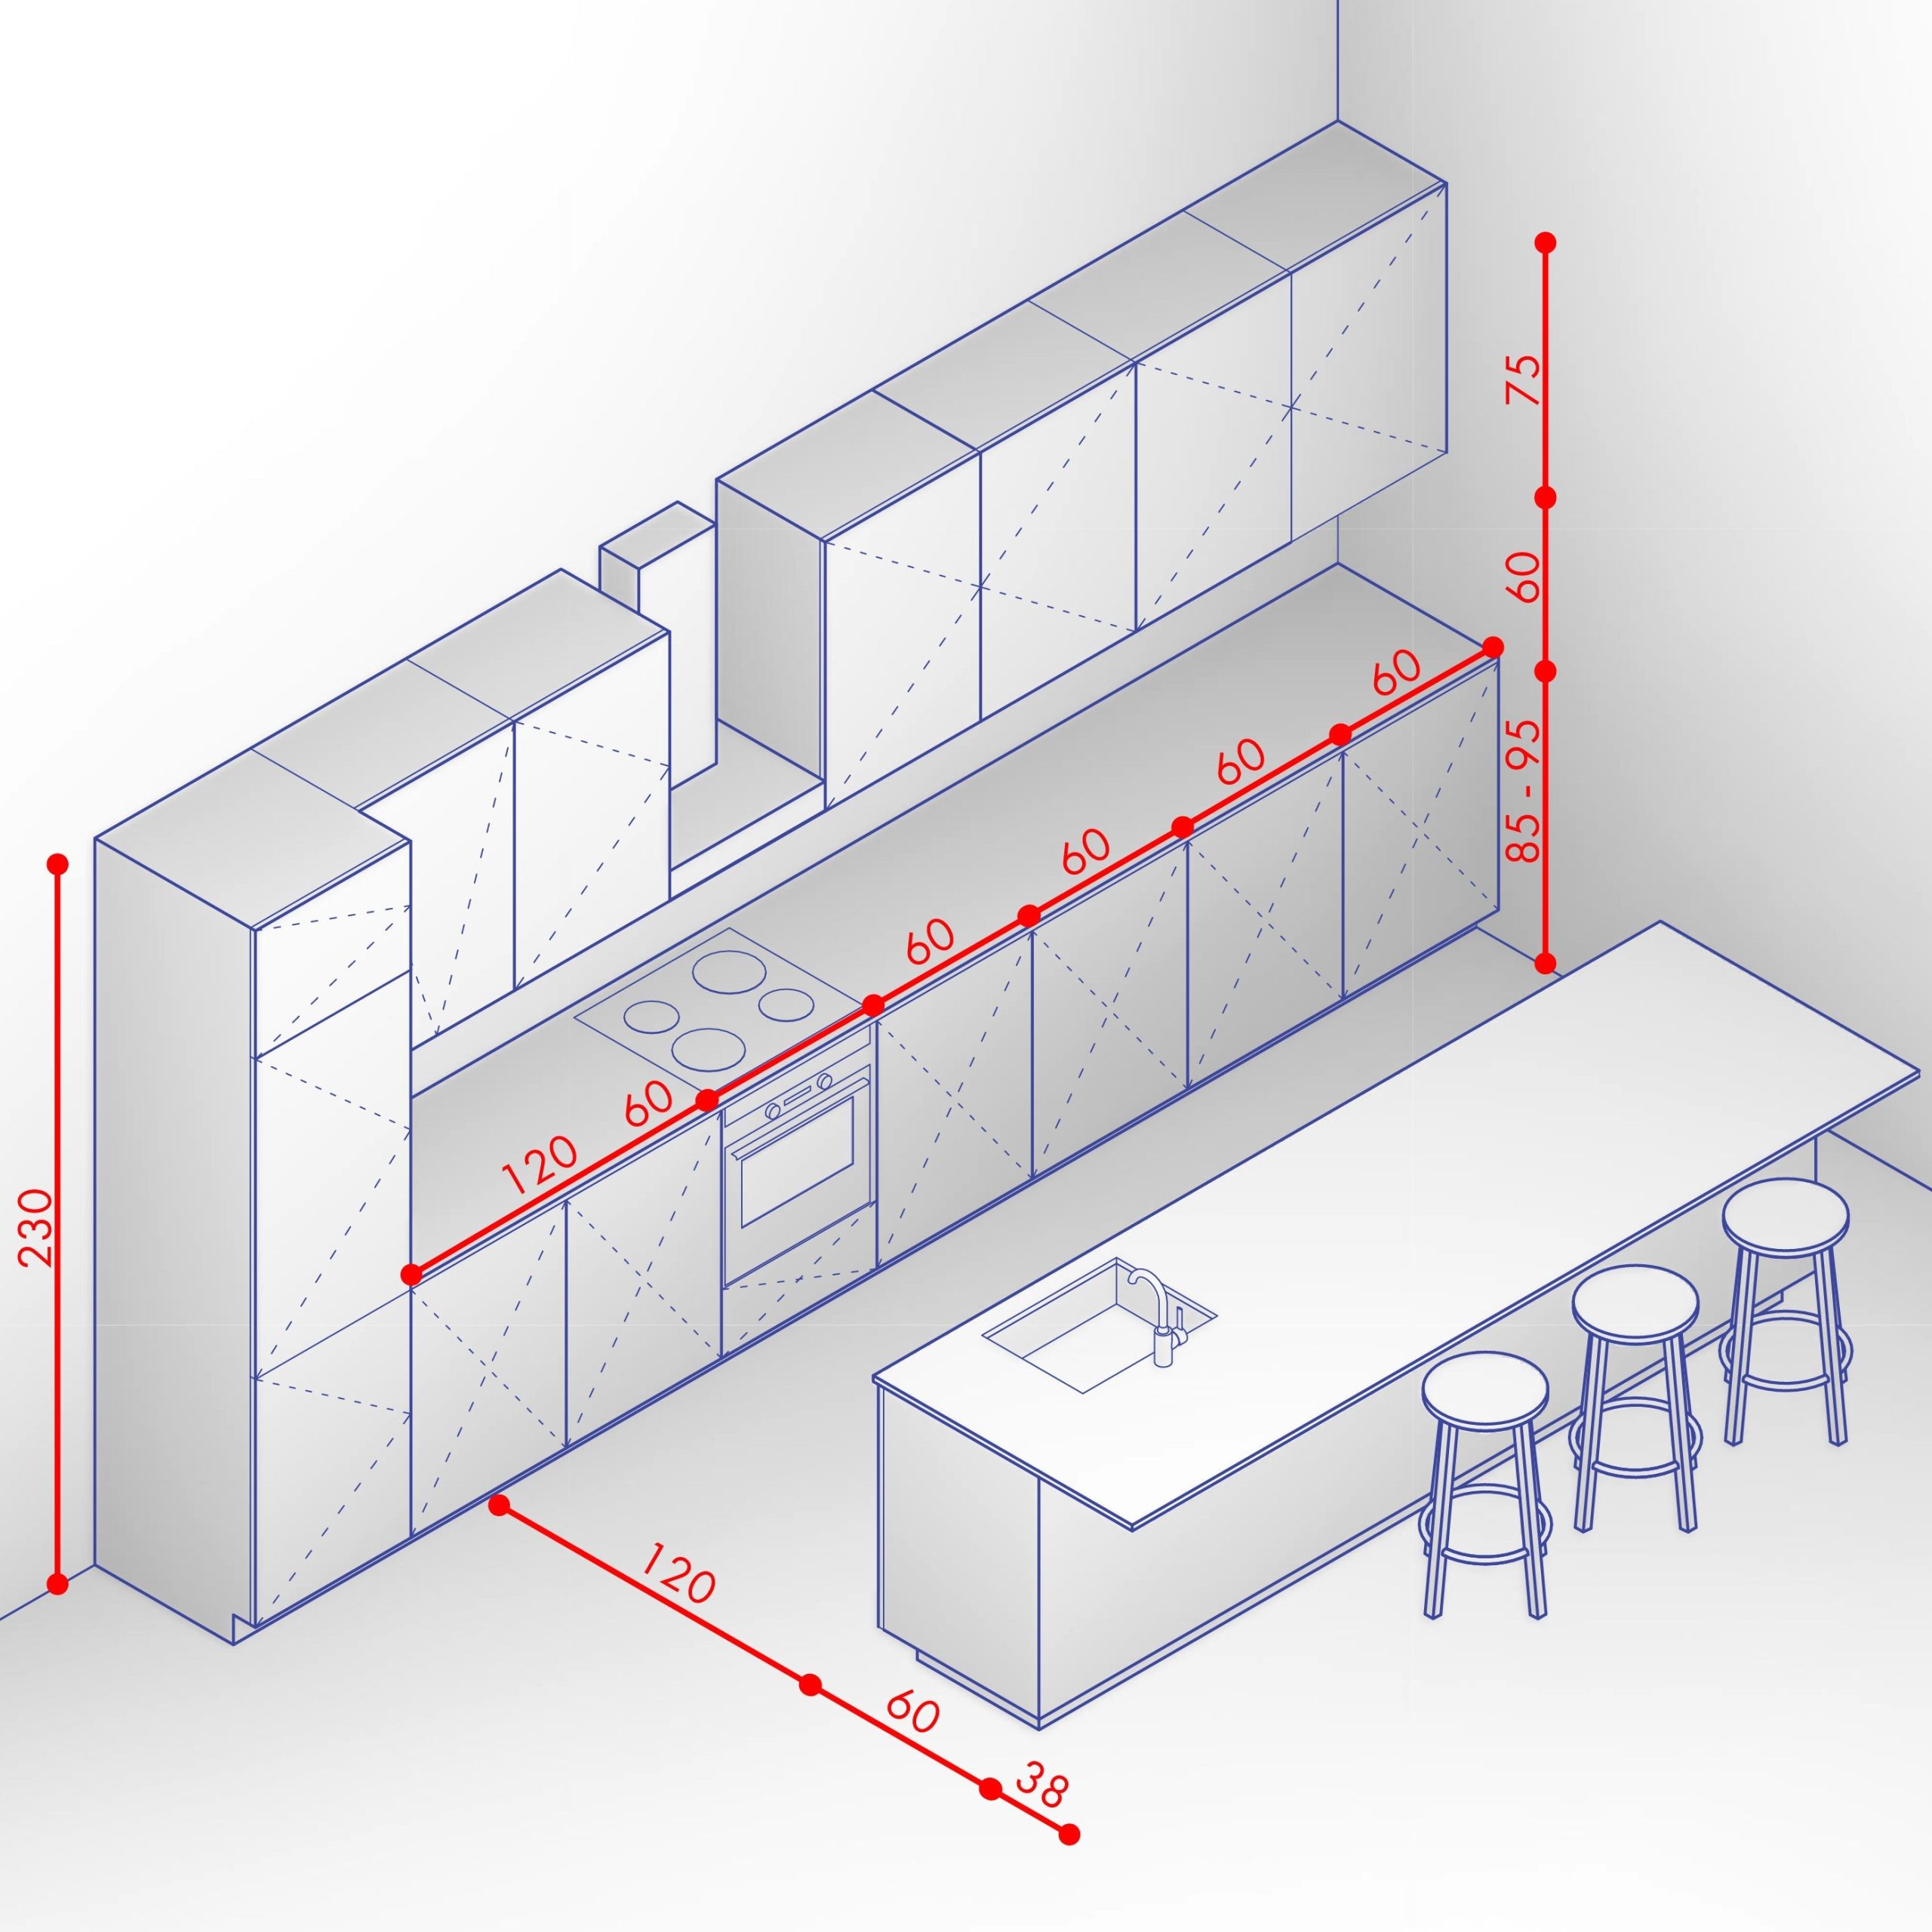
Planning your kitchen cabinet layout can feel overwhelming, but it doesn’t have to be. Imagine having a clear, simple design that fits your space perfectly and makes cooking and organizing a breeze.
You’ll learn exactly how to draw a kitchen cabinet layout step by step—no special skills needed. By the end, you’ll have a smart, practical plan that turns your kitchen into the heart of your home. Ready to create a layout that works for you?
Let’s get started.

Credit: www.freepik.com
Planning Your Kitchen Space
Planning your kitchen space is the first key to a successful cabinet layout. It helps you create a functional and comfortable kitchen. Careful planning saves time and money during installation. It also ensures your kitchen meets your daily needs.
Measuring Your Kitchen Area
Start by measuring the entire kitchen space. Measure the length and width of the walls. Note the height from floor to ceiling. Include windows, doors, and any obstacles like pipes or vents. Write down all measurements clearly. Accurate measurements prevent costly errors later.
Identifying Key Work Zones
Divide your kitchen into main work zones. Focus on these areas:
- Cooking zone: stove, oven, and microwave
- Cleaning zone: sink and dishwasher
- Storage zone: refrigerator and pantry
- Preparation zone: counter space for chopping and mixing
Each zone should be easy to access. Keep pathways clear for smooth movement.
Choosing A Layout Style
Pick a layout that fits your kitchen shape and size. Common styles include:
- Single-wall layout for small kitchens
- L-shaped layout for open corners
- U-shaped layout for ample cabinet space
- Galley layout for narrow kitchens
Consider how you move between zones. Choose a style that feels natural and efficient.
Gathering Design Tools
Before you start sketching your kitchen cabinet layout, gathering the right design tools is crucial. The tools you choose will shape how easily and accurately you can bring your ideas to life. Whether you prefer old-school pencil and paper or high-tech software, having the right materials at hand will keep your process smooth and enjoyable.
Selecting Drawing Materials
Drawing by hand gives you a tactile connection to your design. Grab graph paper to help maintain scale and proportion in your sketches. Use a good set of pencils with different hardness levels—hard pencils for light guidelines and softer ones for shading and details.
Don’t forget an eraser and a ruler or straightedge to keep your lines clean and precise. Some designers swear by colored pencils to differentiate cabinet types or materials, making the layout easier to visualize. Have you ever noticed how a simple change in line thickness can clarify your design instantly?
Using Digital Design Software
Digital tools can speed up your layout process and make revisions painless. Software like SketchUp, AutoCAD, or even free apps like Floorplanner can help you draw accurate cabinet layouts with drag-and-drop ease. They also let you experiment with different styles and configurations without starting over.
Many programs include features like 3D visualization, which can show you how your kitchen will look from every angle. This insight often reveals issues you wouldn’t catch on paper. Which software feels more intuitive to you—one with advanced features or a simple, user-friendly interface?
Sketching The Basic Layout
Begin by drawing the kitchen’s walls and marking doors and windows. Sketch basic shapes to show cabinet locations and work areas. Keep the layout simple to plan space effectively.
Sketching the basic layout of your kitchen cabinets is an exciting first step in transforming your kitchen space. This stage involves creating a visual plan that serves as the foundation for your design. With a pencil and paper, or a digital tool, you can bring your vision to life. It's crucial to focus on key elements like walls, doors, windows, and utility points. These features will dictate how your cabinets fit into the overall space. Let's dive into how you can effectively sketch the basic layout of your kitchen cabinets.
Drawing Walls And Fixed Features
Begin by accurately measuring the dimensions of your kitchen. Use a tape measure to capture the width, height, and length of each wall. Precision here is vital as it ensures your cabinets fit perfectly. Next, draw these measurements on your paper or digital tool to form the room's outline. Ensure you include any fixed features like columns or beams. These features can't be moved, so they must be accounted for in your design.
Placing Doors And Windows
Identify where the doors and windows are located in your kitchen. These are important as they affect how your cabinets can be arranged. Mark their positions on your layout, ensuring you account for door swings and window heights. This step helps you avoid placing cabinets where they would obstruct natural light or access. Consider the flow of movement as well. Will the door swing into the kitchen space? Such insights can guide your cabinet placements effectively.
Marking Plumbing And Electrical Points
Identify and mark the locations of plumbing and electrical points. These are crucial for placing sinks, dishwashers, and ovens. Use different symbols or colors to distinguish between plumbing and electrical outlets on your sketch. This clarity will help avoid costly modifications later. Think about whether you plan to add additional appliances or fixtures. Knowing where your utilities are helps in planning these potential upgrades. By focusing on these foundational elements, you're setting the stage for a successful kitchen cabinet design. Each decision you make at this stage will impact the functionality and aesthetics of your kitchen. Are you ready to see your dream kitchen take shape?

Credit: www.demetracabinetry.us
Designing Cabinet Placement
Designing cabinet placement is a key part of drawing a kitchen cabinet layout. It sets the foundation for a functional and attractive kitchen. Thoughtful placement improves storage, workflow, and overall space use. Each cabinet type serves a different purpose and needs careful positioning. Understanding where to place base, wall, and tall cabinets helps create a balanced and efficient kitchen design.
Arranging Base Cabinets
Base cabinets form the lower part of the kitchen layout. They support countertops and house sinks and appliances. Arrange these cabinets along main work areas for easy access. Leave enough space for drawers and doors to open fully. Group similar functions together, like placing pots and pans near the stove. Keep the kitchen work triangle in mind to reduce movement.
Positioning Wall Cabinets
Wall cabinets provide extra storage above countertops. Position them at a comfortable height for easy reach. Avoid placing wall cabinets too high or too low. Align them with base cabinets for a neat look. Use wall cabinets to store frequently used items like dishes and spices. Make sure they do not block windows or lights.
Including Tall Cabinets And Pantry
Tall cabinets and pantries offer vertical storage for large items. Place tall cabinets at the kitchen edges or near the refrigerator. Use them to store cleaning supplies, brooms, or bulky kitchen tools. Pantries should be easily accessible but not block kitchen flow. Tall cabinets help maximize storage in small kitchens by using vertical space.
Adding Functional Elements
Adding functional elements is key to creating a practical kitchen cabinet layout. These elements ensure the kitchen is efficient and easy to use. They help organize the space around daily tasks like cooking, cleaning, and storage.
Every functional element must fit well within the layout. Placement affects comfort and workflow. Thoughtful design improves your kitchen’s usability and appearance.
Incorporating Appliances
Include major appliances early in the layout design. Position the refrigerator, stove, and dishwasher carefully. Keep enough space around each appliance for easy access. Align appliances to create a smooth workflow. For example, place the stove near the countertop for prep work. Leave room for doors to open freely without obstruction.
Planning Countertops And Work Surfaces
Plan ample countertop space for food preparation. Use continuous surfaces to avoid gaps. Consider different heights if needed for comfort. Include space near appliances like microwaves or mixers. Think about the flow from one task to the next. Allocate spots for chopping, mixing, and plating. Durable, easy-to-clean materials work best.
Designing Storage Solutions
Design storage to keep everything organized and accessible. Use a mix of drawers, shelves, and cabinets. Store pots and pans near the stove. Place dishes and glasses close to the dishwasher. Add pull-out shelves or lazy Susans for corner cabinets. Use vertical space with tall cabinets or hooks. Group items by use to speed up kitchen tasks.
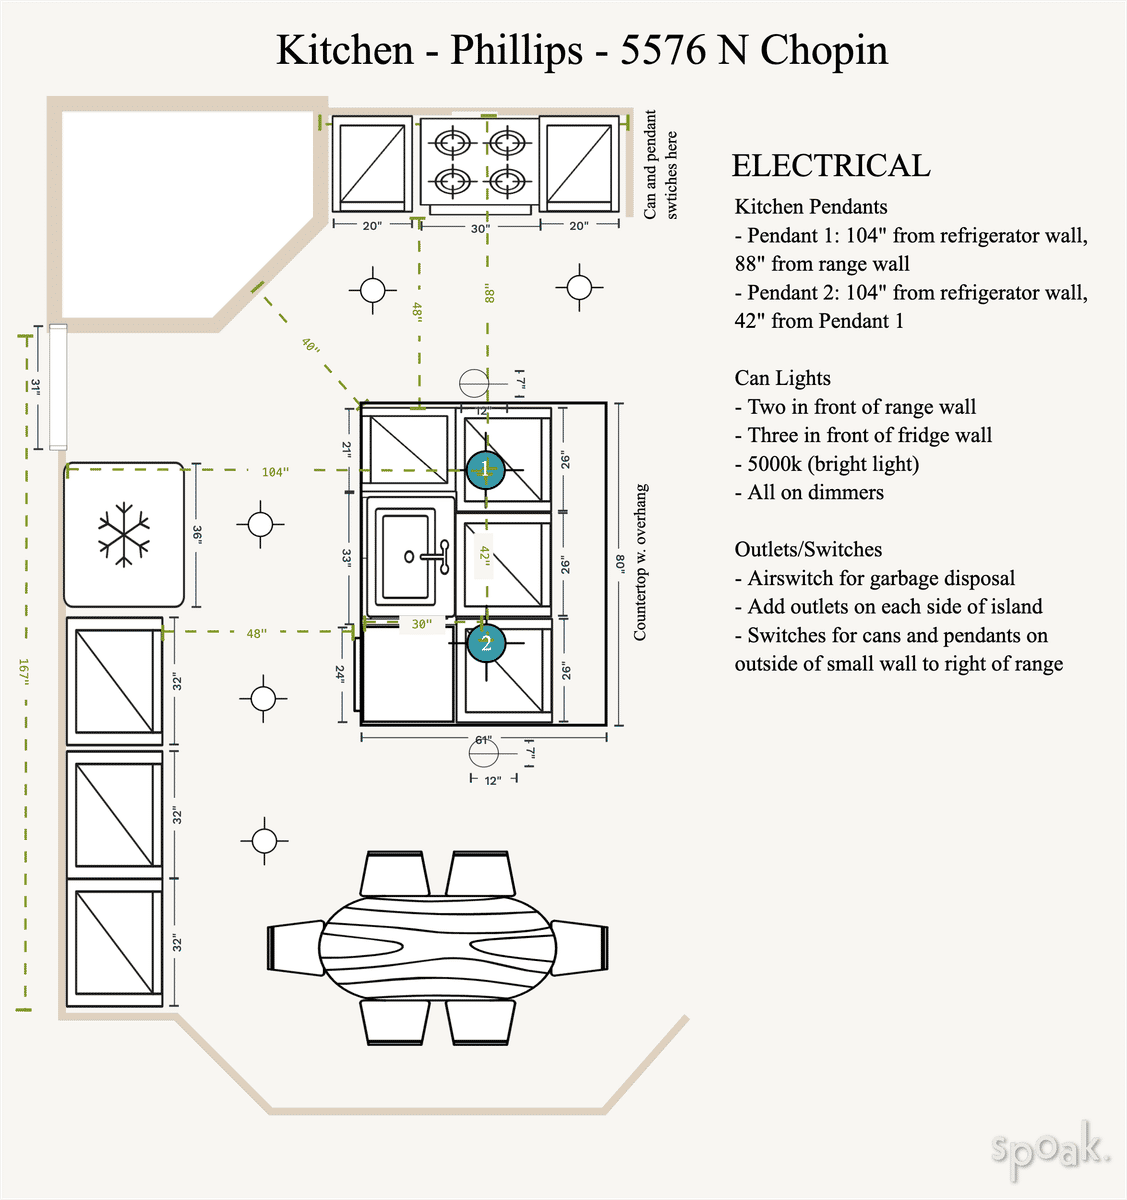
Credit: www.spoak.com
Refining Your Layout
Refining your kitchen cabinet layout is where your design starts to come alive. This stage helps you spot potential issues and make smart adjustments before the actual build. Taking time here saves frustration and ensures your kitchen works smoothly for daily life.
Checking For Workflow Efficiency
Think about how you move through your kitchen while cooking. Does your layout let you easily reach the sink, stove, and refrigerator without unnecessary steps? You want a natural flow that supports your typical kitchen tasks without causing bottlenecks.
Try mapping out your movements in the design or even walk through a mock setup. If you find yourself crossing paths too often or backtracking, consider rearranging cabinets or appliances. What feels like a small change could dramatically speed up meal prep.
Ensuring Proper Clearances
Clearances around cabinets and appliances are crucial for comfort and safety. Make sure doors and drawers can open fully without hitting walls or other fixtures. Also, leave enough space for people to move around without bumping into each other.
Check these key clearances:
- At least 30 inches of aisle space between opposing cabinets
- Minimum 20 inches clearance in front of sinks and appliances
- Consider extra room for high-traffic areas or multiple cooks
Ignoring these details can turn your dream kitchen into a cramped, frustrating space.
Adjusting For Aesthetics
While function is vital, your layout should also look balanced and inviting. Look at how cabinet sizes, shapes, and heights work together. Are tall cabinets overwhelming smaller ones? Does the design feel cluttered or empty in certain spots?
Try stepping back and viewing your plan from different angles or lighting conditions. Small tweaks like aligning cabinet tops or mixing open shelves with closed storage can improve the overall feel. Remember, your kitchen should be a place you enjoy spending time in.
Finalizing And Presenting Your Design
Finalizing and presenting your kitchen cabinet layout is where your vision turns into a clear, workable plan. This stage ensures every detail is captured accurately, making the design easy to understand for anyone involved in the next steps. Clear communication here saves time, reduces mistakes, and sets expectations for the entire project.
Creating A Detailed Floor Plan
Your floor plan is the backbone of your kitchen design. It should show the exact placement of cabinets, appliances, and walkways. Use a scale that fits your space, typically 1/4 inch equals 1 foot, to maintain accuracy.
Include key elements like doors, windows, and electrical outlets. This helps avoid conflicts later and ensures your cabinets fit perfectly. Don’t forget to check the flow of movement—can you open the fridge without bumping into the island?
Adding Dimensions And Notes
Dimensions are crucial for translating your design into reality. Label every cabinet width, height, and depth clearly. Add notes about special features, such as soft-close drawers or pull-out shelves.
Highlight critical clearances, like the space between countertops and upper cabinets. Notes can also explain material choices or installation tips. Think about what questions a builder might ask and answer them in your plan.
Preparing For Construction Or Installation
Before handing your design off, make sure it’s easy to interpret and complete. Provide a materials list with quantities and specifications. This helps avoid ordering mistakes and keeps the project on budget.
Consider creating a digital or printed copy of your plan for quick reference during installation. Communicate any unique installation challenges upfront, so your contractor can prepare. Have you double-checked your plan from the installer’s perspective?
Frequently Asked Questions
What Tools Do I Need To Draw A Kitchen Cabinet Layout?
You need graph paper, pencils, rulers, measuring tape, and a calculator. Software like SketchUp can also help create accurate layouts digitally.
How Do I Measure My Kitchen For Cabinet Layout?
Measure the length and width of walls, doorways, and windows. Note electrical outlets and plumbing locations for precise cabinet placement.
What Is The Ideal Kitchen Cabinet Layout Style?
Popular layouts include L-shape, U-shape, and galley. Choose based on kitchen size, workflow, and available space for efficiency.
How To Plan Cabinet Storage Efficiently In Layout?
Group items by use and accessibility. Include drawers for utensils, tall cabinets for pantry, and corner units for maximizing space.
Conclusion
Drawing a kitchen cabinet layout takes some planning and care. Start by measuring your space clearly and sketching your ideas. Think about where you want your cabinets and how you will use them. Keep your design simple and practical. This helps you create a kitchen that feels good and works well.
Practice your drawing steps, and you will get better each time. A good layout makes cooking and cleaning easier. Enjoy the process and take your time to plan right. Your kitchen will thank you for it.