
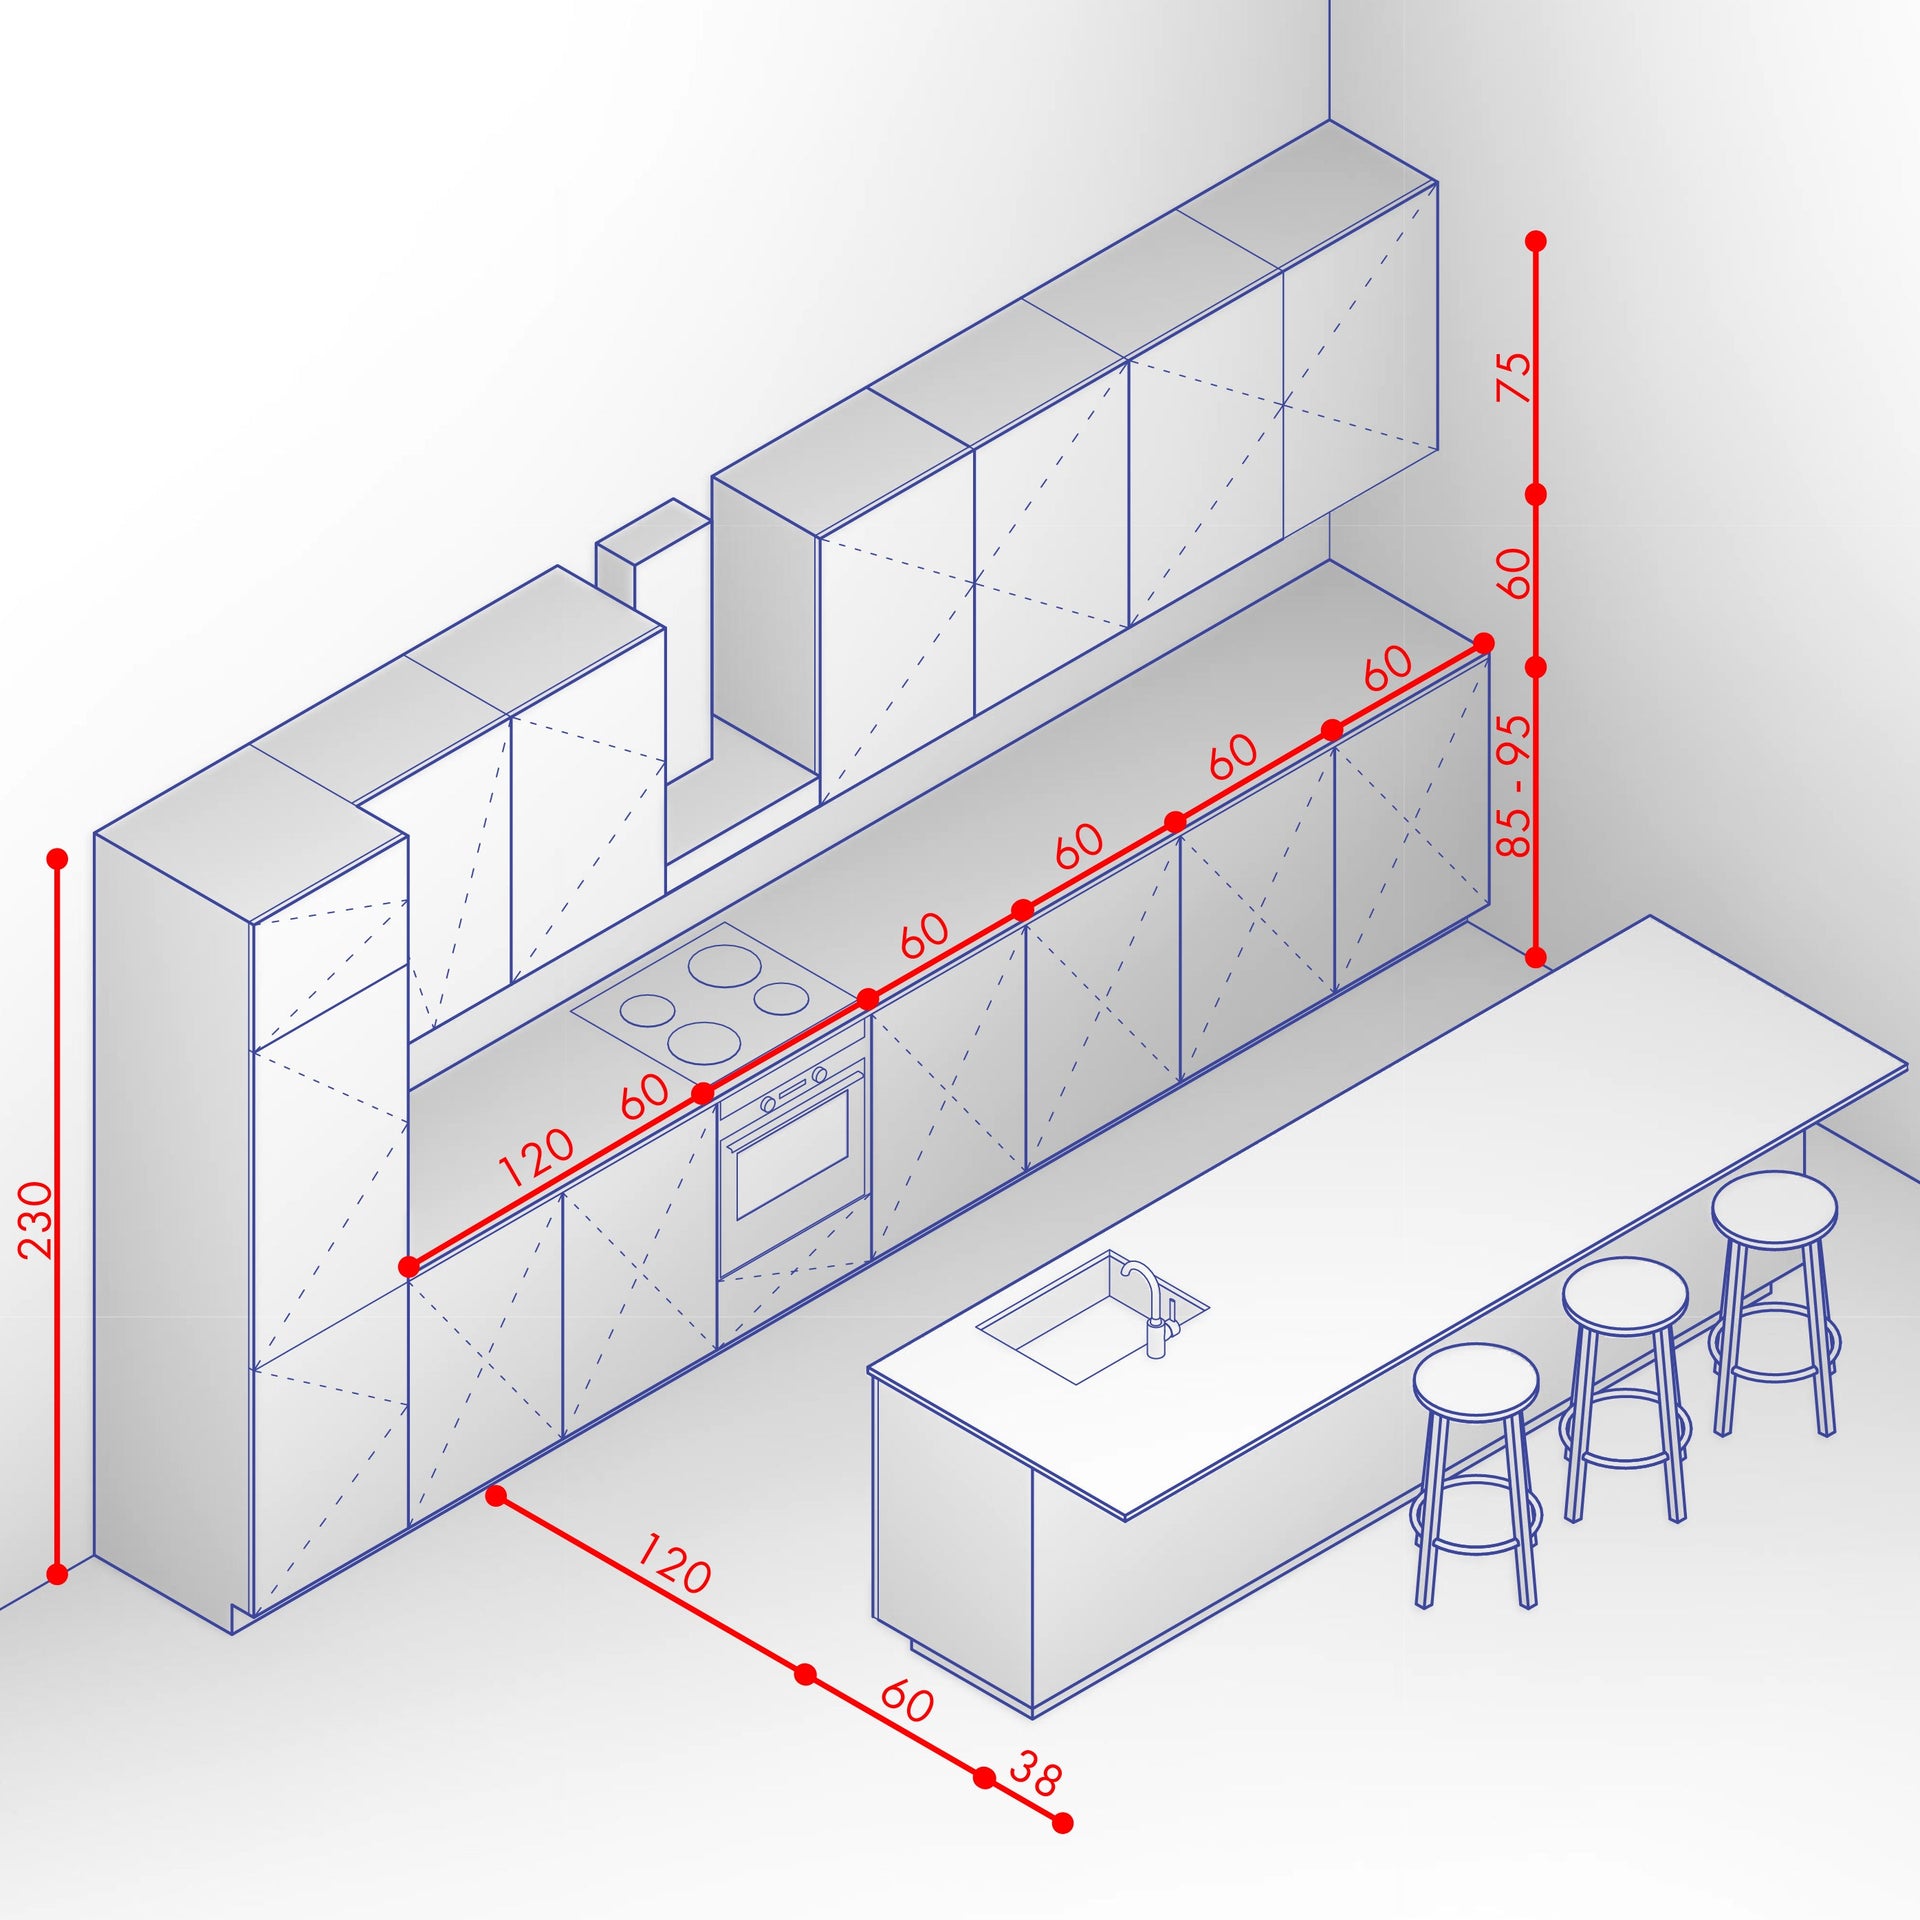
Are you ready to create the kitchen of your dreams? Drawing a kitchen plan might seem tricky, but it’s easier than you think—and it’s the first step to making your space both beautiful and functional.
When you design your kitchen layout yourself, you control how everything fits, flows, and works for your daily life. In this guide, you’ll discover simple, clear steps to draw a kitchen plan that suits your needs perfectly. Keep reading, and you’ll soon have a plan that turns your ideas into reality.
Gather Essential Tools
Gathering essential tools is the first step to drawing a clear kitchen plan. The right tools help create accurate and neat designs. They make the process easier and save time. Choose tools that suit your skills and project needs. This ensures your kitchen plan will look professional and easy to follow.
Choose Drawing Materials
Start with basic drawing materials for simple sketches. Use graph paper to keep lines straight and measurements correct. A pencil allows easy corrections. Include an eraser and ruler for precision. Colored pencils or markers can highlight areas or features. These materials keep your plan organized and readable.
Select Design Software
Design software offers advanced tools for precise kitchen plans. Many options suit beginners and experts. Choose software with easy-to-use features and templates. Look for tools that allow drag-and-drop elements like cabinets and appliances. Software with 3D views helps visualize your kitchen better. Some popular choices include SketchUp, RoomSketcher, and Sweet Home 3D.
Measure Your Space
Measuring your kitchen space accurately is the foundation of creating a practical and efficient kitchen plan. Without precise measurements, your design may face costly mistakes or awkward layouts. Taking your time and being meticulous now saves frustration later when you start placing appliances and cabinets.
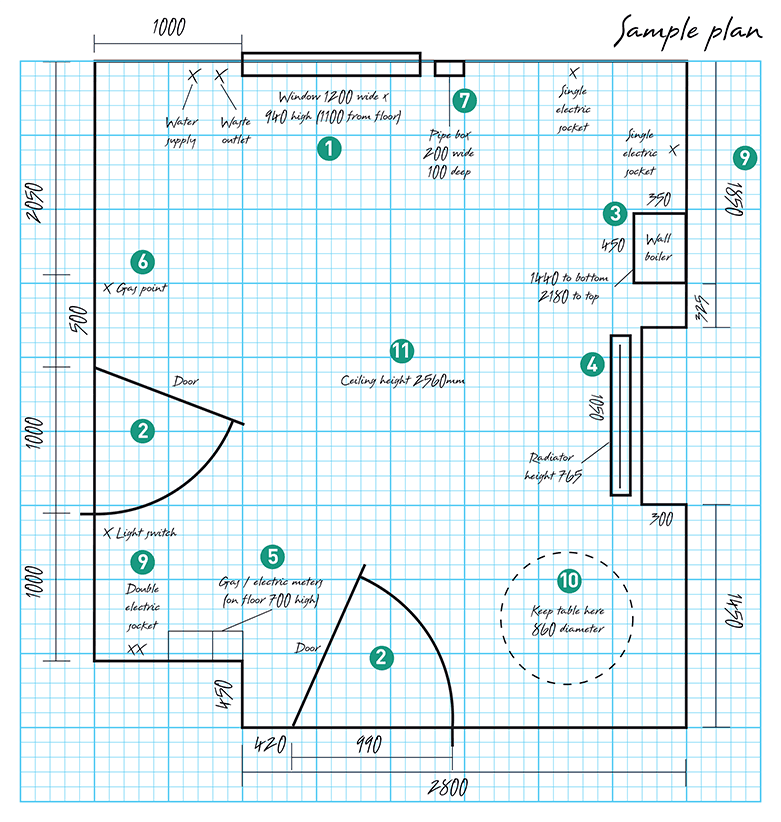
Record Wall Dimensions
Start by measuring the length and height of each wall in your kitchen. Use a tape measure and write down these numbers clearly. Don’t guess or estimate—exact numbers are crucial for fitting cabinets and counters properly.
Measure from corner to corner along the floor, then double-check by measuring at waist height to catch any uneven walls. Write down the height from floor to ceiling on every wall too. This helps you decide where to add tall units or shelves.
Note Door And Window Placement
Doors and windows impact how you arrange your kitchen. Measure their width and height, then note how far they are from adjacent corners. This ensures you don’t plan cabinets or appliances where they would block openings.
Also, check if doors swing inward or outward and if windows open in a way that affects countertop space. Small details like this can change your plan significantly. Have you ever tried to fit a fridge in front of a door and realized it wouldn't open? Avoid that hassle by measuring carefully now.
Create A Basic Floor Plan
Creating a basic floor plan is an essential step in kitchen design. It serves as a blueprint for your kitchen layout. A well-drawn plan makes the design process smoother. It helps you visualize the space clearly. Let's dive into the steps for creating a simple floor plan.
Draw Walls And Boundaries
Begin by sketching the kitchen's outline. Use graph paper for accuracy. Draw the walls to scale. Ensure you include all corners and nooks. This creates the basic structure of your kitchen plan. Remember to mark doorways and windows. These are crucial for your layout and design.
Mark Fixed Features
Identify and mark fixed features like plumbing and electrical outlets. This includes sinks, stoves, and fridges. Note their exact location on your plan. This helps in arranging appliances efficiently. Also, include any structural columns or beams. These elements impact your layout choices.

Credit: www.youtube.com
Plan The Work Triangle
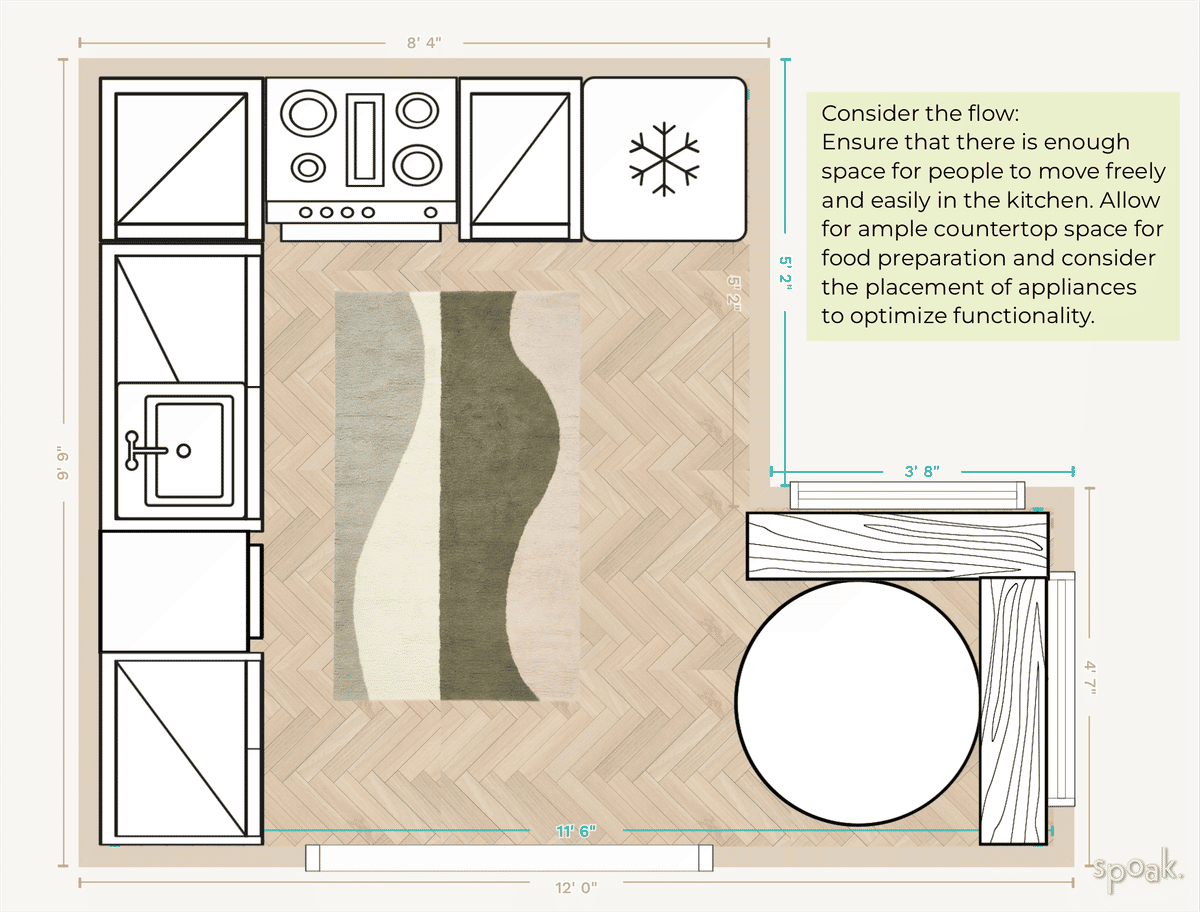
The work triangle is the heart of any kitchen plan. It connects the three main areas where most tasks happen. Planning this triangle well makes cooking easier and faster. It reduces walking and keeps everything close. The three points are the sink, stove, and refrigerator. Each point must be placed thoughtfully for smooth kitchen flow.
Position The Sink
The sink is the center of cleaning and prep work. Place it near a window if possible for natural light. Keep enough counter space on both sides for washing and chopping. The sink should be easy to reach from the stove and fridge. Avoid placing it too far away from these spots to save steps.
Locate The Stove
The stove is where cooking happens. Position it with enough space on each side for pots and pans. It should be close to the sink for easy water access. Place the stove away from doors to avoid drafts. Make sure it has good ventilation to keep the kitchen fresh.
Place The Refrigerator
The refrigerator stores all your food. Set it near the kitchen entrance to unload groceries quickly. Keep it close to the sink and stove for easy food prep. Avoid placing it too far to prevent extra walking. Make sure the fridge door can open fully without blocking pathways.
Design Storage Solutions
Designing smart storage solutions is key to an efficient kitchen plan. Storage keeps your kitchen organized and clutter-free. Good storage helps you find items quickly. It saves space and improves kitchen flow.
Plan storage based on your kitchen size and cooking habits. Use every inch wisely. Combine closed and open storage for easy access and neatness. Think about what you store most and place it within reach.
Add Cabinets And Shelves
Cabinets store dishes, pots, and utensils out of sight. Choose cabinets that fit your kitchen style and size. Use tall cabinets to maximize vertical space. Include lower cabinets with drawers for heavy items.
Open shelves display frequently used items and decorative pieces. Keep shelves neat to avoid clutter. Use sturdy materials to hold heavier objects. Mix open shelves with cabinets for variety.
Consider Pantry Space
A pantry stores dry foods and extras, freeing up cabinet space. Plan a pantry near the cooking area for convenience. Use adjustable shelves to fit different-sized containers. Add baskets or bins for small items.
Keep the pantry organized by grouping similar items together. Label shelves or containers for easy finding. Good lighting in the pantry improves visibility and usability.
Incorporate Countertops And Islands
Adding countertops and islands to your kitchen plan transforms the space into a functional and inviting area. These elements not only boost your workspace but also influence the kitchen’s flow and interaction zones. Thinking carefully about their size and placement will save you from future frustration and make cooking and socializing easier.
Determine Countertop Length
Start by measuring the wall lengths where you want your countertops. Consider the appliances and sink placement to ensure enough workspace between them. Remember, a countertop that’s too short can feel cramped, while one too long might waste valuable space.
Think about how you use your kitchen daily. Do you need more prep area or extra room for small appliances? Your countertop length should reflect these needs rather than just fitting the room.
Plan Kitchen Island Placement
Place your island where it won’t block the main kitchen pathways. Aim for at least 3 feet of clearance around all sides to allow easy movement. This space also helps when multiple people are working in the kitchen at once.
Consider what you want your island to do. Should it be a cooking station, a dining spot, or additional storage? Knowing its purpose helps you decide on size and features like seating or extra cabinets.
Add Appliances And Fixtures
Adding appliances and fixtures to your kitchen plan transforms an empty layout into a functional space. These elements shape how you’ll move around and use the kitchen daily. Careful placement ensures efficiency and comfort, so take time to think through each choice.
Include Dishwasher And Oven
Start by deciding where your dishwasher and oven will go. Placing the dishwasher near the sink simplifies loading and unloading. Think about how often you use your oven and whether you want it built-in or freestanding.
Consider the space you need to open doors fully without blocking walkways. If you enjoy cooking frequently, a double oven might be a smart addition. This allows you to bake and roast at different temperatures simultaneously, saving time.
Have you checked the clearance and ventilation requirements for your appliances? These details affect both safety and comfort in your kitchen.
Plan Lighting And Electrical Outlets
Good lighting brightens your workspace and sets the mood. Combine overhead lights with under-cabinet lighting to eliminate shadows on your countertops. Think about adding dimmers to adjust brightness for different activities.
Electrical outlets should be placed where you need them most—near counters for small appliances and conveniently around the kitchen island. Don’t forget outlets inside cabinets for hidden coffee makers or charging stations.
Ask yourself: Will you need extra outlets for holiday decorations or future gadgets? Planning ahead can save costly upgrades later.
Review And Adjust Layout
Reviewing and adjusting your kitchen plan layout ensures the space works well. It helps avoid problems during cooking and daily use. Small changes can make a big difference in comfort and function.
Check For Workflow Efficiency
Think about how you move between the sink, stove, and refrigerator. This area is called the "work triangle." Keep these three spots close but not crowded. The path should be clear and direct.
Look for any obstacles that slow you down. Cabinets, islands, or appliances should not block movement. Make sure you can open doors and drawers easily. The goal is smooth, quick steps while cooking.
Ensure Adequate Clearance
Measure spaces between counters, appliances, and furniture. At least 36 inches of clearance is best for walkways. Around work areas, 42 to 48 inches allows two people to move comfortably.
Check if doors and drawers have enough room to open fully. Avoid cramped spots that feel tight or unsafe. Proper clearance improves safety and makes the kitchen more pleasant.
Finalize And Save Your Plan
Finalizing your kitchen plan is the last and most important step. It ensures your design is clear and ready for use. Saving your work protects your ideas from loss. This phase focuses on making your plan detailed and easy to share.
Create Detailed Drawings
Make sure every part of your kitchen is drawn with care. Include measurements for walls, counters, and appliances. Draw electrical outlets and plumbing points clearly. Use symbols to mark fixtures and fittings. This helps contractors and designers understand your plan easily. Check for any missing details before moving on.
Export Or Print Layout
Save your kitchen plan in common file formats like PDF or JPEG. This makes sharing simple with builders or family. Printing a hard copy allows for quick reference during construction. Choose the best scale for printing to keep details readable. Keep backup copies on your computer or cloud storage for safety.
Credit: www.staxtradecentres.co.uk
Credit: www.spoak.com
Frequently Asked Questions
What Tools Are Needed To Draw A Kitchen Plan?
You need graph paper, pencil, ruler, measuring tape, and kitchen design software. These tools help create precise and clear kitchen layouts.
How Do I Measure My Kitchen For A Plan?
Measure wall lengths, window and door locations, and appliance spaces. Accurate measurements ensure your plan fits perfectly and avoids costly errors.
What Key Elements Should A Kitchen Plan Include?
Include cabinets, appliances, sink, countertops, and work zones. Proper placement ensures functionality, efficient workflow, and comfortable kitchen use.
How Can I Optimize Space In A Kitchen Plan?
Use smart storage solutions, compact appliances, and multi-functional furniture. This maximizes space and improves kitchen organization and usability.
Conclusion
Drawing a kitchen plan helps organize your space clearly. Start with simple shapes and add details step by step. Think about where appliances and cabinets should go. Measure carefully to avoid mistakes later. A good plan saves time and money during remodeling.
Take your time and keep the design practical. You can change the plan as you go along. Planning well makes cooking and cleaning easier. Keep your kitchen functional and comfortable. Drawing a kitchen plan is a smart first step to a better home.