
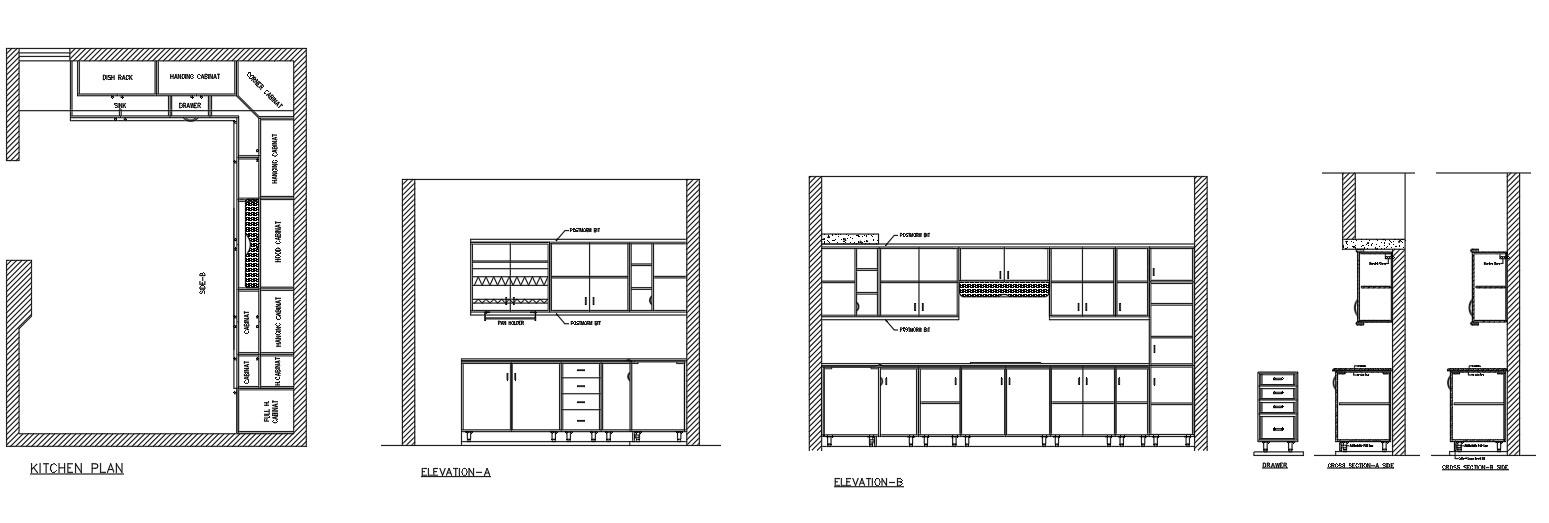
Are you ready to bring your kitchen design ideas to life with precision and ease? Learning how to draw kitchen cabinets in AutoCAD can save you time, reduce errors, and help you visualize your space like a pro.
Whether you’re a beginner or looking to sharpen your skills, this guide will walk you through each step clearly and simply. By the end, you’ll feel confident creating detailed, accurate cabinet drawings that impress clients or guide your own remodeling project.
Let’s dive in and turn your kitchen plans into reality!

Credit: cadbull.com
Preparing Your Workspace
Preparing your workspace is a crucial first step in drawing kitchen cabinets in AutoCAD. A clean and organized workspace helps you work faster and avoid errors. Setting up the right units, organizing layers, and choosing a proper template sets the foundation for a smooth design process.
Setting Up Units And Scale
Start by setting the drawing units to match your project needs. Use inches or millimeters based on your region or client requirements. Correct units ensure accurate measurements and avoid confusion.
Set the scale to fit the size of your kitchen cabinets. This helps you draw details clearly and keeps proportions correct. Use commands like UNITSin AutoCAD to adjust settings easily.
Organizing Layers
Layers keep your drawing neat and manageable. Create separate layers for cabinet frames, doors, hardware, and dimensions. Assign different colors and line types to each layer. This makes it easier to edit specific parts without affecting others.
Turn layers on or off as needed to focus on details. Use the LAYERcommand to create and manage layers efficiently.
Choosing The Right Template
Pick a template suited for cabinet design to save time. Templates often come with predefined layers, units, and title blocks. This reduces setup work and keeps your drawings consistent.
Use industry-standard templates or customize your own. Save your template for future projects to keep your workflow smooth and professional.

Credit: cadbull.com
Basic Cabinet Dimensions
Understanding basic cabinet dimensions is key to drawing kitchen cabinets accurately in AutoCAD. Cabinets come in standard sizes that fit most kitchens. Knowing these sizes helps you create precise and functional kitchen layouts.
Correct dimensions ensure your cabinets fit well in the available space. They also help maintain proper clearance for doors, drawers, and appliances. Accurate measurements avoid costly mistakes during installation.
Standard Sizes For Cabinets
Kitchen cabinets follow typical dimensions for width, height, and depth. These sizes help maintain consistency and ease in design.
- Base Cabinets:Usually 24 inches deep and 34.5 inches high without countertop.
- Wall Cabinets:Typically 12 inches deep and 30 to 42 inches high.
- Tall Cabinets:Range from 84 to 96 inches high and 24 inches deep.
- Widths:Common widths include 9, 12, 15, 18, 24, 30, and 36 inches.
These dimensions allow flexibility in designing kitchens of various sizes.
Measuring Your Kitchen Space
Start by measuring the length and height of walls where cabinets will go. Use a tape measure and write down each measurement clearly.
Measure the distance between corners, windows, and doors. Check for obstacles like pipes or vents that may affect cabinet placement.
Double-check all measurements to avoid errors. Precise measurements help you draw cabinets that fit perfectly in AutoCAD.
Drawing Cabinet Outlines
Start by outlining the cabinet shapes using simple lines and rectangles in AutoCAD. Keep measurements accurate to fit your kitchen space perfectly. Use layers to separate different cabinet parts for easy editing.
Drawing cabinet outlines in AutoCAD is a foundational skill for anyone looking to design a kitchen that’s both functional and aesthetically pleasing. This process not only involves creating the structure of the cabinets but also detailing the doors and drawers. Whether you’re a seasoned designer or a DIY enthusiast, understanding how to outline your cabinets accurately is crucial for bringing your kitchen vision to life.
Creating The Cabinet Box
Begin by setting up your AutoCAD workspace to scale, ensuring precision in your design. Select the rectangle tool to outline the base of your cabinet. Remember, the dimensions you choose should reflect the actual size you need in your kitchen space. Next, draw the vertical lines to represent the cabinet sides. These lines give a three-dimensional perspective, helping you visualize the cabinet's depth. Ensure that your lines are straight and well-aligned for a professional finish. Once your box is complete, use the offset tool to create thickness for the cabinet walls. This step is vital for understanding the material space and ensuring structural integrity in your design.
Adding Doors And Drawers
With the cabinet box in place, it's time to add doors and drawers. Start by deciding on the style and size of the doors. Use the rectangle tool to sketch out the door outlines on the front face of the cabinet. Make sure there's an even gap between doors for a clean look. Next, draw the drawer outlines. Consider the functionality—do you need multiple small drawers or a few large ones? This decision impacts both design and usability. Ensure your lines are clear and distinct to avoid confusion later in the design process. Don't forget to include hardware placements. Small circles can represent knobs or handles. This detail, while minor, adds realism to your design and aids in the construction phase. Have you ever wondered how those seemingly small details can transform a simple drawing into a detailed blueprint? By focusing on precision and functionality, you ensure that your AutoCAD drawings are not just visually appealing but also practical and ready for construction.
Adding Details And Features
Adding details and features to your kitchen cabinet drawings in AutoCAD transforms simple outlines into realistic, functional designs. These elements not only enhance visual appeal but also provide crucial information for construction and installation. Paying attention to these finer points can make your drawings stand out and communicate your ideas more clearly.
Incorporating Shelves
Shelves are a key part of kitchen cabinets, and adding them accurately helps define storage space. Use the offsetcommand to create evenly spaced shelves inside the cabinet frame. Adjust the thickness to match real-world materials—usually around 18mm or 3/4 inch.
Try layering the shelves with different line types or shades to distinguish them from the cabinet walls. This makes your drawing easier to read at a glance. Have you considered how adjustable shelves might change your design? Drawing holes or slots for shelf pins can show this flexibility clearly.
Drawing Handles And Knobs
Handles and knobs bring personality to your kitchen cabinet design. Use simple shapes like rectangles or circles to represent these hardware pieces. Keep their size proportional to the cabinet doors or drawers; too large or too small can throw off the balance.
You can create blocks for handles to reuse them across multiple cabinets, saving time. Experiment with different handle styles by changing the shape or adding small details like screw holes. What style fits your kitchen theme—modern bars or classic round knobs?
Adding Hinges And Hardware
Hinges are essential for door functionality and should be included in your drawing for accuracy. Draw them as small rectangles or circles placed along the cabinet door edges where hinges typically sit. If you want to be precise, use manufacturer's dimensions for popular hinge types.
Don’t forget other hardware like drawer slides or magnetic catches if your design requires them. Including these details can help avoid confusion during installation. How much detail is enough for your project—basic shapes or fully detailed hardware?
Using Blocks And References
Using blocks and references in AutoCAD can save you a lot of time when drawing kitchen cabinets. Instead of redrawing each cabinet from scratch, you create reusable components that you can place multiple times. This approach keeps your drawings consistent and easy to update.
Creating Reusable Cabinet Components
Start by designing a single cabinet with all its details—doors, shelves, handles, and dimensions. Once you're happy with the design, convert it into a block. This means grouping the elements so you can insert the entire cabinet as one object later.
Think about the different cabinet types you'll need: base cabinets, wall cabinets, tall pantry units. Create separate blocks for each type. This way, you can mix and match while maintaining uniformity across your project.
Have you ever spent hours fixing the same mistake on multiple cabinets? Using blocks means you only fix it once inside the block definition, and every instance updates automatically. This can prevent headaches and save hours on revisions.
Inserting Blocks Efficiently
Once your blocks are ready, insert them where needed using the “Insert” command or the tool palette. Use the “Copy” command to place multiple instances quickly. Pay attention to alignment and orientation to keep your layout neat.
Use the “Scale” and “Rotate” options during insertion to fit cabinets into odd spaces without redrawing. But be cautious—scaling blocks disproportionately can distort details, so uniform scaling is best.
Organize your blocks into folders or libraries if you work on multiple projects. This saves you from hunting for files and speeds up your workflow. How much time could you save by having your most-used cabinet blocks just a click away?
Annotating Your Drawing
Annotating your kitchen cabinet drawing in AutoCAD transforms a simple sketch into a clear, professional blueprint. Without proper annotations, even the best designs can confuse contractors or clients. Adding precise details helps communicate your ideas effectively and ensures your vision is built accurately.
Adding Dimensions
Dimensions are the backbone of your drawing. They tell everyone the exact size of each cabinet and space between them. Use AutoCAD’s dimension tools to add length, width, and height measurements directly on your drawing.
Keep dimensions clear and avoid overcrowding your layout. Place measurements outside the cabinet outlines to maintain readability. You can also use different dimension styles to highlight critical sizes, such as countertop height or cabinet depth.
Think about what would confuse you if you were building the cabinets. Would you want to see the width of each drawer or the spacing between shelves? Adding these details saves time on-site and reduces costly mistakes.
Labeling Cabinet Types
Label each cabinet clearly to identify its type and function. Use text labels like “Base Cabinet,” “Wall Cabinet,” or “Tall Pantry” right next to the corresponding drawing. This helps everyone quickly understand the layout without guessing.
Consider adding tags for special features such as “Soft-close drawers” or “Pull-out shelves.” These notes give contractors and installers extra context that shapes how they approach the project. You can use leader lines in AutoCAD to connect labels neatly to their cabinets.
Have you ever struggled to figure out what a cabinet was supposed to be just from the drawing? Clear labeling prevents this confusion and improves communication between you and your team. It also makes revisions easier later on because you can quickly spot which cabinet needs changes.
Finalizing And Exporting
Finalizing and exporting your kitchen cabinet drawing in AutoCAD is a crucial step. It ensures your design is clear and ready to share or print. This phase helps avoid errors and presents your work professionally.
Checking For Accuracy
Review every detail of your drawing carefully. Verify cabinet dimensions match your plan. Confirm door and drawer placements are correct. Check that lines and layers are clean and organized. Use AutoCAD’s measurement tools to double-check sizes. Make sure all text and labels are legible and properly positioned. Correct any mistakes before moving on. This saves time and prevents confusion later.
Exporting To Pdf Or Other Formats
Select the best format to share your drawing. PDF is popular for easy viewing and printing. AutoCAD also supports DWG, DXF, and image formats. Choose the format based on your needs or client requests. Set the paper size and layout in the export settings. Adjust the resolution for clear print quality. Preview the export before saving. Save your file with a clear and descriptive name. This helps keep your projects organized and easy to find.

Credit: cadbull.com
Frequently Asked Questions
How Do I Start Drawing Kitchen Cabinets In Autocad?
Begin by setting up your drawing units and layers. Use precise measurements for cabinet dimensions. Start with basic shapes like rectangles to outline cabinet boxes before detailing.
What Autocad Tools Help Design Kitchen Cabinets Faster?
Use tools like Line, Rectangle, Offset, and Trim for quick drawing. Blocks and Layers also speed up repetitive tasks and organization in cabinet design.
How To Add Cabinet Details In Autocad Drawings?
Add shelves, doors, and handles using Line and Polyline tools. Use Hatch for textures and Dimensions for accurate measurements. Detail enhances clarity and realism.
Can I Customize Kitchen Cabinet Sizes In Autocad?
Yes, you can set exact dimensions using the Properties or Dimension tools. This ensures your cabinets fit specific kitchen layouts perfectly.
Conclusion
Drawing kitchen cabinets in AutoCAD becomes easier with practice. Start with basic shapes and add details step by step. Use layers and tools to keep your work neat. Remember to measure carefully for accurate designs. Keep practicing to improve your skills and speed.
Soon, creating cabinet drawings will feel natural. This method helps you plan kitchens clearly and professionally. Try these tips in your next project and see the difference. Simple steps lead to great results in AutoCAD.