

Are you ready to transform your kitchen ideas into a clear, simple plan? Drawing your kitchen layout on graph paper is a smart and easy way to visualize how everything will fit perfectly.
Whether you’re remodeling or designing from scratch, this step helps you avoid costly mistakes and creates a space that works for you. In this guide, you’ll discover how to turn your vision into a precise, easy-to-follow drawing that anyone can understand.
Keep reading, and by the end, you’ll have the confidence to map out your dream kitchen with ease.
Tools Needed
Before you start sketching your kitchen layout, gathering the right tools is crucial. Having the proper materials makes the process smoother and more precise. It also helps you visualize your space better and avoid costly mistakes later.
Choosing The Right Graph Paper
Pick graph paper with a grid size that matches your scale. A common choice is paper with 1/4 inch squares, which can represent 1 foot in your kitchen. This makes it easier to measure and draw accurately.
Consider whether you want standard square grids or isometric paper for a 3D perspective. Square grids work best for floor plans, while isometric can help when thinking about cabinet heights or shelving.
Don’t underestimate the value of quality paper. Thicker sheets prevent smudging and tearing, especially if you erase and redraw often. Have a few sheets handy; you’ll want to try different layouts.
Essential Drawing Instruments
Start with a sharp pencil—it’s easier to erase and adjust your plan as you go. Mechanical pencils with fine leads offer consistent lines without sharpening hassles.
A good ruler or a scale ruler helps you keep your lines straight and measurements precise. If you’re serious about accuracy, a triangular scale ruler with multiple measurement options is worth the investment.
Don't forget an eraser that cleans well without damaging the paper. A small, pointed eraser lets you correct details without disturbing your entire drawing.
You might also want colored pencils or markers to highlight different zones or appliances. This adds clarity and makes your layout more readable at a glance.
Measuring Your Kitchen
Measuring your kitchen accurately is the first key step in drawing a reliable kitchen layout on graph paper. Precise measurements ensure your design fits the actual space and helps avoid costly mistakes. Take your time to measure all parts of the kitchen carefully. Use a tape measure and a notepad to jot down numbers clearly. Double-check each measurement to guarantee accuracy.
Taking Accurate Dimensions
Start by measuring the length and width of the kitchen walls. Measure from corner to corner, keeping the tape straight and level. Write down each wall’s length in feet or meters, depending on your preference. Include the height of the walls if you want to add cabinets or shelves later. Measure twice to confirm the numbers are correct. This step lays the foundation for your entire layout.
Recording Door And Window Placements
Note the exact location of doors and windows on each wall. Measure from the corner of the wall to the edge of the door or window frame. Record the width and height of each opening too. Mark which way doors swing open to avoid blocking key areas in your plan. This information helps you place appliances and furniture without obstruction. Clear door and window details lead to a practical kitchen design.
Setting The Scale
Set the scale by deciding how much space each square on the graph paper will represent. This helps keep your kitchen layout accurate and easy to follow. Choose a simple scale like one square equals one foot for clear measurements.
Setting the scale is a crucial step when drawing a kitchen layout on graph paper. It ensures that every inch of your actual kitchen space is accurately represented on paper. By establishing a clear scale, you make your drawing precise and easy to understand, which is essential for both planning and execution.
Converting Real Measurements To Graph Units
Start by measuring your kitchen space. Use a tape measure to get the dimensions of walls, counters, and any appliances. Convert these real-world measurements into graph units by deciding how much each square on the graph paper will represent. For example, if each square represents one foot, a 10-foot wall would be drawn as 10 squares. This conversion is key in maintaining accuracy in your layout. Keep a calculator handy for swift conversions and jot down these calculations for reference.
Marking Scale On Paper
Once you have your scale figured out, mark it clearly on your graph paper. Draw a small box and label it with your chosen scale, such as "1 square = 1 foot." This will serve as a constant reminder as you draw. Ensure that your scale is easily visible so you don't have to flip back through pages or notes to find it. A clear scale will prevent mistakes and save you time in the long run. By setting the scale thoughtfully, you bring precision and clarity to your kitchen layout. Have you ever realized how something so simple can make your planning so much smoother?
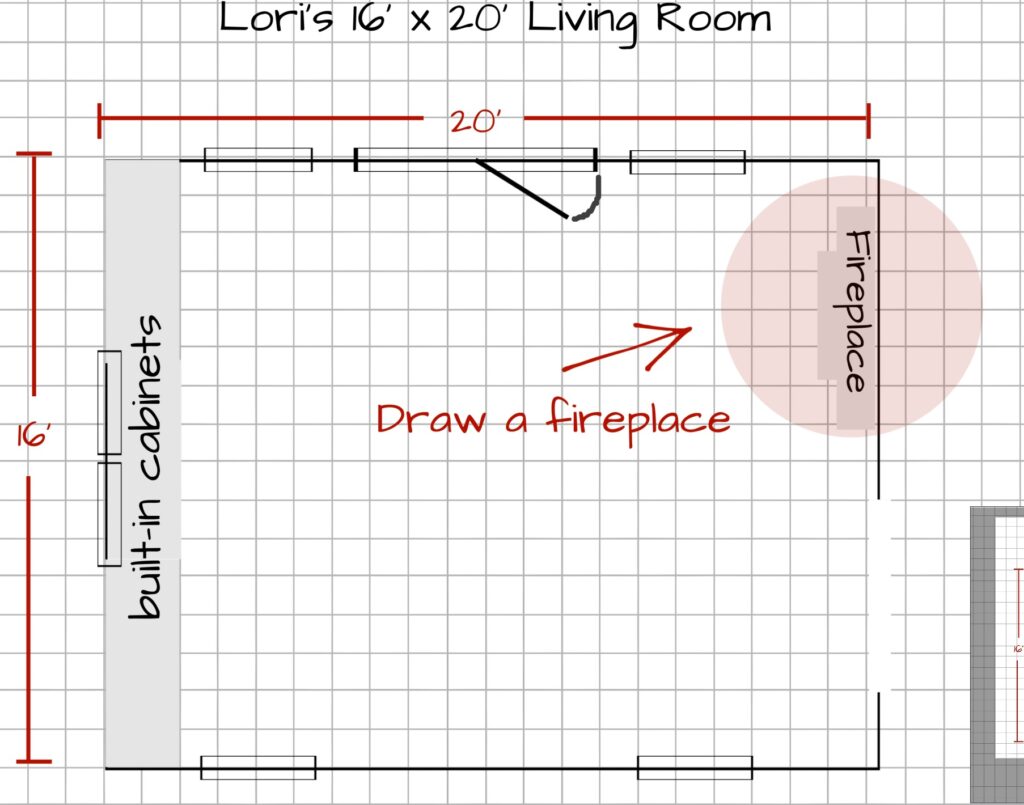
Credit: www.ourrepurposedhome.com
Drawing The Walls
Drawing the walls accurately is the first key to a clear kitchen layout on graph paper. Walls define the space and set boundaries for your design. Marking them carefully helps visualize the room size and shape. It also guides where cabinets, appliances, and doors will fit best. Precision here saves time later and avoids costly mistakes.
Outlining The Perimeter
Start by drawing the outer walls of the kitchen. Use the squares on the graph paper to keep lines straight and proportional. Each square can represent a set measurement, like one foot or one meter. Measure the actual kitchen space before drawing. Then, transfer these measurements onto the paper. Draw bold lines around the edge to show the room’s outer limits clearly.
Including Interior Walls And Features
Next, add any interior walls inside the kitchen space. These may separate the kitchen from other rooms or create pantry areas. Mark these walls using thinner lines than the outer perimeter. Include fixed features like columns or half walls as well. Show doorways and windows by leaving gaps or drawing breaks in the walls. This gives a complete picture of the room’s structure.
Adding Fixtures
Adding fixtures to your kitchen layout on graph paper brings your design closer to reality. This step helps you visualize how your space will function daily. It’s where you decide where everything fits and flows, turning empty lines into a practical kitchen.
Positioning Cabinets And Appliances
Start by marking the locations of your cabinets and major appliances. Think about how you use your kitchen—do you need more storage near the prep area? Place cabinets where they make your cooking and cleaning easier.
When positioning appliances like the refrigerator, oven, and dishwasher, consider their door swings and how much clearance they need. Measure these carefully on your graph paper to avoid cramped spaces. Have you noticed how a fridge door opening into a walkway can make the space feel tight? Avoid that by planning ahead.
- Place tall cabinets or pantry units near the fridge for easy access.
- Keep the oven and stove close to prep counters but away from high traffic zones.
- Allow enough space between appliances to move comfortably.
Marking Sinks, Stoves, And Counters
Sinks and stoves are the heart of your kitchen workflow. Mark them clearly on your graph paper using symbols or color codes to distinguish each fixture. This helps you check if there’s enough counter space between and around them for prep work.
Consider the classic kitchen triangle—the sink, stove, and fridge should form a smooth working path. If your layout breaks this triangle, ask yourself how that will affect your cooking routine. Can you move easily between these points without bumping into obstacles?
| Fixture | Recommended Clearance | Common Placement Tips |
|---|---|---|
| Sink | 36 inches in front | Near dishwasher and trash bin for easy cleanup |
| Stove | 30 inches on each side | Close to counter space for placing utensils and ingredients |
| Counters | At least 24 inches between appliances | Provide enough workspace for chopping, mixing, and plating |
Don’t forget to add small details like space for a cutting board or a spot to rest hot pans. These little considerations can make a big difference in your kitchen’s usability.
Labeling And Final Touches
Labeling and final touches bring clarity and precision to your kitchen layout drawing. This step ensures every detail is easy to read and understand. Proper labeling makes your plan useful for builders, designers, or yourself during renovation.
Clear notes and exact dimensions prevent mistakes and confusion. These final adjustments help you visualize the space accurately. Taking time here saves effort later.
Adding Notes And Dimensions
Write down the names of each kitchen area and appliance. Label counters, sinks, stoves, and cabinets clearly. Use simple words like "Fridge," "Sink," or "Island."
Mark measurements next to walls and fixtures. Include lengths and widths in feet or meters. Use arrows or lines to connect measurements to the correct parts.
- Note window and door positions
- Label electrical outlets and light switches
- Indicate appliance sizes if known
Keep your handwriting neat and consistent. Use a pencil for notes to allow corrections later.
Checking For Accuracy
Double-check all measurements against your initial data. Confirm that doors and windows align properly on the grid. Ensure appliances fit comfortably with enough walking space.
Compare your drawing to the room’s real dimensions. Look for any missing elements or unclear labels. Make corrections with an eraser or fresh pencil marks.
Accuracy now avoids costly changes during construction. A precise layout leads to a smoother kitchen design process.
Tips For Effective Layouts
Designing a kitchen layout on graph paper needs careful planning. Effective layouts balance space, style, and function. Good layouts make cooking easier and improve movement in the kitchen. Follow tips that help create practical and neat designs. Use these ideas to make your kitchen drawing work well in real life.
Maximizing Space And Flow
Use every inch of space wisely. Plan the kitchen work triangle between the sink, stove, and fridge. Keep paths clear and wide enough for easy movement. Place cabinets and appliances so they do not block doors or windows. Think about where you stand most and avoid clutter there. Use vertical space with tall shelves or racks. Include enough counter space near cooking and cleaning areas.
Common Mistakes To Avoid
- Ignoring the scale on the graph paper. Draw items to size for accuracy.
- Placing appliances too close or too far apart. Keep the work triangle balanced.
- Forgetting to include door swings and drawer openings in the plan.
- Making aisles too narrow. Aim for at least 36 inches wide.
- Overcrowding counters with too many appliances or fixtures.
- Not leaving enough storage space. Plan for cabinets and pantry areas.
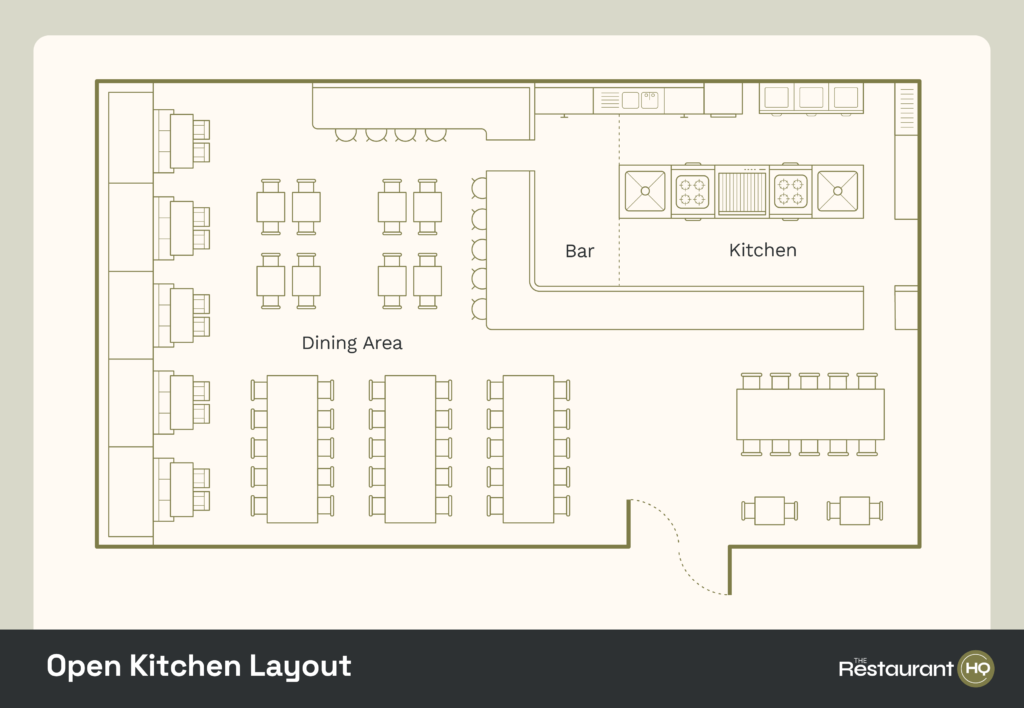
Credit: www.therestauranthq.com

Credit: www.reddit.com
Frequently Asked Questions
How Do I Start Drawing A Kitchen Layout On Graph Paper?
Begin by measuring your kitchen’s dimensions accurately. Then, mark the walls on graph paper using a scale. Include doors, windows, and fixed appliances before adding movable elements. This approach ensures your drawing is precise and proportional.
What Scale Should I Use For Kitchen Layout Drawings?
A common scale is 1 square equals 1 foot or 6 inches. Choose a scale that fits your kitchen size on the graph paper. Consistency in scale helps maintain accuracy and makes your layout easy to understand.
How Can Graph Paper Improve Kitchen Layout Planning?
Graph paper allows precise measurements and easy adjustments. It helps visualize space, furniture placement, and appliance flow. Using graph paper reduces errors and improves overall kitchen design efficiency.
What Key Elements Must I Include In My Kitchen Layout?
Include walls, doors, windows, cabinets, appliances, and countertops. Also, mark electrical outlets and plumbing points if possible. These details ensure your layout is practical and ready for implementation.
Conclusion
Drawing a kitchen layout on graph paper helps plan space clearly. It makes ideas easy to see and change. You can place cabinets, appliances, and counters with care. This method saves time and avoids mistakes later. Try different designs until you find the best fit.
Simple tools and steps bring your kitchen plan to life. Start with measurements, then sketch and adjust as needed. Drawing your layout this way makes building or remodeling easier. Give it a try and enjoy the process.