
Are you ready to transform your kitchen ideas into a clear, detailed design? Drawing your kitchen design might seem tricky, but with the right steps, you can create a plan that fits your style and needs perfectly.
Imagine seeing your dream kitchen on paper before you start any work—that’s exactly what you’ll learn here. This guide will help you take control of your kitchen project, avoid costly mistakes, and bring your vision to life. Keep reading, and you’ll discover simple tips to draw a kitchen design that feels just right for you.
Credit: planner5d.com
Gather Essential Tools
Gathering the right tools is the first step in drawing your kitchen design. The tools you choose affect how clear and detailed your design will be. Picking simple and reliable materials makes the process smooth and enjoyable.
Sketching Materials
Start with basic sketching tools that you can easily control. Pencils allow you to erase and adjust lines. Use different pencil grades for shading and details.
- Graph paper helps keep proportions accurate.
- A ruler ensures straight lines and precise measurements.
- Erasers let you fix mistakes without smudging your work.
- Colored pencils or markers add clarity to different kitchen zones.
These materials give you a hands-on way to explore your ideas quickly. Sketching by hand helps you visualize the layout before finalizing details.
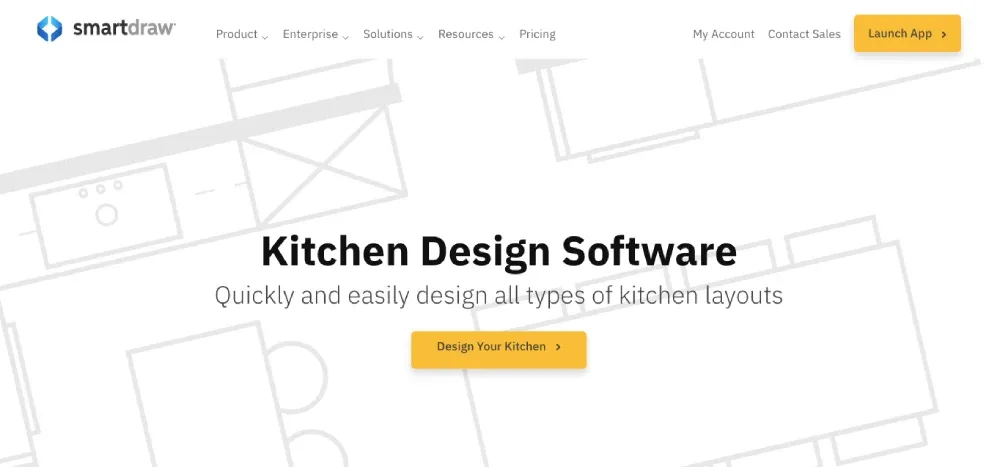
Digital Design Software
Digital tools offer more flexibility and precision. Many software options provide templates and easy drag-and-drop features.
- Programs like SketchUp or RoomSketcher create 3D kitchen models.
- They help you see how cabinets and appliances fit together.
- Digital tools allow quick changes and color testing.
- Some apps include cost estimates and material suggestions.
Using digital software can save time and reduce errors. It makes sharing your design with others simple and clear.
Measure Your Space
Measuring your kitchen space accurately sets the foundation for a successful design. Without precise measurements, even the best ideas can fall apart during installation. Taking the time to measure carefully ensures your new kitchen fits perfectly and functions smoothly.
Taking Accurate Dimensions
Start by measuring the length and width of your kitchen walls using a tape measure. Write down each measurement clearly to avoid confusion later. Double-check your numbers to catch any errors early.
Remember to measure from wall to wall at multiple points, as walls may not be perfectly straight. Note the height from floor to ceiling to help with cabinet and appliance planning. Accuracy here can save you from costly adjustments down the line.
Noting Doors And Windows
Doors and windows affect how you arrange your kitchen elements. Measure the width and height of each door and window, then record their exact location on the walls.
Include details like which way doors open and if windows have sills or trims that could impact cabinet placement. This information helps avoid awkward gaps or blocked pathways in your layout.
Have you considered how a window’s position might influence natural light over your workspace? Adding these details early can enhance both function and comfort in your kitchen design.
Create A Rough Sketch
Begin by sketching the basic layout of your kitchen on paper. This rough draft helps visualize space and appliance placement clearly. Keep lines simple and focus on overall shape and flow before adding details.
Creating a rough sketch is a crucial first step in kitchen design. It allows you to visualize your ideas on paper. This simple drawing sets the foundation for your kitchen layout. Begin with a basic outline. Focus on the main elements like walls and appliances.
Drawing Walls And Fixtures
Start by sketching the kitchen walls. Use a ruler for straight lines. Indicate doorways and windows clearly. These features impact the placement of cabinets and counters. Next, add fixtures like sinks and countertops. Ensure they fit within the space. Visualizing these elements helps in efficient space planning.
Marking Appliances
Identify where each appliance will go. Mark spaces for the refrigerator, stove, and dishwasher. Consider the work triangle concept. The triangle connects the sink, stove, and refrigerator. Keep these areas easily accessible. Proper placement reduces unnecessary movement. This enhances kitchen functionality.

Credit: www.magnet.co.uk
Plan Layout Options
Planning your kitchen layout is the first step to a functional and pleasant cooking space. It shapes how you move, store, and use the kitchen. Thoughtful layout options help you save time and reduce stress while working in the kitchen.
Consider your kitchen's shape and size. Think about the activities you do most. Choose a layout that fits your daily routine and space.
Work Triangle Concept
The work triangle links the sink, stove, and refrigerator. These three points form the main cooking area. A good triangle keeps these stations close but not crowded.
- Keep each leg of the triangle between 4 and 9 feet.
- Avoid obstacles like cabinets or islands inside the triangle.
- Ensure easy movement between the three points.
This layout reduces walking and makes cooking faster. It also prevents traffic jams in the kitchen.
Maximizing Storage
Storage is key in any kitchen. Plan cabinets and shelves to hold all your tools and food.
- Use vertical space with tall cabinets or open shelves.
- Include pull-out drawers for pots and pans.
- Designate spots for frequently used items near work areas.
- Consider corner cabinets with rotating shelves.
Good storage keeps your kitchen tidy and efficient. It helps you find things quickly and keeps counters clear.
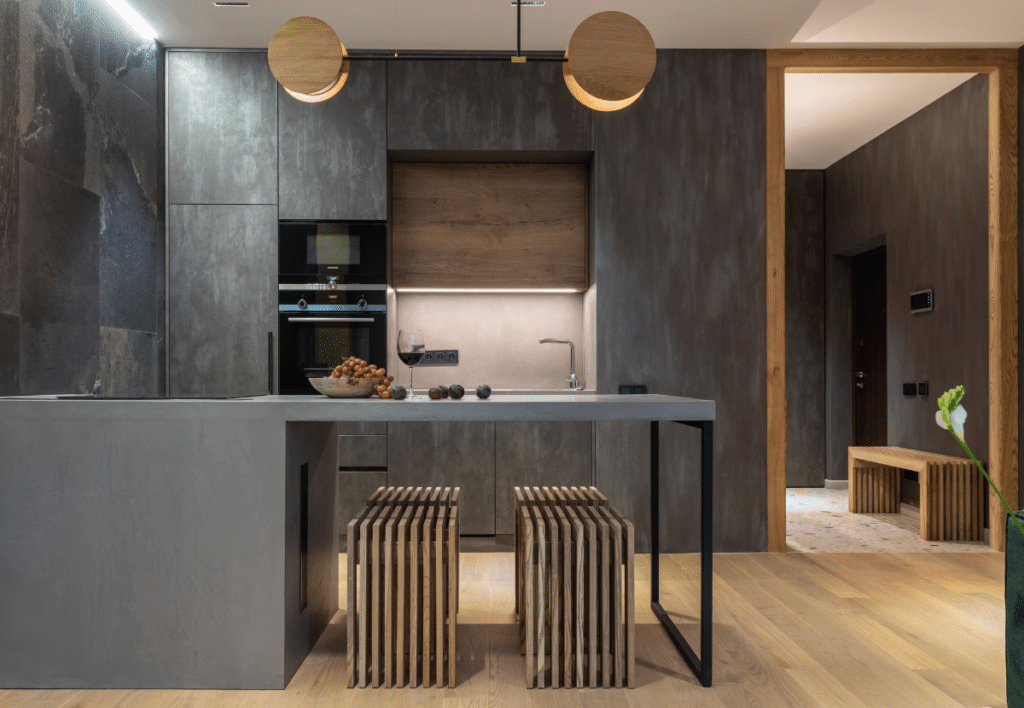
Add Details And Features
Adding details and features brings your kitchen design to life. These elements create personality and improve functionality. Small choices shape the overall look and feel. Focus on key parts that matter most.
Cabinet Styles
Cabinets define the kitchen’s character. Choose from classic, modern, or rustic styles. Each style has unique door shapes and finishes.
- Shaker cabinets offer a simple, clean look.
- Flat-panel cabinets work well in modern kitchens.
- Glass-front cabinets add openness and display space.
- Distressed wood cabinets create a warm, vintage feel.
Pick hardware like knobs and pulls to match the style. These small details enhance the cabinet design.
Countertops And Backsplashes
Countertops and backsplashes impact both beauty and function. Choose durable materials that fit your budget and style.
- Granite offers natural patterns and high durability.
- Quartz is low maintenance with a consistent look.
- Butcher block adds warmth and a natural feel.
- Tiled backsplashes allow creative patterns and colors.
- Glass backsplashes reflect light and brighten the space.
Match or contrast countertops and backsplashes for visual interest. These choices complete the kitchen’s design.
Choose Colors And Materials
Choosing the right colors and materials shapes your kitchen's look and feel. It sets the mood and defines the style. Careful choices make the space inviting and practical. Consider how colors and materials work together. Think about durability and ease of cleaning. Focus on creating a balanced and appealing design.
Coordinating Palettes
Start with a color palette that suits your taste. Pick two to three main colors. Use one for walls or cabinets, another for accents. Think about how colors complement each other. Soft tones create calm, bright colors bring energy. Neutrals like white, gray, or beige work well with many styles.
Use a color wheel to find matching shades. Try these combinations:
- Blue and white for a fresh look
- Gray and yellow for a modern feel
- Beige and brown for warmth
Test colors in your kitchen’s lighting before deciding. Natural light changes how colors appear.
Selecting Finishes
Choose finishes that fit your kitchen’s style and use. Matte finishes hide fingerprints and smudges well. Glossy surfaces reflect light, making space feel bigger. Wood finishes add warmth and texture. Metals like stainless steel bring a sleek look.
Consider durability and maintenance:
| Material | Finish | Benefits | Care |
|---|---|---|---|
| Wood | Matte or Satin | Warm, natural feel | Clean with mild soap |
| Laminate | Glossy or Matte | Affordable, easy to clean | Wipe with damp cloth |
| Stone | Polished or Honed | Durable, elegant | Seal regularly |
| Metal | Brushed or Polished | Modern, easy to maintain | Use gentle cleaner |
Pick finishes that match your lifestyle and cleaning habits. Mix textures for visual interest and balance.
Refine And Finalize Design
Refining and finalizing your kitchen design is a crucial step. This phase ensures your plan is practical and visually pleasing. It helps avoid costly mistakes during construction. Take time to carefully review and adjust your layout. Focus on proportions and details that affect usability and style.
Reviewing Proportions
Check the scale of cabinets, appliances, and countertops. Make sure each element fits well within the space. Allow enough room for movement and workflow. The kitchen should feel balanced, not cramped or too empty. Use simple measurements to compare parts of the design. Confirm that doorways, islands, and seating areas work together.
Making Adjustments
Change any parts that look or feel off. Adjust cabinet heights or countertop depths for comfort. Move appliances to improve accessibility and efficiency. Think about lighting and storage needs too. Small tweaks can make a big difference in daily use. Redraw your design after changes to see the full picture. Repeat this process until the kitchen feels right.
Present Your Design
Presenting your kitchen design clearly is key to turning ideas into reality. A strong presentation helps others understand your vision. It shows how the space will look and function. This step bridges your concept and the building process. Use visuals and detailed plans to communicate effectively.
Creating Visual Mockups
Visual mockups bring your kitchen design to life. They allow you to see colors, layouts, and materials together. Use simple tools or software to create these images. Include:
- Floor plans with cabinet placement
- 3D views of countertops and appliances
- Color samples for walls and furniture
- Lighting ideas and fixture positions
Mockups help spot issues early. They make it easier to explain your design to others.
Sharing With Contractors
Contractors need clear, detailed plans. Provide them with drawings and mockups. Include measurements and material lists. Discuss your goals and any special features. Good communication avoids mistakes and delays.
Share your design in person or by digital files. Ask for feedback to improve the plan. This ensures everyone works toward the same vision.
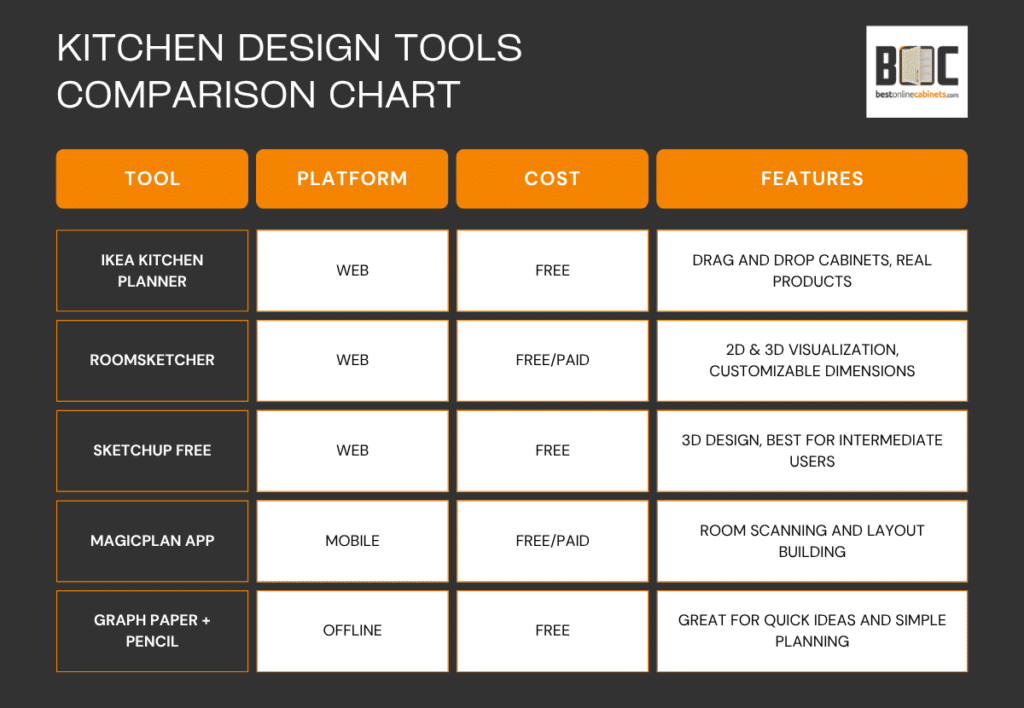
Credit: www.bestonlinecabinets.com
Frequently Asked Questions
What Tools Do I Need To Draw A Kitchen Design?
Start with graph paper, pencils, ruler, and eraser. Use design software like SketchUp for precise digital plans. These tools help create accurate layouts and visualize your kitchen space effectively.
How Do I Measure My Kitchen For Drawing Designs?
Measure walls, windows, doors, and appliances carefully. Record dimensions in inches or centimeters. Accurate measurements ensure your drawing matches the actual kitchen size.
What Are Key Elements To Include In Kitchen Design Drawings?
Include cabinets, countertops, appliances, sinks, and lighting. Mark electrical outlets and plumbing fixtures. These elements provide a complete and practical kitchen layout.
How Can I Make My Kitchen Design Functional?
Focus on the work triangle between sink, stove, and fridge. Ensure enough counter space and storage. This setup improves kitchen efficiency and ease of movement.
Conclusion
Drawing your kitchen design helps you see your ideas clearly. It saves time and avoids costly mistakes later. Start simple, then add details step by step. Use measurements to keep everything fitting well. Remember to think about how you will use the space daily.
A well-planned kitchen makes cooking and cleaning easier. Take your time and enjoy the process. Soon, you will have a kitchen that feels just right. Keep practicing your drawing skills for even better results.