
Are you tired of messy soap bottles cluttering your kitchen sink? Installing a soap dispenser can make your space look cleaner and more organized.
Plus, it’s easier to use and saves you time when washing dishes. You might think it’s a difficult job, but with the right steps, you can do it yourself quickly and without stress. Keep reading to discover how to install a soap dispenser in your kitchen sink and enjoy a tidier, more efficient kitchen.
Credit: www.aliexpress.com
Tools And Materials Needed
Before you start installing a soap dispenser in your kitchen sink, gathering the right tools and materials will save you time and frustration. Having everything ready makes the process smoother and helps you avoid last-minute trips to the hardware store.
Think about the space under your sink. Do you have easy access to plumbing? This affects the type of tools you might need. Let’s look at what you should have on hand to get the job done efficiently.
Essential Tools For Installation
- Adjustable Wrench:Useful for tightening nuts and fittings without damaging them.
- Phillips and Flathead Screwdrivers:Needed for securing mounting plates or brackets.
- Drill with Hole Saw Bit:Required if your sink doesn’t have a pre-drilled hole for the dispenser.
- Plumber’s Putty or Silicone Sealant:Helps create a watertight seal around the dispenser base.
- Measuring Tape:Ensures you position the dispenser correctly for comfortable use.
- Bucket or Towel:Catches any water spills during installation.
Materials Needed For The Soap Dispenser
- Soap Dispenser Kit:Should include the dispenser pump, mounting hardware, and soap reservoir bottle.
- Soap:Choose liquid soap suitable for dispensers to avoid clogging.
- Optional Extension Tube:Useful if your soap reservoir sits deep under the sink.
Why Prepare Thoroughly?
I once started installing a dispenser without a wrench, thinking I could tighten fittings by hand. That mistake cost me extra time and a sore grip. Having the right tools ready helps you avoid small setbacks that turn a simple project into a frustrating one.
Do you have everything on this list ready? Missing even one tool or part can delay your project. Take a moment to gather your items before you begin—your future self will thank you.

Credit: www.amazon.com
Choosing The Right Soap Dispenser
Choosing the right soap dispenser is more than just picking a stylish accessory for your kitchen sink. It impacts convenience, functionality, and how well it fits into your daily routine. Selecting a dispenser that matches your sink setup and personal needs ensures smooth installation and use.
Types Of Soap Dispensers
Soap dispensers come in several types, each offering unique advantages. You’ll find:
- Built-in dispensers:Installed directly into a hole in your sink or countertop, these save counter space and look neat.
- Wall-mounted dispensers:Attached to the wall, they keep your sink area clutter-free but require extra installation steps.
- Countertop dispensers:Easy to place and move, these need no installation but take up space.
Think about your kitchen layout and how much space you have. Do you prefer a permanent fixture or something portable? Your choice affects both aesthetics and practicality.
Size And Compatibility
Size matters when selecting a soap dispenser for your kitchen sink. The dispenser’s pump and bottle must fit the hole size in your sink or countertop. Standard holes are usually 1 to 1.5 inches in diameter, but check your sink’s specifications before buying.
Also, consider the capacity of the soap container. If you dislike refilling often, look for larger reservoirs. However, these may require more space under the sink, so measure carefully.
Compatibility extends to the type of soap you plan to use. Some dispensers are better suited for liquid soap, while others can handle thicker soaps or even lotions. Ask yourself: what soap do you use most, and will the dispenser handle it smoothly?
Preparing The Sink Area
Clear the sink area and remove any items that might block your work. Check for a suitable hole or mark the spot for drilling the soap dispenser. Make sure the surface is dry and clean for easy installation.
Preparing the Sink Area Installing a soap dispenser in your kitchen sink can add both convenience and a touch of elegance. Before you jump into the installation process, it's crucial to prepare the sink area properly. This ensures a smooth installation and helps avoid any unexpected hiccups along the way.
Clearing The Workspace
Begin by clearing the area around the sink. Remove any items like dish racks, sponges, or soap bottles that might obstruct your work. You want to ensure you have ample space to move around without knocking things over. Next, wipe down the sink and surrounding countertop. A clean surface makes it easier to work and prevents dirt or debris from interfering with the installation. Plus, a tidy workspace can make the task feel less overwhelming. Finally, gather all the tools and materials you'll need. Having everything within arm's reach saves time and reduces frustration. A few essentials might include a wrench, plumber's tape, and the soap dispenser kit itself.
Checking For Existing Holes
Take a close look at your sink to see if there are any pre-drilled holes. Many sinks come with extra holes that are covered with caps, which can be easily removed. Using an existing hole can simplify the installation process significantly. If your sink doesn’t have an available hole, you may need to drill one. This can be daunting, but it's manageable with a bit of patience and the right tools. Remember, safety first—wear safety goggles and ensure the drill bit is appropriate for your sink material. Consider the dispenser's location carefully. Imagine reaching for soap while doing dishes. Will the placement be convenient? Your goal is to make daily tasks easier, not more cumbersome.
Removing Old Fixtures
Removing old fixtures is an important first step before installing your new soap dispenser. It clears the way for a smooth installation and prevents any leaks or damage later on. You might find the process easier than expected, especially with the right tools and a bit of patience.
Gathering The Necessary Tools
Before you start, make sure you have everything you need within reach. Common tools include an adjustable wrench, pliers, a bucket, and a towel. Having these ready saves you from interruptions and keeps the workspace organized.
Turning Off The Water Supply
Never remove fixtures without shutting off the water first. Locate the valves under the sink and turn them clockwise until tight. This simple step can prevent unexpected water spills that might damage your cabinets or floor.
Disconnecting The Water Lines
After turning off the water, place a bucket underneath to catch any drips. Use your wrench to loosen the nuts connecting the water lines to the old fixture. Be gentle but firm to avoid damaging the pipes or fittings.
Removing The Old Soap Dispenser
Look under the sink to find the mounting nut holding the dispenser in place. Use your wrench or pliers to unscrew it counterclockwise. Sometimes these nuts can be tight or corroded, so some extra effort or a penetrating lubricant might be necessary.
Cleaning The Area
Once the old fixture is out, wipe the sink surface clean. Remove any old putty or residue to ensure a good seal for your new dispenser. This small step helps avoid leaks and gives your installation a professional finish.
Installing The Soap Dispenser
Installing the soap dispenser is a simple task that improves kitchen convenience. This step involves putting the dispenser pump in place and securing the soap bottle under the sink. Proper installation ensures smooth soap flow and prevents leaks. Follow the instructions carefully for a neat and functional setup.
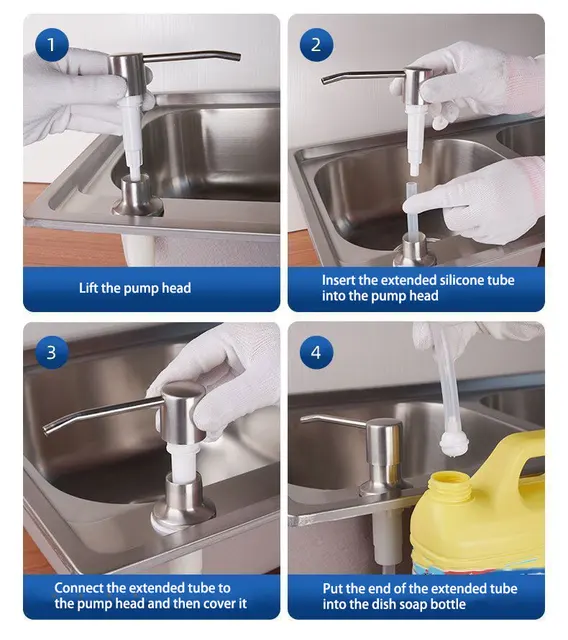
Inserting The Dispenser Pump
Start by placing the soap dispenser pump through the hole in the sink or countertop. Push it down firmly to fit snugly. Make sure the pump is straight and aligned with the sink. Check that it moves up and down freely without resistance. This part controls the soap release, so it must work smoothly.
Securing The Soap Bottle
Attach the soap bottle underneath the sink by screwing it onto the dispenser pump’s threaded shaft. Tighten it by hand until it feels secure, but avoid overtightening. Connect the pump tube to the bottle’s opening. Ensure the tube is fully inserted to prevent leaks. This setup holds the soap and supplies it to the pump effectively.
Credit: www.walmart.com
Connecting The Dispenser To The Sink
Connecting the soap dispenser to your kitchen sink is a straightforward process that ensures your soap flows smoothly and the setup stays secure. This part requires careful attention to the components and how they fit together to avoid leaks or instability.
Attaching The Soap Bottle
Start by locating the soap bottle that comes with your dispenser. It usually has a threaded neck designed to screw onto the bottom of the dispenser pump.
Hold the dispenser pump firmly and align the soap bottle underneath. Twist the bottle clockwise until it feels snug and secure.
Make sure the bottle is positioned upright and isn’t cross-threaded, which can cause leaks. Have you checked if the bottle is large enough to hold enough soap for your kitchen needs?
Tightening The Mounting Hardware
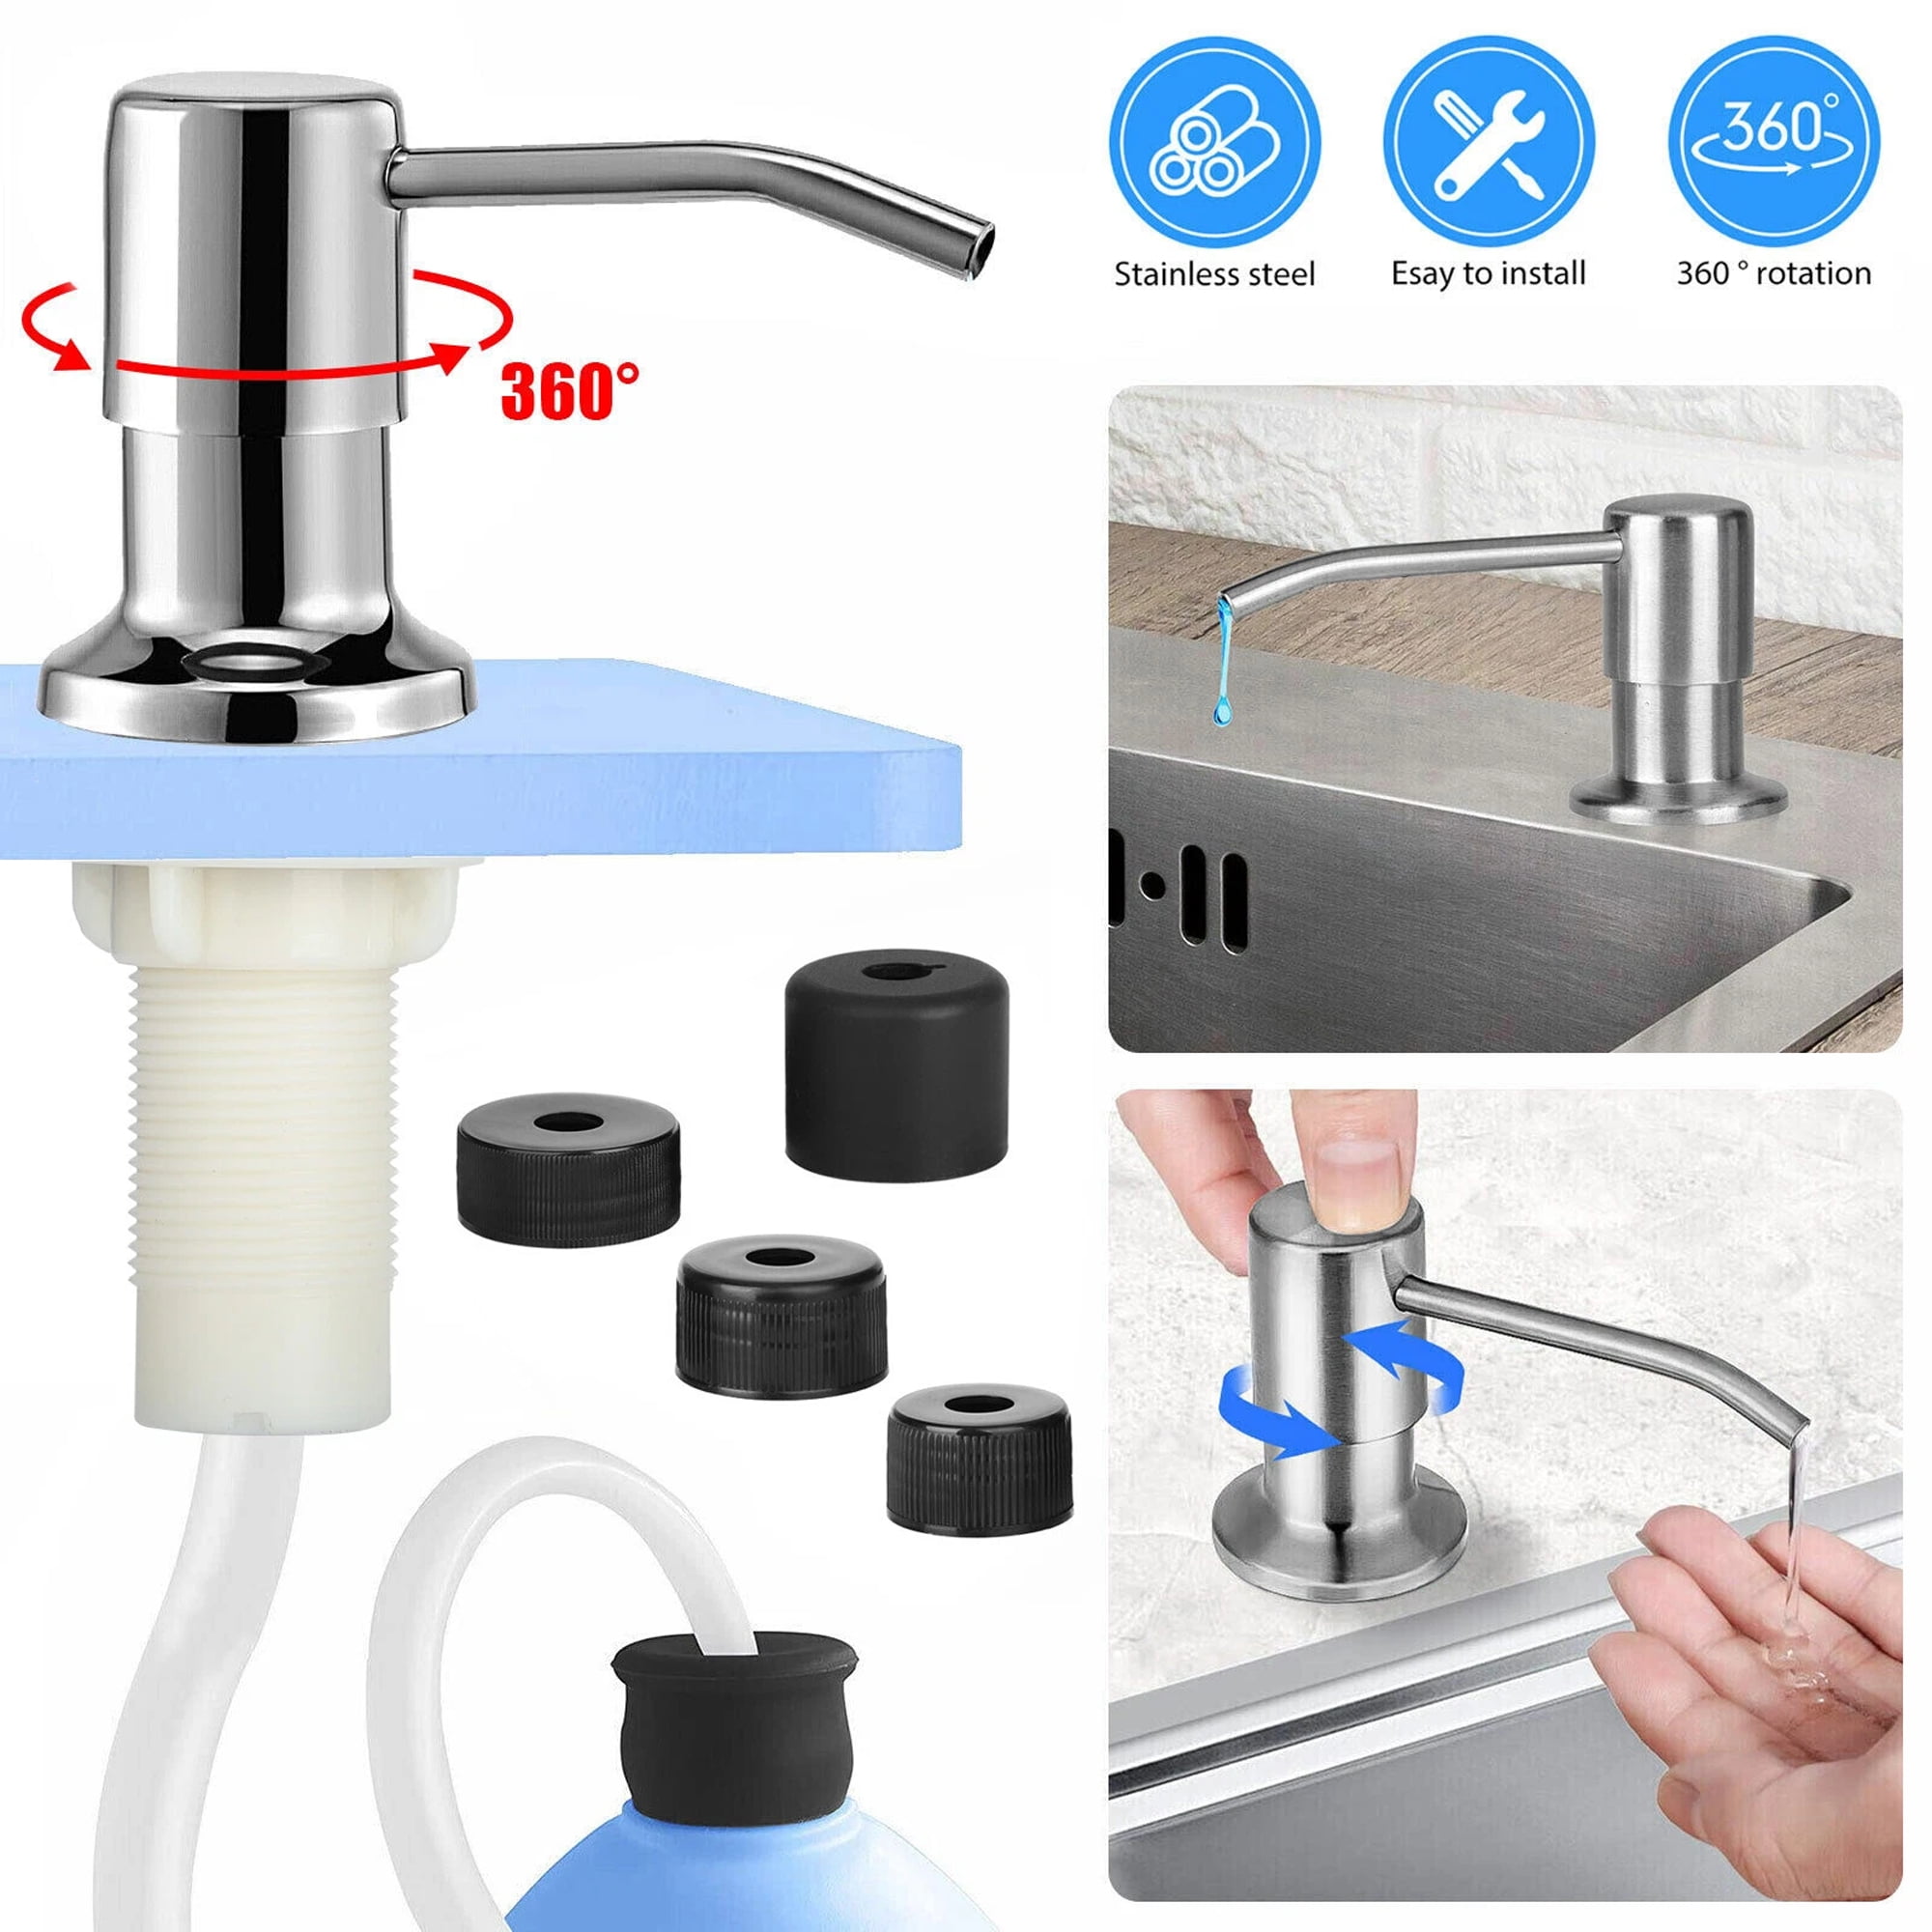
Once the soap bottle is attached, focus on securing the dispenser to the sink. The mounting hardware usually includes a rubber gasket, a metal washer, and a mounting nut.
- Place the rubber gasket on the sink’s hole to prevent water from seeping under the dispenser.
- Insert the dispenser stem through the hole.
- From underneath the sink, slide the metal washer onto the stem.
- Thread the mounting nut onto the stem and tighten it by hand at first.
Use a wrench or pliers to firmly tighten the mounting nut, but avoid over-tightening, which can crack the sink or damage the dispenser. Does the dispenser feel stable when you gently wiggle it? If not, tighten the nut a bit more until it holds steady.
Testing The Soap Dispenser
Testing the soap dispenser is important after installation. It ensures the dispenser works well and does not leak. This step saves time and avoids messes later.
Filling With Soap
Start by opening the soap reservoir on the dispenser. Pour liquid soap slowly into the container. Fill it just below the top to avoid spills. Avoid thick soaps; use liquid soap for smooth pumping.
Checking For Leaks
Look under the sink and around the dispenser base. Watch carefully for any soap drips or wet spots. Tighten connections gently if leaks appear. Use a dry cloth to wipe any excess soap.
Priming The Pump
Press the pump head several times to start soap flow. It may take a few presses before soap comes out. Keep pressing until soap dispenses smoothly. This removes air and fills the pump with soap.
Maintenance Tips
Proper maintenance keeps your soap dispenser working well. Regular care avoids clogs and leaks. It also extends the dispenser’s life. Follow these simple tips to maintain your kitchen sink soap dispenser.
Refilling The Soap
Use liquid soap made for dispensers. Avoid thick or chunky soaps that clog the pump. Remove the dispenser pump and pour soap slowly to prevent spills. Don’t overfill the container. Leave some space for air to help the pump work smoothly.
Cleaning The Dispenser
Clean the pump monthly to remove soap buildup. Soak the pump in warm water for 10 minutes. Use a small brush or toothpick to clear the nozzle. Wipe the dispenser bottle with a damp cloth. Rinse the soap container with warm water before refilling. This keeps soap fresh and prevents mold.
Frequently Asked Questions
How Do I Install A Soap Dispenser In A Kitchen Sink?
Start by drilling a hole if none exists. Insert the dispenser pump through the hole. Secure it underneath with a mounting nut. Attach the soap reservoir and connect the pump tube. Fill with soap and test the pump.
What Tools Are Needed For Soap Dispenser Installation?
You will need a drill, adjustable wrench, screwdriver, and a measuring tape. A hole saw bit matching dispenser size is essential. Also, have plumber's putty or silicone for sealing. These tools ensure a secure and leak-free installation.
Can I Install A Soap Dispenser Without Drilling?
Yes, if your sink has an unused hole. Otherwise, drilling is required to create space. Using existing holes avoids damage and simplifies installation. Check your sink layout before deciding.
How Much Soap Does A Typical Dispenser Hold?
Most kitchen soap dispensers hold between 8 to 16 ounces. This capacity lasts weeks before refilling is needed. Choose a size based on your kitchen usage frequency.
Conclusion
Installing a soap dispenser in your kitchen sink is simple and quick. Follow the steps carefully to avoid mistakes. Use basic tools and take your time. A soap dispenser keeps your sink neat and soap easy to reach. It also saves space on the countertop.
Anyone can do this with clear instructions. Enjoy a cleaner, more organized kitchen today. No need to call a plumber. Just a little effort brings great convenience. Try it yourself and see the difference.