
Are you tired of digging through messy kitchen drawers every time you need a utensil? Imagine opening your drawer and instantly finding exactly what you want—no more frustration, no more wasted time.
Making your own kitchen drawer organizer is easier than you think, and it can transform your cooking space into a more efficient and enjoyable place. In this guide, you’ll discover simple steps to create a custom organizer that fits your needs perfectly.
Keep reading, and let’s turn your cluttered drawers into a neat, stress-free zone.
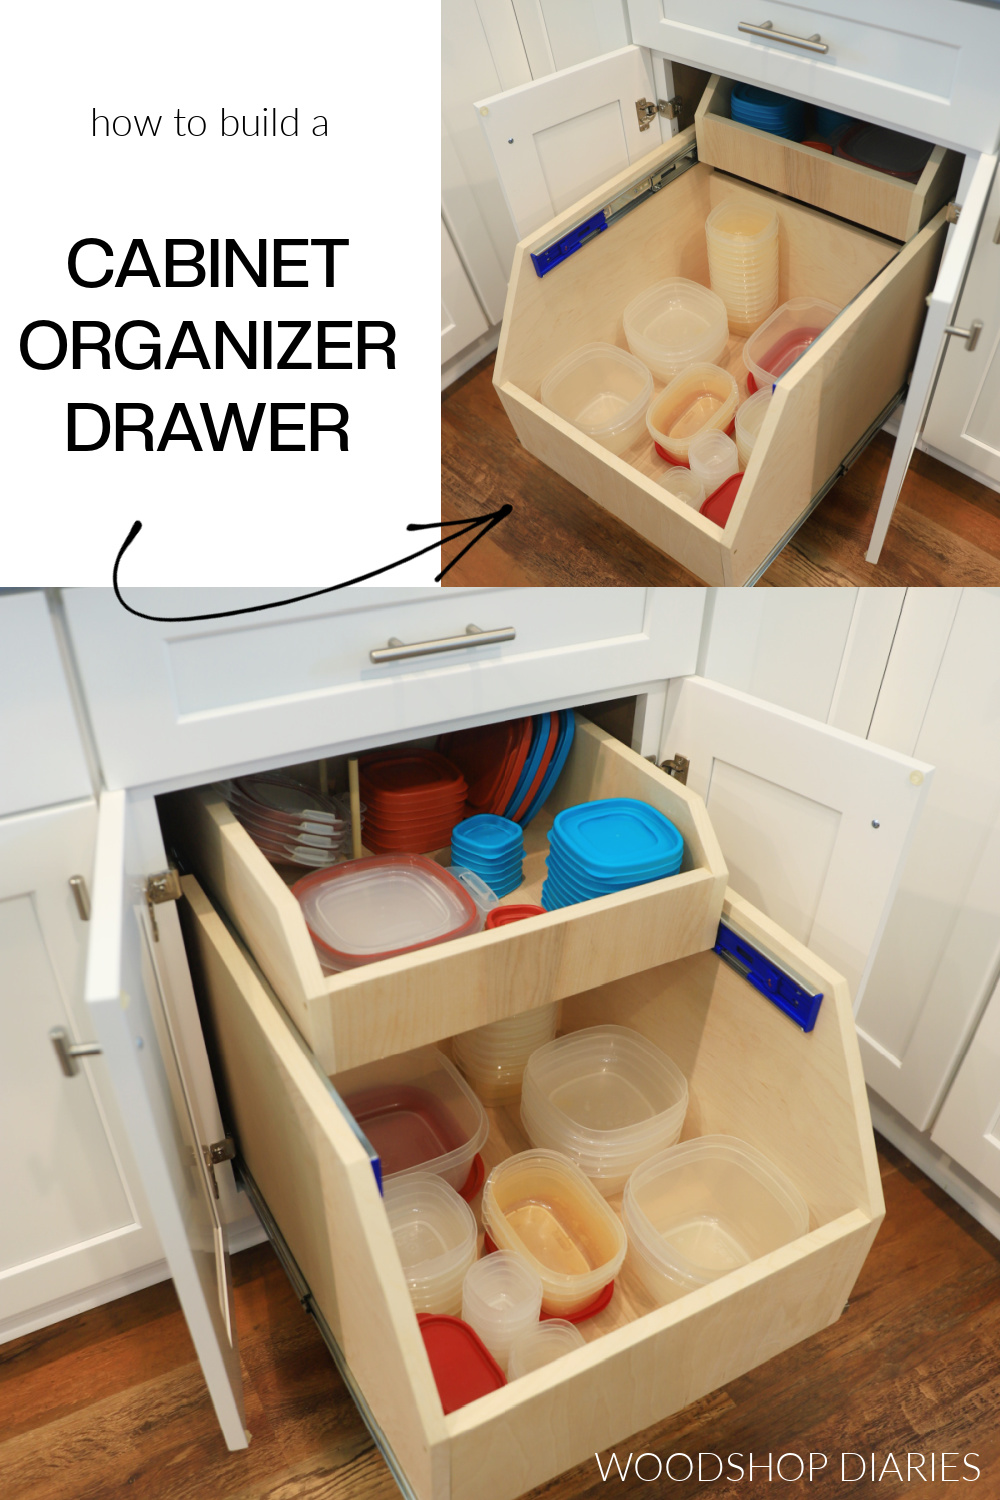
Credit: www.woodshopdiaries.com
Benefits Of Kitchen Drawer Organizers
Kitchen drawer organizers bring many benefits that improve daily cooking and storage. They help keep everything in place and make the kitchen easier to use. These organizers create a more efficient space and save time during meal preparation.
Maximize Storage Space
Organizers help use every inch of drawer space efficiently. They separate items so more things fit without clutter. Small utensils and tools find their own spot. This reduces wasted space and keeps drawers full but tidy.
Simplify Kitchen Tasks
With everything in order, finding tools becomes quick and easy. Cooking and cleaning go faster with less searching. Organizers make it simple to grab what is needed. This reduces frustration and helps maintain focus on tasks.
Maintain Neatness And Order
Drawers stay clean and organized over time. Items do not move around or get mixed up. This keeps the kitchen looking tidy and welcoming. Regular use of organizers helps maintain a neat space every day.

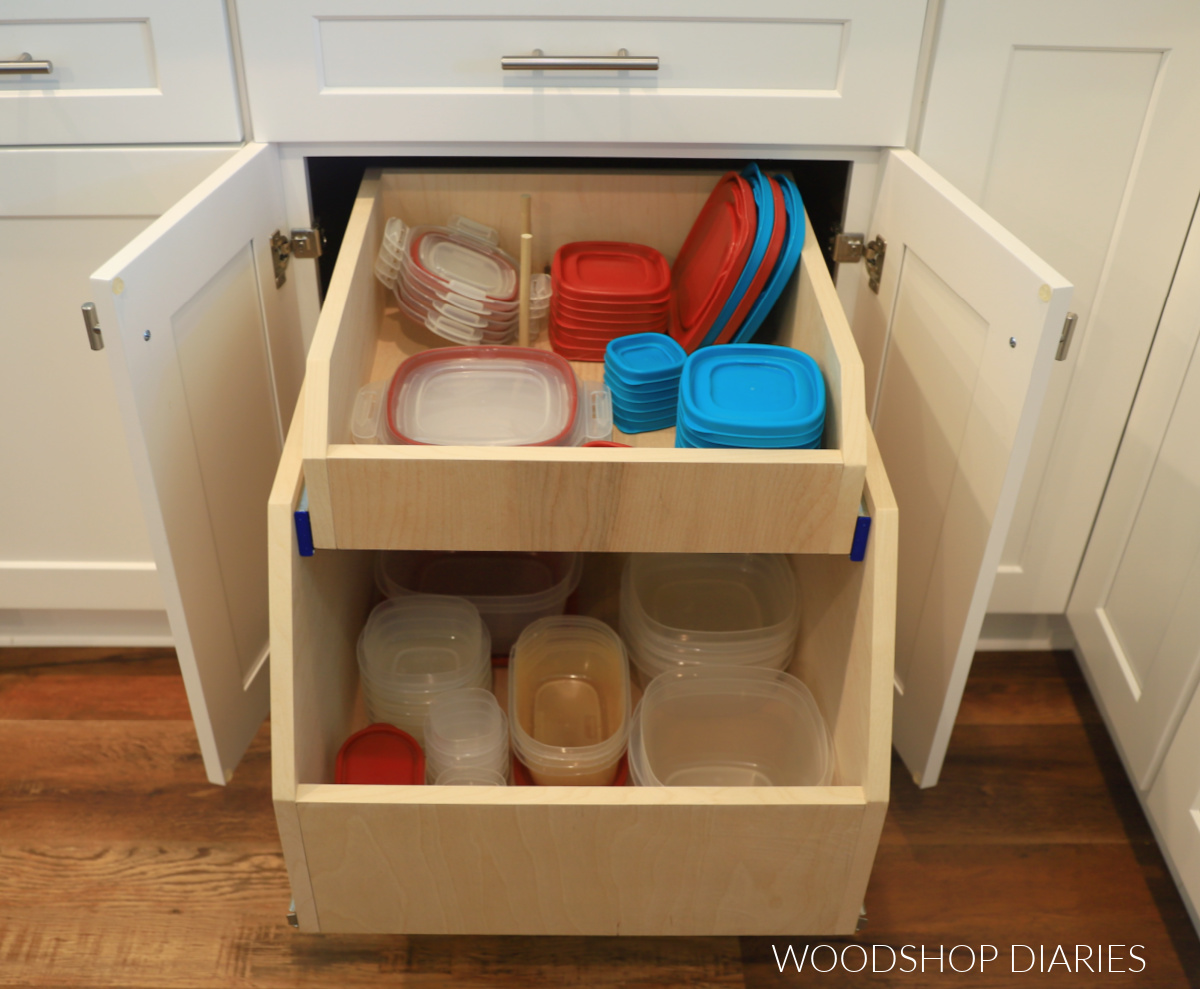
Credit: www.woodshopdiaries.com
Materials And Tools Needed
Creating a kitchen drawer organizer requires some basic materials and tools. Preparing these items first makes the project smooth and enjoyable. The right supplies help build a sturdy and neat organizer. Tools make cutting, measuring, and assembling easier and more precise.
Common Supplies
- Wood boards or plywood sheets
- Sandpaper for smoothing edges
- Wood glue or strong adhesive
- Paint or wood finish (optional)
- Measuring tape or ruler
- Wood stain or sealant for durability
Useful Tools
- Saw (hand saw or electric saw)
- Clamps to hold pieces firmly
- Drill with drill bits
- Screwdriver or screw gun
- Pencil for marking cuts
- Square tool for right angles
Choosing The Right Materials
Pick wood that fits your budget and style. Pine is cheap and easy to work with. Hardwood is stronger but costs more. Plywood offers smooth surfaces and less warping. Avoid soft woods that may break easily.
Consider moisture resistance, especially in kitchen areas. Use wood finishes to protect your organizer. Choose safe, non-toxic paints or stains for food safety.
Planning Your Drawer Organizer
Begin by measuring your drawer space to fit organizers perfectly. Sort kitchen tools by size and use frequency for easy access. Choose materials that are sturdy and easy to clean for long-lasting use.
Planning Your Drawer Organizer Creating an efficient kitchen drawer organizer starts with careful planning. This ensures each item has its place. Follow these steps to design a functional and neat organizer. Begin by assessing your current storage and identifying improvements.
Measuring Drawer Dimensions
Measure the width, depth, and height of your drawers. Use a tape measure for accuracy. Note these dimensions on paper. Accurate measurements are crucial. They help in designing compartments that fit perfectly. Even a small error can affect the final outcome.
Identifying Storage Needs
List all items you want to store. Consider utensils, gadgets, and small tools. Think about frequency of use. Place frequently used items in accessible spots. Group similar items together. This enhances efficiency while cooking. Keep in mind future purchases too.
Designing Layouts
Sketch a layout based on your dimensions and needs. Use graph paper for precision. Draw compartments for each group of items. Ensure there's enough space for each. Consider adjustable dividers. They offer flexibility for changing needs. Ensure everything has a specific place. This reduces clutter and maximizes space.
Step-by-step Diy Instructions
Creating a kitchen drawer organizer yourself can transform clutter into order. You’ll enjoy the satisfaction of using a custom solution that fits your needs perfectly. Let’s break down the process into clear, manageable steps that anyone can follow.
Cutting And Preparing Materials
Start by selecting the right material—thin plywood or sturdy cardboard works well. Measure the inside of your drawer carefully to ensure the organizer fits snugly. Mark your measurements clearly on the material using a pencil and ruler for precision.
Use a fine-toothed saw or a sharp utility knife to make straight cuts along the marked lines. Take your time here; clean cuts make assembly easier and the final product look professional. Sand the edges lightly to remove any splinters or rough spots.
Assembling Dividers
Think about how you want to divide your drawer—small sections for utensils or larger compartments for tools. Cut strips to create dividers that slot into the base and sides of your organizer. If using plywood, you can notch the strips so they fit together securely.
Dry fit the pieces in your drawer before gluing or nailing them in place. This step helps you adjust the layout for maximum efficiency. Use wood glue or strong adhesive to attach the dividers, and clamp them if possible until the glue dries for a sturdy hold.
Finishing Touches
Once assembled, check the organizer for any sharp edges and smooth them out with sandpaper. Consider painting or staining the wood to match your kitchen’s style or to protect the surface from wear. Adding a clear sealant can increase durability, especially in moist environments.
Have you thought about lining the compartments with non-slip drawer liner? This simple addition keeps your items from sliding around. Finally, place the organizer in your drawer and enjoy the newfound order and ease it brings to your kitchen routine.
Creative Organizer Ideas
Creative organizer ideas can transform your kitchen drawer from chaotic to calm. They offer practical ways to keep your utensils, gadgets, and other essentials neat and easy to find. Let’s dive into some clever ideas that make organizing not just useful but also fun and personalized.
Using Repurposed Items
Look around your home for items that can get a second life as drawer organizers. Old muffin tins, ice cube trays, and small boxes work perfectly to separate spoons, forks, and other small tools.
I once used an old wooden wine crate cut into sections to hold my kitchen gadgets. It fit snugly and added a rustic charm. What items in your home could you reuse to save money and add character?
Customizable Compartments
Adjustable dividers let you create compartments that fit your specific kitchen tools. These can be DIY sliders made from thin wood strips or store-bought inserts designed to expand and contract.
This flexibility means you can change the layout as your collection grows or shifts. Think about what you use daily and how much space each tool needs—does your drawer organizer adapt to your needs?
Decorative Options
Adding color or patterns to your drawer organizer makes it visually appealing and easier to navigate. You can line compartments with decorative paper or paint wooden dividers in bright hues.
Using fun designs doesn’t just brighten your kitchen; it helps your brain quickly identify where things belong. What colors or patterns motivate you to keep your space tidy?
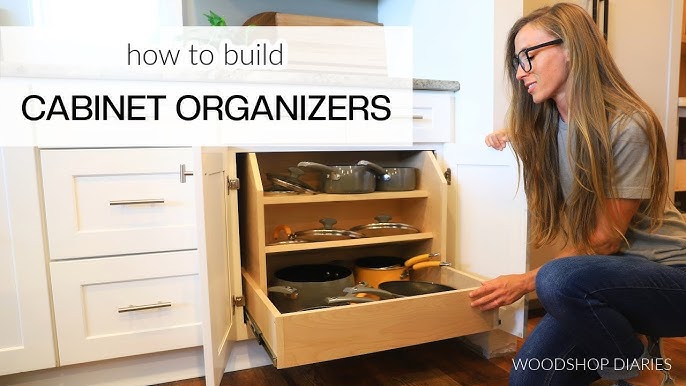
Credit: www.youtube.com
Maintaining And Updating Organizers
Maintaining and updating your kitchen drawer organizers keeps your space efficient and enjoyable to use. Over time, dirt and wear can reduce their functionality, while your storage needs might change. Staying on top of cleaning and adjustments ensures your organizers serve you well for years.
Cleaning Tips
Regular cleaning prevents buildup of crumbs and stains that can make your organizers less effective. Use a damp cloth with mild soap to wipe down wooden or plastic dividers. For fabric or mesh organizers, a gentle hand wash often works best.
Remove everything from the drawer before cleaning to reach all corners. Let organizers dry completely before placing items back to avoid moisture damage. Have you noticed how a simple cleaning refreshes the look and feel of your kitchen instantly?
Adjusting For Changing Needs
Your kitchen habits evolve—maybe you’ve started cooking new recipes or acquired new gadgets. Adjustable organizers with removable dividers can be repositioned to fit different utensils or tools. If your organizer isn’t adjustable, consider swapping in new inserts or adding small containers to better suit your current items.
Try grouping items you use together, so your daily workflow becomes smoother. What’s one item you’ve recently added to your kitchen that needs a special spot?
Troubleshooting Common Issues
Sometimes organizers shift or slide inside drawers, causing frustration. Adding non-slip liners beneath the organizer can fix this problem instantly. If your organizer cracks or breaks, evaluate whether a repair with glue or replacement is the better option.
Loose dividers can be stabilized with small strips of adhesive Velcro or double-sided tape. Don’t let minor problems stop you from enjoying an organized kitchen—small fixes make a big difference. What’s the biggest organizer challenge you’ve faced so far?
Frequently Asked Questions
What Materials Are Best For Kitchen Drawer Organizers?
Wood, plastic, and bamboo are popular materials for kitchen drawer organizers. They are durable, easy to clean, and affordable. Choose based on your kitchen style and budget. Bamboo offers eco-friendly benefits, while plastic allows for customizable compartments. Wood adds a classic, sturdy touch.
How Do I Measure My Drawer For An Organizer?
Measure the drawer’s width, depth, and height with a tape measure. Note any internal obstructions like handles or rails. Accurate measurements ensure a perfect fit for your organizer. Always double-check measurements before purchasing or building your organizer.
Can I Customize Kitchen Drawer Organizers Myself?
Yes, DIY customization is easy and cost-effective. Use adjustable dividers or modular trays. Paint or stain wood organizers to match your kitchen. Custom organizers fit your specific needs and drawer sizes. This approach maximizes space and improves kitchen organization.
How Do Kitchen Drawer Organizers Improve Storage?
They separate utensils and tools, preventing clutter and damage. Organizers make items easy to find, saving time during cooking. They maximize drawer space by using vertical and horizontal areas efficiently. This improves overall kitchen functionality and aesthetics.
Conclusion
Creating a kitchen drawer organizer saves space and keeps tools tidy. It makes cooking easier and faster every day. You only need simple materials and a little time to start. Organizing your drawers helps find items quickly without stress. Try different layouts to fit your kitchen needs best.
Keep your kitchen neat and enjoy the extra room. Small changes can make a big difference. Start today and see how much easier your kitchen feels.