

If you’ve ever faced a slow-draining kitchen sink, the culprit might be a clogged basket strainer. Removing your kitchen sink basket is easier than you think—and doing it yourself can save you time and money.
In this guide, you’ll discover simple, step-by-step instructions to take out your sink basket quickly and without hassle. Whether you want to clean it, replace it, or fix a leak, by the end of this article, you’ll feel confident handling the job on your own.
Ready to get started? Let’s dive in.

Credit: www.youtube.com
Tools Needed
Removing a kitchen sink basket might sound tricky, but having the right tools makes the task much easier. Knowing exactly what you need before starting can save you from frustrating trips to the store. Let’s break down the essential tools and some optional accessories that can simplify your work and protect your sink components.
Basic Tools
- Adjustable Wrench:This tool helps you loosen or tighten the locknut securing the basket. It fits various sizes, making it versatile for plumbing tasks.
- Channel Lock Pliers:Perfect for gripping and turning parts that are hard to reach or stuck tight. They give you extra leverage without damaging the metal.
- Screwdriver:You might need a flathead or Phillips screwdriver to remove any screws holding the basket or strainer in place.
- Bucket or Bowl:Place this under the sink to catch any water that might spill during removal. Keeping your workspace dry prevents slipping and mess.
- Old Towels or Rags:Handy for cleaning up drips and wiping off grime from the basket and sink.
Optional Accessories
- Plumber’s Putty:Useful if you plan to reinstall the basket or install a new one. It creates a watertight seal between the sink and basket flange.
- Lubricant Spray:If the locknut or basket parts are corroded or stuck, a little lubricant can help loosen them without damage.
- Flashlight or Headlamp:Working under the sink can be dim. Extra light ensures you see what you’re doing clearly.
- Pipe Wrench:For larger plumbing parts connected to the sink, this provides additional grip and power.
Have you ever started a project only to realize you don’t have the right tool? It’s frustrating and slows you down. Gathering these tools beforehand lets you focus on the task, making your kitchen sink basket removal quicker and less stressful.
Prepare The Area
Preparing the area is a key first step to remove a kitchen sink basket safely and easily. This stage helps avoid water damage and makes the task smoother. Taking time to get everything ready saves frustration later.
Clear The Sink
Remove all dishes, food scraps, and cleaning tools from the sink. A clear workspace prevents accidents and gives you full access to the basket. Wipe the sink dry to avoid slipping or messes during the process.
Turn Off Water Supply
Locate the water valves under the sink and turn them off. This stops water flow to the faucet and basket. Double-check by turning on the tap to ensure no water comes out. Protects against leaks and water damage while working.
Remove The Drain Stopper
Lift the drain stopper carefully to reveal the basket underneath. Sometimes, it twists or pulls straight up. Removing it clears the way to access the kitchen sink basket easily.
Removing the kitchen sink basket can seem daunting, but with a little patience and the right approach, it's a task you can confidently tackle. The first step in this process involves removing the drain stopper, a component that often gets overlooked. This step is crucial because it ensures you have clear access to the sink basket, making the removal process much smoother.
Lift Out The Stopper
Start by examining your sink's stopper. Most stoppers can be easily removed by simply lifting them out of the drain. If yours feels stuck, try twisting it slightly to loosen any grime or debris. Using a flashlight can help you see if there's anything obstructing the stopper. If it still won't budge, a gentle tug with a pair of pliers might do the trick. Remember to wrap the pliers' jaws in a cloth to avoid scratching your sink.
Unscrew Components
Once the stopper is out, check for any screws or fasteners holding the drain components in place. Some sink stoppers have a small screw underneath that needs unscrewing before the basket can be accessed. Use a screwdriver that fits snugly into the screw head to avoid stripping it. If the screw is corroded, a bit of penetrating oil can help loosen it. Take a moment to keep all removed components in a safe place. A small dish or container nearby can prevent these tiny parts from disappearing. Isn't it satisfying to see your progress as you move closer to a fully functioning sink? As you dismantle the components, you'll gain a deeper understanding of how your kitchen sink works, empowering you to tackle future plumbing tasks with ease.

Credit: www.youtube.com
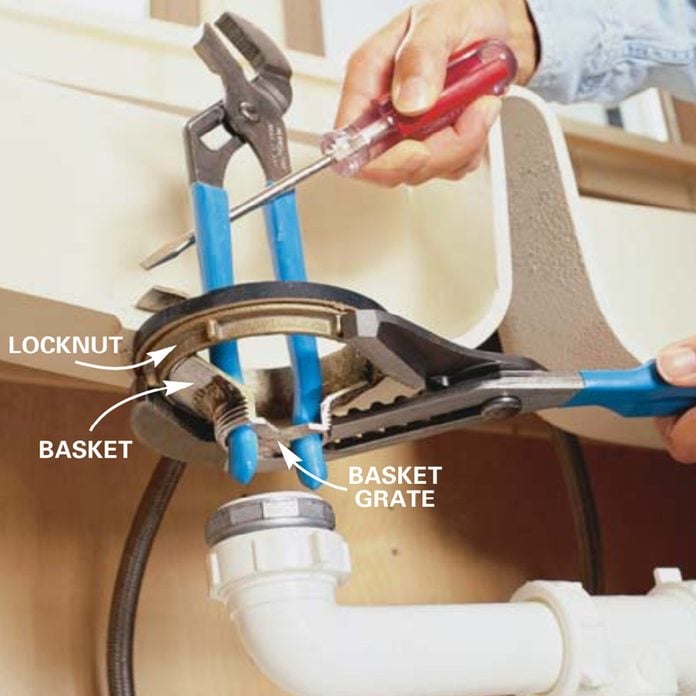
Loosen The Basket Locknut
Loosening the basket locknut is a crucial step in removing your kitchen sink basket. This locknut holds the basket firmly in place, preventing leaks and ensuring a tight seal. If it’s too tight, you won’t be able to remove the basket smoothly, and forcing it could damage your sink or plumbing.
Locate The Locknut
The locknut is usually found underneath the sink, directly beneath the basket drain. It’s a large, circular piece that screws onto the drain pipe. Sometimes it’s hidden behind other plumbing fixtures, so take a moment to clear the area and get a good look.
Have you noticed corrosion or buildup around this area? That can make the locknut harder to spot or remove. Cleaning it gently with a cloth or brush before you start can save you frustration later.
Use Proper Tools
Using the right tools makes loosening the locknut much easier. An adjustable wrench or a basin wrench works well because they can grip the nut securely in tight spaces. Avoid using pliers that might slip or damage the locknut’s surface.
Sometimes, the locknut can be stubborn. Applying a little penetrating oil and waiting a few minutes can help loosen rust or mineral deposits. Do you have a basin wrench at home? If not, it’s worth investing in one—it makes this job so much simpler.
Remove The Basket
Removing the kitchen sink basket is a straightforward task that can save you from stubborn clogs and unpleasant odors. It’s a key step if you want to maintain a clean and efficient sink drain. By focusing on this simple action, you can prevent bigger plumbing issues down the line.
Lift Out The Basket
Start by grasping the basket firmly with your fingers. Most baskets are designed to lift straight out with a gentle pull. If it feels stuck, try wiggling it slightly from side to side to loosen any debris holding it in place.
Sometimes, the basket might have a locking mechanism or a small screw—check for these and release them before pulling. If your basket is metal, it might have rust or mineral buildup, so be patient and avoid using excessive force.
Clean The Drain Area
Once the basket is out, take a close look at the drain opening. It often hides gunk that causes slow drainage. Use an old toothbrush or a small brush to scrub around the edges and inside the drain.
Rinse the area with warm water to wash away loosened debris. You might be surprised how much easier your sink drains after this simple cleaning. Have you ever noticed a foul smell coming from your sink? This step helps eliminate the source.
Inspect And Replace Parts
Inspecting and replacing parts of your kitchen sink basket ensures it works well and lasts longer. Over time, parts can wear out or get damaged. Checking these parts helps avoid leaks and other issues. Replacing worn or broken components keeps your sink basket functioning smoothly.
Check For Damage
Look closely at the sink basket and its parts. Check for cracks, rust, or corrosion on metal pieces. Examine rubber seals and washers for tears or hardening. Loose or bent parts may cause leaks or poor drainage. Use a flashlight to see inside tight spaces. Note any parts that look worn or broken.
Choose Replacement Options
Select parts that match your sink basket model. Choose materials like stainless steel or durable plastic for long life. Purchase complete repair kits for convenience. Consider buying parts from trusted brands or local hardware stores. Keep old parts for reference when buying new ones. Proper parts ensure a secure fit and reliable function.
Reassemble The Sink Basket
Reassembling the sink basket is an important step after cleaning or replacing it. Proper reassembly ensures the sink drains well and prevents leaks. Take your time to align parts correctly and secure them tightly. This process helps maintain a well-functioning kitchen sink.
Reinstall The Basket
Place the basket back into the drain opening carefully. Make sure it fits snugly and sits flat against the sink. Align the holes of the basket with the drain pipe below. Avoid forcing the basket, as this can cause damage.
Tighten Locknut Securely
Slide the locknut up the drain pipe. Turn it clockwise to tighten against the sink bottom. Use your hand first to avoid cross-threading. Then, use a wrench to make it firm but not too tight. Over-tightening can crack the sink or strip the threads.
Test For Leaks
Testing for leaks is an important step after removing the kitchen sink basket. It ensures no water escapes from the plumbing connections. This check helps avoid water damage and costly repairs. Take your time and carefully inspect all areas.
Turn On Water
Start by turning on the faucet slowly. Let the water run for a few minutes. Watch the sink area and pipe connections closely. Listen for any dripping sounds or notice water pooling. Keep the water flow steady to see if leaks appear.
Check Under The Sink
Look under the sink with a flashlight for better visibility. Inspect all joints and seals around the basket and pipes. Use a dry cloth to wipe surfaces first. Then, check again for any wet spots. Even small drops can signal a leak.
Credit: www.familyhandyman.com
Frequently Asked Questions
How Do I Remove A Kitchen Sink Basket Drain?
To remove a kitchen sink basket drain, first clear out debris. Use pliers or a wrench to loosen the locknut underneath. Unscrew the basket from the sink basin, then carefully lift it out. Clean the area before installing a new basket or reassembling.
What Tools Are Needed To Remove A Sink Basket?
You typically need a pair of pliers or an adjustable wrench. A screwdriver may be helpful for some models. Having a bucket to catch water and a cloth for cleanup is recommended. These tools make removal simple and prevent damage.
Can I Remove The Sink Basket Without Turning Off Water?
Yes, you can remove the basket without shutting off water. However, avoid opening faucet or drain valves during removal. Keep a bucket handy to catch any residual water. It’s safer to turn off water supply to prevent spills.
How Long Does It Take To Remove A Kitchen Sink Basket?
Removing a kitchen sink basket usually takes 10 to 20 minutes. Time varies depending on sink type and your experience. Preparation and having the right tools can speed up the process. It’s a quick DIY task for most homeowners.
Conclusion
Removing a kitchen sink basket can be simple and quick. Use basic tools and follow clear steps. Take your time to avoid damage. A clean sink basket helps keep your kitchen tidy. Regular checks can prevent clogs and leaks. Now, you can handle this task yourself.
Save money and feel confident doing it right. Keep your kitchen working smoothly every day.