
Is your kitchen sink clogged and causing you frustration? You might be wondering if a simple plunger can fix the problem without calling a plumber.
The good news is, you don’t have to stress just yet. Understanding how a plunger works and when it’s the right tool can save you time, money, and a lot of hassle. Keep reading to find out if your trusty plunger is the answer to your kitchen sink troubles and learn the best way to use it for quick results.
How A Plunger Works
A plunger is a simple tool that uses pressure to clear clogs. It works by creating suction and force to move blockages in pipes. Understanding how a plunger works helps to use it effectively on a kitchen sink.
Creating A Seal
The first step is to create a tight seal around the drain. The rubber cup of the plunger fits snugly over the sink opening. This seal traps air and water inside the pipe.
Building Pressure
Pressing the plunger down pushes water and air into the drain. Pulling it up draws air back in. This back-and-forth motion builds pressure inside the pipe.
Dislodging The Clog
The changing pressure loosens the blockage inside the pipe. Water pressure forces the clog to move or break apart. This helps clear the drain and restore flow.
Using Water To Enhance Effectiveness
Water inside the sink helps the plunger work better. It transmits pressure more evenly than air alone. Filling the sink with some water before plunging improves results.
Credit: www.aol.com
Types Of Plungers For Kitchen Sinks
Choosing the right plunger can make a big difference when you face a clogged kitchen sink. Not all plungers work the same way, and knowing which type suits your sink can save you time and effort. Let’s look at the main types of plungers designed for kitchen sinks and how they handle blockages.
Flat Plunger
The flat plunger has a simple, flat rubber cup and is mostly used for sinks with flat surfaces. It creates a strong seal on flat areas, making it effective for shallow clogs. If your kitchen sink has a wide, flat drain opening, this might be the plunger for you.
Flange Plunger
This plunger features an extra soft rubber flap (flange) that extends from the cup, designed to fit into the drain. It works well for kitchen sinks because it can reach deeper into the drainpipe, creating a tighter seal. The flange helps you apply more force exactly where you need it.
Accordion Plunger
Made of hard plastic with a bellows design, the accordion plunger delivers strong, focused pressure. It’s powerful but requires careful use to avoid damage to pipes. If you want a tool that pushes hard on stubborn clogs, this type might be worth considering.
Double Cup Plunger
The double cup plunger combines a flat cup and a flange cup, making it versatile for different sinks and toilets. This design allows you to switch between uses easily. If you have multiple plumbing fixtures, this plunger might be the most practical choice.
Preparing Your Sink For Unclogging
Preparing your kitchen sink before using a plunger helps clear clogs faster. A few simple actions make plunging more effective. These steps protect your sink and reduce mess.
Clear The Sink Area
Remove dishes, sponges, and any objects from the sink. Clearing space prevents items from falling in while plunging. It also gives you room to work comfortably.
Remove Standing Water
If the water level is very high, scoop out some with a small container. Leave enough water to cover the plunger’s cup for a good seal. Too much water can cause spills during plunging.
Plug The Overflow Drain
Many kitchen sinks have an overflow hole near the top edge. Cover this hole with a wet cloth or tape. This blocks air escape, allowing stronger plunging pressure.
Check The Sink Strainer
Lift out the sink strainer or stopper to clear visible debris. Food scraps often trap here and can stop water flow. Cleaning this area improves plunging results.

Credit: www.yahoo.com
Step-by-step Plunging Technique
Unclogging a kitchen sink with a plunger can seem like a daunting task, but with the right technique, you can easily tackle the problem yourself. A plunger is not just for toilets; it's a versatile tool that can save you time and money in the kitchen as well. Let's dive into the step-by-step plunging technique to help you restore your sink's flow efficiently.
Preparation Is Key
Before you begin, ensure you have a plunger that fits your sink. A cup-style plunger works best for flat surfaces like kitchen sinks. Clear the sink of any dishes, and remove any debris visible on the drain.
Fill the sink with enough water to cover the plunger's rubber cup. This water will help create a seal, crucial for effective plunging. Also, remember to block any overflow openings with a wet cloth to focus the pressure on the clog.
Position The Plunger Correctly
Place the plunger over the drain, ensuring it's submerged in water. The rubber cup should form a seal around the drain opening. The better the seal, the more effective your plunging will be.
Plunge With Purpose
Use quick, forceful thrusts to push and pull the plunger. Aim for 10 to 15 powerful plunges, maintaining the seal. This action helps dislodge the clog by creating pressure and suction.
After plunging, quickly remove the plunger and check if the water drains away. If not, repeat the plunging process a couple more times. Sometimes, persistent clogs need multiple attempts.
Check Your Progress
If the water begins to drain, you've likely cleared the blockage. Run hot water down the sink to flush out any remaining debris. This step not only ensures the clog is gone but also cleans the pipes.
Still facing a stubborn clog? Consider trying a different approach, such as using a plumbing snake or calling in professional help. Have you ever had success with a plunger, or do you have other tips to share?
Common Mistakes To Avoid
Using a plunger to unclog your kitchen sink can be effective, but many people unknowingly make mistakes that reduce its success. These errors not only waste time but can also make the clog worse. Avoiding these common pitfalls will help you get your sink draining smoothly with less hassle.
Using The Wrong Type Of Plunger
Not all plungers are created equal. A cup-shaped plunger designed for toilets won’t create the right seal on a flat kitchen sink drain. Instead, use a flat-bottomed plunger specifically made for sinks to maximize pressure and suction.
Have you ever tried plunging with a toilet plunger only to get splashes and no progress? That’s a sign you need the right tool for the job.
Ignoring The Overflow Drain
Many kitchen sinks have an overflow drain that can let air escape during plunging. If you don’t cover this opening, the plunger won’t create enough suction to dislodge the clog.
Use a wet cloth or tape to seal the overflow drain before plunging. This simple step can make a big difference in how well your plunge works.
Plunging With An Empty Sink Basin
Plunging works best when the sink has some water in it. Water helps form a tight seal and transmits pressure more effectively to the clog.
Filling the sink with enough water to cover the plunger’s cup improves your chances of success. If you plunge with an empty sink, you might just be pushing air instead of clearing the blockage.
Using Excessive Force
It might seem like pounding harder will clear the clog faster, but this can damage your pipes or cause leaks. Gentle, steady plunging is more effective and safer for your plumbing.
Have you ever felt frustrated and pushed too hard only to make a mess? Take a deep breath and try steady, controlled plunges instead.
Not Removing Sink Stoppers Or Strainers
Failing to remove the sink stopper or strainer before plunging can block the plunger’s suction and prevent it from reaching the clog. Always take these parts out first.
Once removed, ensure the plunger fits snugly around the drain opening for maximum pressure. This simple step often gets overlooked but makes a huge difference.
When A Plunger Isn’t Enough
Sometimes, a plunger just won’t cut it when your kitchen sink is clogged. You might plunge repeatedly, but water still refuses to drain. Knowing when to try other solutions can save you time and frustration.
Signs That The Plunger Isn’t Doing The Job
If you’ve plunged for a few minutes and the water level barely drops, that’s a clear sign the blockage is stubborn. Slow drainage after plunging also means the clog might be deeper or more solid than usual.
Another sign is if you hear gurgling noises in the pipes or notice unpleasant odors. These clues suggest the clog is beyond the reach of your plunger and needs a different approach.
Types Of Clogs A Plunger Can’t Fix
Grease buildup is a common culprit in kitchen sinks. It hardens inside pipes and can’t be broken up by plunging alone. Food particles stuck tightly or foreign objects dropped down the drain also resist plunging efforts.
Tree roots invading underground pipes or damaged plumbing sections require professional tools and expertise. A plunger just won’t reach or remove these more complex blockages.
What To Try When A Plunger Fails
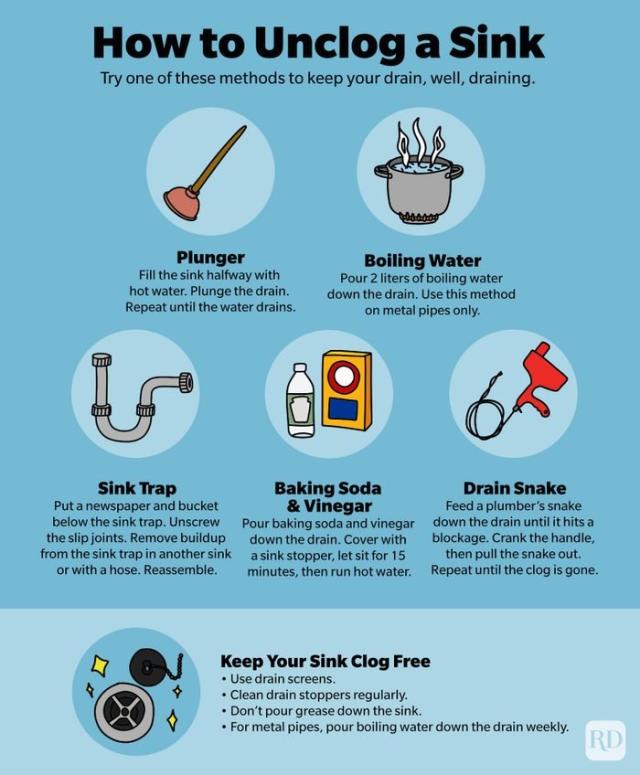
- Use a drain snake:This flexible tool can reach deeper clogs and physically break them up.
- Apply baking soda and vinegar:The chemical reaction can help loosen minor grease or debris clogs.
- Check the P-trap:Sometimes the blockage is right under the sink and can be cleared by removing and cleaning this curved pipe.
If these steps don’t work, consider calling a plumber before the problem worsens. Have you ever kept plunging, hoping for a miracle, only to find you made the clog worse? Knowing when to stop and try another method is key.
Alternative Unclogging Methods
There are several ways to unclog a kitchen sink beyond using a plunger. Some methods use simple household items, while others require tools or chemicals. These alternatives can clear tough clogs and restore proper drainage.
Using Baking Soda And Vinegar
Baking soda and vinegar create a natural cleaning reaction. Start by pouring half a cup of baking soda into the drain. Follow with half a cup of vinegar. Wait 15 to 30 minutes for the fizzing action to break down the clog. Flush with hot water to clear the drain. This method works well for minor blockages and is eco-friendly.
Applying A Drain Snake
A drain snake is a flexible tool designed to reach deep clogs. Insert the snake into the drain and twist it to catch debris. Pull out the clog or push it through the pipe. This tool works best for hair, food scraps, and other solid blockages. It requires no chemicals and offers a quick solution.
Chemical Drain Cleaners
Chemical drain cleaners dissolve grease and organic matter. Choose a product made for kitchen sinks. Carefully follow the instructions on the label. Pour the cleaner into the drain and wait the recommended time. Flush with water to rinse away residue. Use caution, as these chemicals can be harsh and damage pipes if overused.
Preventing Future Clogs
Preventing future clogs is just as important as clearing the current blockage. A plunger can help unclog your kitchen sink, but without proper care, the problem may return quickly. You want to keep your drains flowing smoothly and avoid the frustration of repeated blockages.
Regular Cleaning Habits
One simple way to prevent clogs is by cleaning your sink drain regularly. Pouring hot water down the drain once a week helps dissolve grease and food particles before they build up. You can also use a mixture of baking soda and vinegar to break down debris naturally.
Mindful Disposal Practices
Think twice before tossing scraps down the drain. Avoid pouring grease, coffee grounds, and fibrous vegetables like celery or onion peels into your sink. These items easily accumulate and cause blockages over time.
Use A Drain Strainer
Installing a drain strainer catches food bits and prevents them from slipping into your pipes. It’s a small investment that saves you from costly plumbing issues later. Make it a habit to clean the strainer after every meal to keep water flowing freely.
Regular Maintenance Checks
Check under your sink for slow drainage or unusual odors. These signs often indicate a developing clog. Catching problems early allows you to take quick action before a full blockage forms.
Consider Professional Inspection
If your sink clogs frequently despite your efforts, it might be time for a professional inspection. A plumber can identify hidden issues like pipe damage or buildup that a plunger alone won’t fix. Getting expert advice can save you time and money in the long run.
Frequently Asked Questions
Can A Plunger Unclog A Kitchen Sink Effectively?
Yes, a plunger can often unclog a kitchen sink by creating suction. It loosens minor blockages caused by food or grease. For stubborn clogs, multiple attempts or additional tools may be needed to clear the drain fully.
What Type Of Plunger Works Best For Kitchen Sinks?
A cup-shaped plunger is best for kitchen sinks. It forms a tight seal over the drain, creating strong suction. Avoid flange plungers, as they are designed for toilets and may not work well on sinks.
How Do I Use A Plunger On A Kitchen Sink?
Fill the sink with enough water to cover the plunger cup. Place the plunger over the drain and push down firmly. Pump it up and down rapidly to dislodge the clog. Repeat until water drains freely.
When Should I Avoid Using A Plunger On My Sink?
Avoid plunging if the sink is completely clogged with no water movement. Also, do not use if you suspect a broken pipe. In these cases, contact a professional plumber to prevent damage.
Conclusion
A plunger can often clear simple kitchen sink clogs fast. It pushes and pulls water to loosen blockages. Stubborn clogs might need extra tools or help. Regular use prevents build-up and keeps drains flowing. Always try gentle methods before harsh chemicals.
Clean your plunger after each use to stay hygienic. Remember, small efforts save costly repairs later. A plunger is a handy tool everyone should know how to use. Simple, quick, and effective for many kitchen sink problems.