
Have you ever needed an apron in a hurry but didn’t have one around? What if you could turn a simple kitchen towel into a stylish, handy apron in minutes?
This easy DIY trick not only saves you money but also adds a personal touch to your cooking routine. Keep reading, and you’ll discover how to make your own apron with just a kitchen towel—no sewing or fancy tools required.
Ready to transform your kitchen experience? Let’s dive in!
Materials Needed
Gathering the right materials is the first step to make a kitchen towel apron. Selecting quality items ensures your apron is both functional and durable. Focus on simple materials that are easy to find.
Choosing The Right Kitchen Towel
Select a kitchen towel that is large enough to cover your front comfortably. Cotton towels work best because they absorb spills and are easy to clean. Look for towels with strong fabric and attractive designs.
- Size should be at least 20 by 30 inches
- Choose thick cotton or linen fabric
- Patterns or colors that match your kitchen style
- Avoid towels with loose threads or weak spots
Additional Supplies
Besides the towel, gather a few simple tools to complete the apron. These help secure the towel around your waist and neck.
- Scissors to cut fabric or strings
- Needle and thread or a sewing machine for stitching
- Ribbon, bias tape, or fabric strips for ties
- Safety pins or fabric glue as alternatives
- Measuring tape to check lengths

Credit: food52.com
Preparing The Towel
Preparing your kitchen towel properly sets the foundation for a comfortable and functional apron. Taking the time to measure and cut accurately ensures the apron fits well and looks neat. Adding a sturdy neck loop will keep your apron secure while you work in the kitchen.
Measuring And Cutting
Start by laying your kitchen towel flat on a clean surface. Measure the width and length to fit your body comfortably, usually around 24 inches wide and 30 inches long works well for most adults.
Mark your cutting lines lightly with a fabric chalk or pencil to avoid mistakes. Cut carefully along the lines, keeping the edges as straight as possible for a polished look.
If your towel has a thick hem, consider trimming it slightly to reduce bulk. Have you checked if your kitchen towel fabric is durable enough to hold up after cutting?
Creating The Neck Loop
For the neck loop, you can use a matching ribbon, a strip of fabric, or even a piece of bias tape. Cut it to a length that fits comfortably around your neck, usually about 20 to 24 inches.
Fold the ends of the neck loop material and sew or glue them securely to the top corners of your towel. This will keep the loop from fraying and ensure it holds up during use.
Test the loop by slipping it over your head to check the fit. Does it sit comfortably without feeling too tight or too loose? Adjust the length as needed before finalizing.
Adding Waist Ties
Adding waist ties is a key step to transform a simple kitchen towel into a functional apron. The ties hold the apron securely in place and allow you to adjust the fit for comfort. Choosing the right materials and attaching them properly will make your apron both durable and stylish.
Selecting Tie Materials
Think about what materials you have at hand or what look you want for your apron. Cotton fabric strips work well because they are soft and easy to tie. You can also use ribbon, twill tape, or even strips cut from old clothing.
Consider the width and length of the ties. Ideally, they should be at least 1 inch wide and long enough to wrap around your waist and tie comfortably. If you want something sturdier, denim or canvas strips are great choices.
Do you want your apron to match your kitchen decor or make a statement? Choosing patterned fabric or a contrasting color can add personality. I once used striped ribbon for my apron ties, and it instantly brightened up a plain towel.
Attaching The Ties
Position the ties evenly on each side of the towel, about halfway down its length. This placement lets the apron wrap neatly around your waist without slipping.
You can sew the ties directly onto the towel for a secure hold. If you don’t sew, fabric glue or strong double-sided tape can work for a quick fix, but sewing is more durable.
Make sure to reinforce the stitches by sewing back and forth a few times at the base of each tie. This prevents them from pulling loose while you’re cooking or cleaning.
Have you tried tying the apron before attaching the ties? This can help you decide the best placement and length for your waist ties. Adjusting as you go saves you from having to redo the work later.
Finishing Touches
Secure the ties firmly and trim any loose threads for a neat look. Double-check the fit and adjust straps to stay comfortable while cooking.
In crafting an apron from a kitchen towel, finishing touches are crucial. They add both functionality and a polished look. Let's explore these essential steps to complete your apron project.
Hemming Edges
Hemming the edges prevents fraying. It gives your apron a neat appearance. Fold the edges of the towel about half an inch inwards. Use pins to hold them in place. Sew along the folded edge. This reinforces the hem. It also ensures long-lasting durability.
Adding Pockets
Pockets add utility to your apron. They're great for holding small kitchen tools. Use leftover fabric or another towel. Cut a rectangle for the pocket. Hem the edges of the pocket piece. Pin the pocket to the apron front. Sew the sides and bottom, leaving the top open. Make sure the stitches are strong. This allows your pocket to handle weight.
Styling Ideas
Styling your apron made from a kitchen towel can turn a simple project into a fun and creative experience. Adding personal touches not only makes your apron unique but also reflects your personality in the kitchen. Have you thought about how small changes can make a big difference in the overall look?
Customizing With Fabric Paint
Fabric paint lets you add patterns, quotes, or even your name to the apron. Use stencils for clean shapes or go freestyle to create something truly original. You don’t need to be an artist—simple dots, stripes, or handprints can add charm and character.
Try layering colors to make the design pop or use metallic fabric paint for a subtle shine. Once dry, the paint is washable and durable, so your apron stays vibrant over time. Have you considered what message or image would inspire you while cooking?
Using Embellishments
Adding embellishments can transform your apron from plain to playful. Sew on buttons, patches, or small pockets for both style and function. Even simple ribbons or lace trims along the edges can create a vintage or whimsical feel.
Think about what you like wearing or what matches your kitchen’s vibe. Maybe a few sewn-on beads or iron-on patches that reflect your hobbies can make the apron a conversation starter. What small detail could make your apron truly yours?
Care And Maintenance
Taking care of your kitchen towel apron helps it last longer and stay fresh. Proper cleaning and storage keep it looking neat and ready to use. Follow simple steps to maintain its quality and color. This keeps your apron functional and attractive over time.
Washing Tips
- Wash the apron in cold or warm water to avoid shrinking.
- Use mild detergent to protect the fabric and colors.
- Avoid bleach; it can weaken the towel fibers.
- Turn the apron inside out to protect any decorations.
- Air dry or use low heat in the dryer to prevent damage.
- Iron on low heat if needed to remove wrinkles.
Storage Suggestions
- Fold the apron neatly to prevent creases and wrinkles.
- Hang it on a hook or hanger to keep it ready for use.
- Store in a dry, cool place to avoid mildew or smells.
- Avoid placing heavy items on top to keep its shape.
- Check the apron regularly for stains or damage to clean promptly.
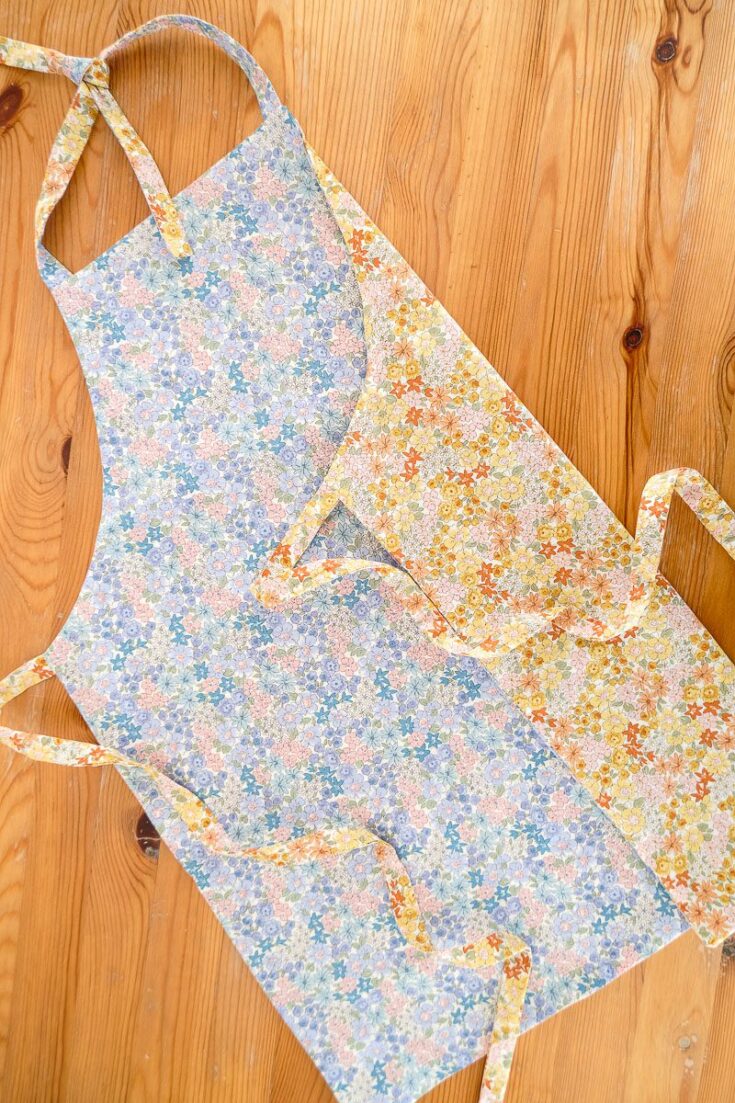
Credit: makylacreates.com
Frequently Asked Questions
What Materials Do I Need To Make An Apron From A Kitchen Towel?
You need a large kitchen towel, scissors, fabric ties or ribbon, and a needle with thread or a sewing machine. These basic materials help you create a simple, functional apron quickly and affordably at home.
How Long Does It Take To Make A Towel Apron?
Making an apron from a kitchen towel usually takes 15 to 30 minutes. It depends on your sewing skills and design complexity. It’s a quick DIY project suitable for beginners and saves money on store-bought aprons.
Can I Customize The Apron Size Using A Kitchen Towel?
Yes, you can customize the apron size by choosing towels with different dimensions. Adjust the ties or straps length to fit your body comfortably. This flexibility makes towel aprons suitable for adults and kids alike.
Is A Kitchen Towel Apron Durable For Cooking?
A kitchen towel apron is durable enough for light to moderate cooking tasks. Use thick cotton towels for better absorbency and stain resistance. However, heavy-duty cooking may require a more robust apron fabric.
Conclusion
Making an apron from a kitchen towel is simple and quick. You only need a few materials and basic steps. This project saves money and helps you reuse old towels. Plus, you get a useful apron that fits just right.
Try it today and enjoy cooking without worrying about spills. Easy, fun, and practical. What’s not to like?