
Have you ever struggled with a stubborn soap dispenser stuck to your kitchen sink? Removing it might seem tricky, but it doesn’t have to be.
Whether you're replacing an old dispenser or just need to clean it thoroughly, knowing the right steps can save you time and frustration. In this guide, you’ll discover simple, effective methods to remove your soap dispenser quickly and safely. Keep reading—you’re just minutes away from mastering this easy kitchen fix!
Tools Needed
Before you start removing the soap dispenser from your kitchen sink, having the right tools is essential. The task can be simple or tricky depending on your sink’s design and the dispenser model. Gathering these tools beforehand saves time and prevents frustration.
Some tools are common in most households, while others might require a quick trip to the hardware store. Do you have everything ready to make this job smooth and hassle-free?
Adjustable Wrench
An adjustable wrench is key for loosening and tightening nuts under the sink. It fits various sizes, so you don’t need multiple wrenches. Without it, you might struggle to access the tight spaces around the dispenser.
Screwdriver Set
Different soap dispensers use different screws. A set with both flathead and Phillips screwdrivers ensures you can handle any screw type. Sometimes screws are hidden or corroded, so having the right screwdriver helps avoid stripping them.
Bucket Or Bowl
Water drips are inevitable when you disconnect plumbing parts. Placing a bucket or bowl under the sink catches drips and keeps your cabinet dry. It’s a small step that prevents a big mess.
Utility Knife Or Razor Blade
If your soap dispenser has caulk or sealant around the base, a utility knife will help you cut through it cleanly. This tool prevents damage to your countertop while freeing the dispenser.
Flashlight
Working under the sink can be dark and cramped. A flashlight brightens the space, helping you see nuts, screws, and connections clearly. Have you ever tried working blind in a cramped cabinet? It’s tough without good lighting.
Towels Or Rags
Keep towels or rags handy for wiping up spills or drying parts. They also provide cushioning when you place tools or parts down. Clean-up becomes much easier with these simple helpers.
Locate The Soap Dispenser
Locating the soap dispenser is the first step to successfully removing it from your kitchen sink. You’ll want to identify its exact position to avoid unnecessary hassle or damage. Sometimes, the dispenser is easy to spot, but other times it might be hidden behind other fixtures or under the sink.
Check Around The Sink Area
Look closely around your sink's edge. Soap dispensers are often installed near the faucet or on the sink deck itself. If you don’t see a visible dispenser, check for small holes or extra spaces that could hold one.
Inspect Under The Sink Cabinet
Open the cabinet doors beneath your sink and use a flashlight to get a better look. The soap dispenser’s reservoir is usually located under the sink, attached directly below the hole where the dispenser sits. Spotting this container can help you trace the dispenser’s exact location.
Identify The Dispenser Pump
Look for the dispenser pump head on the sink surface. It’s usually a small, push-down nozzle that you press to release soap. This pump head is your main clue to where the dispenser is fixed and where you’ll need to focus your removal efforts.
Look For Mounting Hardware
Underneath the sink, check for any mounting nuts or brackets holding the dispenser in place. These are often directly below the pump head and securing the dispenser to the sink. Knowing where these are will make removal easier and prevent damage to your sink or countertop.
Prepare The Area
Clear the sink area to avoid water spills and keep tools handy. Place a towel under the soap dispenser to catch drips and protect the cabinet. Ensure good lighting for better visibility while working.
Removing a soap dispenser from your kitchen sink might seem tricky. But with proper preparation, it becomes manageable. Before diving into the task, setting up your workspace is crucial. This ensures safety and efficiency.
Clear The Counter
Remove all items around the sink. This provides ample space to work. It also prevents accidents or damage to nearby objects. Place items in a safe spot until you finish.
Gather Necessary Tools
Having the right tools is essential. Common tools include a wrench, screwdriver, and pliers. Lay them out within reach. This saves time and reduces frustration during the task.
Protect The Sink Area
Use a towel or cloth to cover the sink. This protects the sink surface from scratches. It also catches any small parts that might drop.
Turn Off The Water Supply
Locate the water valves under the sink. Turn them off to prevent leaks. This step is vital for safety. It ensures no water spills during removal.
Prepare For Cleanup
Have a small bucket or bowl ready. It collects any residual water from the dispenser. Keep a few paper towels nearby too. They help wipe any spills quickly.
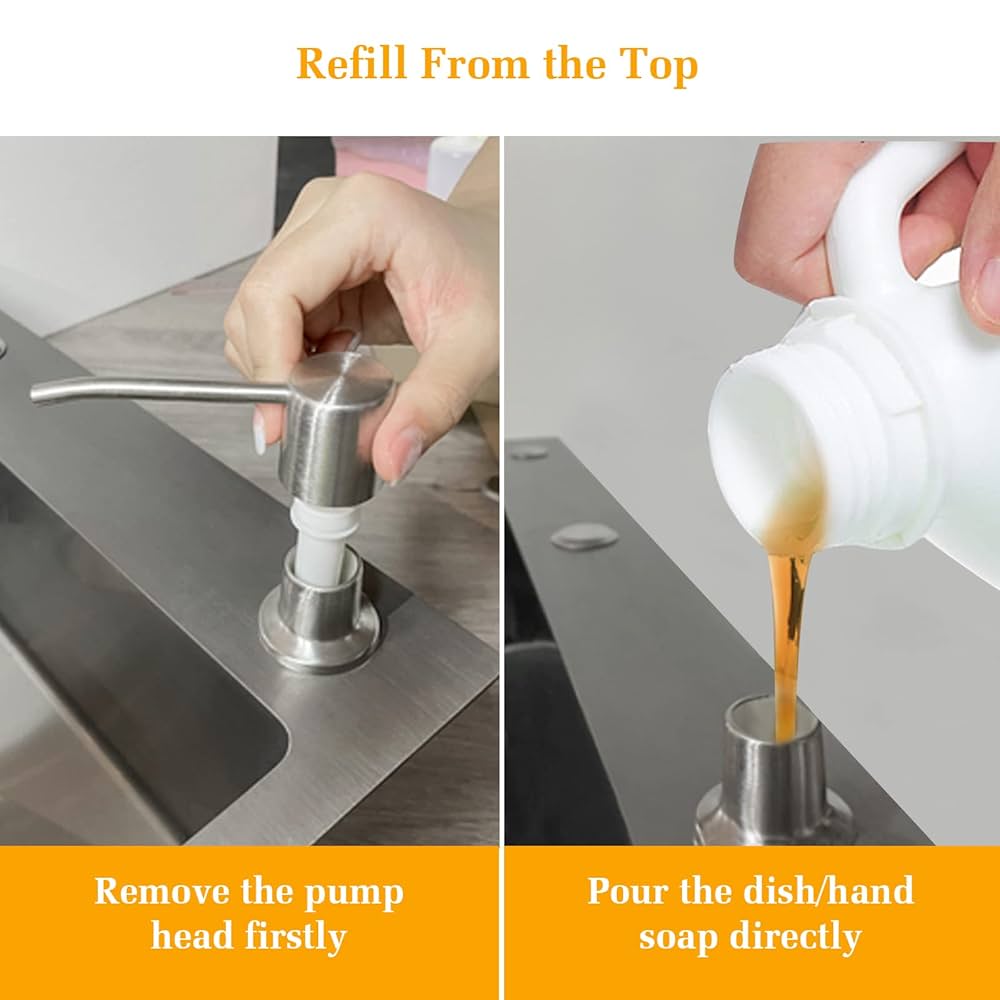
Remove The Soap Bottle
Removing the soap bottle from your kitchen sink soap dispenser is often the first step in maintenance or replacement. It’s a simple task, but doing it correctly can save you from unnecessary mess and frustration. Understanding how to detach the soap bottle without spilling or damaging it is crucial.
Locate The Soap Bottle Under The Sink
Open the cabinet beneath your kitchen sink and look for the soap bottle. It’s usually a plastic container connected by a tube to the dispenser on top of the sink.
Take a moment to check the bottle’s position. Sometimes it’s wedged between pipes or other items, so you might need to move things gently to access it fully.
Unscrew Or Detach The Soap Bottle
Most soap bottles are screwed in place or simply pushed onto the dispenser tube. Grasp the bottle firmly and turn it counterclockwise to unscrew it.
If it feels stuck, avoid forcing it too hard. Instead, wiggle it gently or check for any locking mechanisms that might be holding it in place.
Handle The Soap Bottle Carefully
Soap bottles can be slippery and messy, especially if they’re full. Hold the bottle upright to avoid spilling any liquid soap.
If you expect to reuse the bottle, rinse it out to prevent soap buildup. Otherwise, have a cloth handy to clean up any spills.
Disconnect The Soap Tube
Once the bottle is free, you’ll notice a small tube attached to the dispenser pump. Pull this tube off the bottle’s neck gently.
This tube often holds soap inside, so be prepared for a small drip. Keeping a towel nearby can help you avoid a sticky situation.
Unscrew The Dispenser
Unscrewing the soap dispenser is a key step in removing it from your kitchen sink. This process frees the dispenser from its mounting and allows for easy removal or replacement.
Before unscrewing, clear the area under the sink for better access. Use a flashlight if the space is dark. Locate the nut or mounting bracket holding the dispenser in place.
Locate The Mounting Nut
Look under the sink directly below the soap dispenser. You will see a plastic or metal nut securing the dispenser. This nut holds the dispenser tightly to the sink surface.
Use The Right Tools
Grab an adjustable wrench or pliers. These tools help loosen the mounting nut without damaging it. Avoid using tools that are too large or small for the nut.
Loosen The Nut Carefully
Turn the mounting nut counterclockwise. Apply steady pressure to avoid slipping. If the nut is tight, use a little force but do not over-tighten or break it.
Remove The Soap Dispenser
Once the nut is loose, pull the dispenser up from the sink surface. Some soap dispensers may need a gentle twist while pulling. Check if any parts remain attached and disconnect them carefully.
Disconnect The Pump Mechanism
Disconnecting the pump mechanism is a key step to remove the soap dispenser from your kitchen sink. This part controls the flow of soap and is attached under the sink. Carefully detaching it ensures you don’t damage any components.
Focus on loosening the pump from the dispenser tube and the sink surface. This allows you to safely remove the dispenser for repair or replacement.
Locate The Pump Assembly Under The Sink
Look beneath the sink to find the pump assembly. It is often attached to the soap dispenser tube. Use a flashlight for better visibility.
Unscrew The Lock Nut Holding The Pump
Use your hand or a wrench to turn the lock nut counterclockwise. This nut secures the pump to the sink. Be gentle to avoid stripping the threads.
Detach The Soap Tube From The Pump
Pull the soap tube off the pump nozzle. It may require a slight twist to loosen. Keep a cloth nearby to catch any soap drips.
Remove The Pump Mechanism From The Sink
Once loose, pull the pump mechanism out from the top of the sink. Check for any remaining soap or debris. Clean the area before installing a new dispenser.
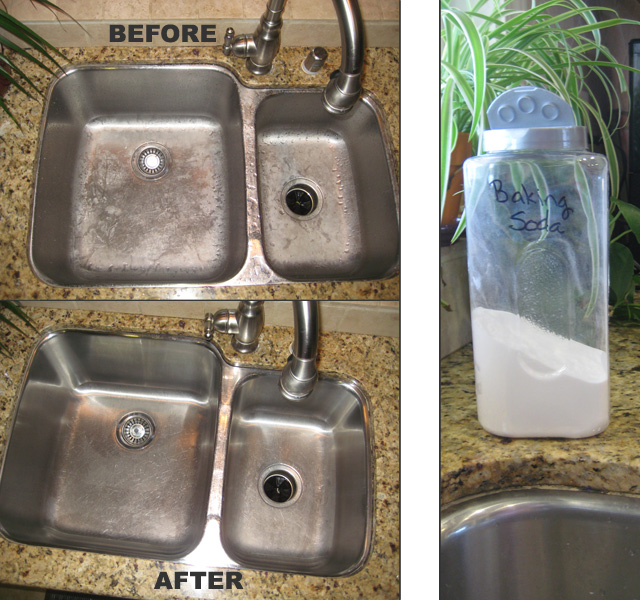
Clean The Sink Area
Cleaning the sink area after removing the soap dispenser is essential to keep your kitchen looking fresh and hygienic. Leftover soap residue and grime can build up quickly, making the sink area sticky and unattractive. Taking the time to clean this space properly will prevent future mess and keep your kitchen feeling inviting.
Gather Your Cleaning Supplies
Before you start scrubbing, make sure you have the right cleaning supplies on hand. You’ll need a mild dish soap, a soft sponge or cloth, an old toothbrush for tight spots, and a clean towel for drying. Avoid harsh chemicals that could damage your sink’s finish or leave harmful residues.
Remove Soap Residue Thoroughly
Soap residue can be stubborn, especially around the base where the dispenser was attached. Use warm water and dish soap to gently scrub the area, paying close attention to crevices and corners. An old toothbrush works perfectly to reach those tight spots without scratching your sink.
Disinfect The Sink Surface
After washing away the soap residue, disinfect the sink surface to kill any lingering bacteria. You can use a mixture of equal parts water and white vinegar or a gentle disinfectant spray. Spray the area, let it sit for a few minutes, then wipe it clean with a soft cloth.
Dry And Polish For A Spotless Finish
Once cleaned and disinfected, dry the sink area completely with a clean towel to avoid water spots. Polishing the sink with a microfiber cloth adds a nice shine and helps repel water in the future. Don’t forget to check the faucet base and surrounding countertop for any missed spots.
Inspect For Damage Or Wear
While cleaning, take a moment to inspect the sink and countertop for any signs of damage or wear. Look for cracks, stains, or rust spots that might need attention. Catching these issues early can save you from costly repairs later on.
Credit: www.lisabronner.com
Troubleshooting Common Issues
Dealing with a kitchen sink soap dispenser that doesn’t work properly can be frustrating. Before you think about replacing the entire unit, try to identify what’s wrong. Many common issues are easy to fix once you know what to look for. Let’s break down some typical problems you might face and how to handle them.
Stuck Dispenser
A soap dispenser that won’t pump might be stuck due to dried soap or debris clogging the nozzle. Try soaking the pump head in warm water to soften hardened soap. If that doesn’t work, use a toothpick or a small brush to clear out any blockages carefully.
Sometimes, the spring inside the pump can get jammed. Press the pump several times while holding it under warm water to loosen it up. If it remains stuck, consider removing the dispenser from the sink to inspect the mechanism closely.
Leaking Dispenser
Leaks usually happen because the dispenser isn’t sealed correctly or the soap container has cracks. Check the base where the dispenser meets the sink for loose fittings. Tighten any screws or nuts holding the dispenser in place to stop soap from leaking out.
If the leak comes from the soap reservoir, inspect it for cracks or damage. Replacing the reservoir is often cheaper and easier than buying a new dispenser. Also, avoid overfilling the dispenser, as excess soap can cause leaks.
Broken Pump
A pump that doesn’t work at all might be broken internally. This can happen if the spring or the pump mechanism wears out over time. If you notice the pump doesn’t return to its original position after pressing, it’s likely broken.
You can try to replace the pump head itself if your model allows it. Otherwise, removing the dispenser and installing a new one might be the best solution. Have you checked if your dispenser’s parts are available separately before deciding?

Credit: www.amazon.co.uk
Frequently Asked Questions
How Do I Safely Remove A Soap Dispenser From Kitchen Sink?
Turn off the water supply first. Unscrew the dispenser from underneath the sink. Disconnect the hose and pull the dispenser out carefully.
What Tools Are Needed To Remove A Kitchen Soap Dispenser?
You typically need an adjustable wrench, pliers, and a screwdriver. These help loosen nuts and disconnect hoses easily.
Can I Remove A Soap Dispenser Without Damaging My Sink?
Yes, by loosening connections gently and avoiding force. Use proper tools and follow step-by-step instructions to prevent damage.
How Do I Disconnect The Soap Dispenser Hose?
Locate the hose under the sink. Twist or pull the hose connector carefully to detach it from the dispenser.
Conclusion
Removing a soap dispenser from your kitchen sink is simple. Start by turning off the water supply. Then, disconnect the soap tube carefully. Unscrew the dispenser from underneath the sink. Clean any leftover soap or debris around the hole. Doing this can help you replace or fix the dispenser easily.
Take your time and follow each step clearly. This way, you avoid damage and mess. Now, you can install a new dispenser or cover the hole. A small task that keeps your kitchen neat and working well.