
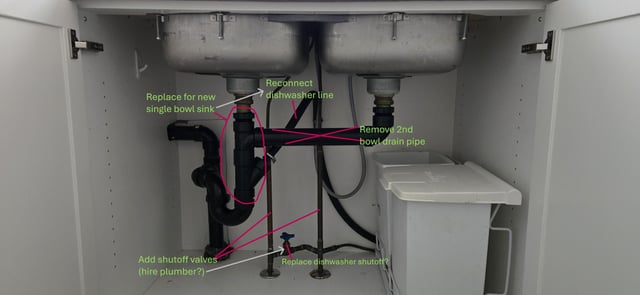
Are you ready to take charge of your kitchen plumbing and save money on costly repairs? Learning how to plumb a kitchen sink with a dishwasher might seem tricky, but with the right steps, you can do it yourself—and enjoy the satisfaction of a job well done.
Imagine having your dishwasher connected perfectly, with no leaks or hassles, making your kitchen run smoothly every day. In this guide, you’ll discover simple, clear instructions that anyone can follow, even if you’re not a plumbing expert. Keep reading, and by the end, you’ll feel confident to tackle this project on your own.
Your kitchen upgrade starts here!
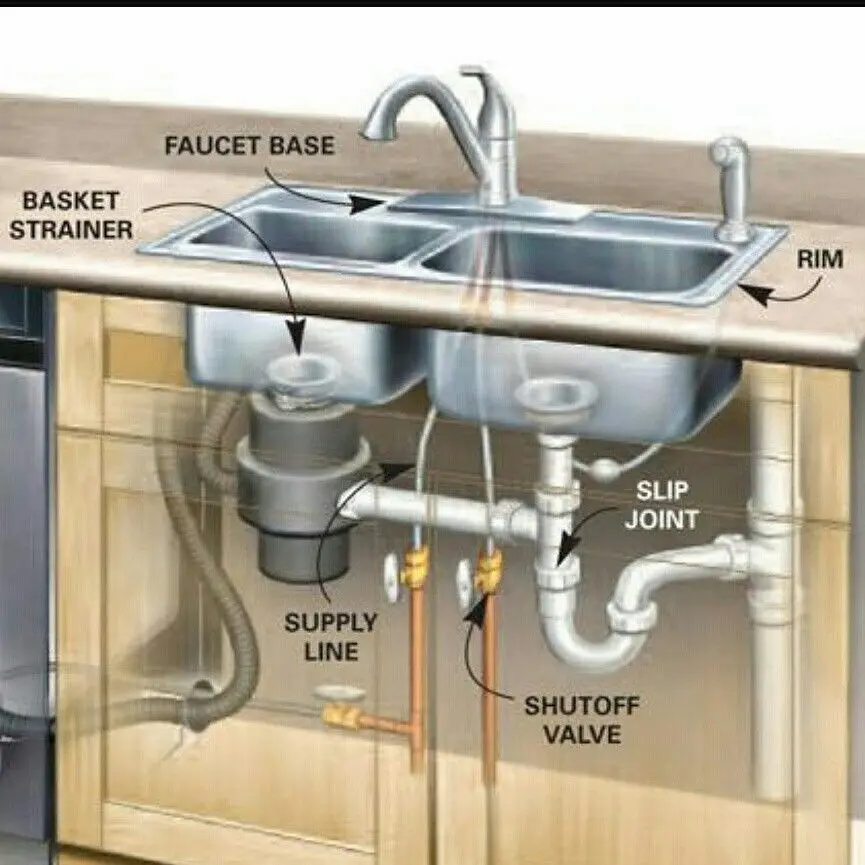
Credit: pipeitrightrepipe.com
Tools And Materials Needed
Before you begin plumbing your kitchen sink with a dishwasher, gathering the right tools and materials is crucial. Having everything on hand saves time and avoids frustrating trips to the hardware store. It also ensures your work is safe, effective, and up to code.
Essential Plumbing Tools
- Adjustable Wrench:Perfect for tightening and loosening nuts of various sizes without damaging pipes.
- Pipe Wrench:Offers a strong grip on metal pipes, essential for older plumbing setups.
- Slip-Joint Pliers:Handy for gripping irregular shapes and turning small nuts.
- Hacksaw:Needed to cut PVC or metal pipes to fit your setup.
- Pipe Cutter:Provides clean, straight cuts on PVC pipes, making assembly easier.
- Plumber’s Tape (Teflon Tape):Prevents leaks by sealing threaded connections tightly.
- Bucket and Towels:Essential for catching water spills and keeping your workspace clean.
Materials For Connecting Your Sink And Dishwasher
- PVC Pipes and Fittings:Used to connect the sink drain and dishwasher drain line.
- Dishwasher Drain Hose:Connects your dishwasher to the sink’s drainage system.
- Tailpiece with Dishwasher Branch:A pipe fitting that allows the dishwasher drain hose to tie into the sink drain.
- Trap Adapter:Helps connect the sink’s P-trap to the drain assembly.
- Pipe Sealant or Plumber’s Putty:Ensures watertight seals around fittings and joints.
- Hose Clamps:Secure the dishwasher drain hose to prevent leaks.
Safety Gear And Miscellaneous Items
- Safety Glasses:Protect your eyes from debris and water splashes.
- Gloves:Keep your hands clean and safe from sharp edges.
- Flashlight or Work Light:Helps you see clearly under the sink, especially in tight spaces.
- Measuring Tape:Ensures pipes are cut to the right length for a smooth fit.
Do you have these tools ready? Missing even one can slow down your project. I once started plumbing without a pipe cutter and ended up using a hacksaw awkwardly, which made the pipe edges rough and hard to seal. Getting the right tools beforehand makes the job smoother and your kitchen leak-free.
Prepare The Work Area
Preparing the work area is the first task before plumbing a kitchen sink with a dishwasher. A neat and organized space helps avoid mistakes. It also makes the job safer and faster. Clear the area under the sink and around it. Remove any items that might get in the way or get damaged by water.
Gather all tools and materials needed. Having everything close by saves time and frustration. Check for leaks or old pipes that need replacement. A clean workspace gives a clear view of plumbing parts.
Clear The Cabinet Space
Empty the cabinet under the kitchen sink completely. Remove boxes, cleaning supplies, or trash. Wipe down the inside to remove dust and dirt. This space needs to be free for easy access to pipes and fittings.
Turn Off Water Supply
Locate the water shut-off valves beneath the sink. Turn them clockwise to stop water flow. If no valves are there, turn off the main water supply. Open the faucet to drain remaining water. This prevents leaks and water damage while working.
Gather Necessary Tools And Materials
- Adjustable wrench
- Pipe wrench
- Plumber’s tape
- Bucket to catch water
- Dishwasher drain hose
- Sink drain assembly
- Flexible water supply lines
Check each tool for proper condition. Having these ready avoids interruptions during work.
Ensure Proper Lighting
Good lighting is essential for plumbing tasks. Use a bright flashlight or portable lamp if needed. Poor lighting can cause errors or missed connections. A well-lit space improves accuracy and safety.
Turn Off Water And Power
Turn off water and power to ensure safety during installation. This prevents leaks and electrical hazards while connecting pipes.
Turning off water and power is crucial before plumbing a kitchen sink with a dishwasher. It ensures safety and prevents water damage. Taking this step can save you from potential hazards. Follow the instructions below to proceed safely.
Turn Off The Water Supply
Locate the water valves under your sink. Turn them clockwise to stop water flow. Ensure both hot and cold water valves are off. Check by turning on the faucet. If no water flows, you have successfully turned it off.
Switch Off The Power
Find the electrical circuit breaker for your kitchen. Flip the switch to cut power to the dishwasher. This prevents electric shock during installation. Confirm by attempting to power on the dishwasher. It should not turn on.
Ensure Complete Safety
Double-check both water and power are off. This step guarantees a safe working environment. Keep tools and other items dry. It reduces the risk of accidents.
Install The Sink Drain
Installing the sink drain is a key part of plumbing a kitchen sink with a dishwasher. It connects your sink to the home's plumbing system and ensures water flows out smoothly. This step requires attention to detail to avoid leaks and clogs.
Start by preparing the sink drain opening. Clean the area around the hole to remove any dirt or debris. This helps the sealant stick better and prevents leaks.
Attach The Drain Flange
Place plumber’s putty around the drain opening on the sink. Press the drain flange firmly into the hole. From under the sink, screw the gasket and nut onto the drain flange. Tighten the nut by hand, then use a wrench for a snug fit. Wipe away any excess putty that squeezes out.
Connect The Tailpiece
Attach the tailpiece to the drain flange. This pipe directs water down to the drain trap. Use a slip nut and washer to secure it. Hand-tighten the nut, then use pliers to ensure a tight seal. Avoid over-tightening to prevent damage.
The P-trap prevents sewer gases from entering your kitchen. Connect it to the tailpiece and the drain pipe in the wall. Use slip nuts and washers to join each connection. Align all parts properly to avoid leaks. Check that the trap is level and secure.
Connect Dishwasher Drain Hose
Locate the dishwasher drain inlet on the drain assembly. Attach the dishwasher drain hose using a clamp. Tighten the clamp with a screwdriver to secure the hose. Ensure the hose is not kinked or bent, which could block water flow.
Test For Leaks
Run water through the sink drain and check for leaks. Inspect all connections carefully. Tighten any loose fittings as needed. Fix leaks before finishing the installation to avoid water damage.
Connect The Dishwasher Drain Hose
Connecting the dishwasher drain hose properly is essential to avoid leaks and ensure smooth drainage. If this step is done incorrectly, you might face water backup or even damage your kitchen cabinets. Pay close attention to the hose attachment and how you secure it to the sink drain system.
Attach To Sink Drain
Start by locating the dishwasher drain port on the sink drain assembly. This is usually a small, raised nozzle designed specifically for the dishwasher hose connection.
Slide the hose onto this drain port firmly. Use a hose clamp to tighten the connection and prevent any leaks. If the clamp feels loose, replace it with a new one rather than risking a weak seal.
Have you ever noticed water pooling under your sink? A loose connection here is often the culprit. Ensuring a snug fit can save you from this common problem.
Use Air Gap Or High Loop
To prevent dirty water from flowing back into your dishwasher, you need either an air gap or a high loop in the drain hose.
- Air Gap:This is a small device installed on your sink or countertop. It creates a physical break in the hose, stopping backflow.
- High Loop:If you don’t have an air gap, loop the hose up under the countertop edge before it connects to the drain. The high point acts as a barrier against backflow.
Choosing between these options depends on your local plumbing codes and your kitchen setup. Have you checked what’s allowed in your area? Adding this step might seem small, but it protects your dishwasher and keeps your dishes clean.

Credit: www.reddit.com
Install The P-trap
Installing the P-trap is a key step in plumbing a kitchen sink with a dishwasher. The P-trap prevents sewer gases from entering your home. It also keeps the sink draining smoothly. Proper installation avoids leaks and blockages.
This part fits under the sink drain and connects to the wall pipe. It forms a water seal that blocks odors. The P-trap must align correctly with the sink drain and waste pipe. Tight seals on all connections stop water from escaping.
Gather Necessary Tools And Materials
- P-trap assembly (usually PVC or metal)
- Pipe wrench or adjustable pliers
- Plumber’s tape (Teflon tape)
- Slip joint washers and nuts
- Bucket to catch water
- Rag for cleanup
Attach The P-trap To The Sink Drain
Start by placing the slip joint washer and nut on the sink tailpiece. Slide the P-trap’s curved section onto the tailpiece. Hand-tighten the nut to hold it in place. Ensure the trap’s opening faces the wall pipe connection.
Connect The P-trap To The Waste Pipe
Slide the washer and nut onto the waste pipe. Push the P-trap’s other end onto the waste pipe. Tighten the slip joint nut by hand. Use a wrench for a snug fit but avoid overtightening. Check alignment before fully tightening.
Seal And Test For Leaks
Wrap plumber’s tape around threaded connections if needed. Place a bucket under the trap. Run water through the sink and dishwasher drain. Watch carefully for drips or wet spots. Tighten connections slightly if leaks appear.
Connect Water Supply Lines
Connecting the water supply lines is a crucial part of plumbing your kitchen sink with a dishwasher. It ensures that both your sink faucet and dishwasher receive the right amount of water without leaks or pressure issues. Getting this step right saves you from future water damage and unnecessary repairs.
Gather The Necessary Tools And Materials
Before you start, make sure you have all the tools and parts on hand. You’ll need a flexible water supply line, adjustable wrenches, plumber’s tape, and shutoff valves. Having everything ready keeps the process smooth and prevents mid-job trips to the hardware store.
Turn Off The Main Water Supply
Never attempt to connect water lines without shutting off the main water supply first. This simple step protects you from unexpected water sprays and potential flooding. Double-check by opening a faucet to confirm the water is off.
Attach Shutoff Valves To The Water Pipes
Install shutoff valves under the sink if they aren’t already there. These valves let you control water flow to the sink and dishwasher independently. It’s a small upgrade that gives you control and makes future repairs easier.
Connect The Sink Water Supply Line
Wrap plumber’s tape around the threaded ends of the water pipe to prevent leaks. Then, securely attach the flexible supply line from the shutoff valve to the faucet inlet. Tighten the connections with an adjustable wrench but avoid overtightening, which can damage fittings.
Connect The Dishwasher Water Supply Line
Locate the dishwasher’s water inlet valve, usually on the side or back of the appliance. Use a flexible supply line to connect the shutoff valve to this inlet. Make sure the connection is firm and sealed with plumber’s tape to avoid water drips.
Test For Leaks And Proper Water Flow
Once everything is connected, turn the main water supply back on. Open both shutoff valves and observe all connections closely. If you notice drips, tighten the fittings slightly. A leak-free setup means your kitchen plumbing is ready for daily use.

Credit: www.reddit.com
Check For Leaks
Checking for leaks is a crucial part of plumbing your kitchen sink with a dishwasher. Even a small drip can cause water damage over time and lead to costly repairs. Taking the time to inspect your connections thoroughly helps ensure your kitchen stays dry and your system works efficiently.
Visual Inspection Of All Connections
Start by closely examining every joint and connection where pipes meet. Look for any signs of moisture, corrosion, or water stains around the fittings. Pay special attention to the dishwasher drain hose and the trap under the sink, as these areas are common leak points.
Use a flashlight to get a clear view in tight spaces. Sometimes leaks show up as tiny droplets or damp spots that are easy to miss. Have a cloth handy to wipe around connections and then check for fresh wetness after running water.
Running Water And Dishwasher Testing
Turn on your kitchen faucet and run the dishwasher through a complete cycle. Watch the connections closely as water flows through the system. This helps reveal leaks that only appear under pressure or when the dishwasher is draining.
Keep an eye on the garbage disposal connection if your dishwasher drains into it. If you spot any water escaping, tighten the clamps or replace worn-out seals immediately. Testing under real use conditions gives you confidence that everything is sealed properly.
Using Tissue Or Paper Towels To Detect Leaks
Place dry tissue or paper towels around suspected leak points. After running water or the dishwasher, check the towels for damp spots. This simple trick can reveal small leaks that are hard to see with the naked eye.
If you find wet areas on the towel, it’s a clear sign you need to tighten fittings or replace washers. This method is quick and effective, especially in hard-to-reach places where visual checks alone might not be enough.
What To Do If You Find A Leak
Stop the water immediately and dry the area thoroughly. Tighten loose connections using a wrench, but avoid overtightening as it can damage fittings. If the leak persists, replace the faulty part like a washer, hose, or gasket.
Sometimes, a sealant or plumber’s tape can help create a watertight connection. Don’t ignore leaks even if they seem minor—fixing them early saves you from bigger problems later. Are you ready to tackle those leaks and keep your kitchen dry?
Test The Dishwasher Drainage
Testing your dishwasher drainage is a crucial step after plumbing your kitchen sink with a dishwasher connection. It ensures that water flows correctly from the dishwasher to the sink drain without any leaks or backups. Skipping this step can lead to water damage or inefficient dishwasher performance.
Check For Visible Leaks Around Connections
Start by running a short wash cycle on your dishwasher. While it’s running, carefully inspect all the plumbing connections, especially where the dishwasher drain hose meets the sink drain or garbage disposal. Look for any signs of water dripping or moisture buildup.
If you spot any leaks, tighten the hose clamps or fittings immediately. A minor adjustment can save you from major repairs later.
Ensure Proper Water Flow Through The Drain Hose
Watch the dishwasher drain hose as the machine empties water. You should see water moving steadily through the hose without any pauses or backflow. If water backs up or drains slowly, the hose might be kinked or clogged.
Try straightening the hose or cleaning it out to improve flow. This simple check prevents standing water in your dishwasher, which can cause odors or damage.
Listen For Unusual Noises During Drainage
Pay attention to strange sounds like gurgling or sputtering when the dishwasher drains. These noises often indicate air trapped in the drain line or partial blockages. They can also hint at incorrect installation of the drain hose.
Adjust the hose height or reseat the connections to fix these issues. Quiet drainage means your system is working smoothly.
Test With A Garbage Disposal Or Air Gap Installed
If your dishwasher drain connects to a garbage disposal or has an air gap, test their function during drainage. Run the dishwasher and watch for any leaks or water spillage around these components.
Make sure the disposal or air gap is free of clogs, and the dishwasher hose is securely attached. This ensures your kitchen stays dry and your dishwasher drains properly.
How Often Should You Test Dishwasher Drainage?
Regular testing can save you headaches down the line. Consider checking your dishwasher drainage every few months or after any kitchen plumbing work. Early detection of problems keeps your dishwasher running efficiently.
Have you ever experienced slow drainage or leaks after installation? Testing your drainage right away can prevent these common issues before they worsen.
Frequently Asked Questions
How Do I Connect A Dishwasher To A Kitchen Sink Drain?
You connect the dishwasher drain hose to the sink drain's dishwasher inlet. Use a dishwasher air gap or a high loop to prevent backflow.
What Tools Are Needed To Plumb A Kitchen Sink With Dishwasher?
You'll need a wrench, screwdriver, plumber’s putty, PVC pipe cutter, and plumber’s tape. These tools help ensure tight, leak-free connections.
Can I Use The Garbage Disposal For Dishwasher Drainage?
Yes, most dishwashers drain into the garbage disposal inlet. Remove the knockout plug before connecting the drain hose.
How Do I Prevent Leaks When Plumbing A Dishwasher Drain?
Use plumber’s tape on threaded connections and tighten fittings securely. Check all joints for leaks after installation.
Conclusion
Plumbing a kitchen sink with a dishwasher is simple with clear steps. Start by gathering all needed tools and parts. Follow the guide carefully to connect pipes and hoses properly. Check all connections to avoid leaks and ensure smooth water flow.
Take your time and work safely to get the best results. This task saves money and helps you learn a useful skill. Now, your kitchen sink and dishwasher can work together without trouble. Give it a try and enjoy a well-plumbed kitchen space.