
Is your kitchen sink soap dispenser leaking, clogged, or just not working right? You’re not alone, and fixing it might be easier than you think.
Removing your soap dispenser can feel tricky, but with the right steps, you can do it yourself without calling a plumber. In this guide, you’ll learn simple, clear instructions to safely take out your kitchen sink soap dispenser. Keep reading, and you’ll have the confidence to handle this common kitchen fix quickly and easily.
Tools Needed
Removing a kitchen sink soap dispenser requires a few simple tools. Having the right tools makes the job faster and easier. These tools help you access hard-to-reach places and safely remove the dispenser parts.
Keep these tools ready before starting. They are common in most home toolkits. Using the correct tools protects your sink and dispenser from damage.
Adjustable Wrench
An adjustable wrench helps loosen nuts under the sink. It fits different sizes of fasteners. Use it to disconnect the soap dispenser from the sink securely.
Screwdriver
A screwdriver removes screws holding the dispenser in place. Most dispensers use either a flathead or Phillips screwdriver. Choose the right type to avoid stripping screws.
Pliers
Pliers provide a strong grip on small parts and hoses. Use them to hold or twist components that are hard to reach. Needle-nose pliers work best for tight spaces.
Bucket Or Bowl
A bucket or bowl catches any water or soap that may drip. Place it under the sink before loosening the dispenser. This keeps your area clean and dry.
Towel Or Rag
A towel helps wipe up spills and dry parts. It also protects the sink surface from scratches. Keep it nearby for quick cleanups during the removal process.
Prepare The Area
Preparing the area is a key step before removing your kitchen sink soap dispenser. It helps keep the workspace clean and safe. Clearing the space makes the task easier and faster. Taking a few simple precautions prevents water damage and mess.
Start by gathering all necessary tools and materials nearby. This keeps everything within reach, so you don’t waste time searching. Place a towel or bucket under the sink to catch any drips or spills. Protecting your cabinet floor from water is important.
Turn off the water supply to avoid leaks during removal. This simple action prevents water from spraying or pooling. Make sure the area is well-lit so you can see clearly. Good lighting reduces mistakes and helps spot connections.
Clear The Sink And Surrounding Countertop
- Remove all items from around the sink.
- Clear soap bottles, sponges, and dish racks.
- Wipe the countertop dry.
- Make room for tools and parts.
Gather Essential Tools And Supplies
- Adjustable wrench
- Screwdriver
- Bucket or bowl
- Old towels or rags
- Flashlight or portable light
Protect The Cabinet Interior
- Place a towel or plastic sheet under the sink.
- Use a bucket to catch water from disconnected hoses.
- Clear items stored under the sink to avoid damage.
- Locate the shut-off valves under the sink.
- Turn valves clockwise to close water flow.
- Open the faucet to drain any remaining water.
Turn Off Water Supply
Turn off the water supply before removing the kitchen sink soap dispenser. Locate the shut-off valves under the sink. Twist them clockwise to stop the water flow.
Turning off the water supply might seem like an obvious step, but it's crucial when you're planning to remove a kitchen sink soap dispenser. Skipping this can lead to unexpected water sprays or leaks. Let's explore how to do this efficiently and safely.
Identify The Valves
First, locate the water supply valves under your sink. Typically, you'll find two valves: one for hot water and another for cold. If you're unsure, follow the pipes from your faucet to the valves.
Turn The Valves Off
Once you've identified the valves, turn them clockwise to shut off the water. It should only take a few turns to completely stop the flow. Test by turning on the faucet to ensure no water is coming through.
Check For Leaks
After turning off the valves, take a moment to check for any leaks. This step can save you from potential water damage. If you notice any drips, tighten the valves a bit more or inspect for any issues.
Consider Safety Measures
Ensure your workspace is safe and dry. Use a towel or cloth to wipe any residual water around the area. This not only keeps your workspace tidy but also prevents slips and falls. Taking the time to properly turn off the water supply can save you from a lot of hassle. Have you ever skipped this step and regretted it? Share your experiences in the comments below!

Credit: www.kraususa.com
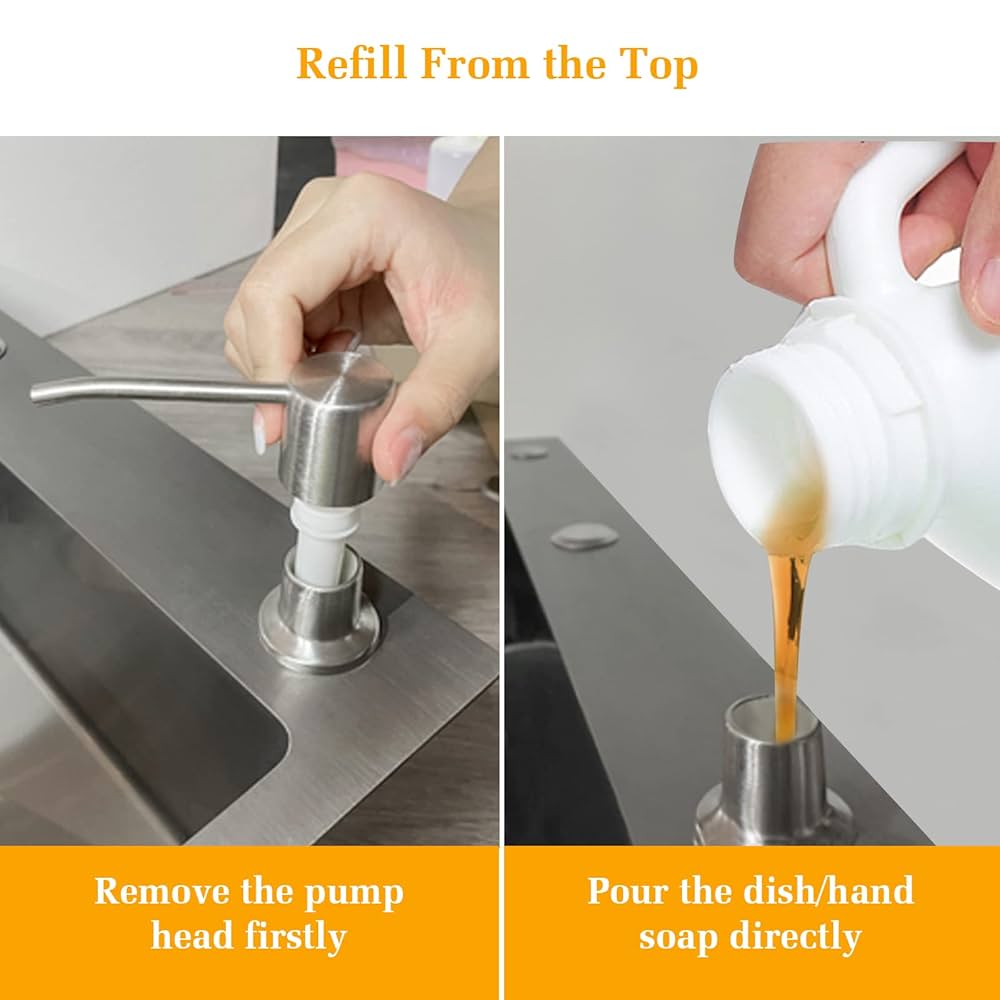
Remove Soap Dispenser Pump
Removing the soap dispenser pump is a simple task. It helps when you need to clean or replace the dispenser. The pump sits on top of the sink and connects to the soap reservoir below. Taking it off carefully prevents damage and leaks.
Locate The Pump On The Sink
Find the soap dispenser pump on the sink surface. It usually looks like a small nozzle or spout near the faucet. Check if it has soap around it, which shows the dispenser’s position clearly.
Press Down And Twist The Pump
Press the pump head down gently. Turn it counterclockwise to unlock it. The pump should unscrew with a little effort. Avoid forcing it to prevent breaking the parts.
Lift The Pump Out Of The Hole
Once loose, pull the pump straight up. It will come out easily from the sink hole. Take care not to spill any soap from the tube attached underneath.
Disconnect The Soap Tube From The Pump
- Look under the sink to find the soap tube connected to the pump.
- Grip the tube close to the pump base.
- Pull the tube gently to detach it from the pump.
- Keep the tube clean to avoid clogging later.
Disconnect Soap Bottle
Disconnecting the soap bottle is a key step when removing your kitchen sink soap dispenser. It ensures you avoid any spills or leaks that could make your workspace messy. Taking your time with this part makes the whole process smoother.
Locate The Soap Bottle Under The Sink
Look directly beneath your sink to find the soap bottle attached to the dispenser. It usually hangs from the sink basin and connects via a tube to the soap dispenser on top.
If you’re unsure, gently feel around for a plastic bottle or container connected by a thin hose. This is the soap bottle you need to disconnect.
Prepare A Towel Or Small Container
Soap bottles often have some leftover liquid inside. You don’t want to spill it all over your cabinet or floor. Place a towel or small container beneath the bottle to catch any drips.
This simple step saves you from cleaning up a sticky mess later, making your work area cleaner and safer.
Detach The Soap Tube From The Bottle
Carefully pull the soap tube away from the bottle’s opening. Sometimes it can be snug, so gently twist the tube while pulling to ease it off.
If the tube feels stuck, don’t force it; check if there’s a clip or fastener holding it in place. Removing that first prevents damage to the tube or bottle.
Remove The Soap Bottle From Its Holder
After disconnecting the tube, lift the soap bottle out of its holder or bracket. Some bottles simply slide out, while others may have a locking mechanism you need to release.
Check for any clips or tabs that might be securing the bottle. Releasing these ensures you can remove the bottle without breaking anything.
Store Or Dispose Of The Soap Bottle Properly
Decide if you want to keep the soap bottle for reuse or throw it away. If you plan to reuse it, clean it thoroughly before storing.
Empty bottles can be recycled depending on your local guidelines. Have you checked what your area allows for plastic recycling? It’s worth knowing to reduce waste.
Unscrew The Dispenser Base
Unscrewing the dispenser base is the key step to remove the kitchen sink soap dispenser. This base holds the dispenser securely to the sink. Removing it frees the dispenser for easy cleaning or replacement.
Before you start, clear the area under the sink. This gives you room to work and see the parts clearly. Use a flashlight if needed. The dispenser base is usually fastened with a nut or screw from underneath the sink.
Locate The Dispenser Base Under The Sink
Look directly under the sink at the soap dispenser’s tube. The base is where the tube connects to the sink surface. It often has a large plastic or metal nut holding it in place.
Use The Right Tool To Loosen The Nut
Use an adjustable wrench or pliers to grip the nut. Turn it counterclockwise to loosen. If it feels stuck, apply gentle, steady pressure to avoid damage.
Support The Dispenser While Unscrewing
Hold the dispenser top firmly from above the sink. This prevents it from turning or falling while you unscrew the base below.
Remove The Base And Lift Out The Dispenser
Once the nut is loose, slide it away from the sink. Pull the dispenser out carefully from above the sink. Check for any remaining soap or debris to clean.
Clean The Sink Surface
Cleaning the sink surface is important before removing a kitchen sink soap dispenser. Dirt and soap buildup can make the area slippery and hard to work on. A clean surface helps prevent damage and makes the process smoother.
Start by wiping the sink with a damp cloth. This removes loose debris and dust. Next, use a mild cleaner to break down soap scum and grease. Avoid harsh chemicals that might harm the sink finish.
Pay special attention around the soap dispenser base. This area often collects grime and residue. Use a soft brush or sponge to scrub gently. Rinse well with clean water to remove all cleaning agents.
Dry the sink surface with a soft towel. A dry surface reduces slipping and improves grip while working. This simple step protects your sink and makes dispenser removal easier.
Gather Cleaning Supplies
- Mild dish soap or all-purpose cleaner
- Soft sponge or cloth
- Soft brush for tough spots
- Clean water for rinsing
- Soft towel for drying
Remove Surface Debris
Wipe the sink surface with a damp cloth. Remove loose dirt and dust. Focus on the area around the dispenser.
Apply Cleaner To Soap Scum
Use a mild cleaner to target soap scum and grease. Apply it with a sponge. Let it sit a few minutes for better effect.
Scrub Gently Around Dispenser Base
Use a soft brush to clean hard-to-reach spots. Avoid scrubbing too hard to protect the sink finish.
Rinse And Dry Thoroughly
Rinse the sink surface with clean water. Remove all cleaner residue. Dry with a soft towel to avoid slipping during removal.

Credit: www.amazon.com
Troubleshooting Common Issues
Dealing with a kitchen sink soap dispenser that won’t cooperate can be frustrating. Some issues, like a stuck pump or leaking parts, are common but often fixable without calling a plumber. Understanding these problems helps you get your dispenser working smoothly again.
Stuck Dispenser
A dispenser that won’t pump soap usually means the pump mechanism is stuck or clogged. Soap residue can harden inside the pump, blocking movement.
Try loosening the pump by twisting it gently back and forth. If it doesn’t budge, soaking the pump head in warm water can soften dried soap.
Have you checked inside the dispenser tube? Sometimes debris or soap buildup blocks the flow. Cleaning the tube with a small brush or pipe cleaner often clears the blockage.
Leaking Connections
Leaks around the soap dispenser base or beneath the sink usually come from loose or damaged connections. Inspect the nut securing the dispenser from underneath and tighten it if it feels loose.
If tightening doesn’t stop the leak, check the rubber gasket or O-ring for cracks or wear. Replacing these seals is an inexpensive fix that often solves leaking issues.
Don’t forget to examine the soap reservoir itself. Cracks or damage can cause leaks that appear as if they come from the connections. Swapping out a damaged bottle or container can save you a lot of hassle.
Tips For Replacing Or Upgrading
Replacing or upgrading your kitchen sink soap dispenser can refresh your kitchen's look and improve functionality. Whether you’re swapping out an old, leaky dispenser or just want a modern upgrade, a few smart tips can make the process easier and more effective.
Think about what features matter most to you. Do you want a larger reservoir so you refill less often? Or maybe a dispenser with a smoother pump action to avoid drips? Knowing what you want helps you pick the best replacement.
Choosing The Right Replacement Dispenser
Measure the hole size in your sink or countertop before buying a new dispenser. Not all dispensers fit the same size opening, so this step avoids frustration later.
Look for dispensers made from durable materials like stainless steel or brass. These last longer and resist corrosion better than plastic models.
Preparing For Installation
Have basic tools ready: a wrench, screwdriver, and plumber’s putty or silicone sealant. These help secure the dispenser tightly and prevent leaks.
Clean the area around the sink hole thoroughly before installing the new dispenser. Residue or grime can stop the seal from sticking properly.
Testing Your New Soap Dispenser
After installation, pump soap a few times to prime the dispenser. Check carefully for any leaks underneath the sink.
Adjust the tightness of the mounting nut if you notice wobbling. A snug fit ensures stability and smooth operation.
Upgrading For Style And Convenience
Consider dispensers with refillable bottles for easy soap changes. Some models have transparent reservoirs so you can see when soap is running low.
Think about matching your dispenser’s finish to your faucet or cabinet hardware for a coordinated look. Small details can make a big difference in your kitchen’s overall style.
Ready to give your kitchen sink soap dispenser a fresh update? What features would make your kitchen routine smoother?

Credit: www.amazon.co.uk
Frequently Asked Questions
How Do I Remove A Kitchen Sink Soap Dispenser?
To remove a kitchen sink soap dispenser, first disconnect the soap bottle underneath. Then, unscrew the mounting nut securing the dispenser to the sink. Finally, lift the dispenser pump out from above the sink.
What Tools Are Needed To Remove The Soap Dispenser?
You typically need an adjustable wrench or pliers to unscrew the mounting nut. A towel helps to catch any drips. Sometimes, a screwdriver may be needed to loosen any clamps or fasteners.
Can I Remove The Soap Dispenser Without Shutting Off Water?
Yes, you can remove the soap dispenser without turning off water. The dispenser is separate from the water supply, so no water shutdown is required.
How Do I Prevent Soap Leakage When Removing Dispenser?
Place a towel or small container under the dispenser to catch drips. Disconnect the soap bottle carefully to avoid spills. Wipe any soap residue immediately for cleanliness.
Conclusion
Removing a kitchen sink soap dispenser is easier than it seems. Start by turning off the water supply and clearing the area under the sink. Use basic tools to loosen the dispenser’s parts carefully. Take your time to avoid damage.
Once removed, clean the area well before installing a new dispenser or leaving it empty. This simple task saves money and keeps your kitchen neat. Try it yourself and enjoy a cleaner sink space today.